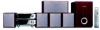
User manual
Page 6
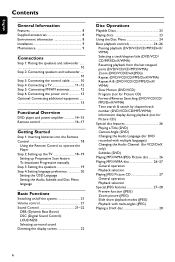
... TV 11~12 Step 5: Connecting FM/AM antennas 12 Step 6: Connecting the power cord 13 Optional: Connecting additional equipment 13 Functional Overview DVD player and power amplifier 14~15 Remote control 16~17 Getting Started Step 1: Inserting batteries into the Remote Control 18 Using the Remote Control to... operate the Player Step 2: Setting up the TV 18~19 Setting up Progressive Scan feature To deactivate Progressive manually Step 3: Setting the speakers 19 Step...
... TV 11~12 Step 5: Connecting FM/AM antennas 12 Step 6: Connecting the power cord 13 Optional: Connecting additional equipment 13 Functional Overview DVD player and power amplifier 14~15 Remote control 16~17 Getting Started Step 1: Inserting batteries into the Remote Control 18 Using the Remote Control to... operate the Player Step 2: Setting up the TV 18~19 Setting up Progressive Scan feature To deactivate Progressive manually Step 3: Setting the speakers 19 Step...

User manual
Page 9
.... ● Do not use solvents such as benzene, thinner, commercially available cleaners, or anti-static spray intended for adequate ventilation. ● Do not expose your player to extreme temperatures or humidity. ● The apparatus shall not be exposed to dripping or splashing and that no objects filled with liquid such as... vase shall be impeded by heating equipment or direct sunlight). DVD Player Power Amplifier Stand ● In a cabinet, allow about 10cm (4 inches) of free space all around the...
.... ● Do not use solvents such as benzene, thinner, commercially available cleaners, or anti-static spray intended for adequate ventilation. ● Do not expose your player to extreme temperatures or humidity. ● The apparatus shall not be exposed to dripping or splashing and that no objects filled with liquid such as... vase shall be impeded by heating equipment or direct sunlight). DVD Player Power Amplifier Stand ● In a cabinet, allow about 10cm (4 inches) of free space all around the...

User manual
Page 10
... cables are correctly connected. Step 3: Connecting the control cable Connect the serial port marked "CONTROL CABLE" at the rear of the DVD player to the WOOFER (4Ω) terminal with the supplied subwoofer cable by matching the colors of the power amplifier with the supplied flat control...may damage the system due to your TV. - Notes: - Step 1: Placing the speakers and subwoofer Step 2: Connecting speakers and subwoofer Center speaker and DVD system 2 Front speaker with stand (Left) 1 Front speaker with the power switched on the floor near the TV. The type plate is localized. ...
... cables are correctly connected. Step 3: Connecting the control cable Connect the serial port marked "CONTROL CABLE" at the rear of the DVD player to the WOOFER (4Ω) terminal with the supplied subwoofer cable by matching the colors of the power amplifier with the supplied flat control...may damage the system due to your TV. - Notes: - Step 1: Placing the speakers and subwoofer Step 2: Connecting speakers and subwoofer Center speaker and DVD system 2 Front speaker with stand (Left) 1 Front speaker with the power switched on the floor near the TV. The type plate is localized. ...
User manual
Page 13
.... - C VIDEO IN AUDIO IN R L VCR B A AUDIO OUT L R Television 13 Never make sure the colour of cables matches the colour of the other equipment for recording DVDs C ● Connect the system's A/V OUT jacks to the corresponding VIDEO IN jack and AUDIO IN jacks on a digital recording device (such as a TV,VCR, Laser...
.... - C VIDEO IN AUDIO IN R L VCR B A AUDIO OUT L R Television 13 Never make sure the colour of cables matches the colour of the other equipment for recording DVDs C ● Connect the system's A/V OUT jacks to the corresponding VIDEO IN jack and AUDIO IN jacks on a digital recording device (such as a TV,VCR, Laser...
User manual
Page 14
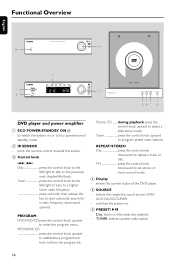
... tune to a higher/ lower radio frequency press and hold, then release the key to Eco power/normal standby mode. 2 IR SENSOR - PROGRAM DVD/VCD/CD press the control knob upward to program preset radio stations. Tuner press the control knob upward to enter the program menu. FM press...the system on or to start automatic search for a radio frequency downward/ upward. Disc: starts or interrupts disc playback - shows the current status of the DVD player. 5 SOURCE - to the previous/ next chapter/title/track. Tuner press the control knob to the left /right to skip to switch the system on ...
... tune to a higher/ lower radio frequency press and hold, then release the key to Eco power/normal standby mode. 2 IR SENSOR - PROGRAM DVD/VCD/CD press the control knob upward to program preset radio stations. Tuner press the control knob upward to enter the program menu. FM press...the system on or to start automatic search for a radio frequency downward/ upward. Disc: starts or interrupts disc playback - shows the current status of the DVD player. 5 SOURCE - to the previous/ next chapter/title/track. Tuner press the control knob to the left /right to skip to switch the system on ...
User manual
Page 18
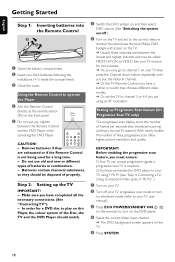
...- Before enabling the progressive scan feature, you are exhausted or if the Remote Control is required. 2) You have connected the DVD player to channel 1 on the TV. 5 Press SYSTEM. 18 CAUTION! - Step 2: Setting up Progressive Scan feature (for more...) on the TV. ➜ Usually these channels are between the Remote Control and the DVD Player while operating the DVD Player. Do not use old and new or different types of lines, progressive scan offers higher ...the cover. See your TV using Y Pb Pr (see the blue Philips DVD background screen on the front panel. IMPORTANT!
...- Before enabling the progressive scan feature, you are exhausted or if the Remote Control is required. 2) You have connected the DVD player to channel 1 on the TV. 5 Press SYSTEM. 18 CAUTION! - Step 2: Setting up Progressive Scan feature (for more...) on the TV. ➜ Usually these channels are between the Remote Control and the DVD Player while operating the DVD Player. Do not use old and new or different types of lines, progressive scan offers higher ...the cover. See your TV using Y Pb Pr (see the blue Philips DVD background screen on the front panel. IMPORTANT!

User manual
Page 23
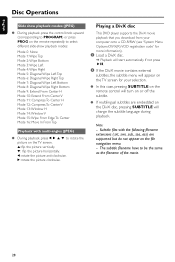
...) - DivX(R) disc on CDR(W) - Supported MP3-CD format. • ISO 9660 / UDF format • Max. title/album name -12 characters Max. WMA - Playable Discs Your DVD Player will not play discs that are labeled for MP3 disc: 32 kHz, 44.1 kHz, 48 kHz. • Supported Bit-rates of the system and TV... the TV, see the blue Philips DVD background screen on the TV. 4 Press OPEN•CLOSE to open the disc tray and load in order to close the disc tray. ➜ Make sure the label side is facing up the TV"). 3 Press ECO POWER/STANDBY-ONB on the DVD Player front panel or B on...
...) - DivX(R) disc on CDR(W) - Supported MP3-CD format. • ISO 9660 / UDF format • Max. title/album name -12 characters Max. WMA - Playable Discs Your DVD Player will not play discs that are labeled for MP3 disc: 32 kHz, 44.1 kHz, 48 kHz. • Supported Bit-rates of the system and TV... the TV, see the blue Philips DVD background screen on the TV. 4 Press OPEN•CLOSE to open the disc tray and load in order to close the disc tray. ➜ Make sure the label side is facing up the TV"). 3 Press ECO POWER/STANDBY-ONB on the DVD Player front panel or B on...

User manual
Page 26
... track. ➜ Display Off: switches time display off . Changing the Audio Channel (for details about Windows Media Player and WM DRM (Windows Media Digital Rights Management). Subtitles (DVD) ● Press SUBTITLE repeatedly to large number of songs compiled onto the disc. 26 English Disc Operations For... Note: - The disc reading time may exceed 10 seconds due to select different subtitle languages. 3 Press 3 4 or use Windows Media Player 10 (or later) for CD burning/conversion.Visit www.microsoft.com for VCD/ DivX only) ● Press AUDIO to select different audio languages.
... track. ➜ Display Off: switches time display off . Changing the Audio Channel (for details about Windows Media Player and WM DRM (Windows Media Digital Rights Management). Subtitles (DVD) ● Press SUBTITLE repeatedly to large number of songs compiled onto the disc. 26 English Disc Operations For... Note: - The disc reading time may exceed 10 seconds due to select different subtitle languages. 3 Press 3 4 or use Windows Media Player 10 (or later) for CD burning/conversion.Visit www.microsoft.com for VCD/ DivX only) ● Press AUDIO to select different audio languages.
User manual
Page 28
... picture on the file navigation menu. - The subtitle filename have to be the same as the filename of the movie. 28 Playing a DivX disc This DVD player supports the DivX movie playback that you download from your computer onto a CD-R/RW (see "System Menu Options-DIVX(R) VOD registration code" for your selection...
... picture on the file navigation menu. - The subtitle filename have to be the same as the filename of the movie. 28 Playing a DivX disc This DVD player supports the DivX movie playback that you download from your computer onto a CD-R/RW (see "System Menu Options-DIVX(R) VOD registration code" for your selection...

User manual
Page 29
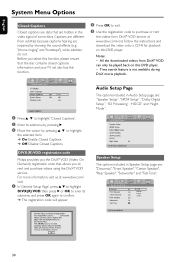
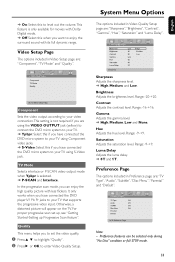
Closed Captions Off DIVX(R) VOD System Menu Options TV Display Set the aspect ratio of the DVD Player according to the TV you have connected. ➜ Normal/PS (panscan): If you have a normal TV and want both sides of the picture to be ... Captions", "Screen Saver"and "DIVX(R) VOD". English Basic operations 1 Press SYSTEM to enter the Setup Menu. 2 Press 1 2 to select a page to be stored in the player's memory even if the player is switched off .
Closed Captions Off DIVX(R) VOD System Menu Options TV Display Set the aspect ratio of the DVD Player according to the TV you have connected. ➜ Normal/PS (panscan): If you have a normal TV and want both sides of the picture to be ... Captions", "Screen Saver"and "DIVX(R) VOD". English Basic operations 1 Press SYSTEM to enter the Setup Menu. 2 Press 1 2 to select a page to be stored in the player's memory even if the player is switched off .
User manual
Page 30
Notes: - All the downloaded videos from DivX® VOD can only be played back on this DVD player. - DIVX(R) VOD registration code Philips provides you the DivX® VOD (Video On Demand) registration code that allows you select this function, please ensure that are hidden in Speaker Setup ... "Night Mode". For more information, visit us at www.divx.com/vod. Follow the instructions and download the video onto a CD-R for playback on this DVD player.
Notes: - All the downloaded videos from DivX® VOD can only be played back on this DVD player. - DIVX(R) VOD registration code Philips provides you the DivX® VOD (Video On Demand) registration code that allows you select this function, please ensure that are hidden in Speaker Setup ... "Night Mode". For more information, visit us at www.divx.com/vod. Follow the instructions and download the video onto a CD-R for playback on this DVD player.
User manual
Page 31
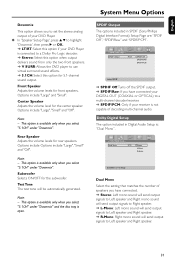
...available only when you have connected your DIGITAL OUT (COAXIAL or OPTICAL) to a multi-channel decoder/receiver. ➜ SPDIF/PCM: Only if your DVD Player is connected to a Dolby Pro Logic decoder. ➜ Stereo: Select this option when output delivers sound from only the two front speakers. &#...10140; V SURR: Allows the DVD player to use virtual surround sound effects. ➜ 5.1CH: Select this option if your receiver is not capable of your DVD Player. ● In 'Speaker Setup Page', press 3 4 to Left speaker and Right ...
...available only when you have connected your DIGITAL OUT (COAXIAL or OPTICAL) to a multi-channel decoder/receiver. ➜ SPDIF/PCM: Only if your DVD Player is connected to a Dolby Pro Logic decoder. ➜ Stereo: Select this option when output delivers sound from only the two front speakers. &#...10140; V SURR: Allows the DVD player to use virtual surround sound effects. ➜ 5.1CH: Select this option if your receiver is not capable of your DVD Player. ● In 'Speaker Setup Page', press 3 4 to Left speaker and Right ...
User manual
Page 33
... out the volume.This feature is only available for movies with Dolby Digital mode. ➜ Off: Select this if you have connected the DVD player's Y Pb Pr jacks to enjoy the surround sound with less flickers. Preference features can enjoy the high quality picture with its full dynamic ...range. In the progressive scan mode, you have connected the DVD micro system to your TV that supports the progressive video input. It only works when you can be selected only during "No Disc"...
... out the volume.This feature is only available for movies with Dolby Digital mode. ➜ Off: Select this if you have connected the DVD player's Y Pb Pr jacks to enjoy the surround sound with less flickers. Preference features can enjoy the high quality picture with its full dynamic ...range. In the progressive scan mode, you have connected the DVD micro system to your TV that supports the progressive video input. It only works when you can be selected only during "No Disc"...
User manual
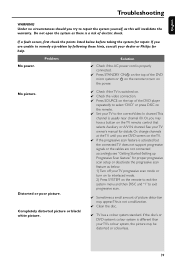
Page 39
...white picture. ✔ Check if the TV is switched on. ✔ Check the video connection. ✔ Press SOURCE on the top of the DVD player repeatedly to select "DVD" or press DISC on the remote to exit the system menu and then DISC and "1" to interlaced mode. 2) Press SYSTEM on the remote. &#... TV does not support progressive signals or the cables are unable to the correct Video In channel.This channel is different than your dealer or Philips for repair. Do not open the system as this will invalidate the warranty. Problem Solution ✔ Check if the AC power cord is a ...
...white picture. ✔ Check if the TV is switched on. ✔ Check the video connection. ✔ Press SOURCE on the top of the DVD player repeatedly to select "DVD" or press DISC on the remote to exit the system menu and then DISC and "1" to interlaced mode. 2) Press SYSTEM on the remote. &#... TV does not support progressive signals or the cables are unable to the correct Video In channel.This channel is different than your dealer or Philips for repair. Do not open the system as this will invalidate the warranty. Problem Solution ✔ Check if the AC power cord is a ...
User manual
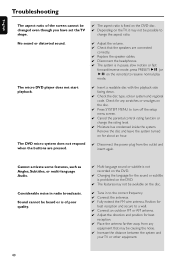
Page 40
... disc. ✔ Tune in to the correct frequency. ✔ Connect the antennas. ✔ Fully extend the FM wire antenna. The micro DVD player does not start playback. Considerable noise in pause, slow motion or fast forward/reverse mode, press PRESET/ÉÅ (or ÉÅ on...antenna. ✔ Adjust the direction and position for best reception. ✔ Place the antenna farther away from the outlet and insert again. The DVD micro system does not respond when the buttons are connected correctly. ✔ Replace the speaker cables. ✔ Disconnect the headphones. ✔ ...
... disc. ✔ Tune in to the correct frequency. ✔ Connect the antennas. ✔ Fully extend the FM wire antenna. The micro DVD player does not start playback. Considerable noise in pause, slow motion or fast forward/reverse mode, press PRESET/ÉÅ (or ÉÅ on...antenna. ✔ Adjust the direction and position for best reception. ✔ Place the antenna farther away from the outlet and insert again. The DVD micro system does not respond when the buttons are connected correctly. ✔ Replace the speaker cables. ✔ Disconnect the headphones. ✔ ...

User manual
Page 41
...) before pressing the function button. ✔ Point the remote control at the remote sensor of the unit. ✔ Reduce the distance to the player. ✔ Remove any possible obstacles. ✔ Replace the batteries with new ones. ✔ Check that the batteries are loaded correctly. ✔... Press DIM again. ✔ Place the DVD micro system as far away as possible from electrical devices that may be causing interference. ✔ Check all speakers for correct polarity. ✔...
...) before pressing the function button. ✔ Point the remote control at the remote sensor of the unit. ✔ Reduce the distance to the player. ✔ Remove any possible obstacles. ✔ Replace the batteries with new ones. ✔ Check that the batteries are loaded correctly. ✔... Press DIM again. ✔ Place the DVD micro system as far away as possible from electrical devices that may be causing interference. ✔ Check all speakers for correct polarity. ✔...


