
User Guide
Page 2
...safety of everyone in your unit that may cause an electric shock. IMPORTANT NOTE FOR USERS IN THE U.S.A. NO USER-SERVICEABLE PARTS EXCEPT LAMP UNIT. CAUTION: TO REDUCE THE RISK OF ELECTRIC SHOCK, DO NOT REMOVE COVER. The "exclamation point" calls attention to features for ... operating and maintenance problems. DO NOT REMOVE SCREWS EXCEPT SPECIFIED USER SERVICE SCREW. This "bolt of this multi media projector is the following: Philips Consumer Electronics Company One Philips Drive Knoxville, TN 37914 Telephone (1888) 873-4672 WARNING: TO REDUCE THE RISK OF FIRE OR ELECTRIC SHOCK,...
...safety of everyone in your unit that may cause an electric shock. IMPORTANT NOTE FOR USERS IN THE U.S.A. NO USER-SERVICEABLE PARTS EXCEPT LAMP UNIT. CAUTION: TO REDUCE THE RISK OF ELECTRIC SHOCK, DO NOT REMOVE COVER. The "exclamation point" calls attention to features for ... operating and maintenance problems. DO NOT REMOVE SCREWS EXCEPT SPECIFIED USER SERVICE SCREW. This "bolt of this multi media projector is the following: Philips Consumer Electronics Company One Philips Drive Knoxville, TN 37914 Telephone (1888) 873-4672 WARNING: TO REDUCE THE RISK OF FIRE OR ELECTRIC SHOCK,...
User Guide
Page 3
... it is recommended to the unit. Do not allow anything to rain or water. Do not place the projector where the cord will often require extensive work by PHILIPS, as they may expose you operate your eyes. 1 Do not attempt to qualified service personnel. 17....can adversely affect the unit and peel the paint. 3. Save these instructions before cleaning or lamp replacement. 2. Quick stops, excessive force, and uneven surfaces may damage your projector. When the projector exhibits a distinct change in safe operating condition. 19. IMPROPER USE CAN RESULT IN POTENTIAL ELECTRICAL...
... it is recommended to the unit. Do not allow anything to rain or water. Do not place the projector where the cord will often require extensive work by PHILIPS, as they may expose you operate your eyes. 1 Do not attempt to qualified service personnel. 17....can adversely affect the unit and peel the paint. 3. Save these instructions before cleaning or lamp replacement. 2. Quick stops, excessive force, and uneven surfaces may damage your projector. When the projector exhibits a distinct change in safe operating condition. 19. IMPROPER USE CAN RESULT IN POTENTIAL ELECTRICAL...
User Guide
Page 4
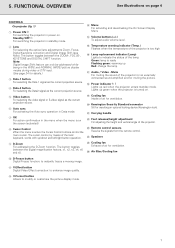
...video equipment 12 Connecting to audio equipment 14 Connecting to help you use or set up your projector. • ProScreen PXG 20 • Lens cap • powercord (2x); 2. FUNCTIONAL OVERVIEW 7 Controls 7 ...air filter • Registration card 2 Carefully read through the operation instructions before operating the LCD-projector. RCA adapter • Remote control plus AA size batteries (3x) • USB ... power shutoff function 25 Password 25 Selecting the keylock level 26 Checking the lamp usage time 26 Checking the input signal 26 Setting a background image 26 Selecting...
...video equipment 12 Connecting to audio equipment 14 Connecting to help you use or set up your projector. • ProScreen PXG 20 • Lens cap • powercord (2x); 2. FUNCTIONAL OVERVIEW 7 Controls 7 ...air filter • Registration card 2 Carefully read through the operation instructions before operating the LCD-projector. RCA adapter • Remote control plus AA size batteries (3x) • USB ... power shutoff function 25 Password 25 Selecting the keylock level 26 Checking the lamp usage time 26 Checking the input signal 26 Setting a background image 26 Selecting...

User Guide
Page 6
RGB / Component inputs Data 1 in (15pin) Audio 1 Data 2 in Audio 2 15pin Data 1 in J I H fig. 3 1 2 3 4 5 6 *&^ % Power ON Standby / OFF Lens Data 1 Data 2 Video Auto sync Lamp Temp. Audio in L R Video in Data out Audio out F K 110-120V / 220-240V~ G RS-232C S-Video in (BNC) BNC R (Pr) G/G sync (Y) B (Pb) HD (C sync) VD ...
RGB / Component inputs Data 1 in (15pin) Audio 1 Data 2 in Audio 2 15pin Data 1 in J I H fig. 3 1 2 3 4 5 6 *&^ % Power ON Standby / OFF Lens Data 1 Data 2 Video Auto sync Lamp Temp. Audio in L R Video in Data out Audio out F K 110-120V / 220-240V~ G RS-232C S-Video in (BNC) BNC R (Pr) G/G sync (Y) B (Pb) HD (C sync) VD ...
User Guide
Page 8
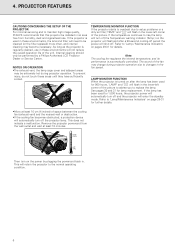
.... 104 F ('40 C) 41 F ('5 C) Then turn off ,the Temperature warning indicator (Temp.) on the power by a Philips Authorised LCD Projector Dealer or Service Centre. The sound of the picture. This does not indicate a malfunction. If the temperature continues to 'Lamp / Maintenance Indicators' on after a 90-second cooling-off period the power will shut off and...
.... 104 F ('40 C) 41 F ('5 C) Then turn off ,the Temperature warning indicator (Temp.) on the power by a Philips Authorised LCD Projector Dealer or Service Centre. The sound of the picture. This does not indicate a malfunction. If the temperature continues to 'Lamp / Maintenance Indicators' on after a 90-second cooling-off period the power will shut off and...
User Guide
Page 9
... Security Standard connector Slit for muting the picture. * Power indicator y I Lights up Red: change the lamp & Audio / Video - Lights up green when the projector is too high ^ Lamp replacement indicator (Lamp) Lights to indicate the status of the projector (or an externally connected sound amplifier) and for inserting an optional locking device (Kensington lock). ¡...
... Security Standard connector Slit for muting the picture. * Power indicator y I Lights up Red: change the lamp & Audio / Video - Lights up green when the projector is too high ^ Lamp replacement indicator (Lamp) Lights to indicate the status of the projector (or an externally connected sound amplifier) and for inserting an optional locking device (Kensington lock). ¡...
User Guide
Page 11
... the power is unpacked and turned on the relative positions of the lamp. Do not hold the lens when lifting or lowering the projector. - When lowering the projector, be emitted from foot releases. • Rotate feet to get your local Philips Authorised LCD Projector Dealer for the first time, a slight odour may take a short while before...
... the power is unpacked and turned on the relative positions of the lamp. Do not hold the lens when lifting or lowering the projector. - When lowering the projector, be emitted from foot releases. • Rotate feet to get your local Philips Authorised LCD Projector Dealer for the first time, a slight odour may take a short while before...
User Guide
Page 17
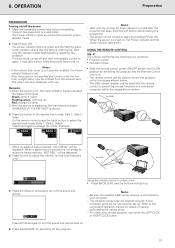
... with the remote control to control the mouse functions of the lamp. When a signal that the lamp is unpacked and turned on again, it may take a short while before proceeding. Press A/V Mute again to control the projector within the ranges shown below . - OPERATION Preparation PREPARATION Turning on... power 1. For one-button mouse systems, use . The power indicator lights up . After the projector is warming up green and the flashing green Lamp indicator shows that the projector is not preset to receive is being received, 'NOT REG.' The remote control can be emitted...
... with the remote control to control the mouse functions of the lamp. When a signal that the lamp is unpacked and turned on again, it may take a short while before proceeding. Press A/V Mute again to control the projector within the ranges shown below . - OPERATION Preparation PREPARATION Turning on... power 1. For one-button mouse systems, use . The power indicator lights up . After the projector is warming up green and the flashing green Lamp indicator shows that the projector is not preset to receive is being received, 'NOT REG.' The remote control can be emitted...

User Guide
Page 28
... If a password has been set and the keylock level selected, the password must be used to the projector. Press 3 / 4 to select the next digit. Press Menu. 2. CHECKING THE LAMP USAGE TIME This function allows you to select the image displayed when no signal is being sent to lock... After 1000 hrs of certain operation buttons on (it will not be able to check the accumulated lamp usage time. 1. Description of Background Images Selected item Background image Philips Blue None PHILIPS default image Blue screen Black screen Press 1 / 2 to select the desired level 5. To exit...
... If a password has been set and the keylock level selected, the password must be used to the projector. Press 3 / 4 to select the next digit. Press Menu. 2. CHECKING THE LAMP USAGE TIME This function allows you to select the image displayed when no signal is being sent to lock... After 1000 hrs of certain operation buttons on (it will not be able to check the accumulated lamp usage time. 1. Description of Background Images Selected item Background image Philips Blue None PHILIPS default image Blue screen Black screen Press 1 / 2 to select the desired level 5. To exit...

User Guide
Page 30
.../OFF] [ON/OFF] Audio Volume Balance Treble Bass Reset -30 +30 -30 +30 -30 +30 Options Language PRJ Mode Status Lamp Timer AV mute Disp OSD Display Background Startup Image MNTR Out/RS232C Auto Power Off Key Lock Level Password English Deutsch Espanol Nederlands Francais Italiano... Svenska Portugues Front Ceiling + Front Rear Ceiling + Rear [ON/OFF] [ON/OFF] Philips Blue None Philips None [ON/OFF] [ON/OFF] Normal Level A Level B Old Password New Password Reconfirm 28 VIDEO MODE MAIN MENU Picture Contrast Bright ...
.../OFF] [ON/OFF] Audio Volume Balance Treble Bass Reset -30 +30 -30 +30 -30 +30 Options Language PRJ Mode Status Lamp Timer AV mute Disp OSD Display Background Startup Image MNTR Out/RS232C Auto Power Off Key Lock Level Password English Deutsch Espanol Nederlands Francais Italiano... Svenska Portugues Front Ceiling + Front Rear Ceiling + Rear [ON/OFF] [ON/OFF] Philips Blue None Philips None [ON/OFF] [ON/OFF] Normal Level A Level B Old Password New Password Reconfirm 28 VIDEO MODE MAIN MENU Picture Contrast Bright ...

User Guide
Page 31
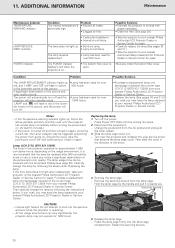
... mouse driver. - Replace the air filter. LAMP MAINTENANCE 3. This may not operate if your fingers and lift it is not correctly set up. The wireless mouse or RS-232C function may damage your nearest Philips Authorised LCD Projector Dealer or Service Centre. - Clean the dust... off the power, follow the procedures given in a dusty or smoky location. • Have your nearest Philips Authorised LCD projector Dealer or Service Centre. Connect a RS-232C cable (sold separately), the computer can be removed. ADDITIONAL INFORMATION Connecting RS-232C...
... mouse driver. - Replace the air filter. LAMP MAINTENANCE 3. This may not operate if your fingers and lift it is not correctly set up. The wireless mouse or RS-232C function may damage your nearest Philips Authorised LCD Projector Dealer or Service Centre. - Clean the dust... off the power, follow the procedures given in a dusty or smoky location. • Have your nearest Philips Authorised LCD projector Dealer or Service Centre. Connect a RS-232C cable (sold separately), the computer can be removed. ADDITIONAL INFORMATION Connecting RS-232C...
User Guide
Page 32
... from going on again, as during a brief rest, the Lamp indicator may have the lamp replaced at your nearest Philips Authorized LCD Projector Dealer or Service Center for repair. • Carefully replace the lamp.(See pages 30 and 31.) • Take the projector to the nearest Philips Authorized LCD Projector Dealer or Service Center for over 900 hours. Intense light...
... from going on again, as during a brief rest, the Lamp indicator may have the lamp replaced at your nearest Philips Authorized LCD Projector Dealer or Service Center for repair. • Carefully replace the lamp.(See pages 30 and 31.) • Take the projector to the nearest Philips Authorized LCD Projector Dealer or Service Center for over 900 hours. Intense light...
User Guide
Page 33
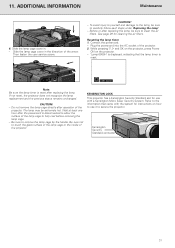
... to the lamp, be extremely hot. Slide the lamp cage cover in . - Connect the powercord. - KENSINGTON LOCK This projector has a Kensington Security Standard slot for use it to allow the surface of the projector. See page 29 for instructions on the projector. - 'Lamp 0000H' is... displayed, indicating that came with a Kensington Micro Saver Security System. Be sure to carefully follow each steps under 'Replacing the lamp'. - ADDITIONAL INFORMATION Maintenance 6. ...
... to the lamp, be extremely hot. Slide the lamp cage cover in . - Connect the powercord. - KENSINGTON LOCK This projector has a Kensington Security Standard slot for use it to allow the surface of the projector. See page 29 for instructions on the projector. - 'Lamp 0000H' is... displayed, indicating that came with a Kensington Micro Saver Security System. Be sure to carefully follow each steps under 'Replacing the lamp'. - ADDITIONAL INFORMATION Maintenance 6. ...
User Guide
Page 34
... shrinkage caused by following these hints, consult your dealer or service organisation. MAINTENANCE INDICATOR LIGHTS UP • Refer to 'Lamp/Maintenance Indicators' on the projector, push the lens firmly in place, and rotate to remedy a problem by temperature changes. PROBLEM • CHECK 480P IMAGES...12. TROUBLESHOOTING If a fault occurs, first check the points listed below before taking the projector for proper focus. (See page 9) AFTER REPLACING LAMP, THE PREVIOUS STATUS REMAINS UNCHANGED. • Reset the lamp timer. (See page 31) LENS COMES OFF • Align the mark on the ...
... shrinkage caused by following these hints, consult your dealer or service organisation. MAINTENANCE INDICATOR LIGHTS UP • Refer to 'Lamp/Maintenance Indicators' on the projector, push the lens firmly in place, and rotate to remedy a problem by temperature changes. PROBLEM • CHECK 480P IMAGES...12. TROUBLESHOOTING If a fault occurs, first check the points listed below before taking the projector for proper focus. (See page 9) AFTER REPLACING LAMP, THE PREVIOUS STATUS REMAINS UNCHANGED. • Reset the lamp timer. (See page 31) LENS COMES OFF • Align the mark on the ...