
User Guide
Page 2
... to prevent operating and maintenance problems. DO NOT REMOVE SCREWS EXCEPT SPECIFIED USER SERVICE SCREW. For the safety of this multi media projector is the following: Philips Consumer Electronics Company One Philips Drive Knoxville, TN 37914 Telephone (1888) 873-4672 English WARNING: TO REDUCE THE RISK OF FIRE OR ELECTRIC SHOCK, DO NOT... FOR USERS IN THE U.S.A. This "bolt of lightning" indicates uninsulated material within your household, please do not remove product covering. NO USER-SERVICEABLE PARTS EXCEPT LAMP UNIT. CAUTION RISK OF ELECTRIC SHOCK.
... to prevent operating and maintenance problems. DO NOT REMOVE SCREWS EXCEPT SPECIFIED USER SERVICE SCREW. For the safety of this multi media projector is the following: Philips Consumer Electronics Company One Philips Drive Knoxville, TN 37914 Telephone (1888) 873-4672 English WARNING: TO REDUCE THE RISK OF FIRE OR ELECTRIC SHOCK, DO NOT... FOR USERS IN THE U.S.A. This "bolt of lightning" indicates uninsulated material within your household, please do not remove product covering. NO USER-SERVICEABLE PARTS EXCEPT LAMP UNIT. CAUTION RISK OF ELECTRIC SHOCK.

User Guide
Page 3
...projector unit. IMPROPER USE CAN RESULT IN POTENTIAL ELECTRICAL SHOCK OR FIRE HAZARDS. Do not use attachments not recommended by the manufacturer for use with a 3-pin grounded plug (for USA-versions only) or a 2-pin grounded plug (for ventilation. Ceiling, wall or shelf mounting should be done with a mounting kit approved by PHILIPS... 22. Save these openings must not be walked on the back of these instructions before cleaning or lamp replacement. 2. The projector should never be covered with it from overheating, these instructions for use and servicing. 1. If the...
...projector unit. IMPROPER USE CAN RESULT IN POTENTIAL ELECTRICAL SHOCK OR FIRE HAZARDS. Do not use attachments not recommended by the manufacturer for use with a 3-pin grounded plug (for USA-versions only) or a 2-pin grounded plug (for ventilation. Ceiling, wall or shelf mounting should be done with a mounting kit approved by PHILIPS... 22. Save these openings must not be walked on the back of these instructions before cleaning or lamp replacement. 2. The projector should never be covered with it from overheating, these instructions for use and servicing. 1. If the...

User Guide
Page 6
... BNC R (Pr) G/G sync (Y) B (Pb) HD (C sync) VD E ! 4 L K RS-232C Auto sync D-Zoom OK Input A/V Mute Lens APPARATEN SKALL ANSLUTAS TILL JODAT UTTAG. English ( * &^ % ≤ £ Lamp Temp. 1 2 3 4 5 6 Power ON A / V Mute Volume ) $ ¡ Menu V-Format ) Standby / OFF Lens Data 1 ™ ™ £ Data 2 V-Effect # @ ! 0 9 Video D-Freeze Auto sync OK D- Zoom 78 §...
... BNC R (Pr) G/G sync (Y) B (Pb) HD (C sync) VD E ! 4 L K RS-232C Auto sync D-Zoom OK Input A/V Mute Lens APPARATEN SKALL ANSLUTAS TILL JODAT UTTAG. English ( * &^ % ≤ £ Lamp Temp. 1 2 3 4 5 6 Power ON A / V Mute Volume ) $ ¡ Menu V-Format ) Standby / OFF Lens Data 1 ™ ™ £ Data 2 V-Effect # @ ! 0 9 Video D-Freeze Auto sync OK D- Zoom 78 §...

User Guide
Page 7
... vertical refresh rate, Sync on the power by a Philips Authorised LCD Projector Dealer or Service Centre. 104 F ('40 C) 41 F ('5 C) NOTES ON OPERATION •The exhaust vent,the lamp cage cover and adjacent areas may change during projector operation. DIGITAL KEYSTONE CORRECTION Digitally adjusts an image that this projector can also be installed in . BNC TERMINALS FOR...
... vertical refresh rate, Sync on the power by a Philips Authorised LCD Projector Dealer or Service Centre. 104 F ('40 C) 41 F ('5 C) NOTES ON OPERATION •The exhaust vent,the lamp cage cover and adjacent areas may change during projector operation. DIGITAL KEYSTONE CORRECTION Digitally adjusts an image that this projector can also be installed in . BNC TERMINALS FOR...

User Guide
Page 8
... muting the picture. * Power indicator y I Lights up green when the projector is active the Cursor Control buttons control the menu cursor. Mute For muting the sound of the lamp; Lights up red when the projector enters standby mode. Standby/OFF y For switching the projector in power on the screen (activated) 8 Cursor Control When the...
... muting the picture. * Power indicator y I Lights up green when the projector is active the Cursor Control buttons control the menu cursor. Mute For muting the sound of the lamp; Lights up red when the projector enters standby mode. Standby/OFF y For switching the projector in power on the screen (activated) 8 Cursor Control When the...

User Guide
Page 10
...: warming up the screen in direct sunlight or room light. SET UP POSITIONING THE PROJECTOR AND SCREEN Position the projector perpendicular to get your local Philips Authorised LCD Projector Dealer for details on , the Lamp indicator lights indicating the status of the projector is not perpendicular to make sure that the cooling fan has stopped (about 2 minutes...
...: warming up the screen in direct sunlight or room light. SET UP POSITIONING THE PROJECTOR AND SCREEN Position the projector perpendicular to get your local Philips Authorised LCD Projector Dealer for details on , the Lamp indicator lights indicating the status of the projector is not perpendicular to make sure that the cooling fan has stopped (about 2 minutes...

User Guide
Page 16
.... 8. The USB mouse receiver can be used to receive is warming up green and the flashing green Lamp indicator shows that the projector is not preset to control the projector within the ranges shown below . - Press Standby/OFF for switching the projector and the Remote Control unit to adjust the volume. (on . - After the...
.... 8. The USB mouse receiver can be used to receive is warming up green and the flashing green Lamp indicator shows that the projector is not preset to control the projector within the ranges shown below . - Press Standby/OFF for switching the projector and the Remote Control unit to adjust the volume. (on . - After the...

User Guide
Page 25
...OK to select "Options" . 3. To exit from the GUI, press Menu. 8. OPERATION Automatic Power Shutoff Function When no input signal is recommended that the lamp be displayed. 4. To exit from the GUI, press Menu. Press 1 / 2 to save the setting. Press 1 / 2 to display the current .... 1. Press Menu. 2. Interlaced (I /P Conversion" , and then press 2. The lamp usage time will automatically shut off . Press Menu. 2. See page 25 for more than 15 minutes, the projector will be replaced after approximately 2,000 hours of a video signal. Press Menu. 2. Press...
...OK to select "Options" . 3. To exit from the GUI, press Menu. 8. OPERATION Automatic Power Shutoff Function When no input signal is recommended that the lamp be displayed. 4. To exit from the GUI, press Menu. Press 1 / 2 to save the setting. Press 1 / 2 to display the current .... 1. Press Menu. 2. Interlaced (I /P Conversion" , and then press 2. The lamp usage time will automatically shut off . Press Menu. 2. See page 25 for more than 15 minutes, the projector will be replaced after approximately 2,000 hours of a video signal. Press Menu. 2. Press...
User Guide
Page 27
... RS-232C port on the filter frame. 6. This may be used in a dusty or smoky location. • Have your nearest Philips Authorised LCD Projector Dealer or Service Centre. - Note: Be sure the filter cover is not correctly set up. Cleaning the side air filter (not .... Replace the air filter. Place the air filter underneath the tabs on the projector. 2. Lamp/Maintenance Indicators • The warning lights on unless it out of the arrow. AIR FILTER MAINTENANCE • This projector is correctly installed. Cleaning and replacing the bottom air filter 1. Remove the bottom...
... RS-232C port on the filter frame. 6. This may be used in a dusty or smoky location. • Have your nearest Philips Authorised LCD Projector Dealer or Service Centre. - Note: Be sure the filter cover is not correctly set up. Cleaning the side air filter (not .... Replace the air filter. Place the air filter underneath the tabs on the projector. 2. Lamp/Maintenance Indicators • The warning lights on unless it out of the arrow. AIR FILTER MAINTENANCE • This projector is correctly installed. Cleaning and replacing the bottom air filter 1. Remove the bottom...

User Guide
Page 28
... page 25.) • Take the projector to your nearest Authorized Philips Industrial LCD Products Dealer or Service Center for approximately 2000 cumulative hours, depending on . Do not remove the lamp cage directly after changing the lamp). - Be sure to allow the surface of the projector. 26 Replacing the lamp 1. Maintenance LAMP indicator (Lamp) The lamp does not light up , follow...
... page 25.) • Take the projector to your nearest Authorized Philips Industrial LCD Products Dealer or Service Center for approximately 2000 cumulative hours, depending on . Do not remove the lamp cage directly after changing the lamp). - Be sure to allow the surface of the projector. 26 Replacing the lamp 1. Maintenance LAMP indicator (Lamp) The lamp does not light up , follow...

User Guide
Page 29
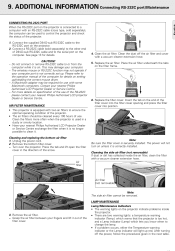
... on how to use with the system for instructions on the projector. - 'Lamp 0000H' is displayed, indicating that came with a Kensington Micro Saver Security System. Resetting the lamp timer 1. Maintenance KENSINGTON LOCK This projector has a Kensington Security Standard slot for cleaning the air filters.... Kensington Security Standard connector ) 27 English Plug the power cord into the AC socket of the projector. 2. Connect the power cord. - Refer to the information that the lamp timer is reset. 9. ADDITIONAL INFORMATION CAUTION! - To avoid injury to yourself and damage to ...
... on how to use with the system for instructions on the projector. - 'Lamp 0000H' is displayed, indicating that came with a Kensington Micro Saver Security System. Resetting the lamp timer 1. Maintenance KENSINGTON LOCK This projector has a Kensington Security Standard slot for cleaning the air filters.... Kensington Security Standard connector ) 27 English Plug the power cord into the AC socket of the projector. 2. Connect the power cord. - Refer to the information that the lamp timer is reset. 9. ADDITIONAL INFORMATION CAUTION! - To avoid injury to yourself and damage to ...

User Guide
Page 30
... this could invalidate the warranty. If you try to the right. TROUBLESHOOTING If a fault occurs, first check the points listed below before taking the projector for proper focus. (See page 8) PICTURE NOISE APPEARS • Adjust the phase setting. (See page 17) • Noise may appear when... and "Bright" adjustments are set to minimum. (See page 14) COLOUR IS FADED OR POOR •"Color" and "Tint" adjustments are unable to "Lamp/Maintenance Indicators" on , creating a black image. (See page 22) PICTURE APPEARS BUT NO SOUND IS HEARD • Cables improperly connected to rear panel ...
... this could invalidate the warranty. If you try to the right. TROUBLESHOOTING If a fault occurs, first check the points listed below before taking the projector for proper focus. (See page 8) PICTURE NOISE APPEARS • Adjust the phase setting. (See page 17) • Noise may appear when... and "Bright" adjustments are set to minimum. (See page 14) COLOUR IS FADED OR POOR •"Color" and "Tint" adjustments are unable to "Lamp/Maintenance Indicators" on , creating a black image. (See page 22) PICTURE APPEARS BUT NO SOUND IS HEARD • Cables improperly connected to rear panel ...