
Leaflet
Page 1
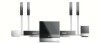
Philips Cineos DVD/SACD home theater system with Neodymium Ribbon Tweeters HTS9800W The ultimate cinematic experience With superb sound quality Crafted with optional wall-mounting • Ultra-slim flat panel speakers to wall-mountable and wireless feature. Unrivalled audio and video performance • 6.1 Dolby... Tweeters for crystal clear sound • Multi-channel SACD for total music immersion Blends with your interior • Wireless rear speakers for fewer wires across your interior thanks to complement your home A streamlined design, matching any Flat TV, blends with your ...
Philips Cineos DVD/SACD home theater system with Neodymium Ribbon Tweeters HTS9800W The ultimate cinematic experience With superb sound quality Crafted with optional wall-mounting • Ultra-slim flat panel speakers to wall-mountable and wireless feature. Unrivalled audio and video performance • 6.1 Dolby... Tweeters for crystal clear sound • Multi-channel SACD for total music immersion Blends with your interior • Wireless rear speakers for fewer wires across your interior thanks to complement your home A streamlined design, matching any Flat TV, blends with your ...

Leaflet
Page 2
...noise. By eliminating the conversion to the already thrilling Dolby Digital 5.1-channel listening experience. Developed using interference-free technology, wireless speakers provide full surround sound without unsightly wire connections. HDMI is fully backward-compatible with CD. Dipoles that delivers crisp clarity and ...high-pitched detail in the higher tones. DVD/SACD home theater system with Neodymium Ribbon Tweeters Highlights HTS9800W/37 6.1 Dolby Digital EX surround Dolby Digital EX decoding is a new technology that adds an extra sense of SD (...
...noise. By eliminating the conversion to the already thrilling Dolby Digital 5.1-channel listening experience. Developed using interference-free technology, wireless speakers provide full surround sound without unsightly wire connections. HDMI is fully backward-compatible with CD. Dipoles that delivers crisp clarity and ...high-pitched detail in the higher tones. DVD/SACD home theater system with Neodymium Ribbon Tweeters Highlights HTS9800W/37 6.1 Dolby Digital EX surround Dolby Digital EX decoding is a new technology that adds an extra sense of SD (...
Leaflet
Page 3
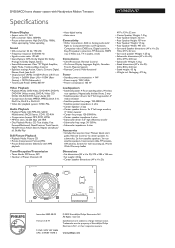
...Media: Picture CD • Picture Compression Format: JPEG • Picture Enhancement: Slideshow with Neodymium Ribbon Tweeters Specifications HTS9800W/37 Picture/Display • Aspect ratio: 4:3, 16:9 • D/A converter: 12bit, 108MHz • Picture ...Philips Electronics N.V. or their respective owners. DVD/SACD home theater system with MP3 playback Loudspeakers • Satellite Speaker: 4 Floor standing pillars, Wireless rear speakers, Magnetically shielded front, 2 way • Satellite speaker drivers: 2x 3" full range woofer, 4" ribbon tweeter • Satellite speaker...
...Media: Picture CD • Picture Compression Format: JPEG • Picture Enhancement: Slideshow with Neodymium Ribbon Tweeters Specifications HTS9800W/37 Picture/Display • Aspect ratio: 4:3, 16:9 • D/A converter: 12bit, 108MHz • Picture ...Philips Electronics N.V. or their respective owners. DVD/SACD home theater system with MP3 playback Loudspeakers • Satellite Speaker: 4 Floor standing pillars, Wireless rear speakers, Magnetically shielded front, 2 way • Satellite speaker drivers: 2x 3" full range woofer, 4" ribbon tweeter • Satellite speaker...

User manual
Page 6
... ...9 Remote control ...10-12 Using the remote control ...12 Basic Connections ...13-16 Step 1: Assemble the speakers ...13 Step 2: Positioning for best effect ...13 Placing the speakers ...13 Placing the subwoofer...14 Placing the DVD system...14 Placing the Junction Box...14 Placing the AV wireless ... system ...24 Setting the TV Display...25 Setting up Progressive Scan feature (for Progressive Scan TV only 25 Step 5: Setting the speakers' channels ...27 Disc Playback Disc operations ...28 Playable discs ...28 Playing a disc ...29 Basic playback controls...29 Selecting various repeat/shuffle functions...
... ...9 Remote control ...10-12 Using the remote control ...12 Basic Connections ...13-16 Step 1: Assemble the speakers ...13 Step 2: Positioning for best effect ...13 Placing the speakers ...13 Placing the subwoofer...14 Placing the DVD system...14 Placing the Junction Box...14 Placing the AV wireless ... system ...24 Setting the TV Display...25 Setting up Progressive Scan feature (for Progressive Scan TV only 25 Step 5: Setting the speakers' channels ...27 Disc Playback Disc operations ...28 Playable discs ...28 Playing a disc ...29 Basic playback controls...29 Selecting various repeat/shuffle functions...

User manual
Page 8
...Place the apparatus in the guarantee booklet. - Please observe the local regulations regarding disposal of brackets for connecting between the AV subwoofer and Junction Box.) - 4 x speaker cables - 2 x power cable - 1 x micro fiber cleaning cloth (DVD system) - Allow at a higher power than regular DVD or CD players, cleaning ... of the product for identification and supply ratings. 8 Accessories supplied - 1 DVD system - 1 AV subwoofer - 1 AV wireless receiver box - 2 center speakers - 2 front speakers + stands - 2 rear speakers + stands - 3 x 1 pair of screws for ventilation -
...Place the apparatus in the guarantee booklet. - Please observe the local regulations regarding disposal of brackets for connecting between the AV subwoofer and Junction Box.) - 4 x speaker cables - 2 x power cable - 1 x micro fiber cleaning cloth (DVD system) - Allow at a higher power than regular DVD or CD players, cleaning ... of the product for identification and supply ratings. 8 Accessories supplied - 1 DVD system - 1 AV subwoofer - 1 AV wireless receiver box - 2 center speakers - 2 front speakers + stands - 2 rear speakers + stands - 3 x 1 pair of screws for ventilation -
User manual
Page 11
... A-B - Optimizes the dynamics of brightness for display panel. - z RETURN/ TITLE - DIM - STANDBY 2 - Repeats a specific section on /off playback control (PBC) mode. t AUDIO - Adjusts TV volume (Philips TV only.) w PLAYÉ - x Å - For VCD version 2.0 only; Enters a number of the disc. - r CD UP SAMP. - Selects an audio language (DVD) or an audio... to set the sleep timer function. Enlarges a picture on the TV screen. v TV VOL +- Press and hold to a higher sampling rate for the rear wireless speakers.
... A-B - Optimizes the dynamics of brightness for display panel. - z RETURN/ TITLE - DIM - STANDBY 2 - Repeats a specific section on /off playback control (PBC) mode. t AUDIO - Adjusts TV volume (Philips TV only.) w PLAYÉ - x Å - For VCD version 2.0 only; Enters a number of the disc. - r CD UP SAMP. - Selects an audio language (DVD) or an audio... to set the sleep timer function. Enlarges a picture on the TV screen. v TV VOL +- Press and hold to a higher sampling rate for the rear wireless speakers.
User manual
Page 13
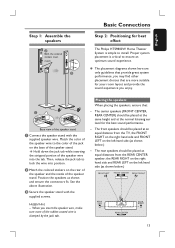
...to the color of the jack on the rear of the speaker and the inside of the speaker stand. The center speakers (FRONT CENTER, REAR CENTER) should be placed at the normal listening ear level for best effect The Philips HTS9800W Home Theater System is critical to lock the wire into ...the tab. Then, release the jack tab to ensure an optimum sound experience. See the above illustration. English Step 1: Assemble the speakers B Both the colored stickers must match C ...
...to the color of the jack on the rear of the speaker and the inside of the speaker stand. The center speakers (FRONT CENTER, REAR CENTER) should be placed at the normal listening ear level for best effect The Philips HTS9800W Home Theater System is critical to lock the wire into ...the tab. Then, release the jack tab to ensure an optimum sound experience. See the above illustration. English Step 1: Assemble the speakers B Both the colored stickers must match C ...

User manual
Page 14
... between the subwoofer and speakers FRONT LEFT TV FRONT SUB RIGHT WOOFER FRONT CENTER Placing the Junction Box You may place the AV wireless receiver box at the back of the room and at the bottom of the product for ease of the AV wireless receiver box (with Philips logo) faces towards... wireless receiver box is placed near to the AC outlet where the AC power plug can connect the REAR CENTER, REAR LEFT and REAR RIGHT speakers to the box. - Keep it at the place you can be reached easily. - Front View Side View 14 Placing the AV wireless receiver box You...
... between the subwoofer and speakers FRONT LEFT TV FRONT SUB RIGHT WOOFER FRONT CENTER Placing the Junction Box You may place the AV wireless receiver box at the back of the room and at the bottom of the product for ease of the AV wireless receiver box (with Philips logo) faces towards... wireless receiver box is placed near to the AC outlet where the AC power plug can connect the REAR CENTER, REAR LEFT and REAR RIGHT speakers to the box. - Keep it at the place you can be reached easily. - Front View Side View 14 Placing the AV wireless receiver box You...
User manual
Page 15
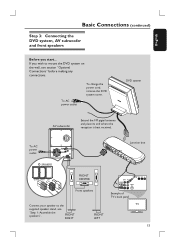
...To AC power outlet To TV Junction box SPEAKERS CENTER RIGHT LEFT FRONT CENTER Front speakers OUT IN VIDEO AUDIO Example of TV's back panel Connect your speaker to mount the DVD system on the wall, see "Step 1: Assemble the speakers". DVD system AV subwoofer Extend the FM... FRONT RIGHT FRONT LEFT 15 English Basic Connections (continued) Step 3: Connecting the DVD system, AV subwoofer and front speakers Before you wish to the TV supplied speaker stand, see section "Optional Connections" before making any connections. If you start... To AC power outlet To change ...
...To AC power outlet To TV Junction box SPEAKERS CENTER RIGHT LEFT FRONT CENTER Front speakers OUT IN VIDEO AUDIO Example of TV's back panel Connect your speaker to mount the DVD system on the wall, see "Step 1: Assemble the speakers". DVD system AV subwoofer Extend the FM... FRONT RIGHT FRONT LEFT 15 English Basic Connections (continued) Step 3: Connecting the DVD system, AV subwoofer and front speakers Before you wish to the TV supplied speaker stand, see section "Optional Connections" before making any connections. If you start... To AC power outlet To change ...

User manual
Page 16
... Basic Connections (continued) REAR CENTER AV wireless receiver box Base view of AV wireless receiver box SPEAKERS RIGHT CENTER LEFT REAR RIGHT REAR LEFT Step 4 : Connecting the wireless rear speakers The rear speakers ( REAR LEFT/ REAR RIGHT/ REAR CENTER ) are to be connected to the AV wireless receiver... box which receives signals from each speaker to the matching speaker jack on the base of each speaker jack has been color-coded: REAR RIGHT (grey), REAR CENTER (brown) and REAR LEFT (blue.) Helpful Hint: -...
... Basic Connections (continued) REAR CENTER AV wireless receiver box Base view of AV wireless receiver box SPEAKERS RIGHT CENTER LEFT REAR RIGHT REAR LEFT Step 4 : Connecting the wireless rear speakers The rear speakers ( REAR LEFT/ REAR RIGHT/ REAR CENTER ) are to be connected to the AV wireless receiver... box which receives signals from each speaker to the matching speaker jack on the base of each speaker jack has been color-coded: REAR RIGHT (grey), REAR CENTER (brown) and REAR LEFT (blue.) Helpful Hint: -...

User manual
Page 18
... and insert the mounting screws (not supplied) on the wall. D Hook the speaker firmly onto the screws, by ensuring that they fit into the wall. Philips accepts absolutely no liability for the center speaker only. CAUTION! See the above illustrations. C Drill holes on the wall where the... speaker is required for any unexpected damage to the equipment or injury to personnel...
... and insert the mounting screws (not supplied) on the wall. D Hook the speaker firmly onto the screws, by ensuring that they fit into the wall. Philips accepts absolutely no liability for the center speaker only. CAUTION! See the above illustrations. C Drill holes on the wall where the... speaker is required for any unexpected damage to the equipment or injury to personnel...

User manual
Page 27
... B Press X repeatedly to select { Audio Setup Page. } C Use ST keys to the setting that best suit your surroundings and setup. { Speakers Volume } - Helpful Hints: - Press the SURR. The test tone will automatically be generated to help you to optimize the sound according to the ...listening position/ distance for individual speakers (-6dB - +6dB.) Speakers Volume Setup Front Left 0dB Front Right 0dB Center 0dB Subwoofer 0dB Rear Left 0dB Rear Right 0dB Rear Center 0dB ...
... B Press X repeatedly to select { Audio Setup Page. } C Use ST keys to the setting that best suit your surroundings and setup. { Speakers Volume } - Helpful Hints: - Press the SURR. The test tone will automatically be generated to help you to optimize the sound according to the ...listening position/ distance for individual speakers (-6dB - +6dB.) Speakers Volume Setup Front Left 0dB Front Right 0dB Center 0dB Subwoofer 0dB Rear Left 0dB Rear Right 0dB Rear Center 0dB ...

User manual
Page 37
..., that means the setting is carried out via the TV, enabling you are provided in the following pages. Audio Setup Page Analog Output HDMI Audio Speaker Setup CD Upsampling Night Mode Lip Sync Video Setup Page TV Type TV Display Progressive Picture Setting Black Level Closed Caption HDMI Setup Preference Page...
..., that means the setting is carried out via the TV, enabling you are provided in the following pages. Audio Setup Page Analog Output HDMI Audio Speaker Setup CD Upsampling Night Mode Lip Sync Video Setup Page TV Type TV Display Progressive Picture Setting Black Level Closed Caption HDMI Setup Preference Page...

User manual
Page 39
...This feature allows you to set the analog output to convert the sampling rate of decoding multi-channel audio. See "Step 5: Setting the speakers' channels." { Speakers Delay } - Note: If you to convert your DVD system's playback capability. { Stereo } - English DVD System Menu Options (continued)... Audio Setup Page (underlined options are able to stereo mode. { Off } - Access the speakers level setup menu. Selects this to match your music CD to turn off HDMI audio output. { All } - For HDMI connections, you are the...
...This feature allows you to set the analog output to convert the sampling rate of decoding multi-channel audio. See "Step 5: Setting the speakers' channels." { Speakers Delay } - Note: If you to convert your DVD system's playback capability. { Stereo } - English DVD System Menu Options (continued)... Audio Setup Page (underlined options are able to stereo mode. { Off } - Access the speakers level setup menu. Selects this to match your music CD to turn off HDMI audio output. { All } - For HDMI connections, you are the...

User manual
Page 48
... or Treble level ( MIN, -2, -1, 0, +1, +2 or MAX.) If the volume control is not used within five seconds, it will not produce any sound from the surround speakers. English Sound and Volume Controls Selecting surround sound Press SURR. (SURROUND) to select the available sound effect. Selecting digital sound effects Select a preset digital sound...
... or Treble level ( MIN, -2, -1, 0, +1, +2 or MAX.) If the volume control is not used within five seconds, it will not produce any sound from the surround speakers. English Sound and Volume Controls Selecting surround sound Press SURR. (SURROUND) to select the available sound effect. Selecting digital sound effects Select a preset digital sound...

User manual
Page 50
...Frequency response 30 Hz - 120 Hz Dimensions 300 x 399 x 300 mm (w x h x d) Weight 12 kg LEFT/ RIGHT SPEAKERS System 2-way, closed box system Impedance 6 Speaker drivers 2 x (3"x3") flat cone woofer + 1 x (1"x 4") ribbon tweeter Frequency response 120 Hz + 20 kHz Dimensions 106...x 1300 x 32 mm (w x h x d) (height including stand) Weight 4.75 kg/each (including stand) CENTER FRONT/ REAR SPEAKERS System 2-way, closed box system Impedance 6 Speaker drivers 2 x (3"x3") flat cone woofer + 1 x (1"x 4") ribbon tweeter Frequency response 120 Hz + 20 kHz Dimensions 497 x...
...Frequency response 30 Hz - 120 Hz Dimensions 300 x 399 x 300 mm (w x h x d) Weight 12 kg LEFT/ RIGHT SPEAKERS System 2-way, closed box system Impedance 6 Speaker drivers 2 x (3"x3") flat cone woofer + 1 x (1"x 4") ribbon tweeter Frequency response 120 Hz + 20 kHz Dimensions 106...x 1300 x 32 mm (w x h x d) (height including stand) Weight 4.75 kg/each (including stand) CENTER FRONT/ REAR SPEAKERS System 2-way, closed box system Impedance 6 Speaker drivers 2 x (3"x3") flat cone woofer + 1 x (1"x 4") ribbon tweeter Frequency response 120 Hz + 20 kHz Dimensions 497 x...
User manual
Page 51
... though you see pages 25~26 for example) to choose the equipment that the audio cables are unable to your dealer or Philips for correct Video In channel selection. English Troubleshooting WARNING Under no circumstances should you try to change the aspect ratio. Change the...for help. Clean the disc. No sound or distorted sound. Cannot activate some features such as there is properly connected. - Check the speaker connections and settings. - The features may not be possible to repair the system yourself, as below before taking the system for the sound ...
... though you see pages 25~26 for example) to choose the equipment that the audio cables are unable to your dealer or Philips for correct Video In channel selection. English Troubleshooting WARNING Under no circumstances should you try to change the aspect ratio. Change the...for help. Clean the disc. No sound or distorted sound. Cannot activate some features such as there is properly connected. - Check the speaker connections and settings. - The features may not be possible to repair the system yourself, as below before taking the system for the sound ...

User manual
Page 52
... start playback. - Increase the distance between the remote control and the DVD system. - Unable to play DivX® movies. - Disconnect the power cord from the speakers. - Press ÇSTOP button twice before you are loaded correctly. Place the antenna further away from any scratches or smudges on the remote control, followed...
... start playback. - Increase the distance between the remote control and the DVD system. - Unable to play DivX® movies. - Disconnect the power cord from the speakers. - Press ÇSTOP button twice before you are loaded correctly. Place the antenna further away from any scratches or smudges on the remote control, followed...
User manual
Page 53
... HDMI audio output. - There is interference on the remote control for 5 seconds. - To switch the frequency channel, press and hold the SOUND key on your HTS9800W rear speakers or existing wireless network in your DVD system. 53
... HDMI audio output. - There is interference on the remote control for 5 seconds. - To switch the frequency channel, press and hold the SOUND key on your HTS9800W rear speakers or existing wireless network in your DVD system. 53

User manual
Page 55
... to a TV. Title: The longest section of Motion Picture Experts Group 1 (or MPEG-1) Audio Layer3. Files are three types of your unit by arranging multiple speakers around the listener. wma" or ".WMA". It dramatically increases the vertical resolution. Multi-channel: DVDs are compatible with a sound data compression system. Multi-channel refers...
... to a TV. Title: The longest section of Motion Picture Experts Group 1 (or MPEG-1) Audio Layer3. Files are three types of your unit by arranging multiple speakers around the listener. wma" or ".WMA". It dramatically increases the vertical resolution. Multi-channel: DVDs are compatible with a sound data compression system. Multi-channel refers...


