Leaflet
Page 3
..., Dolby Digital, Stereo • Sound Enhancement: Class "D" Digital Amplifier, Night Mode, Treble and Bass Control • Equalizer settings: Action, Classic, Concert, Digital, Drama, Rock, Jazz, Sci-Fi • Output power (RMS): 3x125W (Front L/R/ Front Centre) + 2x85W (Rear L/R) + 105W (Rear Centre) + 150W (Subwoofer) • Total Sound Power (RMS): 800 W • Auto digital tuning • Auto store Connectivity • Other connections: AUX in, Analog audio Left/ Right in, ComponentVideo out Progressive, Composite video (CVBS) out, Digital coaxial in, Easy-Fit speaker connectors...
..., Dolby Digital, Stereo • Sound Enhancement: Class "D" Digital Amplifier, Night Mode, Treble and Bass Control • Equalizer settings: Action, Classic, Concert, Digital, Drama, Rock, Jazz, Sci-Fi • Output power (RMS): 3x125W (Front L/R/ Front Centre) + 2x85W (Rear L/R) + 105W (Rear Centre) + 150W (Subwoofer) • Total Sound Power (RMS): 800 W • Auto digital tuning • Auto store Connectivity • Other connections: AUX in, Analog audio Left/ Right in, ComponentVideo out Progressive, Composite video (CVBS) out, Digital coaxial in, Easy-Fit speaker connectors...
User manual
Page 2
...'ll receive notification directly from the manufacturer - As a member of the PHILIPS "family," you're entitled to protection by one of the best-built, bestbacked products available today.We'll do not remove product covering. For the safety of the most comprehensive warranties and outstanding service networks in ...your unit may cause an electrical shock. in our power to keep you happy with PHILIPS makes you should read the enclosed literature closely to prevent operating and maintenance problems. WARNING: To reduce the risk of plug to rain or moisture and objects filled with liquids,...
...'ll receive notification directly from the manufacturer - As a member of the PHILIPS "family," you're entitled to protection by one of the best-built, bestbacked products available today.We'll do not remove product covering. For the safety of the most comprehensive warranties and outstanding service networks in ...your unit may cause an electrical shock. in our power to keep you happy with PHILIPS makes you should read the enclosed literature closely to prevent operating and maintenance problems. WARNING: To reduce the risk of plug to rain or moisture and objects filled with liquids,...

User manual
Page 6
... speakers on the wall ...18 Connecting to a Progressive Scan TV ...19 Connecting to a HDMI compatible device 19 Connecting to an analog audio/ video device 20 Connecting to a digital audio device...20 Connecting to an outdoor FM antenna terminal 21 Getting Started Step 1: Turning on the DVD system ...22 Turning off to standby mode...22 Step 2: Finding the correct viewing channel 22 Step 3 Setting language preferences ...23 On-screen display (OSD) language...23 Audio, Subtitle and Menu...
... speakers on the wall ...18 Connecting to a Progressive Scan TV ...19 Connecting to a HDMI compatible device 19 Connecting to an analog audio/ video device 20 Connecting to a digital audio device...20 Connecting to an outdoor FM antenna terminal 21 Getting Started Step 1: Turning on the DVD system ...22 Turning off to standby mode...22 Step 2: Finding the correct viewing channel 22 Step 3 Setting language preferences ...23 On-screen display (OSD) language...23 Audio, Subtitle and Menu...

User manual
Page 7
...; disc ...36 DVD System Menu Options Accessing the DVD setup menu...37 General Setup Page...38 Audio Setup Page...39 Video Setup Page...40-42 Preference Setup Page ...43-45 Radio Tuning Tuner Operations ...46 Tuning to radio stations...46 Presetting radio stations ...46 Using auto install ...46 Using automatic preset...47 Using manual preset ...47 Selecting a preset radio station...47 Deleting a preset radio station...47 Other Information Sound and Volume Controls 48 Selecting surround sound...48 Adjusting the Bass/ Treble level ...48 Selecting digital sound effects...48 Volume control ...48...
...; disc ...36 DVD System Menu Options Accessing the DVD setup menu...37 General Setup Page...38 Audio Setup Page...39 Video Setup Page...40-42 Preference Setup Page ...43-45 Radio Tuning Tuner Operations ...46 Tuning to radio stations...46 Presetting radio stations ...46 Using auto install ...46 Using automatic preset...47 Using manual preset ...47 Selecting a preset radio station...47 Deleting a preset radio station...47 Other Information Sound and Volume Controls 48 Selecting surround sound...48 Adjusting the Bass/ Treble level ...48 Selecting digital sound effects...48 Volume control ...48...

User manual
Page 8
... call the customer support service for connecting between the AV subwoofer and Junction Box.) - 4 x speaker cables - 2 x power cable - 1 x micro fiber cleaning cloth (DVD system) - If you have been printed on a flat, hard and stable surface. Do not use a micro fiber cleaning cloth and wipe the disc from the rear and the top of brackets for wall mount - 1 remote control with adequate ventilation to qualified personnel. Setup precautions Finding...
... call the customer support service for connecting between the AV subwoofer and Junction Box.) - 4 x speaker cables - 2 x power cable - 1 x micro fiber cleaning cloth (DVD system) - If you have been printed on a flat, hard and stable surface. Do not use a micro fiber cleaning cloth and wipe the disc from the rear and the top of brackets for wall mount - 1 remote control with adequate ventilation to qualified personnel. Setup precautions Finding...
User manual
Page 9
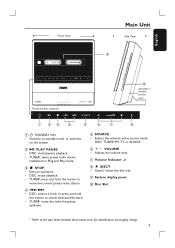
.../forward. - Adjusts the volume level. TUNER: starts preset radio station installation in Plug and Play mode. DISC: stops playback. - b u PLAY PAUSE - DISC: selects a track or press and hold this button to erase the current preset radio station. Opens/ closes the disc tray. DISC: starts/pauses playback. - Exits an operation. - e SOURCE - d ./ > - Selects the relevant active source mode: DISC, TUNER FM, TV or AUX/DI. c Ç STOP - VOLUME - TUNER: tunes the radio frequency up/down. f +- English Front View Main Unit Side View i Touch screen controls j type...
.../forward. - Adjusts the volume level. TUNER: starts preset radio station installation in Plug and Play mode. DISC: stops playback. - b u PLAY PAUSE - DISC: selects a track or press and hold this button to erase the current preset radio station. Opens/ closes the disc tray. DISC: starts/pauses playback. - Exits an operation. - e SOURCE - d ./ > - Selects the relevant active source mode: DISC, TUNER FM, TV or AUX/DI. c Ç STOP - VOLUME - TUNER: tunes the radio frequency up/down. f +- English Front View Main Unit Side View i Touch screen controls j type...
User manual
Page 10
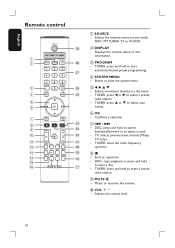
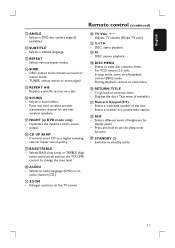
.... Selects movement direction in the menu. - TUNER: press W or X to eject a disc. - h Ç - j VOL +- TUNER: tunes the radio frequency up/down. DISC: stops playback or press and hold to select auto tuning. TUNER: press S or T to erase a preset radio station. Exits an operation. - TV: selects previous/next channel (Philips TV only.) - TUNER: press and hold to select a preset radio station. - Selects the relevant active source mode: DISC, FM TUNER, TV or AUX/DI. e W X S T - Adjusts the volume level. 10 c PROGRAM - d SYSTEM MENU - English Remote control STANDBY...
.... Selects movement direction in the menu. - TUNER: press W or X to eject a disc. - h Ç - j VOL +- TUNER: tunes the radio frequency up/down. DISC: stops playback or press and hold to select auto tuning. TUNER: press S or T to erase a preset radio station. Exits an operation. - TV: selects previous/next channel (Philips TV only.) - TUNER: press and hold to select a preset radio station. - Selects the relevant active source mode: DISC, FM TUNER, TV or AUX/DI. e W X S T - Adjusts the volume level. 10 c PROGRAM - d SYSTEM MENU - English Remote control STANDBY...
User manual
Page 11
... stop mode, turns on/off playback control (PBC) mode. To go back to standby mode. 11 For VCD version 2.0 only; STANDBY 2 - Adjusts TV volume (Philips TV only.) w PLAYÉ - Press and hold to change the tone level. Displays the disc's Title menu (if available.) Numeric Keypad (0-9) - Enters a number of brightness for the rear wireless speakers. Enters or exits disc contents menu. - m REPEAT - o REPEAT A-B - Selects BASS (low tone) or TREBLE (high tone) sound mode and use the VOLUME control to select another transmission channel for display panel. - English Remote...
... stop mode, turns on/off playback control (PBC) mode. To go back to standby mode. 11 For VCD version 2.0 only; STANDBY 2 - Adjusts TV volume (Philips TV only.) w PLAYÉ - Press and hold to change the tone level. Displays the disc's Title menu (if available.) Numeric Keypad (0-9) - Enters a number of brightness for the rear wireless speakers. Enters or exits disc contents menu. - m REPEAT - o REPEAT A-B - Selects BASS (low tone) or TREBLE (high tone) sound mode and use the VOLUME control to select another transmission channel for display panel. - English Remote...
User manual
Page 20
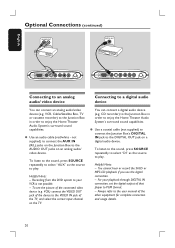
... the Junction Box in order to enjoy the Home Theater Audio System's surround sound capabilities. CD recorder) to the Junction Box in order to enjoy the Home Theater Audio System's surround sound capabilities. Helpful Hints: - Always refer to the user manual of the connected video device (e.g. To listen to the sound, press SOURCE repeatedly to select "AUX" as the source to play . Use an audio cable (red/white - Helpful Hints: - Connecting to a digital audio device You can connect an analog audio/video device (e.g. For...
... the Junction Box in order to enjoy the Home Theater Audio System's surround sound capabilities. CD recorder) to the Junction Box in order to enjoy the Home Theater Audio System's surround sound capabilities. Helpful Hints: - Always refer to the user manual of the connected video device (e.g. To listen to the sound, press SOURCE repeatedly to select "AUX" as the source to play . Use an audio cable (red/white - Helpful Hints: - Connecting to a digital audio device You can connect an analog audio/video device (e.g. For...
User manual
Page 24
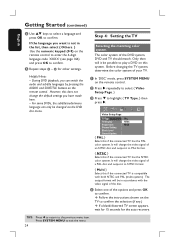
...) English D Use ST keys to select a language and press OK to exit the menu. 24 For some DVDs, the subtitle/audio/menu language can switch the audio and subtitle languages by pressing the AUDIO and SUBTITLE buttons on the remote control. Only then will change the video signal of your TV. Video Setup Page TV Type TV Display Progressive Picture Setting Black Level Closed Caption PAL NTSC Multi { PAL } Select this system. D Select one...
...) English D Use ST keys to select a language and press OK to exit the menu. 24 For some DVDs, the subtitle/audio/menu language can switch the audio and subtitle languages by pressing the AUDIO and SUBTITLE buttons on the remote control. Only then will change the video signal of your TV. Video Setup Page TV Type TV Display Progressive Picture Setting Black Level Closed Caption PAL NTSC Multi { PAL } Select this system. D Select one...

User manual
Page 25
.... A In 'DISC' mode, press SYSTEM MENU on the remote control. Before enabling the progressive scan feature, you have connected the Junction Box to your TV using Y Pb Pr (see page 19.) A Turn off your TV and select the correct Video Input channel. C Turn on your TV progressive scan mode or turn on the TV. English Getting Started (continued) Setting the TV display Set the aspect ratio of the DVD system...
.... A In 'DISC' mode, press SYSTEM MENU on the remote control. Before enabling the progressive scan feature, you have connected the Junction Box to your TV using Y Pb Pr (see page 19.) A Turn off your TV and select the correct Video Input channel. C Turn on your TV progressive scan mode or turn on the TV. English Getting Started (continued) Setting the TV display Set the aspect ratio of the DVD system...
User manual
Page 29
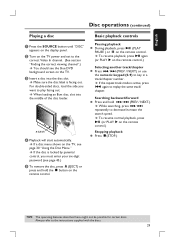
... playback, press u (or PLAY X on the remote control.) Selecting another track/chapter Press ./ > (PREV / NEXT) or use the numeric keypad (0-9) to the correct Video In channel. (See section "Finding the correct viewing channel".) You should see page 30 "Using the Disc Menu." For double-sided discs, load the side you must enter your six-digit password (see page 45.) E To remove the disc, press ç(EJECT) or...
... playback, press u (or PLAY X on the remote control.) Selecting another track/chapter Press ./ > (PREV / NEXT) or use the numeric keypad (0-9) to the correct Video In channel. (See section "Finding the correct viewing channel".) You should see page 30 "Using the Disc Menu." For double-sided discs, load the side you must enter your six-digit password (see page 45.) E To remove the disc, press ç(EJECT) or...

User manual
Page 38
...; VOD service. Use the registration code to your computer onto a CD-R/RW disc for the DVD system on-screen display menu. English DVD System Menu Options (continued) General Setup Page (underlined options are the factory default settings) Disc Lock Not all discs are rated or coded by locking the disc. Note: All the downloaded videos from playing by the disc maker. Subsequent access to 40 discs can be locked. { Lock } - Password'.) { Unlock } - All discs can only be played. OSD language Selects the...
...; VOD service. Use the registration code to your computer onto a CD-R/RW disc for the DVD system on-screen display menu. English DVD System Menu Options (continued) General Setup Page (underlined options are the factory default settings) Disc Lock Not all discs are rated or coded by locking the disc. Note: All the downloaded videos from playing by the disc maker. Subsequent access to 40 discs can be locked. { Lock } - Password'.) { Unlock } - All discs can only be played. OSD language Selects the...

User manual
Page 39
... sampling rate using sophisticated digital signal processing for the DVD system and the input device to communicate and initialize. { Off } - Select this to enable surround sound output from all speakers and the subwoofer. Select this to stereo mode. { Off } - Note: If you to optimize the sound according to your surroundings and setup. { Speakers Volume } - For HDMI connections, you have connected the DVD system to a multi-channel decoder/receiver. { PCM Only } - Select this to turn off HDMI audio output. { All } - Access the speakers level setup menu. If...
... sampling rate using sophisticated digital signal processing for the DVD system and the input device to communicate and initialize. { Off } - Select this to enable surround sound output from all speakers and the subwoofer. Select this to stereo mode. { Off } - Note: If you to optimize the sound according to your surroundings and setup. { Speakers Volume } - For HDMI connections, you have connected the DVD system to a multi-channel decoder/receiver. { PCM Only } - Select this to turn off HDMI audio output. { All } - Access the speakers level setup menu. If...

User manual
Page 41
... works when you have connected the Y Pb Pr jacks on the Junction box to your TV that best suit your picture color by adjusting the brightness, contrast, tint and color (saturation.) Use W X keys to adjust to the setting that supports progressive video input. Turns off the progressive scan as below: 1) Press çEJECT on the DVD system. 2) Press X on the remote control. 3) Press SUBTITLE on progressive scan function. Picture Setting...
... works when you have connected the Y Pb Pr jacks on the Junction box to your TV that best suit your picture color by adjusting the brightness, contrast, tint and color (saturation.) Use W X keys to adjust to the setting that supports progressive video input. Turns off the progressive scan as below: 1) Press çEJECT on the DVD system. 2) Press X on the remote control. 3) Press SUBTITLE on progressive scan function. Picture Setting...

User manual
Page 46
... radio station is found . Presetting radio stations You can store up to select TUNER mode. Using manual preset 2 1 A Press SOURCE on the remote control. Helpful Hints: - D To fine-tune the reception of the button, all the available radio stations will be stored automatically. DVD System's display panel A AUTO INSTALL .... Using auto install (for the first time radio station programming. Using automatic preset - Once complete, the last tuned radio station will exit presetting mode if no valid frequency is only applicable for first time setup only) - Using auto install...
... radio station is found . Presetting radio stations You can store up to select TUNER mode. Using manual preset 2 1 A Press SOURCE on the remote control. Helpful Hints: - D To fine-tune the reception of the button, all the available radio stations will be stored automatically. DVD System's display panel A AUTO INSTALL .... Using auto install (for the first time radio station programming. Using automatic preset - Once complete, the last tuned radio station will exit presetting mode if no valid frequency is only applicable for first time setup only) - Using auto install...

User manual
Page 52
... control rating level or to the correct frequency. - Make sure the source you press the function button - Tune in the setup/system menu. - Point the remote control directly toward the IR sensor. - You may need to enter the password in 'Home Theater' mode with DivX® 5.x/6.x encoder. Press the SURR. No surround sound effect from the power outlet for example, SOURCE) before selecting the system setup menu. - Increase the distance between the remote control and the DVD system. - Replace...
... control rating level or to the correct frequency. - Make sure the source you press the function button - Tune in the setup/system menu. - Point the remote control directly toward the IR sensor. - You may need to enter the password in 'Home Theater' mode with DivX® 5.x/6.x encoder. Press the SURR. No surround sound effect from the power outlet for example, SOURCE) before selecting the system setup menu. - Increase the distance between the remote control and the DVD system. - Replace...

User manual
Page 54
... no Video or Audio output. DivX 3.11/4.x/5.x/6.x: The DivX® code is a specification that provides better spatiality and directionality on Dolby Surround program material, provides a convincing three dimensional sound field on a DVD that can transmit uncompressed high definition video and digital multi-channel audio. HDMI is assigned a chapter number enabling you to a TV that has not been switched into numbers. A still picture data compression system proposed by the HDMI standard, connecting to HDMI...
... no Video or Audio output. DivX 3.11/4.x/5.x/6.x: The DivX® code is a specification that provides better spatiality and directionality on Dolby Surround program material, provides a convincing three dimensional sound field on a DVD that can transmit uncompressed high definition video and digital multi-channel audio. HDMI is assigned a chapter number enabling you to a TV that has not been switched into numbers. A still picture data compression system proposed by the HDMI standard, connecting to HDMI...
Quick start guide
Page 1
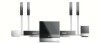
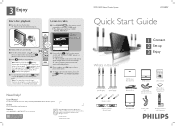
...) Speaker cables Center speakers (front & rear) AV Wireless Receiver Box Junction Box DVD system User manual VGA cable (use W X keys to start automatically. The display panel will start playback. All the available radio stations with your Philips DVD/SACD Home Theater System. Hotline call 1-888-PHILIPS (1-888-744-5477) for DVD system) AV subwoofer Power cable x 2 Remote Control and 2 batteries Listen to radio A Press SOURCE on the remote to select a preset radio station. D To delete a preset radio station, press and hold (STOP) until "INSTALL TUNER" appears...
...) Speaker cables Center speakers (front & rear) AV Wireless Receiver Box Junction Box DVD system User manual VGA cable (use W X keys to start automatically. The display panel will start playback. All the available radio stations with your Philips DVD/SACD Home Theater System. Hotline call 1-888-PHILIPS (1-888-744-5477) for DVD system) AV subwoofer Power cable x 2 Remote Control and 2 batteries Listen to radio A Press SOURCE on the remote to select a preset radio station. D To delete a preset radio station, press and hold (STOP) until "INSTALL TUNER" appears...
Quick start guide
Page 2
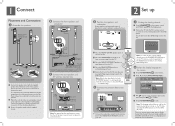
... various system setup options (Audio Setup, Video Setup, Preference Setup) available on this DVD system, not for the correct viewing channel, press the CHANNEL DOWN button on the TV's remote control repeatedly (or AV, SELECT button) until "DISC" appears on the display panel. C Secure the speaker stand with the supplied speaker wire. To view cable markings, remove the DVD system cover. FRONT LEFT TV FRONT CENTER FRONT SUB RIGHT WOOFER DVD SYSTEM REAR LEFT REAR CENTER REAR RIGHT AV WIRELESS RECEIVER BOX A Place the FRONT CENTER speaker above...
... various system setup options (Audio Setup, Video Setup, Preference Setup) available on this DVD system, not for the correct viewing channel, press the CHANNEL DOWN button on the TV's remote control repeatedly (or AV, SELECT button) until "DISC" appears on the display panel. C Secure the speaker stand with the supplied speaker wire. To view cable markings, remove the DVD system cover. FRONT LEFT TV FRONT CENTER FRONT SUB RIGHT WOOFER DVD SYSTEM REAR LEFT REAR CENTER REAR RIGHT AV WIRELESS RECEIVER BOX A Place the FRONT CENTER speaker above...


