Leaflet
Page 1
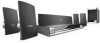
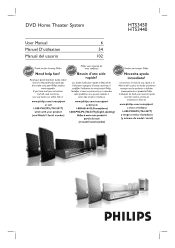
Philips DVD home theater system DivX Ultra HTS3450 Turn up your experience with music (MP3) playback Great audio and video performance • High definition JPEG playback for images in true resolution • Progressive ... it all • USB Direct plays photos and music from USB flash drives • DivX Ultra Certified for enhanced playback of DivX videos • Movies: DVD, DVD+R/RW, (S)VCD, DivX, MPEG4 • Music: CD, MP3-CD, CD-R/RW & Windows Media™ Audio • Picture CD (JPEG) with USB Direct This stylish and...
Philips DVD home theater system DivX Ultra HTS3450 Turn up your experience with music (MP3) playback Great audio and video performance • High definition JPEG playback for images in true resolution • Progressive ... it all • USB Direct plays photos and music from USB flash drives • DivX Ultra Certified for enhanced playback of DivX videos • Movies: DVD, DVD+R/RW, (S)VCD, DivX, MPEG4 • Music: CD, MP3-CD, CD-R/RW & Windows Media™ Audio • Picture CD (JPEG) with USB Direct This stylish and...
Leaflet
Page 2
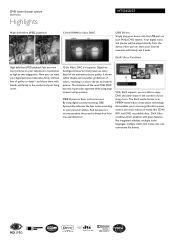
Now you can view your living room. Now you can share your pictures on media like CD-R/ RW, and DVD recordable discs. DivX Ultra Certified High definition JPEG playback lets you view your favorite moments with great features like movies, trailers and music ... absolute clarity, without loss of quality or detail - and share them with friends and family in the comfort of your Philips DVD system. DVD home theater system DivX Ultra Highlights HTS3450/37 High definition JPEG playback 12-bit/108MHz video DAC USB Direct Simply plug your device into one convenient file format. ...
Now you can view your living room. Now you can share your pictures on media like CD-R/ RW, and DVD recordable discs. DivX Ultra Certified High definition JPEG playback lets you view your favorite moments with great features like movies, trailers and music ... absolute clarity, without loss of quality or detail - and share them with friends and family in the comfort of your Philips DVD system. DVD home theater system DivX Ultra Highlights HTS3450/37 High definition JPEG playback 12-bit/108MHz video DAC USB Direct Simply plug your device into one convenient file format. ...
Leaflet
Page 3
...FM Connectivity • Front / Side connections: USB • Rear Connections: Component Video output, S- www.philips.com or their respective owners. DVD home theater system DivX Ultra Specifications HTS3450/37 Picture/Display • D/A converter: 12 bit, 108 MHz • Picture enhancement: Progressive Scan Sound..., DVD+R/+RW, DVDR/-RW, Video CD/SVCD, CD-R/CD-RW • Video disc playback system: NTSC, PAL Tuner/Reception/Transmission • No. All Rights reserved. of Koninklijke Philips Electronics N.V. Video out, Composite video (CVBS) output, EasyFit speaker connectors, VGA...
...FM Connectivity • Front / Side connections: USB • Rear Connections: Component Video output, S- www.philips.com or their respective owners. DVD home theater system DivX Ultra Specifications HTS3450/37 Picture/Display • D/A converter: 12 bit, 108 MHz • Picture enhancement: Progressive Scan Sound..., DVD+R/+RW, DVDR/-RW, Video CD/SVCD, CD-R/CD-RW • Video disc playback system: NTSC, PAL Tuner/Reception/Transmission • No. All Rights reserved. of Koninklijke Philips Electronics N.V. Video out, Composite video (CVBS) output, EasyFit speaker connectors, VGA...
User manual
Page 1
DVD Home Theater System User Manual 6 Manuel D'utilisation 54 Manual del usuario 102 HTS3450 HTS3440 English
DVD Home Theater System User Manual 6 Manuel D'utilisation 54 Manual del usuario 102 HTS3450 HTS3440 English
User manual
Page 4
...procedures other unsafe operation. IF THERE ARE QUESTIONS REGARDING OUR TV SET COMPATIBILITY WITH THIS MODEL 525p AND 625p DVD PLAYER, PLEASE CONTACT OUR CUSTOMER SERVICE CENTER.' This warning label is located on the rearside and inside this... of Communications. AVOID DIRECT EXPOSURE TO BEAM. VARNING! Declaration of Conformity Model number: HTS3450, HTS3440 Trade Name: Philips Responsible Party: Philips Consumer Electronics A Division of Philips Electronics North America Corp. This Class B digital apparatus complies with Canadian ICES-003. Invisible...
...procedures other unsafe operation. IF THERE ARE QUESTIONS REGARDING OUR TV SET COMPATIBILITY WITH THIS MODEL 525p AND 625p DVD PLAYER, PLEASE CONTACT OUR CUSTOMER SERVICE CENTER.' This warning label is located on the rearside and inside this... of Communications. AVOID DIRECT EXPOSURE TO BEAM. VARNING! Declaration of Conformity Model number: HTS3450, HTS3440 Trade Name: Philips Responsible Party: Philips Consumer Electronics A Division of Philips Electronics North America Corp. This Class B digital apparatus complies with Canadian ICES-003. Invisible...

User manual
Page 6
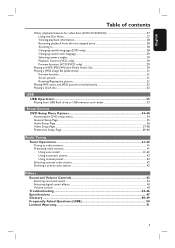
...Connections ...13-18 Step 1 : Placing the speakers ...13 Step 2 : Connecting the speakers to AV subwoofer 14 Step 3 : Connecting the AV subwoofer to DVD system 15 Step 4 : Connecting the FM/AM antennas 15 Step 5 : Connecting to TV ...16 Option 1: Using the Video (CVBS) jack (good picture ... Finding the correct viewing channel 20 Step 3: Setting language preferences ...21 On-screen display (OSD) language...21 Audio, Subtitle and Menu language for DVD playback 21-22 Step 4: Setting the TV Display...22 Step 5: Setting up Progressive Scan feature 23 Step 6: Setting the speakers' channels ...24...
...Connections ...13-18 Step 1 : Placing the speakers ...13 Step 2 : Connecting the speakers to AV subwoofer 14 Step 3 : Connecting the AV subwoofer to DVD system 15 Step 4 : Connecting the FM/AM antennas 15 Step 5 : Connecting to TV ...16 Option 1: Using the Video (CVBS) jack (good picture ... Finding the correct viewing channel 20 Step 3: Setting language preferences ...21 On-screen display (OSD) language...21 Audio, Subtitle and Menu language for DVD playback 21-22 Step 4: Setting the TV Display...22 Step 5: Setting up Progressive Scan feature 23 Step 6: Setting the speakers' channels ...24...
User manual
Page 7
...SVCD 27 Using the Disc Menu ...27 Viewing playback information...28 Resuming playback from the last stopped point 28 Zooming in...28 Changing subtitle language (DVD only 28 Changing sound track language...29 Selecting camera angles...29 Playback Control (VCD only)...29 Preview function (VCD/SVCD only) ...29 Playing ...a DivX disc ...32 USB USB Operations...33 Playing from USB flash drive or USB memory card reader 33 Setup Options DVD Setup Menu Options 34-40 Accessing the DVD setup menu...34 General Setup Page...35 Audio Setup Page...36 Video Setup Page...37-38 Preference Setup Page ...39-40...
...SVCD 27 Using the Disc Menu ...27 Viewing playback information...28 Resuming playback from the last stopped point 28 Zooming in...28 Changing subtitle language (DVD only 28 Changing sound track language...29 Selecting camera angles...29 Playback Control (VCD only)...29 Preview function (VCD/SVCD only) ...29 Playing ...a DivX disc ...32 USB USB Operations...33 Playing from USB flash drive or USB memory card reader 33 Setup Options DVD Setup Menu Options 34-40 Accessing the DVD setup menu...34 General Setup Page...35 Audio Setup Page...36 Video Setup Page...37-38 Preference Setup Page ...39-40...

User manual
Page 8
... and wipe the disc from the centre to the edge in a location with batteries - 1 inter-connect cable (for connecting between the AV subwoofer and the DVD system) - 1 composite video cable (yellow) - 1 FM wire antenna - 1 AM loop antenna - If you are disposing of packaging materials, exhausted batteries and old equipment. 8 English General...
... and wipe the disc from the centre to the edge in a location with batteries - 1 inter-connect cable (for connecting between the AV subwoofer and the DVD system) - 1 composite video cable (yellow) - 1 FM wire antenna - 1 AM loop antenna - If you are disposing of packaging materials, exhausted batteries and old equipment. 8 English General...

User manual
Page 10
b Source buttons - d AUDIO - DISC: stops playback. - Adjusts TV volume (Philips TV only.) j Numeric keypad (0-9) - k REPEAT - Selects various repeat modes; l VOCAL / KARAOKE - Not functional for this button to Eco Power standby mode. Turns off repeat mode. ... mode. Exits an operation. - DISC: starts playback. DISC/USB: switches to TV mode. AUX/DI: toggles between FM and AM band. Selects an audio language (DVD) or an audio channel (CD.) e SETUP - The sound from the TV will output through the connected speakers system.
b Source buttons - d AUDIO - DISC: stops playback. - Adjusts TV volume (Philips TV only.) j Numeric keypad (0-9) - k REPEAT - Selects various repeat modes; l VOCAL / KARAOKE - Not functional for this button to Eco Power standby mode. Turns off repeat mode. ... mode. Exits an operation. - DISC: starts playback. DISC/USB: switches to TV mode. AUX/DI: toggles between FM and AM band. Selects an audio language (DVD) or an audio channel (CD.) e SETUP - The sound from the TV will output through the connected speakers system.

User manual
Page 11
.../ manual preset programming. For DVD, go back to the main menu. TV: selects previous/next channel (Philips TV only.) - u VOL +- Selects multi-channel surround or stereo mode. n ANGLE - o DISC MENU - q OK - DISC: starts programming. - x SURR. - For DVD, enter or exit disc contents... 21 22 23 24 25 w PROGRAM - English Remote Control (continued) m SUBTITLE - TUNER: selects a preset radio station. Confirms a selection. Selects a DVD subtitle language. s . > - DISC: pauses playback. r RETURN/TITLE - TUNER: press up or down . - TUNER: press and hold this button...
.../ manual preset programming. For DVD, go back to the main menu. TV: selects previous/next channel (Philips TV only.) - u VOL +- Selects multi-channel surround or stereo mode. n ANGLE - o DISC MENU - q OK - DISC: starts programming. - x SURR. - For DVD, enter or exit disc contents... 21 22 23 24 25 w PROGRAM - English Remote Control (continued) m SUBTITLE - TUNER: selects a preset radio station. Confirms a selection. Selects a DVD subtitle language. s . > - DISC: pauses playback. r RETURN/TITLE - TUNER: press up or down . - TUNER: press and hold this button...
User manual
Page 13
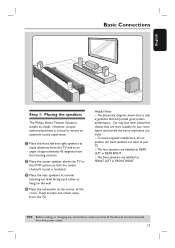
Basic Connections English Step 1: Placing the speakers The Philips Home Theater System is simple to ensure an optimum sound experience. However, proper system placement is critical to install. TIPS: Before making or changing any ... from the TV and at the corner of approximately 45 degrees from the power outlet. 13 B Place the center speaker above the TV or the DVD system so that the center channel's sound is only a guideline that are labelled as FRONT LEFT or FRONT RIGHT. Keep at normal listening ear level...
Basic Connections English Step 1: Placing the speakers The Philips Home Theater System is simple to ensure an optimum sound experience. However, proper system placement is critical to install. TIPS: Before making or changing any ... from the TV and at the corner of approximately 45 degrees from the power outlet. 13 B Place the center speaker above the TV or the DVD system so that the center channel's sound is only a guideline that are labelled as FRONT LEFT or FRONT RIGHT. Keep at normal listening ear level...

User manual
Page 15
... supplied.) Helpful Hints: - English Basic Connections (continued) fix the claw into the slot AM 1 antenna FM antenna 2 Step 3: Connecting the AV subwoofer to DVD system Step 4: Connecting the FM/ AM antennas A Use the supplied inter-connect cable to connect TO AV SUBWOOFER jack at the rear of the... DVD system to secure the connection. B Tighten the screws beside the interconnect cable to the TO DVD SYSTEM jack at the rear of the antennas for optimal reception. - TIPS: Before making or changing...
... supplied.) Helpful Hints: - English Basic Connections (continued) fix the claw into the slot AM 1 antenna FM antenna 2 Step 3: Connecting the AV subwoofer to DVD system Step 4: Connecting the FM/ AM antennas A Use the supplied inter-connect cable to connect TO AV SUBWOOFER jack at the rear of the... DVD system to secure the connection. B Tighten the screws beside the interconnect cable to the TO DVD SYSTEM jack at the rear of the antennas for optimal reception. - TIPS: Before making or changing...

User manual
Page 16
...or 2. - Option 1: Using the Video (CVBS) jack (good picture quality) Use the supplied composite video cable (yellow) to connect the CVBS jack on the DVD system to the video input jack (or labelled as Y/C or S-VHS) on the TV. Option 2: Using the S-Video jack (excellent picture quality) Use an ...S-video cable (not supplied) to connect the S-VIDEO (Y/C) jack on the DVD system to the S-Video input jack (or labelled as A/V In, Video In, Composite or Baseband) on the TV. TIPS: Before making or changing any connections...
...or 2. - Option 1: Using the Video (CVBS) jack (good picture quality) Use the supplied composite video cable (yellow) to connect the CVBS jack on the DVD system to the video input jack (or labelled as Y/C or S-VHS) on the TV. Option 2: Using the S-Video jack (excellent picture quality) Use an ...S-video cable (not supplied) to connect the S-VIDEO (Y/C) jack on the DVD system to the S-Video input jack (or labelled as A/V In, Video In, Composite or Baseband) on the TV. TIPS: Before making or changing any connections...

User manual
Page 17
...up Progressive Scan feature' for details about RF modulator availability and operations. A Use the supplied composite video cable (yellow) to connect the DVD system's CVBS jack to the ANTENNA IN jack on the RF modulator. B Use an RF coaxial cable (not supplied) to connect ... only) Antenna L L R R Option 3: Connecting to view the DVD playback on the TV. It provides superior picture quality when watching DVD movies. Option 4: Using an accessory RF modulator If your electronics retailer or contact Philips for detailed progressive feature setup. See your TV has only a single ...
...up Progressive Scan feature' for details about RF modulator availability and operations. A Use the supplied composite video cable (yellow) to connect the DVD system's CVBS jack to the ANTENNA IN jack on the RF modulator. B Use an RF coaxial cable (not supplied) to connect ... only) Antenna L L R R Option 3: Connecting to view the DVD playback on the TV. It provides superior picture quality when watching DVD movies. Option 4: Using an accessory RF modulator If your electronics retailer or contact Philips for detailed progressive feature setup. See your TV has only a single ...

User manual
Page 18
The Eco Power LED on . Refer to the type plate at the rear or bottom of the product for identification and supply ratings. Helpful Hints: - Never make or change any connections, make sure that all the devices are disconnected from the power outlet. 18 English Basic Connections (continued) L R Step 6: Connecting the power cord After everything is connected properly, plug the AC power cord into the power outlet. TIPS: Before making or changing any connections with the power turned on the DVD system and the AV subwoofer will light up.
The Eco Power LED on . Refer to the type plate at the rear or bottom of the product for identification and supply ratings. Helpful Hints: - Never make or change any connections, make sure that all the devices are disconnected from the power outlet. 18 English Basic Connections (continued) L R Step 6: Connecting the power cord After everything is connected properly, plug the AC power cord into the power outlet. TIPS: Before making or changing any connections with the power turned on the DVD system and the AV subwoofer will light up.
User manual
Page 19
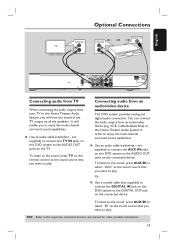
... you want to play. To listen to the sound, press TV on the connected device. not supplied) to connect the AUX IN jacks on this DVD system to the AUDIO OUT jacks on all the speakers. It will have the sound of the TV output on the TV. Connecting audio from... enjoy the multi-channel surround sound capabilities. You can connect the audio output from an audio/video device This DVD system provides analog and digital audio connection. VCR, Cable/Satellite Box) to this DVD system to play . To listen to the sound, press AUX/DI to select "AUX" as the sound source...
... you want to play. To listen to the sound, press TV on the connected device. not supplied) to connect the AUX IN jacks on this DVD system to the AUDIO OUT jacks on all the speakers. It will have the sound of the TV output on the TV. Connecting audio from... enjoy the multi-channel surround sound capabilities. You can connect the audio output from an audio/video device This DVD system provides analog and digital audio connection. VCR, Cable/Satellite Box) to this DVD system to play . To listen to the sound, press AUX/DI to select "AUX" as the sound source...

User manual
Page 20
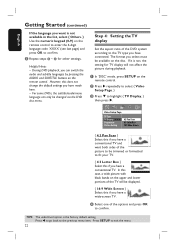
HTS3450 HTS3440 Or Press DISC/USB, TUNER, TV or AUX/DI on the display panel. A Press SOURCE button until you are using a RF modulator, set it ... is detected, pressing the DISC/USB will turn off to channel 3 or 4. English Getting Started Step 1: Turning on the TV. If you see the blue DVD background screen on the DVD system Step 2: Finding the correct viewing channel A Press STANDBY ON (2).
HTS3450 HTS3440 Or Press DISC/USB, TUNER, TV or AUX/DI on the display panel. A Press SOURCE button until you are using a RF modulator, set it ... is detected, pressing the DISC/USB will turn off to channel 3 or 4. English Getting Started Step 1: Turning on the TV. If you see the blue DVD background screen on the DVD system Step 2: Finding the correct viewing channel A Press STANDBY ON (2).

User manual
Page 21
... one of the changes made to the illustrations shown on your preferred language settings for this DVD system will be used instead. A In 'DISC' mode, press SETUP on the DVD disc, the DVD system will automatically play the disc in that language. TIPS: Press W to go back to...Getting Started (continued) Step 3: Setting language preferences The language options are different depending on the user manual. It may not correspond to the DVD disc language. General Setup Page Disc Lock Display Dim Program OSD Language Screen Saver DivX(R) VOD Code English Dansk Deutsch Espanõl C Use...
... one of the changes made to the illustrations shown on your preferred language settings for this DVD system will be used instead. A In 'DISC' mode, press SETUP on the DVD disc, the DVD system will automatically play the disc in that language. TIPS: Press W to go back to...Getting Started (continued) Step 3: Setting language preferences The language options are different depending on the user manual. It may not correspond to the DVD disc language. General Setup Page Disc Lock Display Dim Program OSD Language Screen Saver DivX(R) VOD Code English Dansk Deutsch Espanõl C Use...
User manual
Page 22
... ~ D for TV display will be displayed. { 16:9 Wide Screen } Select this case, a wide picture with black bands on the disc. For some DVDs, the subtitle/audio/menu language can switch the audio and subtitle languages by pressing the AUDIO and SUBTITLE buttons on the remote control. B Press X repeatedly... to select { Video Setup Page. } C Press T to exit the menu. 22 Press SETUP to highlight { TV Display, } then press X. During DVD playback, you can only be available on the upper and lower portions of the options and press OK to confirm. Step 4: Setting the TV display...
... ~ D for TV display will be displayed. { 16:9 Wide Screen } Select this case, a wide picture with black bands on the disc. For some DVDs, the subtitle/audio/menu language can switch the audio and subtitle languages by pressing the AUDIO and SUBTITLE buttons on the remote control. B Press X repeatedly... to select { Video Setup Page. } C Press T to exit the menu. 22 Press SETUP to highlight { TV Display, } then press X. During DVD playback, you can only be available on the upper and lower portions of the options and press OK to confirm. Step 4: Setting the TV display...

User manual
Page 23
...channel. I Confirm your TV's user manual.) A message appears on your TV progressive scan mode (refer to confirm. Helpful Hint: - The blue DVD background screen will be no picture is now completed and you start to enjoy the high quality picture. In this state until "DISC" appears on... that are some progressive scan TVs and High-Definition TVs that you have connected this unit, resulting in an unnatural picture when playing back a DVD VIDEO disc in the menu and press OK. The setup is displayed: A Press OPEN CLOSE to a Progressive Scan TV or component video input...
...channel. I Confirm your TV's user manual.) A message appears on your TV progressive scan mode (refer to confirm. Helpful Hint: - The blue DVD background screen will be no picture is now completed and you start to enjoy the high quality picture. In this state until "DISC" appears on... that are some progressive scan TVs and High-Definition TVs that you have connected this unit, resulting in an unnatural picture when playing back a DVD VIDEO disc in the menu and press OK. The setup is displayed: A Press OPEN CLOSE to a Progressive Scan TV or component video input...


