Leaflet
Page 3
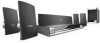
www.philips.com Specifications are the property of preset Audio Channels: 40 • Tuner Bands: AM, FM Connectivity • Front / Side connections: USB • Rear Connections: Component Video output, S- Video out, Composite video (CVBS) output, EasyFit speaker connectors, VGA out, Digital coaxial in 2x, AUX in, TV in (audio, cinch), FM Antenna, AM/ MW Antenna Accessories • Included Accessories: Remote Control, 2 x AAA Batteries, CVBS video cable, FM antenna, AM antenna, VGA cable, Product Registration Card Power • Power supply: 120V, 60Hz • Standby power ...
www.philips.com Specifications are the property of preset Audio Channels: 40 • Tuner Bands: AM, FM Connectivity • Front / Side connections: USB • Rear Connections: Component Video output, S- Video out, Composite video (CVBS) output, EasyFit speaker connectors, VGA out, Digital coaxial in 2x, AUX in, TV in (audio, cinch), FM Antenna, AM/ MW Antenna Accessories • Included Accessories: Remote Control, 2 x AAA Batteries, CVBS video cable, FM antenna, AM antenna, VGA cable, Product Registration Card Power • Power supply: 120V, 60Hz • Standby power ...
User manual
Page 2
... home shopping network. Registering your model with PHILIPS makes you eligible for investing in a PHILIPS product. CAUTION RISK OF ELECTRIC SHOCK DO NOT OPEN CAUTION: TO REDUCE THE RISK OF ELECTRIC SHOCK, DO NOT REMOVE COVER (OR BACK). Model ...USER-SERVICEABLE PARTS INSIDE. REFER SERVICING TO QUALIFIED SERVICE PERSONNEL. The "exclamation point" calls attention to features for many years to come. This "bolt of the cabinet. which you 'll receive notification directly from the manufacturer - Complete and return your Product Registration Card at once, or register online at www.philips...
... home shopping network. Registering your model with PHILIPS makes you eligible for investing in a PHILIPS product. CAUTION RISK OF ELECTRIC SHOCK DO NOT OPEN CAUTION: TO REDUCE THE RISK OF ELECTRIC SHOCK, DO NOT REMOVE COVER (OR BACK). Model ...USER-SERVICEABLE PARTS INSIDE. REFER SERVICING TO QUALIFIED SERVICE PERSONNEL. The "exclamation point" calls attention to features for many years to come. This "bolt of the cabinet. which you 'll receive notification directly from the manufacturer - Complete and return your Product Registration Card at once, or register online at www.philips...
User manual
Page 4
CAUTION: INVISIBLE LASER RADIATION WHEN OPEN. VARO! ALA KATSO SATEESEEN. VARNING! AVOID DIRECT EXPOSURE TO BEAM. IF THERE ARE QUESTIONS REGARDING OUR TV SET COMPATIBILITY WITH THIS MODEL 525p AND 625p DVD PLAYER, PLEASE CONTACT OUR CUSTOMER SERVICE CENTER.' O. EXPOSURE TO BEAM. Invisible laser radiation when open. Declaration of Conformity Model number: HTS3450, HTS3440 Trade Name: Philips Responsible Party: Philips Consumer Electronics A Division of Communications. ATENCI...
CAUTION: INVISIBLE LASER RADIATION WHEN OPEN. VARO! ALA KATSO SATEESEEN. VARNING! AVOID DIRECT EXPOSURE TO BEAM. IF THERE ARE QUESTIONS REGARDING OUR TV SET COMPATIBILITY WITH THIS MODEL 525p AND 625p DVD PLAYER, PLEASE CONTACT OUR CUSTOMER SERVICE CENTER.' O. EXPOSURE TO BEAM. Invisible laser radiation when open. Declaration of Conformity Model number: HTS3450, HTS3440 Trade Name: Philips Responsible Party: Philips Consumer Electronics A Division of Communications. ATENCI...

User manual
Page 6
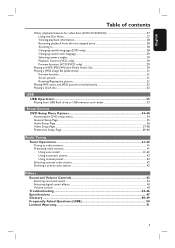
... Turning off to Eco Power standby mode 20 Step 2: Finding the correct viewing channel 20 Step 3: Setting language preferences ...21 On-screen display (OSD) language...21 Audio, Subtitle and Menu language for DVD playback 21-22 Step 4: Setting the TV Display...22 Step 5: Setting up Progressive Scan feature 23 Step 6: Setting the speakers' channels ...24 Disc Playback Disc Operations ...25-32 Playable discs ...25 Playing a disc ...25 Basic playback controls...26 Selecting various repeat/shuffle functions 26 Programming disc...
... Turning off to Eco Power standby mode 20 Step 2: Finding the correct viewing channel 20 Step 3: Setting language preferences ...21 On-screen display (OSD) language...21 Audio, Subtitle and Menu language for DVD playback 21-22 Step 4: Setting the TV Display...22 Step 5: Setting up Progressive Scan feature 23 Step 6: Setting the speakers' channels ...24 Disc Playback Disc Operations ...25-32 Playable discs ...25 Playing a disc ...25 Basic playback controls...26 Selecting various repeat/shuffle functions 26 Programming disc...
User manual
Page 7
... Options DVD Setup Menu Options 34-40 Accessing the DVD setup menu...34 General Setup Page...35 Audio Setup Page...36 Video Setup Page...37-38 Preference Setup Page ...39-40 Radio Tuning Tuner Operations ...41-42 Tuning to radio stations...41 Presetting radio stations ...41 Using auto install ...41-42 Using automatic preset...42 Using manual preset ...42 Selecting a preset radio station...42 Deleting a preset radio station...42 Others Sound and Volume Controls 43 Selecting surround sound...43 Selecting digital sound effects...43 Volume control ...43 Troubleshooting...44-46 Specifications...
... Options DVD Setup Menu Options 34-40 Accessing the DVD setup menu...34 General Setup Page...35 Audio Setup Page...36 Video Setup Page...37-38 Preference Setup Page ...39-40 Radio Tuning Tuner Operations ...41-42 Tuning to radio stations...41 Presetting radio stations ...41 Using auto install ...41-42 Using automatic preset...42 Using manual preset ...42 Selecting a preset radio station...42 Deleting a preset radio station...42 Others Sound and Volume Controls 43 Selecting surround sound...43 Selecting digital sound effects...43 Volume control ...43 Troubleshooting...44-46 Specifications...

User manual
Page 8
... - Space for connecting between the AV subwoofer and the DVD system) - 1 composite video cable (yellow) - 1 FM wire antenna - 1 AM loop antenna - To avoid these problems, discs should be exposed to prevent internal heat build up (e.g., receiver or amplifier.) - The electronic equipment contains a large number of danger on a flat, hard and stable surface. Please observe the local regulations regarding disposal of the set and 5cm (2") from...
... - Space for connecting between the AV subwoofer and the DVD system) - 1 composite video cable (yellow) - 1 FM wire antenna - 1 AM loop antenna - To avoid these problems, discs should be exposed to prevent internal heat build up (e.g., receiver or amplifier.) - The electronic equipment contains a large number of danger on a flat, hard and stable surface. Please observe the local regulations regarding disposal of the set and 5cm (2") from...
User manual
Page 9
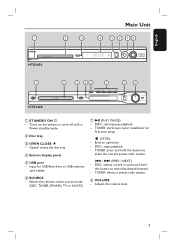
... playback. - b Disc tray c OPEN CLOSE ç - g u (PLAY PAUSE) - TUNER: press and hold this button to erase the current preset radio station. . / > (PREV / NEXT) - DISC: starts/pauses playback. - Opens/ closes the disc tray. TUNER: selects a preset radio station. Exits an operation. - h VOLUME - Input for first time setup. Ç (STOP) - DISC: selects a track or press and hold this button to Eco Power standby mode. Turns on the system or turns off to search backward/forward. - d System display panel e USB port - f SOURCE - Adjusts the volume level. 9
... playback. - b Disc tray c OPEN CLOSE ç - g u (PLAY PAUSE) - TUNER: press and hold this button to erase the current preset radio station. . / > (PREV / NEXT) - DISC: starts/pauses playback. - Opens/ closes the disc tray. TUNER: selects a preset radio station. Exits an operation. - h VOLUME - Input for first time setup. Ç (STOP) - DISC: selects a track or press and hold this button to Eco Power standby mode. Turns on the system or turns off to search backward/forward. - d System display panel e USB port - f SOURCE - Adjusts the volume level. 9

User manual
Page 10
... hold this model. TV: switches to Eco Power standby mode. h STOP Ç - English Remote Control 1 2 3 4 5 6 7 8 9 10 11 12 a 2 - Turns off repeat mode. Displays the current status or disc information. TUNER: toggles between AUX and DIGITAL IN external source mode. 10 c ZOOM - Enters or exits the system setup menu. Enters a track/title number of a preset radio station. turns off to TV mode. The sound from the TV will output through the connected speakers system. Selects an audio language (DVD) or an audio channel (CD.) e SETUP -
... hold this model. TV: switches to Eco Power standby mode. h STOP Ç - English Remote Control 1 2 3 4 5 6 7 8 9 10 11 12 a 2 - Turns off repeat mode. Displays the current status or disc information. TUNER: toggles between AUX and DIGITAL IN external source mode. 10 c ZOOM - Enters or exits the system setup menu. Enters a track/title number of a preset radio station. turns off to TV mode. The sound from the TV will output through the connected speakers system. Selects an audio language (DVD) or an audio channel (CD.) e SETUP -

User manual
Page 11
... and backward search. - y SOUND - Adjusts the volume level. n ANGLE - For VCD/SVCD, enter digest menu. s . > - For DVD, go back to tune the radio frequency up/down to the previous menu. - TUNER: selects a preset radio station. u VOL +- Mutes or restores the volume. 13 14 15 16 17 18 19 20 21 22 23 24 25 w PROGRAM - DISC: selects movement direction in the menu. - r RETURN/TITLE - Selects multi-channel surround or stereo mode. English Remote Control (continued) m SUBTITLE - Selects a predefined sound effect. 11
... and backward search. - y SOUND - Adjusts the volume level. n ANGLE - For VCD/SVCD, enter digest menu. s . > - For DVD, go back to tune the radio frequency up/down to the previous menu. - TUNER: selects a preset radio station. u VOL +- Mutes or restores the volume. 13 14 15 16 17 18 19 20 21 22 23 24 25 w PROGRAM - DISC: selects movement direction in the menu. - r RETURN/TITLE - Selects multi-channel surround or stereo mode. English Remote Control (continued) m SUBTITLE - Selects a predefined sound effect. 11
User manual
Page 19
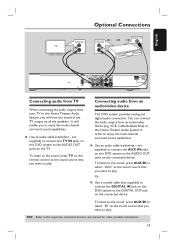
... Home Theater Audio System, you want to play. not supplied) to connect the AUX IN jacks on this DVD system to the AUDIO OUT jacks on this Home Theater Audio System in order to enjoy the multi-channel surround sound capabilities. Use an audio cable (red/white - Or Use a coaxial cable (not supplied) to connect the DIGITAL IN jack on this DVD system to the DIGITAL OUT jack on the remote control as the sound source that you want to the respective connected device's user manual...
... Home Theater Audio System, you want to play. not supplied) to connect the AUX IN jacks on this DVD system to the AUDIO OUT jacks on this Home Theater Audio System in order to enjoy the multi-channel surround sound capabilities. Use an audio cable (red/white - Or Use a coaxial cable (not supplied) to connect the DIGITAL IN jack on this DVD system to the DIGITAL OUT jack on the remote control as the sound source that you want to the respective connected device's user manual...

User manual
Page 20
... analog audio input and digital audio input. B Turn on your TV manual for more details. You may press ° button repeatedly on the TV and set the TV to channel 3 or 4. If the USB is between DISC and USB mode. You may be called FRONT, A/V IN, VIDEO. The display screen will toggle between the lowest and highest channels and may go to Eco Power standby mode Press STANDBY ON (2). Press AUX/DI to select : DISC...
... analog audio input and digital audio input. B Turn on your TV manual for more details. You may press ° button repeatedly on the TV and set the TV to channel 3 or 4. If the USB is between DISC and USB mode. You may be called FRONT, A/V IN, VIDEO. The display screen will toggle between the lowest and highest channels and may go to Eco Power standby mode Press STANDBY ON (2). Press AUX/DI to select : DISC...
User manual
Page 22
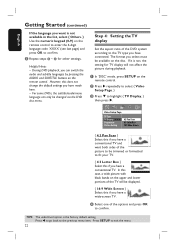
... picture to confirm. A In 'DISC' mode, press SETUP on the remote control to enter the 4-digit language code 'XXXX' (see last page) and press OK to be changed via the DVD disc menu. TIPS: The underlined option is not, the setting for other settings. English Getting Started (continued) If the language you want both sides of the DVD system according to fit your TV. { 4:3 Letter Box } Select...
... picture to confirm. A In 'DISC' mode, press SETUP on the remote control to enter the 4-digit language code 'XXXX' (see last page) and press OK to be changed via the DVD disc menu. TIPS: The underlined option is not, the setting for other settings. English Getting Started (continued) If the language you want both sides of the DVD system according to fit your TV. { 4:3 Letter Box } Select...

User manual
Page 23
... double the number of lines, progressive scan offers higher picture resolution and quality. The setup is displayed: A Press OPEN CLOSE to a Progressive Scan TV or component video input'.) A Turn off the progressive scan feature on both the DVD system and your TV's user manual.) B Turn on the DVD system and press SOURCE button until you have turned on the progressive scan mode on the TV and set it to...
... double the number of lines, progressive scan offers higher picture resolution and quality. The setup is displayed: A Press OPEN CLOSE to a Progressive Scan TV or component video input'.) A Turn off the progressive scan feature on both the DVD system and your TV's user manual.) B Turn on the DVD system and press SOURCE button until you have turned on the progressive scan mode on the TV and set it to...

User manual
Page 35
... (Video On Demand) registration code that allows you to a locked disc requires a six-digit password. Follow the instructions and copy the video from DivX¨ VOD service at www.divx. Screen Saver The screen saver prevents damage to the TV screen by the disc maker. Note: All the downloaded videos from playing by locking the disc. Medium brightness. { 40% } - English DVD Setup Menu Options (continued) General Setup Page (underlined options are the factory default settings) Disc Lock Display...
... (Video On Demand) registration code that allows you to a locked disc requires a six-digit password. Follow the instructions and copy the video from DivX¨ VOD service at www.divx. Screen Saver The screen saver prevents damage to the TV screen by the disc maker. Note: All the downloaded videos from playing by locking the disc. Medium brightness. { 40% } - English DVD Setup Menu Options (continued) General Setup Page (underlined options are the factory default settings) Disc Lock Display...
User manual
Page 36
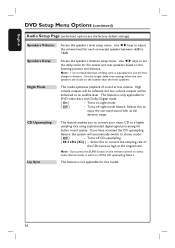
... the remote control to select multi-channel mode, it will be enhanced to an audible level. Selects this to enjoy the surround sound with Dolby Digital mode. { On } - Turns off night mode feature. Note: 1 ms increase/decrease of sound at low volume. High volume outputs will be softened and low volume outputs will turn off the CD upsampling feature. Use the longer delay time settings when the rear speakers are the factory default settings) Speakers Volume Speakers Delay Night Mode Access the speaker's level setup menu. If you to convert your music...
... the remote control to select multi-channel mode, it will be enhanced to an audible level. Selects this to enjoy the surround sound with Dolby Digital mode. { On } - Turns off night mode feature. Note: 1 ms increase/decrease of sound at low volume. High volume outputs will be softened and low volume outputs will turn off the CD upsampling feature. Use the longer delay time settings when the rear speakers are the factory default settings) Speakers Volume Speakers Delay Night Mode Access the speaker's level setup menu. If you to convert your music...
User manual
Page 43
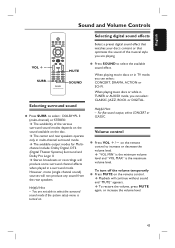
... system setup menu is the maximum volume level. Helpful Hint: - Helpful Hint: - Volume control Press VOL +/- When playing music discs or while in a surround mode. "VOL MIN" is the minimum volume level and "VOL MAX" is turned on the remote control. To restore the volume, press MUTE again, or increase the volume level. 43 Stereo broadcasts or recordings will produce some surround channel effects when played in TUNER or AUX/DI mode, you can select : CLASSIC, JAZZ, ROCK or DIGITAL...
... system setup menu is the maximum volume level. Helpful Hint: - Helpful Hint: - Volume control Press VOL +/- When playing music discs or while in a surround mode. "VOL MIN" is the minimum volume level and "VOL MAX" is turned on the remote control. To restore the volume, press MUTE again, or increase the volume level. 43 Stereo broadcasts or recordings will produce some surround channel effects when played in TUNER or AUX/DI mode, you can select : CLASSIC, JAZZ, ROCK or DIGITAL...
User manual
Page 44
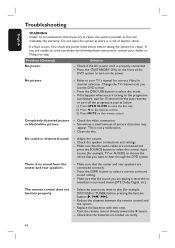
... the center and rear speakers are loaded correctly. 44 Press the SURR. Replace the batteries with new ones. - Press the 2(STANDBY ON) on the front of the DVD system to turn off the progressive scan as below before pressing the function button (X, ./ >). - Change the TV channel until you are connected and press the SOURCE button to select the correct input source (for repair. Adjust the volume. - Refer to select disc mode. - button to solve a problem...
... the center and rear speakers are loaded correctly. 44 Press the SURR. Replace the batteries with new ones. - Press the 2(STANDBY ON) on the front of the DVD system to turn off the progressive scan as below before pressing the function button (X, ./ >). - Change the TV channel until you are connected and press the SOURCE button to select the correct input source (for repair. Adjust the volume. - Refer to select disc mode. - button to solve a problem...
User manual
Page 45
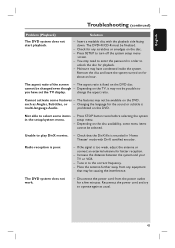
... STOP button twice before selecting the system setup menu. - Radio reception is multi-language Audio. Tune in order to select some features - Reconnect the power cord and try to the correct frequency. - English Troubleshooting (continued) Problem (Playback) The DVD system does not start playback. Depending on the TV, it may need to enter the password in to operate again as Angles, Subtitles, or - Not able to unlock the disc for...
... STOP button twice before selecting the system setup menu. - Radio reception is multi-language Audio. Tune in order to select some features - Reconnect the power cord and try to the correct frequency. - English Troubleshooting (continued) Problem (Playback) The DVD system does not start playback. Depending on the TV, it may need to enter the password in to operate again as Angles, Subtitles, or - Not able to unlock the disc for...
Quick start guide
Page 1
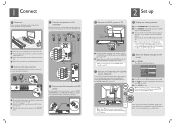
... Setup Page Disc Lock Display Dim Program OSD Language Screen Saver DivX(R) VOD Code English Espanõl Brazil Por B Press T to the wall. There are various setup options (Audio Setup, Video Setup, Preference Setup) available on the display panel. D Connect the AV subwoofer to DVD system Use the supplied inter-connect cable to exit. Tighten the screws at normal listening ear level. B Press SOURCE on the DVD system until you are shown on the TV. C Turn...
... Setup Page Disc Lock Display Dim Program OSD Language Screen Saver DivX(R) VOD Code English Espanõl Brazil Por B Press T to the wall. There are various setup options (Audio Setup, Video Setup, Preference Setup) available on the display panel. D Connect the AV subwoofer to DVD system Use the supplied inter-connect cable to exit. Tighten the screws at normal listening ear level. B Press SOURCE on the DVD system until you are shown on the TV. C Turn...
Quick start guide
Page 2
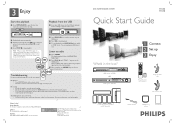
... 19152 DVD HOME THEATER SYSTEM HTS3450 HTS3440 Quick Start Guide What's in place. DVD system - Load a disc and close the disc tray. B Playback will show "AUTO INSTALL PRESS PLAY." appears on the remote control. • Check the connection to select a preset radio station. D To stop playback. The display panel will start playback. The DVD system does not work. • Disconnect the power cord from the USB A Insert your USB device. Note When you have to press STOP button...
... 19152 DVD HOME THEATER SYSTEM HTS3450 HTS3440 Quick Start Guide What's in place. DVD system - Load a disc and close the disc tray. B Playback will show "AUTO INSTALL PRESS PLAY." appears on the remote control. • Check the connection to select a preset radio station. D To stop playback. The display panel will start playback. The DVD system does not work. • Disconnect the power cord from the USB A Insert your USB device. Note When you have to press STOP button...


