User manual
Page 2
... or safety defect. *Additional Benefits Registering your model with PHILIPS makes you should not be exposed to rain or moisture and objects filled with your purchase for which you 'll receive notification directly from the manufacturer - REFER SERVICING TO QUALIFIED SERVICE PERSONNEL. Retain this is located on this apparatus. in PHILIPS. CAUTION: To prevent electric shock, match wide...
... or safety defect. *Additional Benefits Registering your model with PHILIPS makes you should not be exposed to rain or moisture and objects filled with your purchase for which you 'll receive notification directly from the manufacturer - REFER SERVICING TO QUALIFIED SERVICE PERSONNEL. Retain this is located on this apparatus. in PHILIPS. CAUTION: To prevent electric shock, match wide...
User manual
Page 4
... par une exposition dangereuse à l'irradiation. IF THERE ARE QUESTIONS REGARDING OUR TV SET COMPATIBILITY WITH THIS MODEL 525p AND 625p DVD PLAYER, PLEASE CONTACT OUR CUSTOMER SERVICE CENTER.' Invisible laser radiation when open. Declaration of Conformity Model number: HTS3450, HTS3440 Trade Name: Philips Responsible Party: Philips Consumer Electronics A Division of Philips Electronics North America Corp. VARO! ATENCIÓN El uso de mando o ajustes...
... par une exposition dangereuse à l'irradiation. IF THERE ARE QUESTIONS REGARDING OUR TV SET COMPATIBILITY WITH THIS MODEL 525p AND 625p DVD PLAYER, PLEASE CONTACT OUR CUSTOMER SERVICE CENTER.' Invisible laser radiation when open. Declaration of Conformity Model number: HTS3450, HTS3440 Trade Name: Philips Responsible Party: Philips Consumer Electronics A Division of Philips Electronics North America Corp. VARO! ATENCIÓN El uso de mando o ajustes...

User manual
Page 6
... Turning off to Eco Power standby mode 20 Step 2: Finding the correct viewing channel 20 Step 3: Setting language preferences ...21 On-screen display (OSD) language...21 Audio, Subtitle and Menu language for DVD playback 21-22 Step 4: Setting the TV Display...22 Step 5: Setting up Progressive Scan feature 23 Step 6: Setting the speakers' channels ...24 Disc Playback Disc Operations ...25-32 Playable discs ...25 Playing a disc ...25 Basic playback controls...26 Selecting various repeat/shuffle functions 26 Programming disc...
... Turning off to Eco Power standby mode 20 Step 2: Finding the correct viewing channel 20 Step 3: Setting language preferences ...21 On-screen display (OSD) language...21 Audio, Subtitle and Menu language for DVD playback 21-22 Step 4: Setting the TV Display...22 Step 5: Setting up Progressive Scan feature 23 Step 6: Setting the speakers' channels ...24 Disc Playback Disc Operations ...25-32 Playable discs ...25 Playing a disc ...25 Basic playback controls...26 Selecting various repeat/shuffle functions 26 Programming disc...
User manual
Page 7
... Options DVD Setup Menu Options 34-40 Accessing the DVD setup menu...34 General Setup Page...35 Audio Setup Page...36 Video Setup Page...37-38 Preference Setup Page ...39-40 Radio Tuning Tuner Operations ...41-42 Tuning to radio stations...41 Presetting radio stations ...41 Using auto install ...41-42 Using automatic preset...42 Using manual preset ...42 Selecting a preset radio station...42 Deleting a preset radio station...42 Others Sound and Volume Controls 43 Selecting surround sound...43 Selecting digital sound effects...43 Volume control ...43 Troubleshooting...44-46 Specifications...
... Options DVD Setup Menu Options 34-40 Accessing the DVD setup menu...34 General Setup Page...35 Audio Setup Page...36 Video Setup Page...37-38 Preference Setup Page ...39-40 Radio Tuning Tuner Operations ...41-42 Tuning to radio stations...41 Presetting radio stations ...41 Using auto install ...41-42 Using automatic preset...42 Using manual preset ...42 Selecting a preset radio station...42 Deleting a preset radio station...42 Others Sound and Volume Controls 43 Selecting surround sound...43 Selecting digital sound effects...43 Volume control ...43 Troubleshooting...44-46 Specifications...

User manual
Page 8
... not place any user-serviceable parts. Place the set on top of the set (e.g., CDs, magazines.) - Do not place the set on the apparatus (e.g., liquid filled objects, lighted candles.) Accessories supplied - 1 AV subwoofer - 1 center speaker - 2 front and 2 rear speakers - 1 remote control with adequate ventilation to prevent internal heat build up (e.g., receiver or amplifier.) - Install this unit near the AC outlet where the AC power plug can be easily reached...
... not place any user-serviceable parts. Place the set on top of the set (e.g., CDs, magazines.) - Do not place the set on the apparatus (e.g., liquid filled objects, lighted candles.) Accessories supplied - 1 AV subwoofer - 1 center speaker - 2 front and 2 rear speakers - 1 remote control with adequate ventilation to prevent internal heat build up (e.g., receiver or amplifier.) - Install this unit near the AC outlet where the AC power plug can be easily reached...
User manual
Page 9
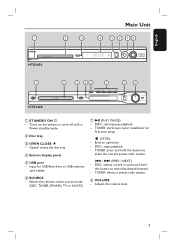
b Disc tray c OPEN CLOSE ç - d System display panel e USB port - DISC: stops playback. - TUNER: selects a preset radio station. f SOURCE - Selects the relevant active source mode: DISC, TUNER (FM/AM,) TV or AUX/DI. TUNER: starts auto tuner installation for USB flash drive or USB memory card reader. DISC: selects a track or press and hold this button to Eco Power standby mode. h VOLUME - DISC: starts/pauses playback. - Exits an operation. - Turns on the system or turns off to search backward/forward. - Input for first time setup. Ç (STOP) - TUNER: press ...
b Disc tray c OPEN CLOSE ç - d System display panel e USB port - DISC: stops playback. - TUNER: selects a preset radio station. f SOURCE - Selects the relevant active source mode: DISC, TUNER (FM/AM,) TV or AUX/DI. TUNER: starts auto tuner installation for USB flash drive or USB memory card reader. DISC: selects a track or press and hold this button to Eco Power standby mode. h VOLUME - DISC: starts/pauses playback. - Exits an operation. - Turns on the system or turns off to search backward/forward. - Input for first time setup. Ç (STOP) - TUNER: press ...

User manual
Page 10
Turns off repeat mode. DISC/USB: switches to TV mode. The sound from the TV will output through the connected speakers system. Selects an audio language (DVD) or an audio channel (CD.) e SETUP - g PLAY É - turns off to Eco Power standby mode. Enters or exits the system setup menu. DISC: starts playback. Enters a track/title number of a preset radio station. Not functional for this button to erase the current preset radio station. TV: switches to DISC or USB mode. AUX/DI: toggles between FM and AM band. d AUDIO - k REPEAT - b Source buttons - Displays ...
Turns off repeat mode. DISC/USB: switches to TV mode. The sound from the TV will output through the connected speakers system. Selects an audio language (DVD) or an audio channel (CD.) e SETUP - g PLAY É - turns off to Eco Power standby mode. Enters or exits the system setup menu. DISC: starts playback. Enters a track/title number of a preset radio station. Not functional for this button to erase the current preset radio station. TV: switches to DISC or USB mode. AUX/DI: toggles between FM and AM band. d AUDIO - k REPEAT - b Source buttons - Displays ...

User manual
Page 11
... start auto search. Mutes or restores the volume. 13 14 15 16 17 18 19 20 21 22 23 24 25 w PROGRAM - TUNER: press and hold this button to start automatic/ manual preset programming. Selects multi-channel surround or stereo mode. TUNER: selects a preset radio station. Adjusts the volume level. x SURR. - Selects a DVD subtitle language. During playback, display the disc title menu or return to the main menu. t PAUSE Å - Confirms a selection. s . > - DISC: starts programming. - Selects a DVD disc camera angle (if available). English Remote Control (continued...
... start auto search. Mutes or restores the volume. 13 14 15 16 17 18 19 20 21 22 23 24 25 w PROGRAM - TUNER: press and hold this button to start automatic/ manual preset programming. Selects multi-channel surround or stereo mode. TUNER: selects a preset radio station. Adjusts the volume level. x SURR. - Selects a DVD subtitle language. During playback, display the disc title menu or return to the main menu. t PAUSE Å - Confirms a selection. s . > - DISC: starts programming. - Selects a DVD disc camera angle (if available). English Remote Control (continued...
User manual
Page 19
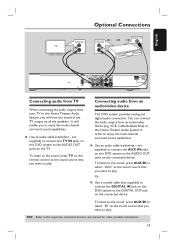
... the multi-channel surround sound capabilities. It will have the sound of the TV output on all the speakers. Connecting audio from an audio/video device (e.g. Use an audio cable (red/white - Or Use a coaxial cable (not supplied) to connect the DIGITAL IN jack on this DVD system to the DIGITAL OUT jack on the connected device. To listen to the sound, press AUX/DI to select "DI" as the sound source that you want to play. You can connect the audio output...
... the multi-channel surround sound capabilities. It will have the sound of the TV output on all the speakers. Connecting audio from an audio/video device (e.g. Use an audio cable (red/white - Or Use a coaxial cable (not supplied) to connect the DIGITAL IN jack on this DVD system to the DIGITAL OUT jack on the connected device. To listen to the sound, press AUX/DI to select "DI" as the sound source that you want to play. You can connect the audio output...

User manual
Page 20
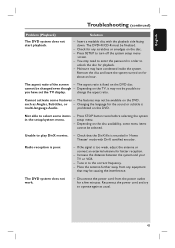
Press TUNER to the correct video-in channel. A Press SOURCE button until you have completed all the necessary connections before proceeding. You should see the Video In channel. The display screen will toggle between analog audio input and digital audio input. If the USB is between FM and AM band. B Turn on the TV and set the TV to Eco Power standby mode Press STANDBY ON (2). You may go to Channel 1 on your TV...
Press TUNER to the correct video-in channel. A Press SOURCE button until you have completed all the necessary connections before proceeding. You should see the Video In channel. The display screen will toggle between analog audio input and digital audio input. If the USB is between FM and AM band. B Turn on the TV and set the TV to Eco Power standby mode Press STANDBY ON (2). You may go to Channel 1 on your TV...
User manual
Page 22
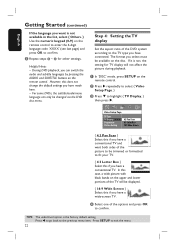
... TV Display Progressive Picture Setting 4:3 Pan Scan 4:3 Letter Box 16:9 Wide Screen { 4:3 Pan Scan } Select this does not change the default settings you have connected. TIPS: The underlined option is not, the setting for other settings. Step 4: Setting the TV display Set the aspect ratio of the TV will not affect the picture during playback. A In 'DISC' mode, press SETUP on the disc. For some DVDs, the subtitle/audio/menu language can switch the audio...
... TV Display Progressive Picture Setting 4:3 Pan Scan 4:3 Letter Box 16:9 Wide Screen { 4:3 Pan Scan } Select this does not change the default settings you have connected. TIPS: The underlined option is not, the setting for other settings. Step 4: Setting the TV display Set the aspect ratio of the TV will not affect the picture during playback. A In 'DISC' mode, press SETUP on the disc. For some DVDs, the subtitle/audio/menu language can switch the audio...

User manual
Page 23
... SOURCE button until you have turned on the progressive scan mode on your TV's user manual.) A message appears on both the DVD system and your action by selecting the in the progressive scan mode. Helpful Hint: - Press SETUP to confirm. D Press SETUP on the remote control. Otherwise, select { Cancel } and press OK to go back to open the disc tray. The setup is displayed: A Press OPEN CLOSE to the previous menu...
... SOURCE button until you have turned on the progressive scan mode on your TV's user manual.) A message appears on both the DVD system and your action by selecting the in the progressive scan mode. Helpful Hint: - Press SETUP to confirm. D Press SETUP on the remote control. Otherwise, select { Cancel } and press OK to go back to open the disc tray. The setup is displayed: A Press OPEN CLOSE to the previous menu...

User manual
Page 35
...; VOD (Video On Demand) registration code that allows you to a locked disc requires a six-digit password. Use the registration code to purchase or rent the videos from playing by locking the disc. Selects the brightness of the current disc. Turns off the screen saver function. Up to 40 discs can be played back on this DVD system. English DVD Setup Menu Options (continued) General Setup Page (underlined options are the factory default settings) Disc Lock Display Dim Not all discs are...
...; VOD (Video On Demand) registration code that allows you to a locked disc requires a six-digit password. Use the registration code to purchase or rent the videos from playing by locking the disc. Selects the brightness of the current disc. Turns off the screen saver function. Up to 40 discs can be played back on this DVD system. English DVD Setup Menu Options (continued) General Setup Page (underlined options are the factory default settings) Disc Lock Display Dim Not all discs are...
User manual
Page 36
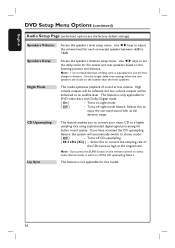
... the remote control to select multi-channel mode, it will be softened and low volume outputs will turn off the CD upsampling feature. English DVD Setup Menu Options (continued) Audio Setup Page (underlined options are closer to the listener than the front speakers. Use W X keys to convert the sampling rate of sound at low volume. Selects this to adjust the volume level for the center and rear speakers based on night mode. { Off } - If you to convert your music...
... the remote control to select multi-channel mode, it will be softened and low volume outputs will turn off the CD upsampling feature. English DVD Setup Menu Options (continued) Audio Setup Page (underlined options are closer to the listener than the front speakers. Use W X keys to convert the sampling rate of sound at low volume. Selects this to adjust the volume level for the center and rear speakers based on night mode. { Off } - If you to convert your music...
User manual
Page 43
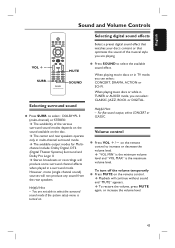
... channel sound) sources will produce some surround channel effects when played in multi-channel surround mode. To turn off the volume temporarily Press MUTE on the remote control to select the surround sound mode if the system setup menu is the maximum volume level. Press SOUND to select : DOLBY+PL II (multi-channel) or STEREO. Helpful Hint: - Helpful Hint: - Playback will continue without sound and "MUTE" appears. The availability of the musical style you can select : CONCERT, DRAMA, ACTION or SCI-FI. Selecting digital sound effects Select a preset digital sound...
... channel sound) sources will produce some surround channel effects when played in multi-channel surround mode. To turn off the volume temporarily Press MUTE on the remote control to select the surround sound mode if the system setup menu is the maximum volume level. Press SOUND to select : DOLBY+PL II (multi-channel) or STEREO. Helpful Hint: - Helpful Hint: - Playback will continue without sound and "MUTE" appears. The availability of the musical style you can select : CONCERT, DRAMA, ACTION or SCI-FI. Selecting digital sound effects Select a preset digital sound...
User manual
Page 44
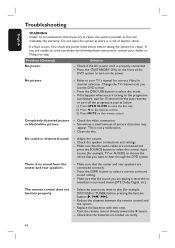
... sound from the center and rear speakers. - Press the 2(STANDBY ON) on the power. button to select disc mode. - If you are playing is no circumstances should you try to hear through the DVD system. No picture. - Press the DISC/USB button to select a correct surround sound setting. - There is recorded or broadcast in surround sound (DTS, Dolby Digital, etc.). Problem (General) No power. Sometimes a small amount of electric shock. Make sure that the batteries are connected correctly. - Adjust...
... sound from the center and rear speakers. - Press the 2(STANDBY ON) on the power. button to select disc mode. - If you are playing is no circumstances should you try to hear through the DVD system. No picture. - Press the DISC/USB button to select a correct surround sound setting. - There is recorded or broadcast in surround sound (DTS, Dolby Digital, etc.). Problem (General) No power. Sometimes a small amount of electric shock. Make sure that the batteries are connected correctly. - Adjust...
User manual
Page 45
... to turn off the system setup menu screen. - The DVD system does not work. - Cannot activate some menu items cannot be possible to operate again as Angles, Subtitles, or - Depending on the DVD. Place the antenna further away from the power outlet for playback. - such as usual. 45 Press STOP button twice before selecting the system setup menu. - Radio reception is encoded in order to unlock the disc...
... to turn off the system setup menu screen. - The DVD system does not work. - Cannot activate some menu items cannot be possible to operate again as Angles, Subtitles, or - Depending on the DVD. Place the antenna further away from the power outlet for playback. - such as usual. 45 Press STOP button twice before selecting the system setup menu. - Radio reception is encoded in order to unlock the disc...
Quick start guide
Page 1
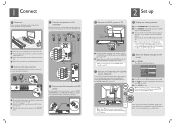
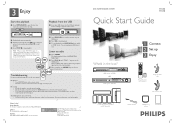
... the viewing channel A Press STANDBY ON on the screen A Press SETUP. Use the TV's remote control to select the correct viewing channel for more information. B Select the display language on the DVD system. General Setup Page Disc Lock Display Dim Program OSD Language Screen Saver DivX(R) VOD Code English Espanõl Brazil Por B Press T to the AC power outlets. C Place the front speakers at the rear of the AV subwoofer. REAR REAR RIGHT LEFT FRONT RIGHT CENTER FRONT...
... the viewing channel A Press STANDBY ON on the screen A Press SETUP. Use the TV's remote control to select the correct viewing channel for more information. B Select the display language on the DVD system. General Setup Page Disc Lock Display Dim Program OSD Language Screen Saver DivX(R) VOD Code English Espanõl Brazil Por B Press T to the AC power outlets. C Place the front speakers at the rear of the AV subwoofer. REAR REAR RIGHT LEFT FRONT RIGHT CENTER FRONT...
Quick start guide
Page 2
... P.O. User Manual See the user manual that cames with strong reception signal will show "AUTO INSTALL PRESS PLAY." HTS3440 1 Connect 2 Set up 3 Enjoy Remote Control and 2 batteries Composite video cable Inter-connect cable 1 center, 2 front, 2 rear speakers and AV subwoofer FM wire antenna AM/MW loop antenna User Manual Load a disc and close the disc tray. Press SURR button to cancel the resume mode, then press PLAY button. HTS3450 OR DVD system - Note When you have to press STOP button two times to select multi-channel surround output. Reconnect...
... P.O. User Manual See the user manual that cames with strong reception signal will show "AUTO INSTALL PRESS PLAY." HTS3440 1 Connect 2 Set up 3 Enjoy Remote Control and 2 batteries Composite video cable Inter-connect cable 1 center, 2 front, 2 rear speakers and AV subwoofer FM wire antenna AM/MW loop antenna User Manual Load a disc and close the disc tray. Press SURR button to cancel the resume mode, then press PLAY button. HTS3450 OR DVD system - Note When you have to press STOP button two times to select multi-channel surround output. Reconnect...
Leaflet
Page 2
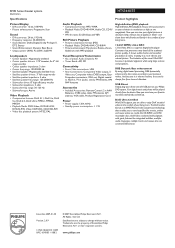
... authentic picture quality. DVD home theater system DivX Ultra Specifications Picture/Display • D/A converter: 12 bit, 108 MHz • Picture enhancement: Progressive Scan Sound • D/A converter: 24 bit, 192 kHz • Frequency response: 30-20000 Hz • Sound System: Dolby Digital, Dolby Prologic II, DTS, Stereo • Sound Enhancement: Dynamic Bass Boost • Output power (RMS): 4x125W, 2x250W Loudspeakers • Center Speaker: Magnetically shielded • Center speaker drivers: 1.75" tweeter, 2x 3" full range woofers • Center speaker...
... authentic picture quality. DVD home theater system DivX Ultra Specifications Picture/Display • D/A converter: 12 bit, 108 MHz • Picture enhancement: Progressive Scan Sound • D/A converter: 24 bit, 192 kHz • Frequency response: 30-20000 Hz • Sound System: Dolby Digital, Dolby Prologic II, DTS, Stereo • Sound Enhancement: Dynamic Bass Boost • Output power (RMS): 4x125W, 2x250W Loudspeakers • Center Speaker: Magnetically shielded • Center speaker drivers: 1.75" tweeter, 2x 3" full range woofers • Center speaker...


