

User manual
Page 7
... 33 Sound Control 33 Selecting surround sound 33 Selecting digital sound effects 34 Volume Control 34 Dimming system's display screen 34 Using the remote to your TV 18 Setting the TV shape 18 Step 3: Setting the speakers 19 Test Tone - turning on /off 28 Screen ...15 Control buttons available on the remote only 16 Getting Started Step 1: Inserting batteries into the remote control 17 Using the remote control to operate the system 17 Step 2: Setting the TV 17 Selecting the color system that corresponds to operate 'Philips' television 34 Specifications 35 Troubleshooting 36...
... 33 Sound Control 33 Selecting surround sound 33 Selecting digital sound effects 34 Volume Control 34 Dimming system's display screen 34 Using the remote to your TV 18 Setting the TV shape 18 Step 3: Setting the speakers 19 Test Tone - turning on /off 28 Screen ...15 Control buttons available on the remote only 16 Getting Started Step 1: Inserting batteries into the remote control 17 Using the remote control to operate the system 17 Step 2: Setting the TV 17 Selecting the color system that corresponds to operate 'Philips' television 34 Specifications 35 Troubleshooting 36...
User manual
Page 8
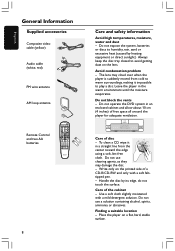
...the player on the lens. English General Information Supplied accessories Composite video cable (yellow) Audio cable (white, red) FM wire antenna AM loop antenna Remote Control and two AA batteries 8 Care and safety information Avoid high temperatures, moisture, water and dust - The lens may damage the disc. - ... and allow about 10 cm (4 inches) of free space all around the player for adequate ventilation. 10 cm (4 inches) 10 cm (4 inches) PHILIPS DVD Home Cinema System 10 cm (4 inches) Care of the cabinet - Do not expose the system, batteries or discs to humidity, rain, sand ...
...the player on the lens. English General Information Supplied accessories Composite video cable (yellow) Audio cable (white, red) FM wire antenna AM loop antenna Remote Control and two AA batteries 8 Care and safety information Avoid high temperatures, moisture, water and dust - The lens may damage the disc. - ... and allow about 10 cm (4 inches) of free space all around the player for adequate ventilation. 10 cm (4 inches) 10 cm (4 inches) PHILIPS DVD Home Cinema System 10 cm (4 inches) Care of the cabinet - Do not expose the system, batteries or discs to humidity, rain, sand ...
User manual
Page 14
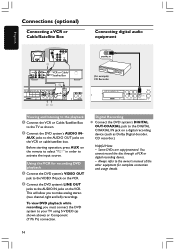
AUX jacks to the AUDIO OUT jacks on the remote to select "AUX" in order to activate the input source. Always refer to make analog stereo (two channel, right and left) recordings. Connections (optional) Connecting a ...
AUX jacks to the AUDIO OUT jacks on the remote to select "AUX" in order to activate the input source. Always refer to make analog stereo (two channel, right and left) recordings. Connections (optional) Connecting a ...
User manual
Page 15
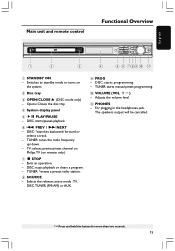
Switches to standby mode or turns on remote only.) 7 Ç STOP - Exits an operation. - DISC: starts programming. - TV: selects previous/next channel on Philips TV (on the system. 2 Disc tray 3 OPEN /CLOSE 0 (DISC mode only) - DISC: *searches backward/forward or selects a track. - TUNER: *erases a preset radio station. 8 SOURCE - TUNER: ... will be cancelled. * = Press and hold the button for more than two seconds. 15 TUNER: tunes the radio frequency up / down. - English Main unit and remote control Functional Overview 1 2 3 4 5 6 7 8 9 10 11 1 STANDBY ON -
Switches to standby mode or turns on remote only.) 7 Ç STOP - Exits an operation. - DISC: starts programming. - TV: selects previous/next channel on Philips TV (on the system. 2 Disc tray 3 OPEN /CLOSE 0 (DISC mode only) - DISC: *searches backward/forward or selects a track. - TUNER: *erases a preset radio station. 8 SOURCE - TUNER: ... will be cancelled. * = Press and hold the button for more than two seconds. 15 TUNER: tunes the radio frequency up / down. - English Main unit and remote control Functional Overview 1 2 3 4 5 6 7 8 9 10 11 1 STANDBY ON -
User manual
Page 16
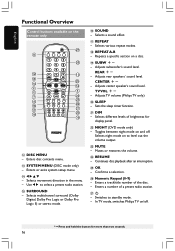
...brightness for more than two seconds. 16 Switches to select a preset radio station. % SURROUND - REAR +- Adjusts rear speakers' sound level. Adjusts TV volume (Philips TV only.) ) SLEEP - Selects different levels of a preset radio station. ≥B - Sets the sleep timer function. ¡ DIM - Selects a sound ...& REPEAT - Adjusts center speaker's sound level. Enters or exits system setup menu. $ 1234 - In TV mode, switches Philips TV on/off . Toggles between night mode on the remote only 27 8 26 12 10 13 25 14 14 6 6 5 7 24 15 23 16 22 17 21 18 20...
...brightness for more than two seconds. 16 Switches to select a preset radio station. % SURROUND - REAR +- Adjusts rear speakers' sound level. Adjusts TV volume (Philips TV only.) ) SLEEP - Selects different levels of a preset radio station. ≥B - Sets the sleep timer function. ¡ DIM - Selects a sound ...& REPEAT - Adjusts center speaker's sound level. Enters or exits system setup menu. $ 1234 - In TV mode, switches Philips TV on/off . Toggles between night mode on the remote only 27 8 26 12 10 13 25 14 14 6 6 5 7 24 15 23 16 22 17 21 18 20...
User manual
Page 17
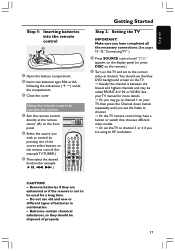
...channel is not to be called FRONT, A/V IN, or VIDEO. Remove batteries if they should see the Video In channel. ➜ Or, the TV remote control may be used for example ÉÅ, S, T .) Getting Started Step 2: Setting the TV IMPORTANT! You should be disposed of properly. 17... CAUTION! - Batteries contain chemical substances, so they are exhausted or if the remote is between the lowest and highest channels and may have completed all the necessary connections. (See pages 11-12 "Connecting TV".) 1 Press ...
...channel is not to be called FRONT, A/V IN, or VIDEO. Remove batteries if they should see the Video In channel. ➜ Or, the TV remote control may be used for example ÉÅ, S, T .) Getting Started Step 2: Setting the TV IMPORTANT! You should be disposed of properly. 17... CAUTION! - Batteries contain chemical substances, so they are exhausted or if the remote is between the lowest and highest channels and may have completed all the necessary connections. (See pages 11-12 "Connecting TV".) 1 Press ...
User manual
Page 18
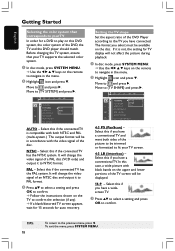
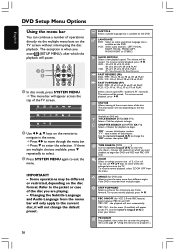
... to and press 2. Select this if the connected TV is not, the setting for TV display will be in accordance with black bands on the remote to {TV SHAPE} and press 2. TIPS: 18 To return to {TV SYSTEM} and press 2. Move to the previous menu, press 1. Select this if you have... to and press 2. If it to PAL format. 3 Press 34 to select a setting and press OK to confirm. ➜ Follow the instructions shown on the remote to fit your TV screen. 4:3 LB (letterbox) - TV SHAPE TV SYSTEM VIDEO OUT PROGRESSIVE SCR SAVER SMART POWER SET TO NTSC AUTO NTSC PAL AUTO...
... to and press 2. Select this if the connected TV is not, the setting for TV display will be in accordance with black bands on the remote to {TV SHAPE} and press 2. TIPS: 18 To return to {TV SYSTEM} and press 2. Move to the previous menu, press 1. Select this if you have... to and press 2. If it to PAL format. 3 Press 34 to select a setting and press OK to confirm. ➜ Follow the instructions shown on the remote to fit your TV screen. 4:3 LB (letterbox) - TV SHAPE TV SYSTEM VIDEO OUT PROGRESSIVE SCR SAVER SMART POWER SET TO NTSC AUTO NTSC PAL AUTO...
User manual
Page 19
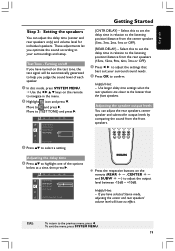
... the delay time 4 Press 34 to highlight one of each speaker. 1 In disc mode, press SYSTEM MENU. ➜ Use the 1 2 3 4 keys on the remote to navigate in relation to help you optimize the sound according to your surround sound needs. 6 Press OK to set the delay time in the... tone, the test signal will be automatically generated to the listening position/distance from the front speakers. If you have no effect. Turning on the remote (REAR +-, CENTER +and SUBW +-) to and press 2. English Getting Started Step 3: Setting the speakers You can adjust the rear speakers, center ...
... the delay time 4 Press 34 to highlight one of each speaker. 1 In disc mode, press SYSTEM MENU. ➜ Use the 1 2 3 4 keys on the remote to navigate in relation to help you optimize the sound according to your surround sound needs. 6 Press OK to set the delay time in the... tone, the test signal will be automatically generated to the listening position/distance from the front speakers. If you have no effect. Turning on the remote (REAR +-, CENTER +and SUBW +-) to and press 2. English Getting Started Step 3: Setting the speakers You can adjust the rear speakers, center ...
User manual
Page 20
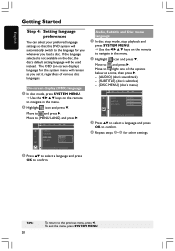
...and press 2. Move to and press 2. Move to highlight one of various disc languages. To exit the menu, press SYSTEM MENU. The OSD (on the remote to navigate in the menu. 2 Highlight icon and press 4. Move to the previous menu, press 1. On-screen display (OSD) language 1 In disc mode,... You can select your preferred language settings so that this DVD system will be used instead. If the language selected is not available on the remote to navigate in the menu. 2 Highlight icon and press 4. OSD LANGUAGE SET TO ENGLISH 3 Press 34 to select a language and press OK to ...
...and press 2. Move to and press 2. Move to highlight one of various disc languages. To exit the menu, press SYSTEM MENU. The OSD (on the remote to navigate in the menu. 2 Highlight icon and press 4. Move to the previous menu, press 1. On-screen display (OSD) language 1 In disc mode,... You can select your preferred language settings so that this DVD system will be used instead. If the language selected is not available on the remote to navigate in the menu. 2 Highlight icon and press 4. OSD LANGUAGE SET TO ENGLISH 3 Press 34 to select a language and press OK to ...
User manual
Page 21
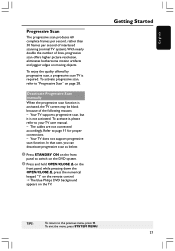
... DVD system. 2 Press and hold OPEN/CLOSE 0 on the front panel, while pressing down the OPEN/CLOSE 0, press the numerical keypad "1" on the remote control. ➜ The blue Philips DVD background appears on the front panel to page 11 for proper connections. - To activate progressive scan, refer to "Progressive Scan" on moving...
... DVD system. 2 Press and hold OPEN/CLOSE 0 on the front panel, while pressing down the OPEN/CLOSE 0, press the numerical keypad "1" on the remote control. ➜ The blue Philips DVD background appears on the front panel to page 11 for proper connections. - To activate progressive scan, refer to "Progressive Scan" on moving...
User manual
Page 22
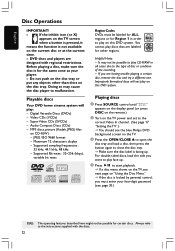
... a disc, then press the button again to malfunction. Playing discs 1 Press SOURCE control until "DISC" appears on the display panel (or press DISC on the remote.) 2 Turn on the TV power and set to the correct Video In channel. (See page 17 "Setting the TV".) ➜ You should see the blue... Philips DVD background screen on this DVD system. If you want to play on CD-R(W) - Always refer to the type of disc or condition of the ...
... a disc, then press the button again to malfunction. Playing discs 1 Press SOURCE control until "DISC" appears on the display panel (or press DISC on the remote.) 2 Turn on the TV power and set to the correct Video In channel. (See page 17 "Setting the TV".) ➜ You should see the blue... Philips DVD background screen on this DVD system. If you want to play on CD-R(W) - Always refer to the type of disc or condition of the ...
User manual
Page 23
...the power supply will increase the search speed. To select a playback feature or item G Use the 1 2 3 4 keys or numeric keypad (0-9) on the remote, then press OK to resume normal playback. ➜ While searching, pressing and holding S / T again will cancel the resume option. Always refer to the ...normal playback, press ÉÅ again. Helpful Hint: - For VCD, repeat playback is not possible if the PBC mode is switched on the remote. Opening the disc tray or disconnecting the DVD system from the last stopped point (DVD/VCD/CD) G When play mode G While playing a ...
...the power supply will increase the search speed. To select a playback feature or item G Use the 1 2 3 4 keys or numeric keypad (0-9) on the remote, then press OK to resume normal playback. ➜ While searching, pressing and holding S / T again will cancel the resume option. Always refer to the ...normal playback, press ÉÅ again. Helpful Hint: - For VCD, repeat playback is not possible if the PBC mode is switched on the remote. Opening the disc tray or disconnecting the DVD system from the last stopped point (DVD/VCD/CD) G When play mode G While playing a ...
User manual
Page 25
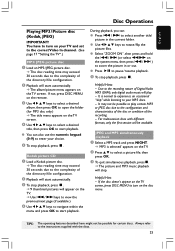
.... 2 Playback will be possible to play . - If not, press DISC MENU on the disc menu. It may exceed 30 seconds due to turn on the remote. 3 Use 1 2 3 4 keys to select a desired album, then press OK to open the folder (for certain discs.
.... 2 Playback will be possible to play . - If not, press DISC MENU on the disc menu. It may exceed 30 seconds due to turn on the remote. 3 Use 1 2 3 4 keys to select a desired album, then press OK to open the folder (for certain discs.
User manual
Page 26
...;. the playback will only apply to program".) the disc menu (if available) will appear across the top of the TV screen. 2 Use 1 2 3 4 keys on the remote to navigate in the menu. ➜ Press 1 2 to move within the enlarged picture on DVD only TITLE SEARCH (TITLE XX:YY") Select a Title for playback...
...;. the playback will only apply to program".) the disc menu (if available) will appear across the top of the TV screen. 2 Use 1 2 3 4 keys on the remote to navigate in the menu. ➜ Press 1 2 to move within the enlarged picture on DVD only TITLE SEARCH (TITLE XX:YY") Select a Title for playback...
User manual
Page 27
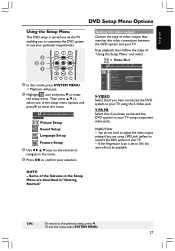
... Setup Menu This DVD setup is set to enter the menu. SETUP MENU Picture Setup Sound Setup Language Setup Feature Setup 3 Use 1 2 3 4 keys on the remote to navigate in the menu. 4 Press OK to enter the setup menu. You do not need to adjust the video output setting if you have...
... Setup Menu This DVD setup is set to enter the menu. SETUP MENU Picture Setup Sound Setup Language Setup Feature Setup 3 Use 1 2 3 4 keys on the remote to navigate in the menu. 4 Press OK to enter the setup menu. You do not need to adjust the video output setting if you have...
User manual
Page 29
... smart power will switch to enjoy the full dynamic of inactivity for energy saving. TIPS: To return to level out the volume. turning on the remote. It is disabled. Follow the steps of "Using the Setup Menu" and select : > NIGHT MODE NIGHT MODE OFF CNTR DELAY ON REAR DELAY TEST TONE...
... smart power will switch to enjoy the full dynamic of inactivity for energy saving. TIPS: To return to level out the volume. turning on the remote. It is disabled. Follow the steps of "Using the Setup Menu" and select : > NIGHT MODE NIGHT MODE OFF CNTR DELAY ON REAR DELAY TEST TONE...
User manual
Page 30
... and Video Output. Move to the previous menu, press 1. You will have a parental level assigned to the complete disc or to certain scenes on the remote to navigate in the menu. 2 Select icon and press 4. TIPS: 30 To return to {PARENTAL} and press 2. This feature lets you enter your children or...
... and Video Output. Move to the previous menu, press 1. You will have a parental level assigned to the complete disc or to certain scenes on the remote to navigate in the menu. 2 Select icon and press 4. TIPS: 30 To return to {PARENTAL} and press 2. This feature lets you enter your children or...
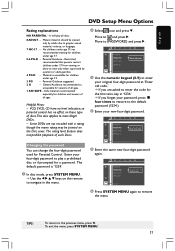
User manual
Page 31
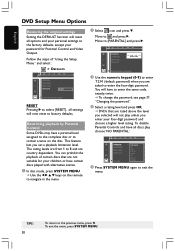
... PASSWORD 3 Use the numeric keypad (0-9) to enter your four-digit password to graphic sexual material, violence, or language. 7 NC-17 - should be printed on the remote to the default password (1234.) 4 Enter your new four-digit password. recommended as acceptable for viewers of all ages. 1 KID SAFE - Move to remove the...
... PASSWORD 3 Use the numeric keypad (0-9) to enter your four-digit password to graphic sexual material, violence, or language. 7 NC-17 - should be printed on the remote to the default password (1234.) 4 Enter your new four-digit password. recommended as acceptable for viewers of all ages. 1 KID SAFE - Move to remove the...
User manual
Page 32
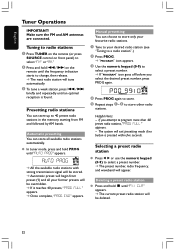
... tune a weak station, press S / T briefly and repeatedly until "AUTO PROG" appears. Tuning to radio stations 1 Press TUNER on the remote (or press SOURCE control on front panel) to 40 preset radio stations in the memory, starting from preset (1) and all available radio stations automatically.... Deleting a preset radio station G Press and hold S / T on the remote until the frequency indication starts to your former presets will be deleted. 32 Helpful Hints: - AUTO PROG ➜ All the available radio ...
... tune a weak station, press S / T briefly and repeatedly until "AUTO PROG" appears. Tuning to radio stations 1 Press TUNER on the remote (or press SOURCE control on front panel) to 40 preset radio stations in the memory, starting from preset (1) and all available radio stations automatically.... Deleting a preset radio station G Press and hold S / T on the remote until the frequency indication starts to your former presets will be deleted. 32 Helpful Hints: - AUTO PROG ➜ All the available radio ...
User manual
Page 34
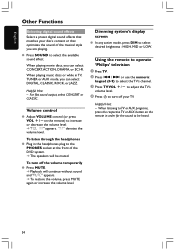
Using the remote to operate 'Philips' television 1 Press TV. 2 Press S / T or use the numeric keypad (0-9) to select... Playback will be heard. 34 When listening to TV or AUX programs, press the respective TV or AUX button on the remote) to increase or decrease the volume level. ➜ "VOL XX" appears. G Press SOUND to select the TV's ...the volume, press MUTE again or increase the volume level. Volume control G Adjust VOLUME control (or press VOL +/-on the remote in the headphones plug to select desired brightness : HIGH, MID or LOW. to adjust the TV's volume level. 4 ...
Using the remote to operate 'Philips' television 1 Press TV. 2 Press S / T or use the numeric keypad (0-9) to select... Playback will be heard. 34 When listening to TV or AUX programs, press the respective TV or AUX button on the remote) to increase or decrease the volume level. ➜ "VOL XX" appears. G Press SOUND to select the TV's ...the volume, press MUTE again or increase the volume level. Volume control G Adjust VOLUME control (or press VOL +/-on the remote in the headphones plug to select desired brightness : HIGH, MID or LOW. to adjust the TV's volume level. 4 ...


