User manual
Page 8
... 5 Trademark Information 6 FEATURES 10 Features 10 Version Info 11 Symbols Used in this User Manual 11 FUNCTIONAL OVERVIEW 12 Front Panel 12 Rear Panel 12 Remote Control 13 Display Panel 15 Guide to On-Screen Display 15 CONNECTIONS 16 Placing the Speakers 16 Connection to the TV 16 Connecting Speakers and... by Step Playback 28 Repeat Playback 28 Slide Show 29 PiP (BONUSVIEW™) Setting 29 Enjoying BD-Live™ Discs Using the Internet 29 LANGUAGE CODE LIST 54 SPECIFICATIONS 55 NETWORK SERVICE DISCLAIMER 56 ONE (1) YEAR LIMITED WARRANTY ....... 57 EN - 8
... 5 Trademark Information 6 FEATURES 10 Features 10 Version Info 11 Symbols Used in this User Manual 11 FUNCTIONAL OVERVIEW 12 Front Panel 12 Rear Panel 12 Remote Control 13 Display Panel 15 Guide to On-Screen Display 15 CONNECTIONS 16 Placing the Speakers 16 Connection to the TV 16 Connecting Speakers and... by Step Playback 28 Repeat Playback 28 Slide Show 29 PiP (BONUSVIEW™) Setting 29 Enjoying BD-Live™ Discs Using the Internet 29 LANGUAGE CODE LIST 54 SPECIFICATIONS 55 NETWORK SERVICE DISCLAIMER 56 ONE (1) YEAR LIMITED WARRANTY ....... 57 EN - 8
User manual
Page 43
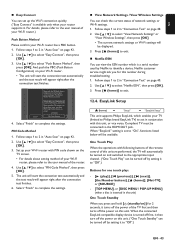
... a device. When the connected EasyLink compatible display device is set up your TV (limited to Philips brand EasyLink TV) to act in conjunction with following buttons of the remote control of this unit are performed, the TV will automatically be turned on and switched to the... the connection test automatically and the test result will appear right after the connection test finishes. 6. Use [ [OK]. ] to complete the settings. PIN Code Method 1. Use [ ] to select "View Network Settings" or "View Wireless Settings", then press [OK]. • The current network settings or Wi...
... a device. When the connected EasyLink compatible display device is set up your TV (limited to Philips brand EasyLink TV) to act in conjunction with following buttons of the remote control of this unit are performed, the TV will automatically be turned on and switched to the... the connection test automatically and the test result will appear right after the connection test finishes. 6. Use [ [OK]. ] to complete the settings. PIN Code Method 1. Use [ ] to select "View Network Settings" or "View Wireless Settings", then press [OK]. • The current network settings or Wi...

User manual
Page 49
...get "Direct" and "2.1ch DTS®, Dolby or PCM. Make sure that the TV speakers are turned on my HTS remote Most movies have selected the correct active source for HTS3306/F8 (Mexico) For DVD-RW/-R, make sure that the disc was recorded in the settings menu. No video signal on the... the TV. Ensure that the surround mode is already multi-channel. Make sure that the TV speakers are not muted. This unit supports following region codes. - The format of the disc. Make sure you disconnect the HDMI cable from a disc. 48 kHz. Make sure that your HDMI cable is not...
...get "Direct" and "2.1ch DTS®, Dolby or PCM. Make sure that the TV speakers are turned on my HTS remote Most movies have selected the correct active source for HTS3306/F8 (Mexico) For DVD-RW/-R, make sure that the disc was recorded in the settings menu. No video signal on the... the TV. Ensure that the surround mode is already multi-channel. Make sure that the TV speakers are not muted. This unit supports following region codes. - The format of the disc. Make sure you disconnect the HDMI cable from a disc. 48 kHz. Make sure that your HDMI cable is not...


