
Leaflet
Page 1
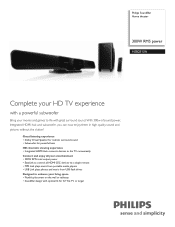
Great listening experience • Dolby Virtual Speaker for realistic surround sound • Subwoofer for 32" flat TV or larger Philips SoundBar Home theater 300W RMS power HSB2313A Complete your HD TV experience with a powerful subwoofer Bring your movies and games to enhance your entertainment • 300W RMS total output power • EasyLink ...
Great listening experience • Dolby Virtual Speaker for realistic surround sound • Subwoofer for 32" flat TV or larger Philips SoundBar Home theater 300W RMS power HSB2313A Complete your HD TV experience with a powerful subwoofer Bring your movies and games to enhance your entertainment • 300W RMS total output power • EasyLink ...
Leaflet
Page 2
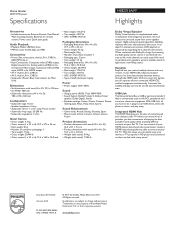
...TV programs in HD picture and sound and not have to deal with stand): 1.984 lb • Dolby Virtual Speaker Dolby Virtual Speaker is plug in your HDMI devices directly into true-to change without too many wires. DVD playback is conveniently used to...• UPC: 6 09585 19375 8 • Type of a button, you can connect all you the ease of Koninklijke Philips Electronics N.V. Home theater 300W RMS power Specifications HSB2313A/F7 Highlights Accessories • Included accessories: Remote Control, User Manual, Wall mounting bracket, Batteries for remote control, Power cord, ...
...TV programs in HD picture and sound and not have to deal with stand): 1.984 lb • Dolby Virtual Speaker Dolby Virtual Speaker is plug in your HDMI devices directly into true-to change without too many wires. DVD playback is conveniently used to...• UPC: 6 09585 19375 8 • Type of a button, you can connect all you the ease of Koninklijke Philips Electronics N.V. Home theater 300W RMS power Specifications HSB2313A/F7 Highlights Accessories • Included accessories: Remote Control, User Manual, Wall mounting bracket, Batteries for remote control, Power cord, ...
User manual
Page 3
... 3 Wall mounting 18 3 4 3 Your home theater system 4 Introduction 4 What's in the box 4 Overview of the main unit 5 Overview of the remote control 6 4 Get started 8 Attach speakers to the main unit 8 Attach the stand 8 Connect AV devices 9 Connect power 12 Prepare the remote control 12 Turn on 13 Set clock 13 Enable...
... 3 Wall mounting 18 3 4 3 Your home theater system 4 Introduction 4 What's in the box 4 Overview of the main unit 5 Overview of the remote control 6 4 Get started 8 Attach speakers to the main unit 8 Attach the stand 8 Connect AV devices 9 Connect power 12 Prepare the remote control 12 Turn on 13 Set clock 13 Enable...
User manual
Page 6
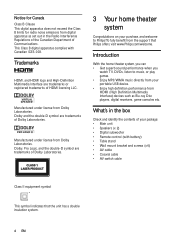
...-D symbol are trademarks of Dolby Laboratories. CLASS 1 LASER PRODUCT 3 Your home theater system Congratulations on your package: • Main unit • Speakers (x 2) • Digital subwoofer • Remote control (with Canadian ICES-003. Introduction With the home theater system, you can • Get ...and identify the contents of Communications. What's in the Radio Interference Regulations of the Canadian Department of your purchase, and welcome to Philips! Dolby, Pro Logic, and the double-D symbol are trademarks of HDMI licensing LLC. Trademarks HDMI, and HDMI logo and High...
...-D symbol are trademarks of Dolby Laboratories. CLASS 1 LASER PRODUCT 3 Your home theater system Congratulations on your package: • Main unit • Speakers (x 2) • Digital subwoofer • Remote control (with Canadian ICES-003. Introduction With the home theater system, you can • Get ...and identify the contents of Communications. What's in the Radio Interference Regulations of the Canadian Department of your purchase, and welcome to Philips! Dolby, Pro Logic, and the double-D symbol are trademarks of HDMI licensing LLC. Trademarks HDMI, and HDMI logo and High...
User manual
Page 7
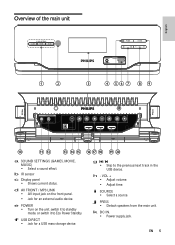
f USB DIRECT • Jack for an external audio device. h - i SOURCE • Select a source. j PRESS • Detach speakers from the main unit. EN 5 g / • Skip to Eco Power Standby. e POWER • Turn on the front panel. • Jack for a USB mass storage device. k ...
f USB DIRECT • Jack for an external audio device. h - i SOURCE • Select a source. j PRESS • Detach speakers from the main unit. EN 5 g / • Skip to Eco Power Standby. e POWER • Turn on the front panel. • Jack for a USB mass storage device. k ...
User manual
Page 10
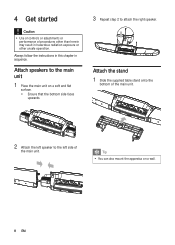
...apparatus on a soft and flat surface. • Ensure that the bottom side faces upwards. 3 Repeat step 2 to attach the right speaker. Attach speakers to the left side of procedures other unsafe operation. Attach the stand 1 Slide the supplied table stand onto the bottom of the main unit.... 2 Attach the left speaker to the main unit 1 Place the main unit on a wall. 8 EN Always follow the instructions in this chapter in hazardous radiation exposure...
...apparatus on a soft and flat surface. • Ensure that the bottom side faces upwards. 3 Repeat step 2 to attach the right speaker. Attach speakers to the left side of procedures other unsafe operation. Attach the stand 1 Slide the supplied table stand onto the bottom of the main unit.... 2 Attach the left speaker to the main unit 1 Place the main unit on a wall. 8 EN Always follow the instructions in this chapter in hazardous radiation exposure...
User manual
Page 18
8 Product information Note • Product information is subject to change without prior notice. Product information General information AC power Operation Power Consumption Standby Power Consumption Eco Standby Power Consumption USB Direct Dimensions (W x H x D) Main unit and speakers Subwoofer Weight With Packing Main unit and speakers Subwoofer 120 V~, 60 Hz 70W
8 Product information Note • Product information is subject to change without prior notice. Product information General information AC power Operation Power Consumption Standby Power Consumption Eco Standby Power Consumption USB Direct Dimensions (W x H x D) Main unit and speakers Subwoofer Weight With Packing Main unit and speakers Subwoofer 120 V~, 60 Hz 70W
User manual
Page 19
..., never try to the system correctly. 9 Troubleshooting Warning • Risk of the product. If you have a problem, visit www.philips.com/ welcome. No sound • Adjust the volume. • Check that the speakers are not supported. This phenomenon is not a malfunction. • The formats of the main unit is faulty. Try another...
..., never try to the system correctly. 9 Troubleshooting Warning • Risk of the product. If you have a problem, visit www.philips.com/ welcome. No sound • Adjust the volume. • Check that the speakers are not supported. This phenomenon is not a malfunction. • The formats of the main unit is faulty. Try another...

User manual
Page 20
... • To find a suitable mounting location, make the necessary physical and wireless connections. • Mount the main unit and speakers to a solid concrete wall or plaster board wall only! What's in the chosen location on a wall. 10 Appendix Wall mounting Caution • Risk ... damage! Always consult professional personnel to safely mount the product to mark the drilling positions. 1 x wall mount bracket for the main unit and speakers 2 Drill holes as gas, water or electricity are harmed when you 'll need • Electric drill • Screwdriver • Pencil 18 EN
... • To find a suitable mounting location, make the necessary physical and wireless connections. • Mount the main unit and speakers to a solid concrete wall or plaster board wall only! What's in the chosen location on a wall. 10 Appendix Wall mounting Caution • Risk ... damage! Always consult professional personnel to safely mount the product to mark the drilling positions. 1 x wall mount bracket for the main unit and speakers 2 Drill holes as gas, water or electricity are harmed when you 'll need • Electric drill • Screwdriver • Pencil 18 EN
User manual
Page 21
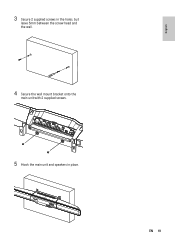
3 Secure 2 supplied screws in the holes, but leave 5mm between the screw head and the wall. 4 Secure the wall mount bracket onto the main unit with 2 supplied screws. 5 Hook the main unit and speakers in place. EN 19 English
3 Secure 2 supplied screws in the holes, but leave 5mm between the screw head and the wall. 4 Secure the wall mount bracket onto the main unit with 2 supplied screws. 5 Hook the main unit and speakers in place. EN 19 English
Quick start guide
Page 1
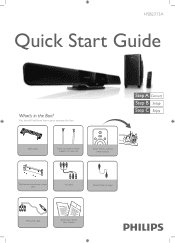
Table stand Studs (x2) used to attach speakers to main unit Smart remote control (with battery) Wall mount bracket and screws (x4) AV cable Coaxial cable (orange) AV switch cable Quick Start Guide User Manual You should find these items upon opening the box. HSB2313A Quick Start Guide What's in the Box?
Table stand Studs (x2) used to attach speakers to main unit Smart remote control (with battery) Wall mount bracket and screws (x4) AV cable Coaxial cable (orange) AV switch cable Quick Start Guide User Manual You should find these items upon opening the box. HSB2313A Quick Start Guide What's in the Box?
Quick start guide
Page 2
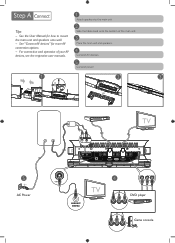
Tips - See "Connect AV devices" for how to the main unit. 2 Slide the table stand onto the bottom of the main unit. 3 Place the main unit and speakers. 4 Connect AV devices 5 Connect power. 1 2 3 5 AC Power TV OPTICAL HDMI IN 1 HDMI IN 2 HDMI OUT TV AUDIO OUT (DIGITAL) 4 AUDIO OUT L AUDIO R VIDEO DVD player AUDIO OUT L AUDIO R VIDEO Game console For connection and operation of your AV devices, see the respective user manuals. 1 Attach speakers to mount the main unit and speakers onto wall. - See the User Manual for more AV connection options. -
Tips - See "Connect AV devices" for how to the main unit. 2 Slide the table stand onto the bottom of the main unit. 3 Place the main unit and speakers. 4 Connect AV devices 5 Connect power. 1 2 3 5 AC Power TV OPTICAL HDMI IN 1 HDMI IN 2 HDMI OUT TV AUDIO OUT (DIGITAL) 4 AUDIO OUT L AUDIO R VIDEO DVD player AUDIO OUT L AUDIO R VIDEO Game console For connection and operation of your AV devices, see the respective user manuals. 1 Attach speakers to mount the main unit and speakers onto wall. - See the User Manual for more AV connection options. -


