
Leaflet
Page 2
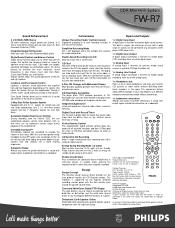
... Mini Hi-Fi System FW-R7 Sound Enhancement 2 x 50 Watts RMS Stereo 50 watts continuous output power per channel, at 6 Ohms, from 30 Hz-20 kHz, with no unpleasant volume jumps during playback of the recorded CD. With the usual two-speaker setup, Incredible Surround™ widens the soundstage farther to a subwoofer. Loudness and Pure Sound Control Loudness is foreseen to a subwoofer. CD players, DVD players, DAT players etc.). 1 x Digital Coax Output A digital output connection is dynamic sound adjustment that amplifies...
... Mini Hi-Fi System FW-R7 Sound Enhancement 2 x 50 Watts RMS Stereo 50 watts continuous output power per channel, at 6 Ohms, from 30 Hz-20 kHz, with no unpleasant volume jumps during playback of the recorded CD. With the usual two-speaker setup, Incredible Surround™ widens the soundstage farther to a subwoofer. Loudness and Pure Sound Control Loudness is foreseen to a subwoofer. CD players, DVD players, DAT players etc.). 1 x Digital Coax Output A digital output connection is dynamic sound adjustment that amplifies...

User manual
Page 2
... Card serves as the owner of your purchase, and welcome to get the most comprehensive warranties and outstanding service networks in Philips.You've selected one of your Philips warranty. NO USER-SERVICEABLE PARTS INSIDE. sThe "exclamation point" calls attention to features for which you can count on your model. Warranty Verification Registering your product within your total satisfaction...
... Card serves as the owner of your purchase, and welcome to get the most comprehensive warranties and outstanding service networks in Philips.You've selected one of your Philips warranty. NO USER-SERVICEABLE PARTS INSIDE. sThe "exclamation point" calls attention to features for which you can count on your model. Warranty Verification Registering your product within your total satisfaction...

User manual
Page 6
... playback 7 CD(RW) handling 7 Controls and connections 8-9 Installation Power...10 Speaker connections 10 Antenna connections 10 Analog audio connections 11 Digital audio connections 11 Connecting a subwoofer 11 Remote control Remote control buttons 12 Remote control batteries 12 Display ...13 Basic functions Switching on, switching to standby 14 Loading the CD changer, CD recorder 14 Playing a CD(RW 14 Sound control 15 Demo mode 15 Selecting a disc on the CD changer 16 Selecting a track and searching 16 SHUFFLE and REPEAT 16 CD text...16 Program Programming track numbers 17...
... playback 7 CD(RW) handling 7 Controls and connections 8-9 Installation Power...10 Speaker connections 10 Antenna connections 10 Analog audio connections 11 Digital audio connections 11 Connecting a subwoofer 11 Remote control Remote control buttons 12 Remote control batteries 12 Display ...13 Basic functions Switching on, switching to standby 14 Loading the CD changer, CD recorder 14 Playing a CD(RW 14 Sound control 15 Demo mode 15 Selecting a disc on the CD changer 16 Selecting a track and searching 16 SHUFFLE and REPEAT 16 CD text...16 Program Programming track numbers 17...
User manual
Page 7
... this CD changer and CD recorder you can only be recorded once and will not work properly! In some countries, the use . Discs for recording For recording, make sure to use of Philips audio CDR and audio CDRW discs only. Do not try to play on a CD or attach a sticker to it. CD(RW) handling If the CDR Mini Hi-Fi system fails to read discs correctly, use a computer...
... this CD changer and CD recorder you can only be recorded once and will not work properly! In some countries, the use . Discs for recording For recording, make sure to use of Philips audio CDR and audio CDRW discs only. Do not try to play on a CD or attach a sticker to it. CD(RW) handling If the CDR Mini Hi-Fi system fails to read discs correctly, use a computer...
User manual
Page 8
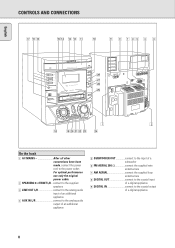
... L/R connect to the analog audio input of an additional appliance 4 AUX IN L/R connect to the analog audio output of an additional appliance 5 SUBWOOFER OUT connect to the input of a subwoofer 6 FM AERIAL 300 connect the supplied wire antenna here 7 AM AERIAL connect the supplied loop antenna here 8 DIGITAL OUT connect to the coaxial input of a digital appliance 9 DIGITAL IN connect to the power outlet. DSC English CONTROLS AND CONNECTIONS & 0^ %$ # @ ! 0 9 8 7 65 4 3 CD CHANGE OPEN/CLOSE STANDBY ON CD 1 CD 2 CD 3 DISPLAY CDR CD REWRITABLE COMPATIBLE • 3 CD CHANGER R7...
... L/R connect to the analog audio input of an additional appliance 4 AUX IN L/R connect to the analog audio output of an additional appliance 5 SUBWOOFER OUT connect to the input of a subwoofer 6 FM AERIAL 300 connect the supplied wire antenna here 7 AM AERIAL connect the supplied loop antenna here 8 DIGITAL OUT connect to the coaxial input of a digital appliance 9 DIGITAL IN connect to the power outlet. DSC English CONTROLS AND CONNECTIONS & 0^ %$ # @ ! 0 9 8 7 65 4 3 CD CHANGE OPEN/CLOSE STANDBY ON CD 1 CD 2 CD 3 DISPLAY CDR CD REWRITABLE COMPATIBLE • 3 CD CHANGER R7...
User manual
Page 9
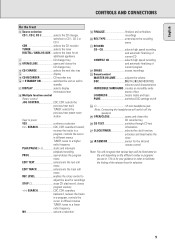
... rotary control to adjust the level for recordings STOP stops CD play/record, closes program memory ! English CONTROLS AND CONNECTIONS On the front 0 Source selection CD 1, CD 2, CD 3 selects the CD changer, switches to CD 1, CD 2 or CD 3 CDR selects the CD recorder TUNER selects the tuner DIGITAL / ANALOG AUX ....selects the input for an additional appliance CD changer tray @ OPEN/CLOSE opens and closes the CD changer tray # CD CHANGE selects the next disc tray display % CD RECORDER CD recorder tray ^ y STANDBY ON switches the unit on the different modes or programs...
... rotary control to adjust the level for recordings STOP stops CD play/record, closes program memory ! English CONTROLS AND CONNECTIONS On the front 0 Source selection CD 1, CD 2, CD 3 selects the CD changer, switches to CD 1, CD 2 or CD 3 CDR selects the CD recorder TUNER selects the tuner DIGITAL / ANALOG AUX ....selects the input for an additional appliance CD changer tray @ OPEN/CLOSE opens and closes the CD changer tray # CD CHANGE selects the next disc tray display % CD RECORDER CD recorder tray ^ y STANDBY ON switches the unit on the different modes or programs...

User manual
Page 10
... the power completely, remove the power cable from a TV, VCR or other radiation sources. 3 Turn the antenna for optimum reception. 1 Connect the colored (or marked) wire to the red terminal and the black (or unmarked) wire to the black terminal. 2 Connect: - AM AERIAL FM antenna The supplied wire antenna can only be used to the following two conditions: 1. Left speaker to the power outlet. This device must accept any interference received...
... the power completely, remove the power cable from a TV, VCR or other radiation sources. 3 Turn the antenna for optimum reception. 1 Connect the colored (or marked) wire to the red terminal and the black (or unmarked) wire to the black terminal. 2 Connect: - AM AERIAL FM antenna The supplied wire antenna can only be used to the following two conditions: 1. Left speaker to the power outlet. This device must accept any interference received...

User manual
Page 11
... to connect a turntable directly to the amplifier. CD recorder. • Use a coaxial cable to select the analog input for the appliance. yAUX Analog is displayed. 3 Operate your appliance as usual. 4 Operate your appliance as usual and adjust volume and sound with the subwoofer. 11 amplifier or tape recorder. • Use a cinch cable to connect the analog audio inputs of the additional appliance. 3 Press DIGITAL / ANALOG AUX repeatedly to connect the coaxial input of the subwoofer with SUBWOOFER...
... to connect a turntable directly to the amplifier. CD recorder. • Use a coaxial cable to select the analog input for the appliance. yAUX Analog is displayed. 3 Operate your appliance as usual. 4 Operate your appliance as usual and adjust volume and sound with the subwoofer. 11 amplifier or tape recorder. • Use a cinch cable to connect the analog audio inputs of the additional appliance. 3 Press DIGITAL / ANALOG AUX repeatedly to connect the coaxial input of the subwoofer with SUBWOOFER...

User manual
Page 12
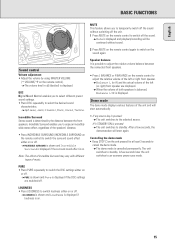
... the program TRACK INCR selects automatic or manual increment of a track TIMER ON/OFF ........activates and deactivates the timer SLEEP activates the sleep timer MUTE mutes the sound BRIGHTNESS...........controls the brightness of the display L BALANCE adjusts the volume balance to the left speaker R BALANCE adjusts the volume balance to the right speaker LOUDNESS boosts treble and bass INCREDIBLE SURROUND creates an incredibly wide stereo effect PURE switches DSC settings on...
... the program TRACK INCR selects automatic or manual increment of a track TIMER ON/OFF ........activates and deactivates the timer SLEEP activates the sleep timer MUTE mutes the sound BRIGHTNESS...........controls the brightness of the display L BALANCE adjusts the volume balance to the left speaker R BALANCE adjusts the volume balance to the right speaker LOUDNESS boosts treble and bass INCREDIBLE SURROUND creates an incredibly wide stereo effect PURE switches DSC settings on...
User manual
Page 13
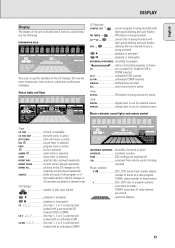
... 17 18 19 This area is used for external source Music calendar, sound lights and remote control PRESET STEP TOTAL TRACK TIME TOTAL REM REC TRACK TIME CD CHANGER CD R W CD TEXT EDIT TRACK REC PROG ALARM SLEEP REPEAT SHUFFLE DISC TRACK ALL AM PM CD RECORDER COMPILE CDC FM TUNER CD CD AUX CD R W START RECORDING IN PROGRESS FINALIZE ALC FINISH TUNER STEREO NEWS TA EON INCREDIBLE SURROUND AUX LOUDNESS DIGITAL ANALOG PURE 20 + 1 2 3 4 5 6 7 8 9 10 11 12...
... 17 18 19 This area is used for external source Music calendar, sound lights and remote control PRESET STEP TOTAL TRACK TIME TOTAL REM REC TRACK TIME CD CHANGER CD R W CD TEXT EDIT TRACK REC PROG ALARM SLEEP REPEAT SHUFFLE DISC TRACK ALL AM PM CD RECORDER COMPILE CDC FM TUNER CD CD AUX CD R W START RECORDING IN PROGRESS FINALIZE ALC FINISH TUNER STEREO NEWS TA EON INCREDIBLE SURROUND AUX LOUDNESS DIGITAL ANALOG PURE 20 + 1 2 3 4 5 6 7 8 9 10 11 12...
User manual
Page 14
..., repeatedly press DISPLAY on the unit: yTotal number of tracks, total playing time of current track 2 Press STOP & (Çon the unit again to open the CD changer tray. CD recorder: Press OPEN/CLOSE on the remote control) to standby press y STANDBY ON again on the unit (2 on the remote control). CD RECORDABLE MINI HIFI SYSTEM CD-TEXT EDITING CD RECORDER DIGITAL / ANALOG AUX TUNER iR SENSOR CD TEXT CLOCK/TIMER OPEN/CLOSE JOG CONTROL YES RECORD CD CD MASTER VOLUME PURE NO...
..., repeatedly press DISPLAY on the unit: yTotal number of tracks, total playing time of current track 2 Press STOP & (Çon the unit again to open the CD changer tray. CD recorder: Press OPEN/CLOSE on the remote control) to standby press y STANDBY ON again on the unit (2 on the remote control). CD RECORDABLE MINI HIFI SYSTEM CD-TEXT EDITING CD RECORDER DIGITAL / ANALOG AUX TUNER iR SENSOR CD TEXT CLOCK/TIMER OPEN/CLOSE JOG CONTROL YES RECORD CD CD MASTER VOLUME PURE NO...
User manual
Page 15
... remote control). MUTE This feature allows you to select different preset sound settings. • Press DSC repeatedly to switch off the sound. yWhen the volume of music. If y STANDBY ON is displayed if the DSC settings are displayed. A few seconds, the demonstration will start again. yLOUDNESS is shown and Loudness is displayed if loudness is determined by using MASTER VOLUME (-VOLUME/+on or off . Incredible Surround Stereo sound is on . Demo mode The demo mode displays...
... remote control). MUTE This feature allows you to select different preset sound settings. • Press DSC repeatedly to switch off the sound. yWhen the volume of music. If y STANDBY ON is displayed if the DSC settings are displayed. A few seconds, the demonstration will start again. yLOUDNESS is shown and Loudness is displayed if loudness is determined by using MASTER VOLUME (-VOLUME/+on or off . Incredible Surround Stereo sound is on . Demo mode The demo mode displays...
User manual
Page 18
... recorded, or - play a recorded CDRW on a standard CD player or - Auto Level Control (ALC) Auto Level Control ensures that case, recording of 99 tracks on it. COMPILE CD is displayed and you 3 main functions: - making recordings from the CD changer is the same for the volume level of recording time left to analog recording. Erasing a CDRW disc The recording procedure is being used for bit" recording...
... recorded, or - play a recorded CDRW on a standard CD player or - Auto Level Control (ALC) Auto Level Control ensures that case, recording of 99 tracks on it. COMPILE CD is displayed and you 3 main functions: - making recordings from the CD changer is the same for the volume level of recording time left to analog recording. Erasing a CDRW disc The recording procedure is being used for bit" recording...
User manual
Page 20
... recording time remaining starts to select one of the following high speed recording modes: If a disc from the CD changer is absolutely free of "High speed recording". • To stop recording, press STOP & on the unit. CD RECORDABLE MINI HIFI SYSTEM CD-TEXT EDITING CD RECORDER DIGITAL / ANALOG AUX TUNER iR SENSOR CD TEXT CLOCK/TIME OPEN/CLOSE JOG CONTROL YES RECORD CD CD MASTER VOLUME PURE NO PROG SEARCH STOP REC LEVEL SEARCH PLAY...
... recording time remaining starts to select one of the following high speed recording modes: If a disc from the CD changer is absolutely free of "High speed recording". • To stop recording, press STOP & on the unit. CD RECORDABLE MINI HIFI SYSTEM CD-TEXT EDITING CD RECORDER DIGITAL / ANALOG AUX TUNER iR SENSOR CD TEXT CLOCK/TIME OPEN/CLOSE JOG CONTROL YES RECORD CD CD MASTER VOLUME PURE NO PROG SEARCH STOP REC LEVEL SEARCH PLAY...
User manual
Page 22
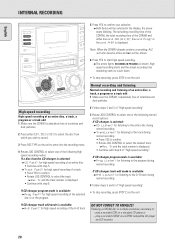
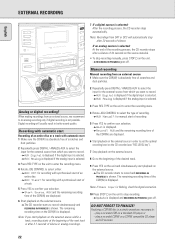
... EXTERNAL RECORDING STANDBY ON CD 1 CD 2 CD 3 DISPLAY CDR R7 FW- CD RECORDABLE MINI HIFI SYSTEM CD-TEXT EDITING CD RECORDER DIGITAL / ANALOG AUX TUNER iR SENSOR CD TEXT CLOCK/TIME OPEN/CLOSE JOG CONTROL YES RECORD CD CD MASTER VOLUME PURE NO PROG SEARCH STOP REC LEVEL SEARCH PLAY/ PAUSE COMPILE CD EDIT TRACK TEXT REC TYPE FINALIZE ERASE LOUDNESS INCREDIBLE URR OUND 7 If a digital source is selected. Manual recording Manual recording from an external source 1 Make sure the...
... EXTERNAL RECORDING STANDBY ON CD 1 CD 2 CD 3 DISPLAY CDR R7 FW- CD RECORDABLE MINI HIFI SYSTEM CD-TEXT EDITING CD RECORDER DIGITAL / ANALOG AUX TUNER iR SENSOR CD TEXT CLOCK/TIME OPEN/CLOSE JOG CONTROL YES RECORD CD CD MASTER VOLUME PURE NO PROG SEARCH STOP REC LEVEL SEARCH PLAY/ PAUSE COMPILE CD EDIT TRACK TEXT REC TYPE FINALIZE ERASE LOUDNESS INCREDIBLE URR OUND 7 If a digital source is selected. Manual recording Manual recording from an external source 1 Make sure the...

User manual
Page 27
.... SEARCH or ⁄ SEARCH (à or á on the remote control) as often as necessary for less than 2 seconds. yTuner is displayed, PROG and the current preset number in the music calendar start blinking. yPROG and the current preset number in the music calendar start flashing. 3 Press ! yAutoprogram is scrolled. 2 Press TUNER again to select the tuner. English TUNER CD CHANGE OPEN/CLOSE STANDBY ON CD 1 CD 2 CD 3 DISPLAY CDR CD REWRITABLE COMPATIBLE • 3 CD CHANGER R7 FW-
.... SEARCH or ⁄ SEARCH (à or á on the remote control) as often as necessary for less than 2 seconds. yTuner is displayed, PROG and the current preset number in the music calendar start blinking. yPROG and the current preset number in the music calendar start flashing. 3 Press ! yAutoprogram is scrolled. 2 Press TUNER again to select the tuner. English TUNER CD CHANGE OPEN/CLOSE STANDBY ON CD 1 CD 2 CD 3 DISPLAY CDR CD REWRITABLE COMPATIBLE • 3 CD CHANGER R7 FW-
User manual
Page 28
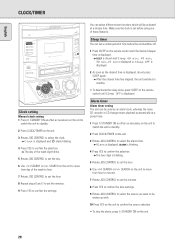
CD RECORDABLE MINI HIFI SYSTEM CD-TEXT EDITING CD RECORDER DIGITAL / ANALOG AUX TUNER iR SENSOR CD TEXT CLOCK/TIMER OPEN/CLOSE JOG CONTROL YES RECORD CD CD MASTER VOLUME PURE NO PROG SEARCH STOP REC LEVEL SEARCH PLAY/ PAUSE COMPILE CD EDIT TRACK TEXT REC TYPE FINALIZE ERASE LOUDNESS INCREDIBLE SURR OUND Clock setting Manual clock setting 1 Press y STANDBY ON as often as an alarm clock, whereby the tuner, CD recorder or CD changer starts playback automatically at a chosen time. You can select...
CD RECORDABLE MINI HIFI SYSTEM CD-TEXT EDITING CD RECORDER DIGITAL / ANALOG AUX TUNER iR SENSOR CD TEXT CLOCK/TIMER OPEN/CLOSE JOG CONTROL YES RECORD CD CD MASTER VOLUME PURE NO PROG SEARCH STOP REC LEVEL SEARCH PLAY/ PAUSE COMPILE CD EDIT TRACK TEXT REC TYPE FINALIZE ERASE LOUDNESS INCREDIBLE SURR OUND Clock setting Manual clock setting 1 Press y STANDBY ON as often as an alarm clock, whereby the tuner, CD recorder or CD changer starts playback automatically at a chosen time. You can select...

User manual
Page 29
... timer is shown and X starts blinking. 3 Press YES on . Subject to select the record timer. Weight 4.6 kg/each move, always rotate JOG CONTROL to do recordings automatically from an external source or from a preset radio station at 25° C) Output power 2.5 mW (Read), 35 mW (Write) Beam divergence 60 degree Tuner Wave range FM 87.5-108.0 MHz AM 530-1,700 kHz Speakers System 3 way bass...
... timer is shown and X starts blinking. 3 Press YES on . Subject to select the record timer. Weight 4.6 kg/each move, always rotate JOG CONTROL to do recordings automatically from an external source or from a preset radio station at 25° C) Output power 2.5 mW (Read), 35 mW (Write) Beam divergence 60 degree Tuner Wave range FM 87.5-108.0 MHz AM 530-1,700 kHz Speakers System 3 way bass...
User manual
Page 30
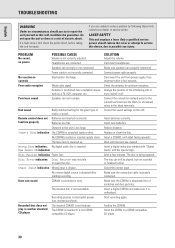
... inserted. Connect the colored (or marked) wires to the colored terminals and the black (or unmarked) wires to controls Poor radio reception Poor bass sound POSSIBLE CAUSE Volume is too large. Wrong Disc indication, No digital audio disc is scratched or dirty. The CDRW is absolutely free of music or sound. Bad sound Badly matched setting for the given type of scratches and dust particles. English TROUBLESHOOTING WARNING...
... inserted. Connect the colored (or marked) wires to the colored terminals and the black (or unmarked) wires to controls Poor radio reception Poor bass sound POSSIBLE CAUSE Volume is too large. Wrong Disc indication, No digital audio disc is scratched or dirty. The CDRW is absolutely free of music or sound. Bad sound Badly matched setting for the given type of scratches and dust particles. English TROUBLESHOOTING WARNING...
User manual
Page 31
... WARRANTY AUDIO SYSTEM One Year Free Labor One Year Free Service on the product below. Warranty coverage begins the day you a service call. Centers may have proof of purchase to you pay for the replacement or repair of purchase. It will be easier for all replaced and repaired parts also expires. MODEL SERIAL MAKE SURE YOU KEEP... Please record the model and serial numbers found on Parts This product must have...
... WARRANTY AUDIO SYSTEM One Year Free Labor One Year Free Service on the product below. Warranty coverage begins the day you a service call. Centers may have proof of purchase to you pay for the replacement or repair of purchase. It will be easier for all replaced and repaired parts also expires. MODEL SERIAL MAKE SURE YOU KEEP... Please record the model and serial numbers found on Parts This product must have...


