Leaflet
Page 2
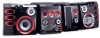
... powerful Amplifier and Speakers on the Philips Audio System. Mini Hi-Fi System with 5 CD Tray Changer standard product information FW C579 game port • Front game port connection • Game volume control • 3 game sound modes (speed, punch & blast) • MIX-IT USB PC link • Bundled MusicMatch Jukebox software • Track info display • Navigate via set remote control for Play, Pause, Stop, Next and Previous track disc player • 5 CD Changer • Plays CD, CD-R and CD-RW discs • 40 tracks CD random program • Play modes...
... powerful Amplifier and Speakers on the Philips Audio System. Mini Hi-Fi System with 5 CD Tray Changer standard product information FW C579 game port • Front game port connection • Game volume control • 3 game sound modes (speed, punch & blast) • MIX-IT USB PC link • Bundled MusicMatch Jukebox software • Track info display • Navigate via set remote control for Play, Pause, Stop, Next and Previous track disc player • 5 CD Changer • Plays CD, CD-R and CD-RW discs • 40 tracks CD random program • Play modes...
User manual
Page 2
... With FCC Standards This system complies with the FCC rules, Part 15 and with 21 CFR 1040.10. Invisible laser radiation when open. Philips Consumer Electronics North America P.O.Box 14810 Knoxville,TN 37914-1810 Phone no sean los aquí descritos puede ocasionar peligro de exposición a radiación. CAUTION Use of controls or adjustments or performance of...
... With FCC Standards This system complies with the FCC rules, Part 15 and with 21 CFR 1040.10. Invisible laser radiation when open. Philips Consumer Electronics North America P.O.Box 14810 Knoxville,TN 37914-1810 Phone no sean los aquí descritos puede ocasionar peligro de exposición a radiación. CAUTION Use of controls or adjustments or performance of...
User manual
Page 3
... RBO DIM CLOCK •TIMER PROG CD / CD-R / CD-RW COMPATIBLE IRSENSOR RIG H T CH AN N EL OVERD RIVE CRU ISE TU RBO EV•PRESET NEXT•PRESET CD TUNER USB PC LINK GAME•AUX MASTER VOLUME DBB DSC VAC STOP • DEMO STOP PR PLAY • PAUSE SEARCH• TUNING MAX SOUND MIX-IT VOLUM E GAM E GAMESOUND SPEED PUNCH BLAST MODE MAX SOUND• DIGITAL SOUND CONTROL VIRTUAL AMBIENCE CONTROL • DYNAMIC BASS BOOST...
... RBO DIM CLOCK •TIMER PROG CD / CD-R / CD-RW COMPATIBLE IRSENSOR RIG H T CH AN N EL OVERD RIVE CRU ISE TU RBO EV•PRESET NEXT•PRESET CD TUNER USB PC LINK GAME•AUX MASTER VOLUME DBB DSC VAC STOP • DEMO STOP PR PLAY • PAUSE SEARCH• TUNING MAX SOUND MIX-IT VOLUM E GAM E GAMESOUND SPEED PUNCH BLAST MODE MAX SOUND• DIGITAL SOUND CONTROL VIRTUAL AMBIENCE CONTROL • DYNAMIC BASS BOOST...
User manual
Page 4
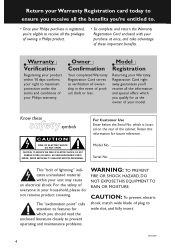
... of your Philips warranty. For Customer Use Enter below the Serial No. sThe "exclamation point" calls attention to features for future reference. Owner Confirmation Your completed Warranty Registration Card serves as the owner of your model. REFER SERVICING TO QUALIFIED SERVICE PERSONNEL. CAUTION: To prevent electric shock, match wide blade of everyone in the event of product theft or...
... of your Philips warranty. For Customer Use Enter below the Serial No. sThe "exclamation point" calls attention to features for future reference. Owner Confirmation Your completed Warranty Registration Card serves as the owner of your model. REFER SERVICING TO QUALIFIED SERVICE PERSONNEL. CAUTION: To prevent electric shock, match wide blade of everyone in the event of product theft or...

User manual
Page 8
... Dimming system's display screen 19 Volume control 19 Sound control 19 MAX sound 19 Digital Sound Control 19 Virtual Ambience Control 19 Dynamic Bass Boost 19 Disc Operations Playable discs 20 Loading discs 20 Basic playback controls 20-21 Repeat and Shuffle 21 Repeat play 21 Random play 21 Programming the disc tracks 21 Checking the program 22 Playing a disc without clearing the program 22 Clearing the program 22 Tuner Operations Tuning to radio stations 23 Presetting radio stations 23 Using the Plug and Play 23 Automatic presetting 23 Manual presetting...
... Dimming system's display screen 19 Volume control 19 Sound control 19 MAX sound 19 Digital Sound Control 19 Virtual Ambience Control 19 Dynamic Bass Boost 19 Disc Operations Playable discs 20 Loading discs 20 Basic playback controls 20-21 Repeat and Shuffle 21 Repeat play 21 Random play 21 Programming the disc tracks 21 Checking the program 22 Playing a disc without clearing the program 22 Clearing the program 22 Tuner Operations Tuning to radio stations 23 Presetting radio stations 23 Using the Plug and Play 23 Automatic presetting 23 Manual presetting...
User manual
Page 9
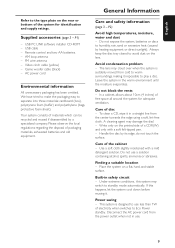
... AC power cord from the power outlet when not in a straight line from cold to warm surroundings, making it impossible to standby mode automatically. USB PC LINK software installer CD-ROM - General Information Care and safety information (page 3 - Do not expose the system, batteries or discs to ...Handle the disc by a specialized company. Do not use . 9 English Refer to the type plate on the rear or bottom of the system for adequate ventilation. P1) - Game woofer cable (black) - Your system consists of free space all around the system for identification and supply ratings. In...
... AC power cord from the power outlet when not in a straight line from cold to warm surroundings, making it impossible to standby mode automatically. USB PC LINK software installer CD-ROM - General Information Care and safety information (page 3 - Do not expose the system, batteries or discs to ...Handle the disc by a specialized company. Do not use . 9 English Refer to the type plate on the rear or bottom of the system for adequate ventilation. P1) - Game woofer cable (black) - Your system consists of free space all around the system for identification and supply ratings. In...
User manual
Page 10
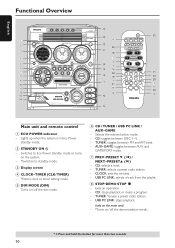
... a track. - Exits an operation. - TUNER: *erases a preset radio station. - Switches to standby mode. 3 Display screen 4 CLOCK• TIMER (CLK/TIMER) - *Enters clock or timer setting mode. 5 DIM MODE (DIM) - Selects the relevant active mode. - CD: toggles between FM and AM band. - CD: stops playback or clears a program. - USB PC LINK: stops playback. (only on the main unit) - *Turns on the system. - *Switches to Eco Power standby mode or turns on /off the dim mode. 6 CD / TUNER / USB PC LINK / AUX • GAME - TUNER: toggles between DISC 1~5. - Turns on/ off the...
... a track. - Exits an operation. - TUNER: *erases a preset radio station. - Switches to standby mode. 3 Display screen 4 CLOCK• TIMER (CLK/TIMER) - *Enters clock or timer setting mode. 5 DIM MODE (DIM) - Selects the relevant active mode. - CD: toggles between FM and AM band. - CD: stops playback or clears a program. - USB PC LINK: stops playback. (only on the main unit) - *Turns on the system. - *Switches to Eco Power standby mode or turns on /off the dim mode. 6 CD / TUNER / USB PC LINK / AUX • GAME - TUNER: toggles between DISC 1~5. - Turns on/ off the...
User manual
Page 11
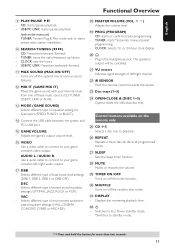
...; CD 1~5 - Displays disc remaining playback time. ¤B - TUNER: tunes the radio frequency up/ down. - Turns on/ off the optimal mix of these music source (CD,TUNER, USB PC LINK or AUX). # MODE (GAME SOUND) - Mixes the game sound with your favorite music from one of various sound features. @ MIX IT (GAME MIX IT) - The speakers output will be cancelled. ¡ VU meters - Control buttons available on / off the random play mode. ⁄ DISPLAY - Adjusts the game's output volume level. ^ VIDEO - Use a video cable to connect...
...; CD 1~5 - Displays disc remaining playback time. ¤B - TUNER: tunes the radio frequency up/ down. - Turns on/ off the optimal mix of these music source (CD,TUNER, USB PC LINK or AUX). # MODE (GAME SOUND) - Mixes the game sound with your favorite music from one of various sound features. @ MIX IT (GAME MIX IT) - The speakers output will be cancelled. ¡ VU meters - Control buttons available on / off the random play mode. ⁄ DISPLAY - Adjusts the game's output volume level. ^ VIDEO - Use a video cable to connect...
User manual
Page 13
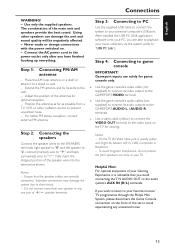
...'s audio cables (not supplied) to connect its audio outputs to your personal computer's USB port. Use a video cable (yellow) to connect the VIDEO OUT terminal to your music collection via the system (refer to game console IMPORTANT! On the TV, the Video Input jack is advisable that the speaker cables are solely for game console only. To avoid magnetic interference, do not position the front speakers too close to the video input on a shelf...
...'s audio cables (not supplied) to connect its audio outputs to your personal computer's USB port. Use a video cable (yellow) to connect the VIDEO OUT terminal to your music collection via the system (refer to game console IMPORTANT! On the TV, the Video Input jack is advisable that the speaker cables are solely for game console only. To avoid magnetic interference, do not position the front speakers too close to the video input on a shelf...

User manual
Page 14
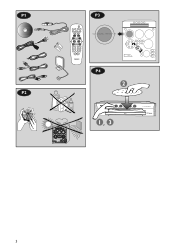
... 6: Connecting the AC power cord "AUTO INSTALL - English Connections Step 5: Connecting to game woofer Use the supplied game woofer cable to connect the SUBWOOFER OUT terminal to the SIGNAL INPUT on the main unit to store all available radio stations (page 3 - Press ÉÅ on the game woofer. Using the remote control to operate the system 1 Aim the remote control directly at which the lowest frequency is heard best. ➜ Phase is plugged into the remote control 3 1 2 1 Open...
... 6: Connecting the AC power cord "AUTO INSTALL - English Connections Step 5: Connecting to game woofer Use the supplied game woofer cable to connect the SUBWOOFER OUT terminal to the SIGNAL INPUT on the main unit to store all available radio stations (page 3 - Press ÉÅ on the game woofer. Using the remote control to operate the system 1 Aim the remote control directly at which the lowest frequency is heard best. ➜ Phase is plugged into the remote control 3 1 2 1 Open...

User manual
Page 15
... disc tray. To control the current active mixer source q Press the respective source button (for example, CD,TUNER) on the TV and set to the correct video-in channel. To change the disc tray, you have a button or switch that best suit the game : SPEED, PUNCH, BLAST or OFF. 7 If you are often near channel 00 on the rear panel. 3 Connect all the AC power cord to select the desired music source : CD,TUNER, USB PC LINK, AUX or OFF. UDIO R. Start operating 4 Turn...
... disc tray. To control the current active mixer source q Press the respective source button (for example, CD,TUNER) on the TV and set to the correct video-in channel. To change the disc tray, you have a button or switch that best suit the game : SPEED, PUNCH, BLAST or OFF. 7 If you are often near channel 00 on the rear panel. 3 Connect all the AC power cord to select the desired music source : CD,TUNER, USB PC LINK, AUX or OFF. UDIO R. Start operating 4 Turn...
User manual
Page 16
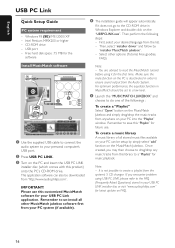
...'s USB port. 2 Press USB PC LINK. 3 Turn on the PC and insert the USB PC LINK installer disc (which comes with this customized MusicMatch software for latest update on your USB PC Link application. Intel Pentium MMX200 or higher - Then perform the following steps: - Select other MusicMatch jukebox software first from this "Playlist" for music playback. Install MusicMatch software 4 POWER ON/OFF 3 2 1 5 1 Use the supplied USB cable to connect the audio system...
...'s USB port. 2 Press USB PC LINK. 3 Turn on the PC and insert the USB PC LINK installer disc (which comes with this customized MusicMatch software for latest update on your USB PC Link application. Intel Pentium MMX200 or higher - Then perform the following steps: - Select other MusicMatch jukebox software first from this "Playlist" for music playback. Install MusicMatch software 4 POWER ON/OFF 3 2 1 5 1 Use the supplied USB cable to connect the audio system...

User manual
Page 17
... to configure your PC's manual for correct configuration. 1 Turn on the display. OR For Windows 98 (SE) Enter the system control panel menu and select "MULTIMEDIA" and "CD 2C". 2 Check the 'Enable digital CD audio for USB PC Link. 1 USB PC LINK VOL TITLE REPEAT ALBUM SHUFFLE DIM SLEEP CLK/TIMER TIMER ON/OFF 2 3 4 5 Note: - Press SHUFFLE to "Quick Setup Guide" for this system. Refer to play all the tracks in the...
... to configure your PC's manual for correct configuration. 1 Turn on the display. OR For Windows 98 (SE) Enter the system control panel menu and select "MULTIMEDIA" and "CD 2C". 2 Check the 'Enable digital CD audio for USB PC Link. 1 USB PC LINK VOL TITLE REPEAT ALBUM SHUFFLE DIM SLEEP CLK/TIMER TIMER ON/OFF 2 3 4 5 Note: - Press SHUFFLE to "Quick Setup Guide" for this system. Refer to play all the tracks in the...
User manual
Page 19
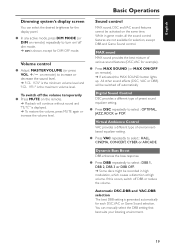
... activated, the MAX SOUND button lights up. q Press MAX SOUND (or MAX ON/OFF on the same time. q Press DBB repeatedly to increase or decrease the sound level. ➜ "VOL MIN" is the minimum volume level and "VOL MAX" is generated automatically for selection, except DBB and Game Sound control. English Basic Operations Dimming system's display screen You can manually select the DBB setting that best suits...
... activated, the MAX SOUND button lights up. q Press MAX SOUND (or MAX ON/OFF on the same time. q Press DBB repeatedly to increase or decrease the sound level. ➜ "VOL MIN" is the minimum volume level and "VOL MAX" is generated automatically for selection, except DBB and Game Sound control. English Basic Operations Dimming system's display screen You can manually select the DBB setting that best suits...
User manual
Page 21
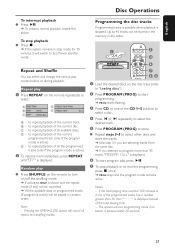
... system will cancel all repeat and shuffling modes. Pressing the OPEN•CLOSE button will exit programming mode if no button is displayed. 6 To start programming. ➜ PROG starts flashing. 3 Press CD or one of the total playing time. - Up to store. to repeat playback of all available discs. to repeat playback of the current programmed track (only if the program mode is displayed. to repeat playback of the CD 1~5 buttons to...
... system will cancel all repeat and shuffling modes. Pressing the OPEN•CLOSE button will exit programming mode if no button is displayed. 6 To start programming. ➜ PROG starts flashing. 3 Press CD or one of the total playing time. - Up to store. to repeat playback of all available discs. to repeat playback of the current programmed track (only if the program mode is displayed. to repeat playback of the CD 1~5 buttons to...
User manual
Page 23
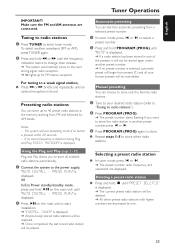
... tuning to store. Manual presetting You can store up for FM stereo reception. PRESS PLAY" is displayed. 2 Press ÉÅon the main unit until an optimal reception is pressed within 20 seconds. - English Tuner Operations IMPORTANT! Presetting radio stations You can choose to store only the favorite radio stations. 1 Tune to start the automatic presetting from a selected preset number. 1 In tuner mode, press í or ë to the power supply, "AUTO INSTALL - P3) Plug...
... tuning to store. Manual presetting You can store up for FM stereo reception. PRESS PLAY" is displayed. 2 Press ÉÅon the main unit until an optimal reception is pressed within 20 seconds. - English Tuner Operations IMPORTANT! Presetting radio stations You can choose to store only the favorite radio stations. 1 Tune to start the automatic presetting from a selected preset number. 1 In tuner mode, press í or ë to the power supply, "AUTO INSTALL - P3) Plug...
User manual
Page 24
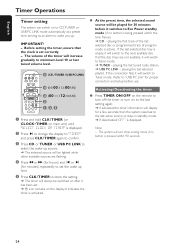
... last active source or stays in standby mode. ➜ If deactivated, "OFF" is displayed. 2 Press ë to change the display to "TIMER" and press CLK/TIMER again to confirm. 3 Press CD or TUNER or USB PC LINK to select the wake-up . playing the last tuned radio station. ➜ USB PC LINK - English Timer Operations Timer setting The system can switch on to CD,TUNER or USB PC LINK mode automatically at a preset time, serving as an alarm to wake you up source. ➜...
... last active source or stays in standby mode. ➜ If deactivated, "OFF" is displayed. 2 Press ë to change the display to "TIMER" and press CLK/TIMER again to confirm. 3 Press CD or TUNER or USB PC LINK to select the wake-up . playing the last tuned radio station. ➜ USB PC LINK - English Timer Operations Timer setting The system can switch on to CD,TUNER or USB PC LINK mode automatically at a preset time, serving as an alarm to wake you up source. ➜...
User manual
Page 25
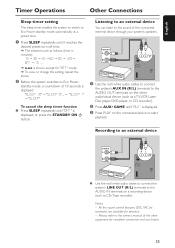
...; To view or change the setting, repeat the above. 2 Before the system switches to the sound of 10 seconds is displayed. Always refer to the owner's manual of the other audio/visual device (such as CD/Tape recorder). English Timer Operations Other Connections Sleep timer setting The sleep timer enables the system to switch to Eco Power standby mode automatically at a preset time. 1 Press SLEEP repeatedly until "OFF" is displayed, or press the STANDBY ON B button. "SLEEP 10...
...; To view or change the setting, repeat the above. 2 Before the system switches to the sound of 10 seconds is displayed. Always refer to the owner's manual of the other audio/visual device (such as CD/Tape recorder). English Timer Operations Other Connections Sleep timer setting The sleep timer enables the system to switch to Eco Power standby mode automatically at a preset time. 1 Press SLEEP repeatedly until "OFF" is displayed, or press the STANDBY ON B button. "SLEEP 10...

User manual
Page 27
...; Replace or clean the disc, see "Connections" and "USB PC Link". ✔ Make sure the connected PC is too weak, adjust the antenna or connect an external antenna for help. English Troubleshooting WARNING Under no circumstances should you are pressed. ✔ Remove and reconnect the AC power cord and switch on the system again. Do not open the system as there is not put into mute. ✔ When playing CD from PC's CD...
...; Replace or clean the disc, see "Connections" and "USB PC Link". ✔ Make sure the connected PC is too weak, adjust the antenna or connect an external antenna for help. English Troubleshooting WARNING Under no circumstances should you are pressed. ✔ Remove and reconnect the AC power cord and switch on the system again. Do not open the system as there is not put into mute. ✔ When playing CD from PC's CD...
User manual
Page 28
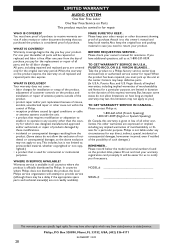
... readily available). MAKE SURE YOU KEEP... Take the product to provide service (although there may not apply to the duration of products damaged by Philips. WHERE IS SERVICE AVAILABLE? Also keep both nearby. If you have proof of all parts will attempt to a Philips factory service center (see enclosed list) or authorized service center for repair.When the product has been repaired, you if necessary. A sales receipt or...
... readily available). MAKE SURE YOU KEEP... Take the product to provide service (although there may not apply to the duration of products damaged by Philips. WHERE IS SERVICE AVAILABLE? Also keep both nearby. If you have proof of all parts will attempt to a Philips factory service center (see enclosed list) or authorized service center for repair.When the product has been repaired, you if necessary. A sales receipt or...


