Leaflet
Page 1
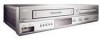
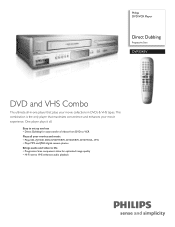
... player that maximizes convenience and enhances your movie experience. Philips DVD/VCR Player Direct Dubbing Progressive Scan DVP3345V DVD and VHS Combo The ultimate all-in DVDs & VHS tapes. This combination is the only player that plays your movies and music • Plays CD, (S)VCD, DVD, DVD+R/RW, DVD-R/RW, DVD+R DL, VHS • Plays MP3 and JPEG digital camera...
... player that maximizes convenience and enhances your movie experience. Philips DVD/VCR Player Direct Dubbing Progressive Scan DVP3345V DVD and VHS Combo The ultimate all-in DVDs & VHS tapes. This combination is the only player that plays your movies and music • Plays CD, (S)VCD, DVD, DVD+R/RW, DVD-R/RW, DVD+R DL, VHS • Plays MP3 and JPEG digital camera...
Leaflet
Page 2
..., your eye perceives a sharper picture with the even lines, both fields are the property of Koninklijke Philips Electronics N.V. All Rights reserved. DVD/VCR Player Direct Dubbing Progressive Scan Specifications DVP3345V/17 Highlights Picture/Display • D/A converter: 10 bit / 54MHz • Picture enhancement: Progressive ...noise ratio: 90 • THD: -80dB Video Playback • Compression formats: MPEG1 • Playback Media: CD-R/CD-RW, DVD+R/+RW, DVD-R/-RW, DVD-Video, Video CD/SVCD, VHS Tapes • Video disc playback system: NTSC • Number of Video Heads: 4 •...
..., your eye perceives a sharper picture with the even lines, both fields are the property of Koninklijke Philips Electronics N.V. All Rights reserved. DVD/VCR Player Direct Dubbing Progressive Scan Specifications DVP3345V/17 Highlights Picture/Display • D/A converter: 10 bit / 54MHz • Picture enhancement: Progressive ...noise ratio: 90 • THD: -80dB Video Playback • Compression formats: MPEG1 • Playback Media: CD-R/CD-RW, DVD+R/+RW, DVD-R/-RW, DVD-Video, Video CD/SVCD, VHS Tapes • Video disc playback system: NTSC • Number of Video Heads: 4 •...

User manual
Page 5
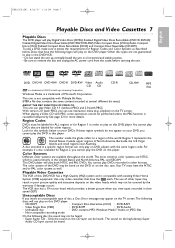
...3-4 Table of Contents 5 Introduction 6 Playable Discs and Video Cassettes 7 Initial DVD/VCR Setup Hookups 8-12 Remote Control Setup 13 First-time DVD/VCR Setup 14 Basic Playback Video Cassette Playback 15 Disc Playback 16 Basic DVD/VCR Controls Display Panel 17 Front Panel, Rear Panel and Remote Control . . .... . .18 Additional VCR Features Hi-Fi Stereo 32 Disc Playback Features...
...3-4 Table of Contents 5 Introduction 6 Playable Discs and Video Cassettes 7 Initial DVD/VCR Setup Hookups 8-12 Remote Control Setup 13 First-time DVD/VCR Setup 14 Basic Playback Video Cassette Playback 15 Disc Playback 16 Basic DVD/VCR Controls Display Panel 17 Front Panel, Rear Panel and Remote Control . . .... . .18 Additional VCR Features Hi-Fi Stereo 32 Disc Playback Features...
User manual
Page 6
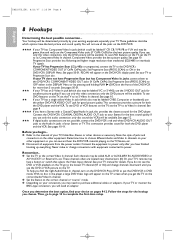
...not currently available. Some explanations in this manual are not available on every disc. This DVD/VCR combines a Digital Video Disc (DVD) player and a Hi-Fi Video Cassette Recorder (VCR) into one unit, letting you play DVDs, Audio Compact Discs (Audio CDs), and Video Cassettes on the disc, you try to... make it available. Details are provided with your new DVD/VCR. • Remote Control and two AA batteries • One set the menus, which vary among DVDs. Available Disc Features... Read this owner's manual carefully to learn how to set in this...
...not currently available. Some explanations in this manual are not available on every disc. This DVD/VCR combines a Digital Video Disc (DVD) player and a Hi-Fi Video Cassette Recorder (VCR) into one unit, letting you play DVDs, Audio Compact Discs (Audio CDs), and Video Cassettes on the disc, you try to... make it available. Details are provided with your new DVD/VCR. • Remote Control and two AA batteries • One set the menus, which vary among DVDs. Available Disc Features... Read this owner's manual carefully to learn how to set in this...
User manual
Page 7
... and Compact Discs Rewritable (CD-RW). With version 2.0 (with PBC), you view tapes recorded in the DVD/VCR. • Do not stand the unit up vertically. Region Codes DVDs must have the NTSC and/or PAL color system as described below on the disc case. Color Systems Different...and stable position. • Be sure to play the DVD on the TV screen. The color system of DVD Format/Logo Licensing Corporation. Discs that are NTSC, which is cancelled temporarily. DVD DVD+R DVD+RW DVD-R DVD-RW Video CD is a trademark of this DVD/VCR has a High Quality (HQ) system and is not ...
... and Compact Discs Rewritable (CD-RW). With version 2.0 (with PBC), you view tapes recorded in the DVD/VCR. • Do not stand the unit up vertically. Region Codes DVDs must have the NTSC and/or PAL color system as described below on the disc case. Color Systems Different...and stable position. • Be sure to play the DVD on the TV screen. The color system of DVD Format/Logo Licensing Corporation. Discs that are NTSC, which is cancelled temporarily. DVD DVD+R DVD+RW DVD-R DVD-RW Video CD is a trademark of this DVD/VCR has a High Quality (HQ) system and is not ...
User manual
Page 8
... for the best sound quality. See pages 10-11. Determine how to the correct channel or "source" mode. ● Depending on the DVD/VCR. Or, your TV manual for excellent picture quality. See your TV's remote may need an adaptor. Then, go to the lowest TV channel... finished hooking up everything. Remember... ● Set the TV to put the DVD/VCR in the player, a large DVD Video logo will be determined primarily by pressing and holding PLAY B (DVD) on the DVD/VCR's display panel. Press DVD to the correct Video In channel. If you use only this video connection, ...
... for the best sound quality. See pages 10-11. Determine how to the correct channel or "source" mode. ● Depending on the DVD/VCR. Or, your TV manual for excellent picture quality. See your TV's remote may need an adaptor. Then, go to the lowest TV channel... finished hooking up everything. Remember... ● Set the TV to put the DVD/VCR in the player, a large DVD Video logo will be determined primarily by pressing and holding PLAY B (DVD) on the DVD/VCR's display panel. Press DVD to the correct Video In channel. If you use only this video connection, ...
User manual
Page 9
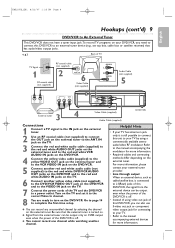
...Video Cable (not supplied) AUDIO IN L R VIDEO IN Audio Cable (not supplied) 5 IN OUT AUDIO OUT R L VIDEO OUT DIGITAL AUDIO OUT DVD AUDIO OUT S-VIDEO OUT COMPONENT VIDEO OUT Y DVD/VCR VCR AUDIO OUT AUDIO IN L L L COAXIAL R CB / PB R R VIDEO OUT VIDEO IN CR / PR 3 External tuner 4 Video Cable (supplied... complete the first-time setup. ● You can record any unscrambled channel by using video out jack of this DVD/VCR, you need to connect this DVD/VCR, the signal from the external tuner can also use S-video out jack or component video output jack for connecting to...
...Video Cable (not supplied) AUDIO IN L R VIDEO IN Audio Cable (not supplied) 5 IN OUT AUDIO OUT R L VIDEO OUT DIGITAL AUDIO OUT DVD AUDIO OUT S-VIDEO OUT COMPONENT VIDEO OUT Y DVD/VCR VCR AUDIO OUT AUDIO IN L L L COAXIAL R CB / PB R R VIDEO OUT VIDEO IN CR / PR 3 External tuner 4 Video Cable (supplied... complete the first-time setup. ● You can record any unscrambled channel by using video out jack of this DVD/VCR, you need to connect this DVD/VCR, the signal from the external tuner can also use S-video out jack or component video output jack for connecting to...
User manual
Page 10
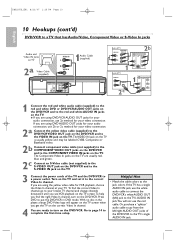
... the TV on the correct Video In channel. 4 You are ready to turn on the DVD/VCR. Press DVD to put the DVD/VCR in the player, a large DVD Video logo will not use the red cable. If you are using DVD AUDIO OUT jacks for your audio connection, use 2b or 2c method for your video... jacks Audio and Video IN Jacks on TV 2a Video Cable (supplied) AUDIO IN L R VIDEO IN 1Audio Cable (supplied) DIGITAL AUDIO OUT DVD AUDIO OUT S-VIDEO OUT COMPONENT VIDEO OUT Y DVD/VCR VCR AUDIO OUT AUDIO IN L L L COAXIAL R CB / PB R R VIDEO OUT VIDEO IN CR / PR Back of TV COMPONENT AUDIO IN VIDEO IN...
... the TV on the correct Video In channel. 4 You are ready to turn on the DVD/VCR. Press DVD to put the DVD/VCR in the player, a large DVD Video logo will not use the red cable. If you are using DVD AUDIO OUT jacks for your audio connection, use 2b or 2c method for your video... jacks Audio and Video IN Jacks on TV 2a Video Cable (supplied) AUDIO IN L R VIDEO IN 1Audio Cable (supplied) DIGITAL AUDIO OUT DVD AUDIO OUT S-VIDEO OUT COMPONENT VIDEO OUT Y DVD/VCR VCR AUDIO OUT AUDIO IN L L L COAXIAL R CB / PB R R VIDEO OUT VIDEO IN CR / PR Back of TV COMPONENT AUDIO IN VIDEO IN...
User manual
Page 11
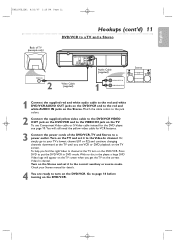
... at the TV until you get the TV on the TV. Turn on the Stereo and set it to page 14 before turning on the DVD/VCR. Check your TV's lowest channel (01 or 02) and continue changing channels downward at the TV, turn on the TV screen when you see page... 1 Connect the supplied red and white audio cable to the red and white DVD/VCR AUDIO OUT jacks on the DVD/VCR and to your Stereo manual for the DVD player, see VCR or DVD playback on the Stereo. You will appear on the DVD/VCR. Or, simply go to the red and white AUDIO IN jacks on the...
... at the TV until you get the TV on the TV. Turn on the Stereo and set it to page 14 before turning on the DVD/VCR. Check your TV's lowest channel (01 or 02) and continue changing channels downward at the TV, turn on the TV screen when you see page... 1 Connect the supplied red and white audio cable to the red and white DVD/VCR AUDIO OUT jacks on the DVD/VCR and to your Stereo manual for the DVD player, see VCR or DVD playback on the Stereo. You will appear on the DVD/VCR. Or, simply go to the red and white AUDIO IN jacks on the...
User manual
Page 12
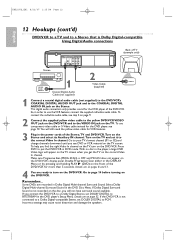
... AUDIO IN 1 Coaxial Digital Audio Cable (not supplied) 2 Video Cable (supplied) VIDEO IN 1 Connect a coaxial digital audio cable (not supplied) to the DVD/VCR's COAXIAL DIGITAL AUDIO OUT jack and to the VIDEO IN jack on the TV. Make sure Progressive Scan (PROG. If Dolby Digital Surround Sound is...To help you see step 5 on page 9. 2 Connect the supplied yellow video cable to the yellow DVD/VCR VIDEO OUT jack on the DVD/VCR and to the COAXIAL DIGITAL AUDIO IN jack on the DVD/VCR's display panel. SCAN) is not connected to a Dolby Digital-compatible Stereo, set DOLBY DIGITAL to turn ...
... AUDIO IN 1 Coaxial Digital Audio Cable (not supplied) 2 Video Cable (supplied) VIDEO IN 1 Connect a coaxial digital audio cable (not supplied) to the DVD/VCR's COAXIAL DIGITAL AUDIO OUT jack and to the VIDEO IN jack on the TV. Make sure Progressive Scan (PROG. If Dolby Digital Surround Sound is...To help you see step 5 on page 9. 2 Connect the supplied yellow video cable to the yellow DVD/VCR VIDEO OUT jack on the DVD/VCR and to the COAXIAL DIGITAL AUDIO IN jack on the DVD/VCR's display panel. SCAN) is not connected to a Dolby Digital-compatible Stereo, set DOLBY DIGITAL to turn ...
User manual
Page 13
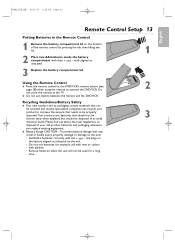
... - Using the Remote Control ● Point the remote control at the TV. ● Do not put objects between the remote and the DVD/VCR. E8E20UD_EN1 8/23/07 1:25 PM Page 13 English Remote Control Setup 13 Putting Batteries in bodily injury, property damage or damage to the unit...compartment with alkaline. • Remove batteries when the unit will not be recycled and reused. To prevent battery leakage that needs to operate the DVD/VCR. markings on the unit. • Do not mix batteries, for a long time. Specialized companies can be used for example, old with ...
... - Using the Remote Control ● Point the remote control at the TV. ● Do not put objects between the remote and the DVD/VCR. E8E20UD_EN1 8/23/07 1:25 PM Page 13 English Remote Control Setup 13 Putting Batteries in bodily injury, property damage or damage to the unit...compartment with alkaline. • Remove batteries when the unit will not be recycled and reused. To prevent battery leakage that needs to operate the DVD/VCR. markings on the unit. • Do not mix batteries, for a long time. Specialized companies can be used for example, old with ...
User manual
Page 14
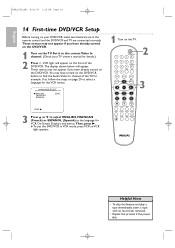
...the Audio/Video In channel of the DVD/VCR. Set it to select a language for details.) 2 Press y. If so, follow the steps on the TV. Then, press B. ● To put the DVD/VCR in the remote control and the DVD/VCR and TV are in VCR mode, press VCR so VCR light appears. 1 Turn on page 20... to the correct Video In channel. (Check your DVD/VCR, make sure batteries are connected correctly. These menus may not appear ...
...the Audio/Video In channel of the DVD/VCR. Set it to select a language for details.) 2 Press y. If so, follow the steps on the TV. Then, press B. ● To put the DVD/VCR in the remote control and the DVD/VCR and TV are in VCR mode, press VCR so VCR light appears. 1 Turn on page 20... to the correct Video In channel. (Check your DVD/VCR, make sure batteries are connected correctly. These menus may not appear ...
User manual
Page 15
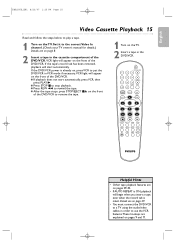
... STOP C to stop playback. ● Press REW h to rewind the tape. ● After the tape stops, press STOP/EJECT CA on the front of the DVD/VCR. Set it to the correct Video In channel. (Check your TV owner's manual for details.) Details are on pages 29-32. • If AUTO REPEAT... PM Page 15 Video Cassette Playback 15 Read and follow the steps below to remove the tape. 1 Turn on the TV. 2 Insert a tape in the DVD/VCR. VCR light will begin when you insert a tape, even when the record tab is ON, playback will appear on the front of the...
... STOP C to stop playback. ● Press REW h to rewind the tape. ● After the tape stops, press STOP/EJECT CA on the front of the DVD/VCR. Set it to the correct Video In channel. (Check your TV owner's manual for details.) Details are on pages 29-32. • If AUTO REPEAT... PM Page 15 Video Cassette Playback 15 Read and follow the steps below to remove the tape. 1 Turn on the TV. 2 Insert a tape in the DVD/VCR. VCR light will begin when you insert a tape, even when the record tab is ON, playback will appear on the front of the...
User manual
Page 16
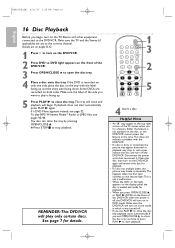
.... If playback does not start playback. Either the feature is facing up and the shiny side facing down. Some DVDs are on pages 8-12. 1 Press y to turn on the DVD/VCR. 2 Press DVD so DVD light appears on the front of the TV screen when you try a feature. Helpful Hints • An "X".... This happens when the first layer switches to the correct channel. Details are recorded on the disc, or the DVD/VCR cannot access the feature at the top right corner of the DVD/VCR. 3 Press OPEN/CLOSE A to start automatically, press PLAY B again. You also can close the tray by ...
.... If playback does not start playback. Either the feature is facing up and the shiny side facing down. Some DVDs are on pages 8-12. 1 Press y to turn on the DVD/VCR. 2 Press DVD so DVD light appears on the front of the TV screen when you try a feature. Helpful Hints • An "X".... This happens when the first layer switches to the correct channel. Details are recorded on the disc, or the DVD/VCR cannot access the feature at the top right corner of the DVD/VCR. 3 Press OPEN/CLOSE A to start automatically, press PLAY B again. You also can close the tray by ...
User manual
Page 17
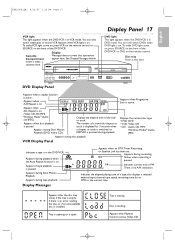
...PM Page 17 English Display Panel 17 VCR light This light appears when the DVD/VCR is in DVD mode. OPEN/CLOSE STANDBY-ON ONE TOUCH RECORDING • LONG PLAY DVD light This light appears when the DVD/VCR is in the DVD/VCR. Appears when A-B Repeat is installed. ... is on . Disc is on . Appears during playback when the Auto Repeat function is loading. DVD PLAYER/VCR DVP3345V VIDEO L AUDIO R REW F.FWD STOP/EJECT PLAY REC TRACKING VCR DVD SOURCE STOP PLAY DVD DVD Display Panel Appears when a repeat function is pressed during Slow Motion Playback.
...PM Page 17 English Display Panel 17 VCR light This light appears when the DVD/VCR is in DVD mode. OPEN/CLOSE STANDBY-ON ONE TOUCH RECORDING • LONG PLAY DVD light This light appears when the DVD/VCR is in the DVD/VCR. Appears when A-B Repeat is installed. ... is on . Disc is on . Appears during playback when the Auto Repeat function is loading. DVD PLAYER/VCR DVP3345V VIDEO L AUDIO R REW F.FWD STOP/EJECT PLAY REC TRACKING VCR DVD SOURCE STOP PLAY DVD DVD Display Panel Appears when a repeat function is pressed during Slow Motion Playback.
User manual
Page 18
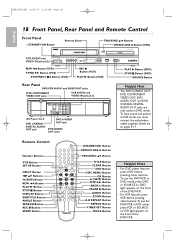
... PLAY REW F.FWD STOP/EJECT PLAY REC TRACKING K/L Buttons OPEN/CLOSE A Button (DVD) OPEN/CLOSE DVD PLAYER/VCR DVP3345V TRACKING VCR DVD SOURCE STOP PLAY DVD REW h Button (VCR) F.FWD g Button (VCR) STOP/EJECT C A Button (VCR) REC I Button SPEED Button OPEN/CLOSE 1 2 3 4 5 6 TRACKING 7 8 9 CLEAR TITLE +10 0 VCR INPUT SETUP DVD DISC MENU OK REW PLAY FFW STOP PAUSE BACK DISPLAY SUBTITLE ZOOM...
... PLAY REW F.FWD STOP/EJECT PLAY REC TRACKING K/L Buttons OPEN/CLOSE A Button (DVD) OPEN/CLOSE DVD PLAYER/VCR DVP3345V TRACKING VCR DVD SOURCE STOP PLAY DVD REW h Button (VCR) F.FWD g Button (VCR) STOP/EJECT C A Button (VCR) REC I Button SPEED Button OPEN/CLOSE 1 2 3 4 5 6 TRACKING 7 8 9 CLEAR TITLE +10 0 VCR INPUT SETUP DVD DISC MENU OK REW PLAY FFW STOP PAUSE BACK DISPLAY SUBTITLE ZOOM...
User manual
Page 20
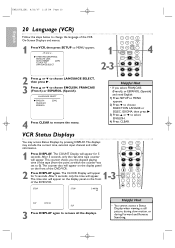
...SELECTION LANGUE or SELEC. The counter also will appear on the display panel on the front of the DVD/VCR. The COUNT Display will appear for 5 seconds. VCR INPUT SETUP DVD DISC MENU OK REW PLAY FFW STOP PAUSE BACK DISPLAY SUBTITLE ZOOM AUDIO ANGLE SEARCH REPEAT REPEAT A-B ... SELECT, then press B. 3 Press K or L to remove the menu. The time also will appear on the display panel on the front of the DVD/VCR. 2 1-3 Press DISPLAY again. LANGUAGE SELECT BENGLISH FRANCAIS ESPAÑOL [ON] 4 Press CLEAR to choose ENGLISH, FRANCAIS (French) or ESPAÑOL...
...SELECTION LANGUE or SELEC. The counter also will appear on the display panel on the front of the DVD/VCR. The COUNT Display will appear for 5 seconds. VCR INPUT SETUP DVD DISC MENU OK REW PLAY FFW STOP PAUSE BACK DISPLAY SUBTITLE ZOOM AUDIO ANGLE SEARCH REPEAT REPEAT A-B ... SELECT, then press B. 3 Press K or L to remove the menu. The time also will appear on the display panel on the front of the DVD/VCR. 2 1-3 Press DISPLAY again. LANGUAGE SELECT BENGLISH FRANCAIS ESPAÑOL [ON] 4 Press CLEAR to choose ENGLISH, FRANCAIS (French) or ESPAÑOL...
User manual
Page 21
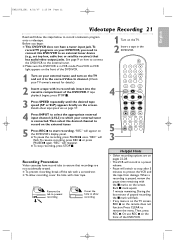
...playback begins, press STOP C. 3 Press SPEED repeatedly until the desired tape speed (SP or SLP) appears briefly on the front of the DVD/VCR. Press VCR so VCR light appears on the front of paused recording, the ■ mark will switch to stop recording, press STOP C. Before you need to ... a recording is on the TV screen, REC I on the screen. During the last minute of the DVD/VCR. 1 Turn on your external tuner, and turn on your DVD/VCR, you begin: ● This DVD/VCR does not have record tabs to remove the menu. Cover the hole to allow recording, cover the hole ...
...playback begins, press STOP C. 3 Press SPEED repeatedly until the desired tape speed (SP or SLP) appears briefly on the front of the DVD/VCR. Press VCR so VCR light appears on the front of paused recording, the ■ mark will switch to stop recording, press STOP C. Before you need to ... a recording is on the TV screen, REC I on the screen. During the last minute of the DVD/VCR. 1 Turn on your external tuner, and turn on your DVD/VCR, you begin: ● This DVD/VCR does not have record tabs to remove the menu. Cover the hole to allow recording, cover the hole ...
User manual
Page 22
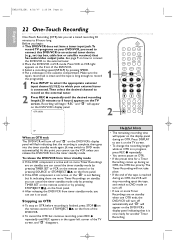
...9679; Put a videotape in the upper left corner of the TV screen, and " " disappears. Helpful Hints • The remaining recording time will appear on the DVD/VCR's display panel will flash indicating that the recording is now ready for a Timer Recording comes up during an OTR. OTR (0:30) 2 OPEN/CLOSE 1 2 3 4...REC I repeatedly until the desired recording length (30 minutes to 8 hours) appears on how to connect the DVD/VCR to the external tuner. ● Place the DVD/VCR in VCR mode. E8E20UD_EN1 8/23/07 1:25 PM Page 22 English 22 One-Touch Recording One-Touch Recording (OTR) ...
...9679; Put a videotape in the upper left corner of the TV screen, and " " disappears. Helpful Hints • The remaining recording time will appear on the DVD/VCR's display panel will flash indicating that the recording is now ready for a Timer Recording comes up during an OTR. OTR (0:30) 2 OPEN/CLOSE 1 2 3 4...REC I repeatedly until the desired recording length (30 minutes to 8 hours) appears on how to connect the DVD/VCR to the external tuner. ● Place the DVD/VCR in VCR mode. E8E20UD_EN1 8/23/07 1:25 PM Page 22 English 22 One-Touch Recording One-Touch Recording (OTR) ...
User manual
Page 23
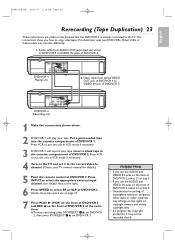
...English Rerecording (Tape Duplication) 23 These instructions are on page 57. 7 Press PLAY B (VCR) on the front of DVD/VCR 1 and REC I on the front of DVD/VCR 2 DIGITAL AUDIO OUT DVD AUDIO OUT S-VIDEO OUT COMPONENT VIDEO OUT Y DVD/VCR VCR AUDIO OUT AUDIO IN L L L COAXIAL R CB / PB R R VIDEO OUT VIDEO... use the AUDIO and VIDEO IN jacks on the front of DVD/VCR 2, select L2 at DVD/VCR 2. Video cable from AUDIO OUT jacks (red and white) of DVD/VCR 1 to the TV. Press VCR to copy videotapes. Other VCRs or Camcorders may not be recorded clearly. Put a prerecorded tape...
...English Rerecording (Tape Duplication) 23 These instructions are on page 57. 7 Press PLAY B (VCR) on the front of DVD/VCR 1 and REC I on the front of DVD/VCR 2 DIGITAL AUDIO OUT DVD AUDIO OUT S-VIDEO OUT COMPONENT VIDEO OUT Y DVD/VCR VCR AUDIO OUT AUDIO IN L L L COAXIAL R CB / PB R R VIDEO OUT VIDEO... use the AUDIO and VIDEO IN jacks on the front of DVD/VCR 2, select L2 at DVD/VCR 2. Video cable from AUDIO OUT jacks (red and white) of DVD/VCR 1 to the TV. Press VCR to copy videotapes. Other VCRs or Camcorders may not be recorded clearly. Put a prerecorded tape...


