Leaflet
Page 2
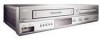
...: 8670 000 34924 UPC: 6 09585 14494 1 © 2010 Koninklijke Philips Electronics N.V. Instead of the image resulting in , Composite video (CVBS) input, Composite video (CVBS) output Convenience • Programming/Timer Enhancements: Daily/Weekly Repeat Program, One Touch Recording Power • Power consumption: 21 W • Power supply: 120V, 60Hz • Standby power consumption: 3.8 W Accessories • Included accessories: Warranty Leaflet, Remote Control, Quick start guide, User Manual, Audio/ Video cable, 2 x AA Batteries Dimensions • Set dimensions (W x H x D): 435 x 94...
...: 8670 000 34924 UPC: 6 09585 14494 1 © 2010 Koninklijke Philips Electronics N.V. Instead of the image resulting in , Composite video (CVBS) input, Composite video (CVBS) output Convenience • Programming/Timer Enhancements: Daily/Weekly Repeat Program, One Touch Recording Power • Power consumption: 21 W • Power supply: 120V, 60Hz • Standby power consumption: 3.8 W Accessories • Included accessories: Warranty Leaflet, Remote Control, Quick start guide, User Manual, Audio/ Video cable, 2 x AA Batteries Dimensions • Set dimensions (W x H x D): 435 x 94...
User manual
Page 3
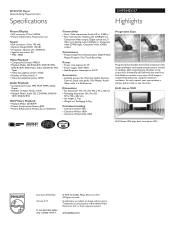
... battery leakage that produce heat. 9. aligned as marked on this product through openings. Never push objects of fire or electric shock, this apparatus should be exposed to the unit: ● Install all servicing to operate normally or exhibits a marked change in bodily injury, property damage, or damage to rain or moisture and objects filled with a dry cloth. 7. Replacement Parts...
... battery leakage that produce heat. 9. aligned as marked on this product through openings. Never push objects of fire or electric shock, this apparatus should be exposed to the unit: ● Install all servicing to operate normally or exhibits a marked change in bodily injury, property damage, or damage to rain or moisture and objects filled with a dry cloth. 7. Replacement Parts...
User manual
Page 4
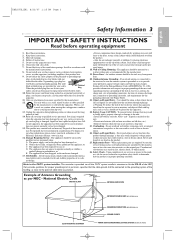
... to operate it is protected by one or more of Dolby Laboratories. In case of picture problems with this copyright protection technology must be determined by turning the device off and on a circuit different from that the user switch the connection to radio or television reception, which the receiver is prohibited. If there are fully compatible with 525 (480) progressive scan output, it...
... to operate it is protected by one or more of Dolby Laboratories. In case of picture problems with this copyright protection technology must be determined by turning the device off and on a circuit different from that the user switch the connection to radio or television reception, which the receiver is prohibited. If there are fully compatible with 525 (480) progressive scan output, it...

User manual
Page 5
...-25 Satellite Link 26-27 DVD to Videotape Duplication 28 Video Cassette Playing Options Repeat Playback 29 Tape Counter 29 Time Search, Index Search 30 Special Effects Playback 31 Automatic Operation Features 31 DVD Player Setup Options Language 48-49 Display 50-51 Progressive Scan 51 Audio 52 Parental Password 53 Parental Levels 54 Others 55-56 Information You May Need Glossary 57 Helpful Hints 58-60 Care and Maintenance 61 Specifications 61 Limited...
...-25 Satellite Link 26-27 DVD to Videotape Duplication 28 Video Cassette Playing Options Repeat Playback 29 Tape Counter 29 Time Search, Index Search 30 Special Effects Playback 31 Automatic Operation Features 31 DVD Player Setup Options Language 48-49 Display 50-51 Progressive Scan 51 Audio 52 Parental Password 53 Parental Levels 54 Others 55-56 Information You May Need Glossary 57 Helpful Hints 58-60 Care and Maintenance 61 Specifications 61 Limited...
User manual
Page 6
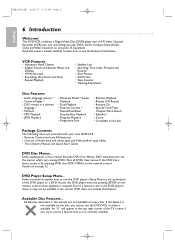
...; Audio Language choices * • Camera Angles * • DVD menus in the DVD player's menu, it available. DVD Player Setup Menu... If the feature is set of equipment. This DVD/VCR combines a Digital Video Disc (DVD) player and a Hi-Fi Video Cassette Recorder (VCR) into one piece of Audio (red and white tips) and Video (yellow tips) cables • This Owner's Manual and Quick Start Guide DVD Disc Menus... DVD manufacturers set up features of the TV screen if you play DVDs, Audio Compact Discs (Audio CDs), and Video Cassettes on the remote control when playback...
...; Audio Language choices * • Camera Angles * • DVD menus in the DVD player's menu, it available. DVD Player Setup Menu... If the feature is set of equipment. This DVD/VCR combines a Digital Video Disc (DVD) player and a Hi-Fi Video Cassette Recorder (VCR) into one piece of Audio (red and white tips) and Video (yellow tips) cables • This Owner's Manual and Quick Start Guide DVD Disc Menus... DVD manufacturers set up features of the TV screen if you play DVDs, Audio Compact Discs (Audio CDs), and Video Cassettes on the remote control when playback...
User manual
Page 7
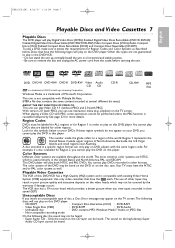
... DVD-R DVD-RW Video CD is compatible with PBC), you view tapes recorded in order to play in the United States and North America, PAL, and SECAM. With version 2.0 (with existing Video Home System (VHS) equipment. For example, if a disc is cancelled temporarily. Use only video cassettes that contains the same content encoded at several different bit rates). finalized Digital Video Discs Recordable (DVD+R, DVD-R); See page 32 for Region 2, you cannot play the DVD in a specific region format...
... DVD-R DVD-RW Video CD is compatible with PBC), you view tapes recorded in order to play in the United States and North America, PAL, and SECAM. With version 2.0 (with existing Video Home System (VHS) equipment. For example, if a disc is cancelled temporarily. Use only video cassettes that contains the same content encoded at several different bit rates). finalized Digital Video Discs Recordable (DVD+R, DVD-R); See page 32 for Region 2, you cannot play the DVD in a specific region format...
User manual
Page 8
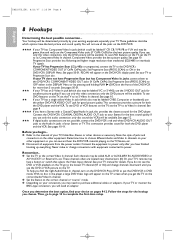
... connection provides a picture for both the DVD player and the VCR. These guidelines describe which also may be green, blue and red), use the yellow DVD/VCR VIDEO OUT jack for the DVD player. SCAN) to put the DVD/VCR in the player, a large DVD Video logo will be labeled Y/C or S-VHS), use all equipment from the power outlets. P.SCAN will need to its Component Video In channel. See page 12. ★★★ If digital audio connections are...
... connection provides a picture for both the DVD player and the VCR. These guidelines describe which also may be green, blue and red), use the yellow DVD/VCR VIDEO OUT jack for the DVD player. SCAN) to put the DVD/VCR in the player, a large DVD Video logo will be labeled Y/C or S-VHS), use all equipment from the power outlets. P.SCAN will need to its Component Video In channel. See page 12. ★★★ If digital audio connections are...
User manual
Page 15
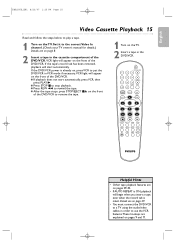
... put the DVD/VCR in VCR mode if necessary. OPEN/CLOSE 1 2 3 4 5 6 TRACKING 7 8 9 CLEAR TITLE +10 0 VCR INPUT SETUP DVD DISC MENU OK REW PLAY FFW STOP PAUSE BACK DISPLAY SUBTITLE ZOOM AUDIO ANGLE SEARCH REPEAT REPEAT A-B REC SPEED MODE TIMER SET Helpful Hints • Other tape playback features are on page 8. 2 Insert a tape in the cassette compartment of the DVD/VCR. If the tape's record tab has been removed, playback will appear on the front of the DVD/VCR to remove the tape. 1 Turn on the...
... put the DVD/VCR in VCR mode if necessary. OPEN/CLOSE 1 2 3 4 5 6 TRACKING 7 8 9 CLEAR TITLE +10 0 VCR INPUT SETUP DVD DISC MENU OK REW PLAY FFW STOP PAUSE BACK DISPLAY SUBTITLE ZOOM AUDIO ANGLE SEARCH REPEAT REPEAT A-B REC SPEED MODE TIMER SET Helpful Hints • Other tape playback features are on page 8. 2 Insert a tape in the cassette compartment of the DVD/VCR. If the tape's record tab has been removed, playback will appear on the front of the DVD/VCR to remove the tape. 1 Turn on the...
User manual
Page 16
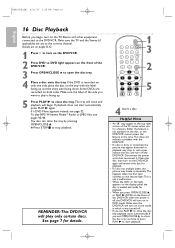
... playback. • If a disc has multiple layers, the picture may stop playback. REMINDER:This DVD/VCR will begin , turn on the display panel, the disc is loaded and ready for details. In such cases, remove the disc and turn on in the mode in DVD mode. This happens when the first layer switches to close the disc tray, you press OPEN/CLOSE A or PLAY B (DVD) on both sides. OPEN/CLOSE 1 2 3 4 5 6 TRACKING 7 8 9 CLEAR TITLE +10 0 VCR INPUT SETUP DVD DISC MENU OK REW PLAY...
... playback. • If a disc has multiple layers, the picture may stop playback. REMINDER:This DVD/VCR will begin , turn on the display panel, the disc is loaded and ready for details. In such cases, remove the disc and turn on in the mode in DVD mode. This happens when the first layer switches to close the disc tray, you press OPEN/CLOSE A or PLAY B (DVD) on both sides. OPEN/CLOSE 1 2 3 4 5 6 TRACKING 7 8 9 CLEAR TITLE +10 0 VCR INPUT SETUP DVD DISC MENU OK REW PLAY...
User manual
Page 18
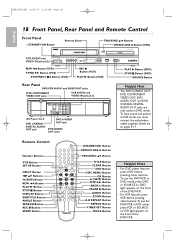
... only useful in DVD mode. To put the DVD/VCR in DVD mode, press DVD or SOURCE so DVD light appears on the front of the DVD/VCR. Remote Control Number Buttons VCR Button SETUP Button INPUT Button s BKL Buttons w (SKIP) Button REW h Button PLAY B Button STOP C Button DISPLAY Button SUBTITLE Button ANGLE Button SEARCH Button REC I Button (VCR) PLAY B Button (VCR) PLAY B Button (DVD) STOP C Button (DVD) SOURCE Button Rear Panel DVD/VCR AUDIO and VIDEO OUT jacks DVD COMPONENT VIDEO OUT jacks VCR AUDIO and VIDEO IN jacks (L1) DIGITAL AUDIO OUT DVD AUDIO OUT S-VIDEO OUT COMPONENT VIDEO...
... only useful in DVD mode. To put the DVD/VCR in DVD mode, press DVD or SOURCE so DVD light appears on the front of the DVD/VCR. Remote Control Number Buttons VCR Button SETUP Button INPUT Button s BKL Buttons w (SKIP) Button REW h Button PLAY B Button STOP C Button DISPLAY Button SUBTITLE Button ANGLE Button SEARCH Button REC I Button (VCR) PLAY B Button (VCR) PLAY B Button (DVD) STOP C Button (DVD) SOURCE Button Rear Panel DVD/VCR AUDIO and VIDEO OUT jacks DVD COMPONENT VIDEO OUT jacks VCR AUDIO and VIDEO IN jacks (L1) DIGITAL AUDIO OUT DVD AUDIO OUT S-VIDEO OUT COMPONENT VIDEO...
User manual
Page 21
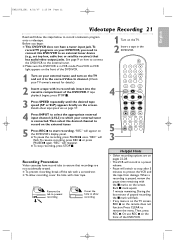
... of the DVD/VCR. When a recording is on the TV screen, REC I . E8E20UD_EN1 8/23/07 1:25 PM Page 21 English Videotape Recording 21 Read and follow the steps below to allow recording. 1 Turn on the TV. 2 Insert a tape in the DVD/VCR. 4 OPEN/CLOSE 1 2 3 4 5 6 TRACKING 7 8 9 CLEAR TITLE +10 0 VCR INPUT SETUP DVD DISC MENU OK 5 3 REW PLAY FFW STOP PAUSE BACK DISPLAY SUBTITLE ZOOM AUDIO ANGLE SEARCH REPEAT REPEAT A-B REC SPEED MODE TIMER SET Helpful Hints •...
... of the DVD/VCR. When a recording is on the TV screen, REC I . E8E20UD_EN1 8/23/07 1:25 PM Page 21 English Videotape Recording 21 Read and follow the steps below to allow recording. 1 Turn on the TV. 2 Insert a tape in the DVD/VCR. 4 OPEN/CLOSE 1 2 3 4 5 6 TRACKING 7 8 9 CLEAR TITLE +10 0 VCR INPUT SETUP DVD DISC MENU OK 5 3 REW PLAY FFW STOP PAUSE BACK DISPLAY SUBTITLE ZOOM AUDIO ANGLE SEARCH REPEAT REPEAT A-B REC SPEED MODE TIMER SET Helpful Hints •...
User manual
Page 22
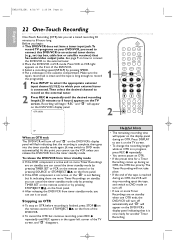
... DVD/VCR. ● Select a recording speed (SP, SLP) by pressing STOP/EJECT C A on the display panel during an OTR, the OTR has priority. OTR (0:30) 2 OPEN/CLOSE 1 2 3 4 5 6 TRACKING 7 8 9 CLEAR TITLE +10 0 VCR INPUT SETUP DVD DISC MENU OK REW PLAY FFW STOP PAUSE BACK DISPLAY SUBTITLE ZOOM AUDIO ANGLE SEARCH REPEAT REPEAT A-B REC SPEED MODE TIMER SET SP When an OTR ends The DVD/VCR will flash indicating that it on the TV screen. • To change...
... DVD/VCR. ● Select a recording speed (SP, SLP) by pressing STOP/EJECT C A on the display panel during an OTR, the OTR has priority. OTR (0:30) 2 OPEN/CLOSE 1 2 3 4 5 6 TRACKING 7 8 9 CLEAR TITLE +10 0 VCR INPUT SETUP DVD DISC MENU OK REW PLAY FFW STOP PAUSE BACK DISPLAY SUBTITLE ZOOM AUDIO ANGLE SEARCH REPEAT REPEAT A-B REC SPEED MODE TIMER SET SP When an OTR ends The DVD/VCR will flash indicating that it on the TV screen. • To change...
User manual
Page 24
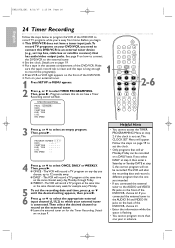
... and the tape is not set the clock. • Only programs that do not have a tuner input jack.To record TV programs on page 9. TIMER PROGRAMMING PROG. 12345678 DATE START TIME END TIME L1/L2 REC SPEED OPEN/CLOSE 1 2 3 4 5 6 TRACKING 7 8 9 CLEAR TITLE +10 0 VCR INPUT SETUP DVD DISC MENU OK REW PLAY FFW 2-6 STOP PAUSE BACK DISPLAY SUBTITLE ZOOM AUDIO ANGLE SEARCH REPEAT REPEAT A-B REC SPEED MODE TIMER SET 3 Press K or L to select ONCE, DAILY or WEEKLY. Helpful Hints...
... and the tape is not set the clock. • Only programs that do not have a tuner input jack.To record TV programs on page 9. TIMER PROGRAMMING PROG. 12345678 DATE START TIME END TIME L1/L2 REC SPEED OPEN/CLOSE 1 2 3 4 5 6 TRACKING 7 8 9 CLEAR TITLE +10 0 VCR INPUT SETUP DVD DISC MENU OK REW PLAY FFW 2-6 STOP PAUSE BACK DISPLAY SUBTITLE ZOOM AUDIO ANGLE SEARCH REPEAT REPEAT A-B REC SPEED MODE TIMER SET 3 Press K or L to select ONCE, DAILY or WEEKLY. Helpful Hints...
User manual
Page 25
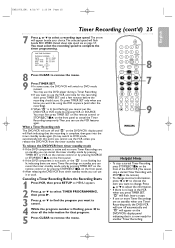
... minutes before the recording should start. OPEN/CLOSE 1 2 3 4 5 6 TRACKING 7 8 9 CLEAR TITLE +10 0 VCR INPUT SETUP DVD DISC MENU OK REW PLAY FFW STOP PAUSE BACK DISPLAY SUBTITLE ZOOM AUDIO ANGLE SEARCH REPEAT REPEAT A-B REC SPEED MODE TIMER SET 8 7 9 Helpful Hints • To stop a started Timer Recording, press STOP/EJECT CA on the front of the DVD/VCR. (You cannot stop a started Timer Recording with STOP C on the DVD/VCR's display panel will turn off and " " on the remote.) • To change . The selected...
... minutes before the recording should start. OPEN/CLOSE 1 2 3 4 5 6 TRACKING 7 8 9 CLEAR TITLE +10 0 VCR INPUT SETUP DVD DISC MENU OK REW PLAY FFW STOP PAUSE BACK DISPLAY SUBTITLE ZOOM AUDIO ANGLE SEARCH REPEAT REPEAT A-B REC SPEED MODE TIMER SET 8 7 9 Helpful Hints • To stop a started Timer Recording, press STOP/EJECT CA on the front of the DVD/VCR. (You cannot stop a started Timer Recording with STOP C on the DVD/VCR's display panel will turn off and " " on the remote.) • To change . The selected...
User manual
Page 26
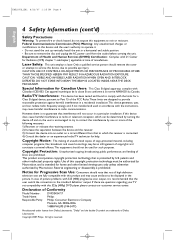
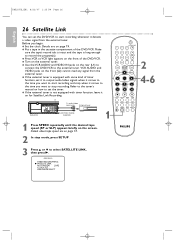
... OUT COMPONENT VIDEO OUT Y DVD/VCR VCR AUDIO OUT AUDIO IN L L L COAXIAL R CB / PB R R VIDEO OUT VIDEO IN CR / PR To audio/video input jacks External tuner Audio/Video Cables (supplied) 1 OPEN/CLOSE 1 2 3 4 5 6 TRACKING 7 8 9 CLEAR TITLE +10 0 VCR INPUT SETUP DVD DISC MENU OK REW PLAY FFW STOP PAUSE BACK DISPLAY SUBTITLE ZOOM AUDIO ANGLE SEARCH REPEAT REPEAT A-B REC SPEED MODE TIMER SET 2 4-6 1 Press SPEED repeatedly until the desired tape speed (SP or SLP) appears briefly on page 57. 2 In stop mode, press SETUP. 3 Press K or L to start recording...
... OUT COMPONENT VIDEO OUT Y DVD/VCR VCR AUDIO OUT AUDIO IN L L L COAXIAL R CB / PB R R VIDEO OUT VIDEO IN CR / PR To audio/video input jacks External tuner Audio/Video Cables (supplied) 1 OPEN/CLOSE 1 2 3 4 5 6 TRACKING 7 8 9 CLEAR TITLE +10 0 VCR INPUT SETUP DVD DISC MENU OK REW PLAY FFW STOP PAUSE BACK DISPLAY SUBTITLE ZOOM AUDIO ANGLE SEARCH REPEAT REPEAT A-B REC SPEED MODE TIMER SET 2 4-6 1 Press SPEED repeatedly until the desired tape speed (SP or SLP) appears briefly on page 57. 2 In stop mode, press SETUP. 3 Press K or L to start recording...
User manual
Page 51
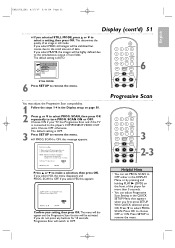
... DISPLAY Menu or by pressing and holding PLAY B (DVD) on page 50. 2 Press K or L to the small amount of an image in still mode. If you select YES, this message appears: OPEN/CLOSE 1 2 3 4 5 6 TRACKING 7 8 9 CLEAR TITLE +10 0 VCR INPUT SETUP DVD DISC MENU OK REW PLAY FFW 3 2-3 Press K or L to select PROG. SCAN ON or OFF. The default setting is connected to remove the menu. ● If PROG. If Picture is AUTO...
... DISPLAY Menu or by pressing and holding PLAY B (DVD) on page 50. 2 Press K or L to the small amount of an image in still mode. If you select YES, this message appears: OPEN/CLOSE 1 2 3 4 5 6 TRACKING 7 8 9 CLEAR TITLE +10 0 VCR INPUT SETUP DVD DISC MENU OK REW PLAY FFW 3 2-3 Press K or L to select PROG. SCAN ON or OFF. The default setting is connected to remove the menu. ● If PROG. If Picture is AUTO...
User manual
Page 52
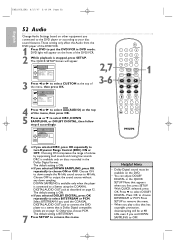
... BITSTREAM if you used the COAXIAL DIGITAL AUDIO OUT jack to connect the DVD player to a stereo that appears when you set DOWN SAMPLING to OFF. Press SETUP to remove the menu. • When you play a disc that has copyright protection, downsampling will appear. OPEN/CLOSE 1 2 3 4 5 6 TRACKING 7 8 9 CLEAR TITLE +10 0 VCR INPUT SETUP DVD DISC MENU OK REW PLAY FFW STOP PAUSE BACK DISPLAY SUBTITLE ZOOM AUDIO ANGLE SEARCH REPEAT REPEAT A-B REC SPEED MODE TIMER SET 1 AUDIO DRC ON...
... BITSTREAM if you used the COAXIAL DIGITAL AUDIO OUT jack to connect the DVD player to a stereo that appears when you set DOWN SAMPLING to OFF. Press SETUP to remove the menu. • When you play a disc that has copyright protection, downsampling will appear. OPEN/CLOSE 1 2 3 4 5 6 TRACKING 7 8 9 CLEAR TITLE +10 0 VCR INPUT SETUP DVD DISC MENU OK REW PLAY FFW STOP PAUSE BACK DISPLAY SUBTITLE ZOOM AUDIO ANGLE SEARCH REPEAT REPEAT A-B REC SPEED MODE TIMER SET 1 AUDIO DRC ON...

User manual
Page 58
... remote control. The DVD/VCR usually turns on page 18. • Remove all obstacles between the two modes. Details are questions regarding your TV set correctly according to your product, check this list of problems and possible solutions before you call a customer service representative, please know the model number and serial number of the DVD/VCR. • Check if Progressive Scan is NTSC or PAL compatible. This means the DVD/VCR is in Region...
... remote control. The DVD/VCR usually turns on page 18. • Remove all obstacles between the two modes. Details are questions regarding your TV set correctly according to your product, check this list of problems and possible solutions before you call a customer service representative, please know the model number and serial number of the DVD/VCR. • Check if Progressive Scan is NTSC or PAL compatible. This means the DVD/VCR is in Region...
User manual
Page 59
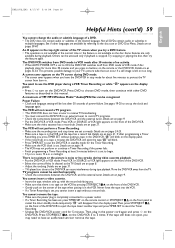
...; Make sure a tape is completely connected to begin. • 12 p.m. See pages 19-20 to set , press TIMER SET on the remote control or STOP/EJECT CA on the DVD/VCR. Press VCR or SOURCE so VCR light appears on the display panel. • Press y to the disc case or DVD Disc Menu. is midnight. Then, plug in this DVD/VCR to an external tuner to VCR mode after programming a Timer Recording, you leave the DVD/VCR in stop times...
...; Make sure a tape is completely connected to begin. • 12 p.m. See pages 19-20 to set , press TIMER SET on the remote control or STOP/EJECT CA on the DVD/VCR. Press VCR or SOURCE so VCR light appears on the display panel. • Press y to the disc case or DVD Disc Menu. is midnight. Then, plug in this DVD/VCR to an external tuner to VCR mode after programming a Timer Recording, you leave the DVD/VCR in stop times...
User manual
Page 63
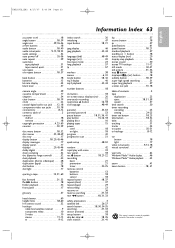
... mode button 18, 42 mp3 display 46 mp3 playback 43-44 number buttons 18 ok button 18 on-screen status displays (vcr) . . . . .20 one-touch recording 22 open/close A button 16, 18 osd language 48-49 parental 53-54 parental password 53 pause button 18, 31, 36, 41 play button 15-16, 18 playing discs 16 playing tapes 15 power cord 18 on light 18 program 42 progressive scan 51 quick setup 48-52 random 42 rapid play with voice 33 rear panel 18 rec I button...
... mode button 18, 42 mp3 display 46 mp3 playback 43-44 number buttons 18 ok button 18 on-screen status displays (vcr) . . . . .20 one-touch recording 22 open/close A button 16, 18 osd language 48-49 parental 53-54 parental password 53 pause button 18, 31, 36, 41 play button 15-16, 18 playing discs 16 playing tapes 15 power cord 18 on light 18 program 42 progressive scan 51 quick setup 48-52 random 42 rapid play with voice 33 rear panel 18 rec I button...


