
Leaflet
Page 1
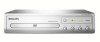
This Philips DVD player delivers your movies and music entertainment experience right in your movies and music • Plays MP3, WMA and JPEG digital camera photos • Plays CD, (S)VCD, DVD, DVD+R/RW, DVD-R/RW Fits any space, any lifestyle • Ultra-slim design that promises flawless, true-to-... outputs for analog and digital audio • Progressive Scan component video for optimized image quality Play all Introducing a dream player that fits anywhere Bring audio and video to play virtually any disc! Philips DVD player DVP1013 Simply plays it all your personal environment.
This Philips DVD player delivers your movies and music entertainment experience right in your movies and music • Plays MP3, WMA and JPEG digital camera photos • Plays CD, (S)VCD, DVD, DVD+R/RW, DVD-R/RW Fits any space, any lifestyle • Ultra-slim design that promises flawless, true-to-... outputs for analog and digital audio • Progressive Scan component video for optimized image quality Play all Introducing a dream player that fits anywhere Bring audio and video to play virtually any disc! Philips DVD player DVP1013 Simply plays it all your personal environment.

Leaflet
Page 2
...; Issue date 2011-01-06 Version: 2.0.4 12 NC: 8670 000 53019 UPC: 6 09585 17188 6 © 2011 Koninklijke Philips Electronics N.V. www.philips.com Progressive Scan Progressive Scan doubles the vertical resolution of the original sound curves. At such a speed, your TV or home ...the field with the even lines, both fields are the property of Koninklijke Philips Electronics N.V. A full image is captured from the original analogue sound wave form, giving a much richer audio reproduction. DVD player Specifications DVP1013/F7 Highlights Picture/Display • D/A converter: 12 bit, 108 MHz...
...; Issue date 2011-01-06 Version: 2.0.4 12 NC: 8670 000 53019 UPC: 6 09585 17188 6 © 2011 Koninklijke Philips Electronics N.V. www.philips.com Progressive Scan Progressive Scan doubles the vertical resolution of the original sound curves. At such a speed, your TV or home ...the field with the even lines, both fields are the property of Koninklijke Philips Electronics N.V. A full image is captured from the original analogue sound wave form, giving a much richer audio reproduction. DVD player Specifications DVP1013/F7 Highlights Picture/Display • D/A converter: 12 bit, 108 MHz...

User manual
Page 6
... rear of packaging materials, exhausted batteries and old equipment. Please observe the local regulations regarding the disposal of your DVD Video player and enter below the Serial No. Laser Safety This unit employs a laser. or their respective owners. The packaging... Environmental Information All unnecessary packaging has been omitted. Your DVD player consists of Microsoft Corporation in the United States and/or other countries. Windows Media and the Windows logo are trademarks of Koninklijke Philips Electronics N.V. Manufactured under license from Dolby Laboratories. Model No...
... rear of packaging materials, exhausted batteries and old equipment. Please observe the local regulations regarding the disposal of your DVD Video player and enter below the Serial No. Laser Safety This unit employs a laser. or their respective owners. The packaging... Environmental Information All unnecessary packaging has been omitted. Your DVD player consists of Microsoft Corporation in the United States and/or other countries. Windows Media and the Windows logo are trademarks of Koninklijke Philips Electronics N.V. Manufactured under license from Dolby Laboratories. Model No...

User manual
Page 10
... qualified personnel. English Care and Safety Information DANGER! Setup Finding a suitable location - Since the optical unit (laser) of the DVD player operates at least 10 cm (4.0") clearance from the rear and the top of other equipment that might heat it up . Do ...cleaning CD. 5cm (2.0") Avoid high temperatures, moisture, water and dust - CAUTION! Allow at a higher power than regular DVD or CD players, cleaning CDs intended for DVD or CD players may damage the optical unit (laser). Please leave all maintenance work to prevent overheating. 5cm (2.0") 10cm (4.0") 10cm (4.0") ...
... qualified personnel. English Care and Safety Information DANGER! Setup Finding a suitable location - Since the optical unit (laser) of the DVD player operates at least 10 cm (4.0") clearance from the rear and the top of other equipment that might heat it up . Do ...cleaning CD. 5cm (2.0") Avoid high temperatures, moisture, water and dust - CAUTION! Allow at a higher power than regular DVD or CD players, cleaning CDs intended for DVD or CD players may damage the optical unit (laser). Please leave all maintenance work to prevent overheating. 5cm (2.0") 10cm (4.0") 10cm (4.0") ...

User manual
Page 11
...and India regions ALL 5 China, Calcos Islands, Walls and Futuna ALL 6 Islands 11 English Region U.S.A. Check the regional code number on this DVD player. and Canada regions Discs that can be unable to support the Region Management System. Accessories supplied Composite video cable (yellow) and audio cables (...RETURN TITLE PREV STOP PLAY/PAUSE SETUP NEXT MUTE SUBTITLE ZOOM REPEAT AUDIO REPEAT A-B General Information Region codes This DVD player is designed to playback the disc. If you are having trouble playing a certain disc, remove the disc and try a different...
...and India regions ALL 5 China, Calcos Islands, Walls and Futuna ALL 6 Islands 11 English Region U.S.A. Check the regional code number on this DVD player. and Canada regions Discs that can be unable to support the Region Management System. Accessories supplied Composite video cable (yellow) and audio cables (...RETURN TITLE PREV STOP PLAY/PAUSE SETUP NEXT MUTE SUBTITLE ZOOM REPEAT AUDIO REPEAT A-B General Information Region codes This DVD player is designed to playback the disc. If you are having trouble playing a certain disc, remove the disc and try a different...

User manual
Page 12
...IMPORTANT! - C Proceed to the television. Using Composite Video jacks (CVBS) A Use the composite video cable (yellow) to connect the DVD player's CVBS jack to make sure that all the devices are disconnected from the following options, depending on the capabilities of your television. -... Y 1 IMPORTANT! - TIPS: Before making or changing any connections, make one video connection from the power outlet. 12 Connect the DVD player directly to page 19 for detailed progressive scan setup. The progressive scan video quality is only possible when using YPbPr and a progressive scan...
...IMPORTANT! - C Proceed to the television. Using Composite Video jacks (CVBS) A Use the composite video cable (yellow) to connect the DVD player's CVBS jack to make sure that all the devices are disconnected from the following options, depending on the capabilities of your television. -... Y 1 IMPORTANT! - TIPS: Before making or changing any connections, make one video connection from the power outlet. 12 Connect the DVD player directly to page 19 for detailed progressive scan setup. The progressive scan video quality is only possible when using YPbPr and a progressive scan...

User manual
Page 13
See your electronics retailer or contact Philips for details on the RF modulator. (It may have been connected to your TV...and operations. If your TV, use the audio cables (white/red) to connect AUDIO OUT (L/ R) jacks of this DVD player through your television only has a single Antenna In jack (or labeled as 75 ohm or RF In,) you will need... IN 1 IMPORTANT! - Using an accessory RF modulator A Use the composite video cable (yellow) to connect the DVD player's CVBS jack to the corresponding AUDIO IN jacks on the RF modulator. English Connections (continued) RF coaxial cable to view the...
See your electronics retailer or contact Philips for details on the RF modulator. (It may have been connected to your TV...and operations. If your TV, use the audio cables (white/red) to connect AUDIO OUT (L/ R) jacks of this DVD player through your television only has a single Antenna In jack (or labeled as 75 ohm or RF In,) you will need... IN 1 IMPORTANT! - Using an accessory RF modulator A Use the composite video cable (yellow) to connect the DVD player's CVBS jack to the corresponding AUDIO IN jacks on the RF modulator. English Connections (continued) RF coaxial cable to view the...

User manual
Page 15
... output to the corresponding Digital Audio In jack on your receiver (cable not supplied). B Connect the COAXIAL jack of the DVD player to PCM-Only or ALL depending on the capabilities of your receiver (see page 31 {Digital Output}). TIPS: Before making or changing any connections, make ...sure that all . If the audio format of the Digital Output does not match the capabilities of the DVD Player to the corresponding AUDIO IN jacks on the stereo system (cable supplied). Receiver has a PCM, Dolby Digital or MPEG decoder A Select one of the video...
... output to the corresponding Digital Audio In jack on your receiver (cable not supplied). B Connect the COAXIAL jack of the DVD player to PCM-Only or ALL depending on the capabilities of your receiver (see page 31 {Digital Output}). TIPS: Before making or changing any connections, make ...sure that all . If the audio format of the Digital Output does not match the capabilities of the DVD Player to the corresponding AUDIO IN jacks on the stereo system (cable supplied). Receiver has a PCM, Dolby Digital or MPEG decoder A Select one of the video...
User manual
Page 17
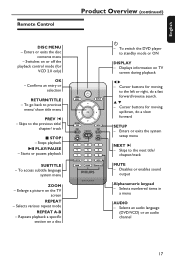
...system menu ZOOM - Selects various repeat mode REPEAT A-B - Skips to the previous title/ chapter/ track STOP - Selects an audio language (DVD/VCD) or an audio channel 17 Skips to the next title/ chapter/track MUTE - Displays information on a disc DISC MENU DISPLAY RETURN ...for VCD 2.0 only) OK - Disables or enables sound output Alphanumeric keypad - Selects numbered items in a menu AUDIO - S T - To switch the DVD player to previous menu/ show title menu PREV í - To go back to standby mode or ON DISPLAY - English Remote Control Product Overview (continued) ...
...system menu ZOOM - Selects various repeat mode REPEAT A-B - Skips to the previous title/ chapter/ track STOP - Selects an audio language (DVD/VCD) or an audio channel 17 Skips to the next title/ chapter/track MUTE - Displays information on a disc DISC MENU DISPLAY RETURN ...for VCD 2.0 only) OK - Disables or enables sound output Alphanumeric keypad - Selects numbered items in a menu AUDIO - S T - To switch the DVD player to previous menu/ show title menu PREV í - To go back to standby mode or ON DISPLAY - English Remote Control Product Overview (continued) ...

User manual
Page 18
... see the Video In channel. Using the remote control to operate the system A Press STANDBY-ON 2 on your TV's manual for the DVD player output. Or, you are exhausted or if the remote is not to turn that chooses different video modes. DISC MENU DISPLAY RETURN TITLE PREV...remote sensor (IR) on . See your TV, then press the Channel down button repeatedly until you are between the remote control and the DVD player while operating the DVD player. 18 CAUTION! - Do not use old and new or different types of properly. Refer to the correct video-in combination. - C ...
... see the Video In channel. Using the remote control to operate the system A Press STANDBY-ON 2 on your TV's manual for the DVD player output. Or, you are exhausted or if the remote is not to turn that chooses different video modes. DISC MENU DISPLAY RETURN TITLE PREV...remote sensor (IR) on . See your TV, then press the Channel down button repeatedly until you are between the remote control and the DVD player while operating the DVD player. 18 CAUTION! - Do not use old and new or different types of properly. Refer to the correct video-in combination. - C ...

User manual
Page 19
...231; on your TV and set to interlace mode (refer to confirm. Press SETUP to open the disc tray. I Turn on the DVD player to exit the menu item. 19 CONFIRM AGAIN TO USE PROGRESSIVE SCAN. TY Type TV Display Progressive Closed Captions Sharpness Brightness Contrast Color Preference... some progressive scan TVs and High-Definition TVs that are not fully compatible with this DVD player to turn off the progressive scan feature on the DVD player. In such a case, turn on both the DVD player and your TV user manual). Ensure that you start enjoy the high quality picture....
...231; on your TV and set to interlace mode (refer to confirm. Press SETUP to open the disc tray. I Turn on the DVD player to exit the menu item. 19 CONFIRM AGAIN TO USE PROGRESSIVE SCAN. TY Type TV Display Progressive Closed Captions Sharpness Brightness Contrast Color Preference... some progressive scan TVs and High-Definition TVs that are not fully compatible with this DVD player to turn off the progressive scan feature on the DVD player. In such a case, turn on both the DVD player and your TV user manual). Ensure that you start enjoy the high quality picture....

User manual
Page 20
... color system of a PAL disc and output it to NTSC format. General Audio Video - - B Press X to play. It will change the video signal of the DVD player, disc and TV should match in order for the disc to select { Video Setup Page }. TIPS: 20 The underlined option is the factory default setting.
... color system of a PAL disc and output it to NTSC format. General Audio Video - - B Press X to play. It will change the video signal of the DVD player, disc and TV should match in order for the disc to select { Video Setup Page }. TIPS: 20 The underlined option is the factory default setting.

User manual
Page 21
... confirm. D Use S T to select a language and press OK to previous menu item. It may not correspond to change the subtitle language. { Disc Menu } Select this DVD player screen display menu. Audio Subtitle Disc Menu Parental Password Default Preference A Press STOP Ç twice to change the language of the disc menu. General Audio...
... confirm. D Use S T to select a language and press OK to previous menu item. It may not correspond to change the subtitle language. { Disc Menu } Select this DVD player screen display menu. Audio Subtitle Disc Menu Parental Password Default Preference A Press STOP Ç twice to change the language of the disc menu. General Audio...

User manual
Page 22
... Maximum 14 characters display. - Supported bit-rate; 32 - 320 kbps (MP3) 32 - 192 kbps (WMA) JPEG pictures - Playable discs Using this DVD player due to the configuration and characteristics of recording and authoring software that was used. 22 The file extensions has to the condition of the disc...the same zone as TIFF. Before playing a disc, make sure the disc is not available on this DVD player, you can only display DCF-standard still pictures or JPEG pictures such as your player. Audio CD (Compact Disc Digital Audio) Video CD (Formats 1.0, 1.1, 2.0) Super Video CD MP3-...
... Maximum 14 characters display. - Supported bit-rate; 32 - 320 kbps (MP3) 32 - 192 kbps (WMA) JPEG pictures - Playable discs Using this DVD player due to the configuration and characteristics of recording and authoring software that was used. 22 The file extensions has to the condition of the disc...the same zone as TIFF. Before playing a disc, make sure the disc is not available on this DVD player, you can only display DCF-standard still pictures or JPEG pictures such as your player. Audio CD (Compact Disc Digital Audio) Video CD (Formats 1.0, 1.1, 2.0) Super Video CD MP3-...

User manual
Page 23
... to the instructions supplied with the label facing up . D Place a disc into the disc tray with the discs. 23 Do not overturn the DVD player while disc loading, playing or ejecting. - If a disc menu appears on the TV, see page 35). Pausing playback A During playback, press ...u to the selected title/chapter/track. Selecting title/chapter/track During playback, press PREV í to go to the beginning of the DVD player. Tips: - Screen saver will start automatically. Sound will automatically switch to Power Standby mode if you do not press any buttons for ...
... to the instructions supplied with the label facing up . D Place a disc into the disc tray with the discs. 23 Do not overturn the DVD player while disc loading, playing or ejecting. - If a disc menu appears on the TV, see page 35). Pausing playback A During playback, press ...u to the selected title/chapter/track. Selecting title/chapter/track During playback, press PREV í to go to the beginning of the DVD player. Tips: - Screen saver will start automatically. Sound will automatically switch to Power Standby mode if you do not press any buttons for ...

User manual
Page 28
... and commercial CD. D Press S T to previous / next page of the directory/file configuration. English Playback Features (continued) Playing MP3/WMA/JPEG/ Kodak Picture CD This DVD player can ; IMPORTANT!
... and commercial CD. D Press S T to previous / next page of the directory/file configuration. English Playback Features (continued) Playing MP3/WMA/JPEG/ Kodak Picture CD This DVD player can ; IMPORTANT!
User manual
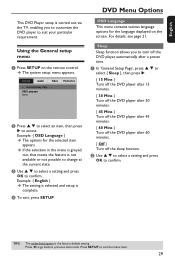
Page 29
...7716; Preference B Press S T to select an item, then press X to previous menu item. For details, see page 21. English This DVD Player setup is complete. Example: { English } The setting is selected and setup is carried out via the TV, enabling you to turn off the ...then press X. { 15 Mins } Turn off the DVD player after 15 minutes. { 30 Mins } Turn off the DVD player after 30 minutes. { 45 Mins } Turn off the DVD player after 45 minutes. { 60 Mins } Turn off the DVD player after 60 minutes. { Off } Turn off the DVD player automatically after a preset time. A In 'General Setup...
...7716; Preference B Press S T to select an item, then press X to previous menu item. For details, see page 21. English This DVD Player setup is complete. Example: { English } The setting is selected and setup is carried out via the TV, enabling you to turn off the ...then press X. { 15 Mins } Turn off the DVD player after 15 minutes. { 30 Mins } Turn off the DVD player after 30 minutes. { 45 Mins } Turn off the DVD player after 45 minutes. { 60 Mins } Turn off the DVD player after 60 minutes. { Off } Turn off the DVD player automatically after a preset time. A In 'General Setup...
User manual
Page 30
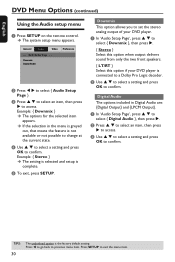
... select { Downmix }, then press X. { Stereo } Select this option when output delivers sound from only the two front speakers. { LT/RT } Select this option if your DVD player. English DVD Menu Options (continued) Using the Audio setup menu A Press SETUP on the remote control. Downmix Digital Audio Preference B Press W X to confirm. D Use S T to select... setup menu appears. Audio Setup Page - - C Press S T to select an item, then press X to confirm. Press SETUP to set the stereo analog output of your DVD player is complete.
... select { Downmix }, then press X. { Stereo } Select this option when output delivers sound from only the two front speakers. { LT/RT } Select this option if your DVD player. English DVD Menu Options (continued) Using the Audio setup menu A Press SETUP on the remote control. Downmix Digital Audio Preference B Press W X to confirm. D Use S T to select... setup menu appears. Audio Setup Page - - C Press S T to select an item, then press X to confirm. Press SETUP to set the stereo analog output of your DVD player is complete.

User manual
Page 31
... Output Set the Digital Output according to your optional audio equipment connection. { All } Select this if the connected device is activated. The DVD player will convert the Dolby Digital and MPEG-2 multichannel signals to access. This rate can be achieved in multichannel decoder that means the feature is... { TV Display } The options for the selected item appears. Discs are recorded at the current state. LPCM Output If you connect the DVD player to a PCM compatible receiver via the digital terminals, such as coaxial or optical etc, you use the AUDIO OUT sockets to connect to ...
... Output Set the Digital Output according to your optional audio equipment connection. { All } Select this if the connected device is activated. The DVD player will convert the Dolby Digital and MPEG-2 multichannel signals to access. This rate can be achieved in multichannel decoder that means the feature is... { TV Display } The options for the selected item appears. Discs are recorded at the current state. LPCM Output If you connect the DVD player to a PCM compatible receiver via the digital terminals, such as coaxial or optical etc, you use the AUDIO OUT sockets to connect to ...
User manual
Page 32
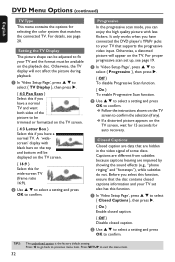
... appear on the TV screen to be available on the TV screen. { 4:3 Letter Box } Select this function. Press W to go back to confirm. DVD Menu Options (continued) English TV Type This menu contains the options for wide-screen TV (frame ratio 16:9). It only works when you have a normal... 'Video Setup Page', press S T to fit your TV and the format must be trimmed or formatted on the playback disc. Before you have connected the DVD player's YPbPr jacks to your TV set up, see page 20. A In 'Video Setup Page', press S T to confirm. For details, see page 19. B Use S T ...
... appear on the TV screen to be available on the TV screen. { 4:3 Letter Box } Select this function. Press W to go back to confirm. DVD Menu Options (continued) English TV Type This menu contains the options for wide-screen TV (frame ratio 16:9). It only works when you have a normal... 'Video Setup Page', press S T to fit your TV and the format must be trimmed or formatted on the playback disc. Before you have connected the DVD player's YPbPr jacks to your TV set up, see page 20. A In 'Video Setup Page', press S T to confirm. For details, see page 19. B Use S T ...


