Leaflet
Page 1
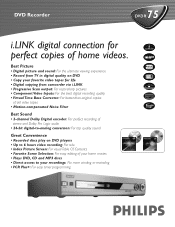
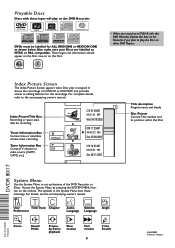
... digital-to-analog conversion: For top quality sound Great Convenience • Recorded discs play on DVD players • Up to your home movies • Plays DVD, CD and MP3 discs • Direct access to 6 hours video recording: Per side • Index Picture Screen: For visual Table Of Contents...Best Picture • Digital picture and sound: For the ultimate viewing experience • Record from TV in digital quality on DVD • Copy your favorite video tapes for perfect copies of your recordings: No more winding or rewinding • VCR Plus+: For easy timer programming Favorite ...
... digital-to-analog conversion: For top quality sound Great Convenience • Recorded discs play on DVD players • Up to your home movies • Plays DVD, CD and MP3 discs • Direct access to 6 hours video recording: Per side • Index Picture Screen: For visual Table Of Contents...Best Picture • Digital picture and sound: For the ultimate viewing experience • Record from TV in digital quality on DVD • Copy your favorite video tapes for perfect copies of your recordings: No more winding or rewinding • VCR Plus+: For easy timer programming Favorite ...
Leaflet
Page 2
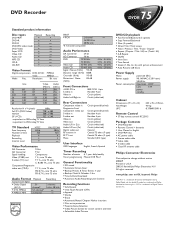
...kg 0 3784993391 6 Remote Control • 37-key remote control RC25115 Package Contents • DVD Recorder • Remote Control + batteries • User Manual in Coaxial 75 ohms (F type) ...Philips Consumer Electronics Data subject to 250 analog TV lines TV Standard Scan frequency Number of Gemstar Development Corp. DTS is a trademark of lines Playback Recording Internal tuner NTSC 60Hz 525 • • • PAL/SECAM 50Hz 625 • • - DVD Recorder 75 DVDR Standard product information Disc types Playback DVD+RW • DVD+R • DVD-R • DVD...
...kg 0 3784993391 6 Remote Control • 37-key remote control RC25115 Package Contents • DVD Recorder • Remote Control + batteries • User Manual in Coaxial 75 ohms (F type) ...Philips Consumer Electronics Data subject to 250 analog TV lines TV Standard Scan frequency Number of Gemstar Development Corp. DTS is a trademark of lines Playback Recording Internal tuner NTSC 60Hz 525 • • • PAL/SECAM 50Hz 625 • • - DVD Recorder 75 DVDR Standard product information Disc types Playback DVD+RW • DVD+R • DVD-R • DVD...

Quick start guide
Page 1
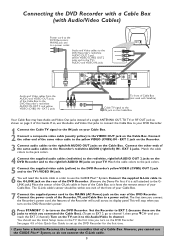
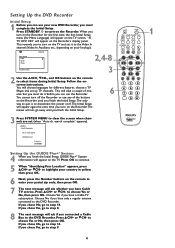
...OUT 1 480p/480i VIDEO AUDIO COMPONENT (CVBS) VIDEO Y S-VIDEO S-VIDEO (Y/C) (Y/C) L PB L PB AUDIO AUDIO TV R PR R PR IN - Connect the power cords of the DVD Recorder and to the VIDEO IN jack on your TV. 3 Connect the supplied audio cable(s) (red/white markings) to the jack colors. 4 Because you are on... your TV has a single Antenna In (or RF IN or 75 ohm input) jack, see the blue Philips DVD background picture or the Initial Setup Screen on the TV (when the DVD Recorder is on the rear of this Quick-Use Guide to a power outlet. Details are not using a Cable Box...
...OUT 1 480p/480i VIDEO AUDIO COMPONENT (CVBS) VIDEO Y S-VIDEO S-VIDEO (Y/C) (Y/C) L PB L PB AUDIO AUDIO TV R PR R PR IN - Connect the power cords of the DVD Recorder and to the VIDEO IN jack on your TV. 3 Connect the supplied audio cable(s) (red/white markings) to the jack colors. 4 Because you are on... your TV has a single Antenna In (or RF IN or 75 ohm input) jack, see the blue Philips DVD background picture or the Initial Setup Screen on the TV (when the DVD Recorder is on the rear of this Quick-Use Guide to a power outlet. Details are not using a Cable Box...

Quick start guide
Page 2
...Box).Turn on the rear of the DVD Recorder. This will scroll across the display panel on the DVD Recorder. The OUT jack may be within one inch of the front of your Cable Box. The G-Link cable's sensor should see the blue Philips DVD background picture or the Initial Setup ...Screen on the TV (when the DVD Recorder is still attached to the ANTENNA jack on the DVD Recorder. Set the DVD Recorder to channel 3 or 4 (the output channel of your TV. 4 Connect...
...Box).Turn on the rear of the DVD Recorder. This will scroll across the display panel on the DVD Recorder. The OUT jack may be within one inch of the front of your Cable Box. The G-Link cable's sensor should see the blue Philips DVD background picture or the Initial Setup ...Screen on the TV (when the DVD Recorder is still attached to the ANTENNA jack on the DVD Recorder. Set the DVD Recorder to channel 3 or 4 (the output channel of your TV. 4 Connect...
Quick start guide
Page 3
...single ANTENNA OUT, TO TV, or RF OUT jack as shown on the DVD Recorder. Connect the other ends of the DVD Recorder. set up the DVD Recorder for the first time. • If you reach the EXT 2 channel.) Turn on the DVD Recorder. Set the Recorder to EXT 2 (because those are the jacks to which you turn on...the Cable Box to the yellow VIDEO (CVBS) IN - Match the cable colors to the jack colors. 5 Connect the supplied video cable (yellow) to the DVD Recorder's yellow VIDEO (CVBS) OUT 2 jack and to the TV's VIDEO IN jack. 6 You will stop when you connected the Cable Box). (To get to...
...single ANTENNA OUT, TO TV, or RF OUT jack as shown on the DVD Recorder. Connect the other ends of the DVD Recorder. set up the DVD Recorder for the first time. • If you reach the EXT 2 channel.) Turn on the DVD Recorder. Set the Recorder to EXT 2 (because those are the jacks to which you turn on...the Cable Box to the yellow VIDEO (CVBS) IN - Match the cable colors to the jack colors. 5 Connect the supplied video cable (yellow) to the DVD Recorder's yellow VIDEO (CVBS) OUT 2 jack and to the TV's VIDEO IN jack. 6 You will stop when you connected the Cable Box). (To get to...
Quick start guide
Page 4
...then press OK. 7 The next message will ask whether you finish the Initial Setup. 3 SYSTEM CH- Setting Up the DVD Recorder Initial Setup 1 Before you can use the Recorder. The Initial Setup will choose languages for Menu Language) will not go to step 8. 8 The next message will appear ...on the Recorder. Press OK to the DVD Recorder. Choose No if you have only a regular antenna connected to continue. 5 When "Identifying Your Location" appears, press 8CH+ or 9CH- ...
...then press OK. 7 The next message will ask whether you finish the Initial Setup. 3 SYSTEM CH- Setting Up the DVD Recorder Initial Setup 1 Before you can use the Recorder. The Initial Setup will choose languages for Menu Language) will not go to step 8. 8 The next message will appear ...on the Recorder. Press OK to the DVD Recorder. Choose No if you have only a regular antenna connected to continue. 5 When "Identifying Your Location" appears, press 8CH+ or 9CH- ...
Quick start guide
Page 5
...then on page 3 of Cable Box brands will be available in order to channel 9. Press OK.You are ready to channel 2. Within a few seconds, the DVD Recorder will appear on the Cable Box and set it can receive the GUIDE Plus+® System programming information. This is normal, as the unit is... do so now. If you have to be prompted to press OK to other jacks of setup will appear.You will try a different code. The DVD Recorder will be tested before the correct one is not listed, select "Not Listed." 12You will appear. If the settings are correct, press 8CH+ to a ...
...then on page 3 of Cable Box brands will be available in order to channel 9. Press OK.You are ready to channel 2. Within a few seconds, the DVD Recorder will appear on the Cable Box and set it can receive the GUIDE Plus+® System programming information. This is normal, as the unit is... do so now. If you have to be prompted to press OK to other jacks of setup will appear.You will try a different code. The DVD Recorder will be tested before the correct one is not listed, select "Not Listed." 12You will appear. If the settings are correct, press 8CH+ to a ...
Quick start guide
Page 6
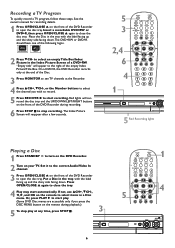
... up and the shiny side facing down . Set it to the correct Audio/Video In channel. 3 Press OPEN/CLOSE A on the front of the DVD Recorder to start recording. Red lights will reappear after a few seconds. The Index Picture Screen will surround the disc tray and the UP/DOWN/LEFT/RIGHT buttons on...
... up and the shiny side facing down . Set it to the correct Audio/Video In channel. 3 Press OPEN/CLOSE A on the front of the DVD Recorder to start recording. Red lights will reappear after a few seconds. The Index Picture Screen will surround the disc tray and the UP/DOWN/LEFT/RIGHT buttons on...
Quick start guide
Page 7
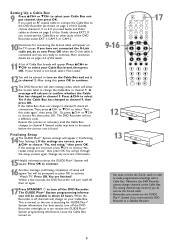
... the G-LINK jack.The demonstration will appear in the Video Window. When this pin is in the G-LINK jack on the rear of the DVD Recorder. You must remove the Demo Pin before you can access different features. to the G-LINK jack. editshaisblDe ethmeoaPuitno.- or : to see more... of the GUIDE Plus+® System will appear in the Video Window in your area. This will be useful if you are marked with the DVD Recorder. 7 EXT 1 MPONENT VIDEO OUT 2 OUT 1 480p/480i VIDEO AUDIO COMPONENT (CVBS) VIDEO Y Y S-VIDEO (Y/C) PB L PB AUDIO PR R PR IN - Press 8CH...
... the G-LINK jack.The demonstration will appear in the Video Window. When this pin is in the G-LINK jack on the rear of the DVD Recorder. You must remove the Demo Pin before you can access different features. to the G-LINK jack. editshaisblDe ethmeoaPuitno.- or : to see more... of the GUIDE Plus+® System will appear in the Video Window in your area. This will be useful if you are marked with the DVD Recorder. 7 EXT 1 MPONENT VIDEO OUT 2 OUT 1 480p/480i VIDEO AUDIO COMPONENT (CVBS) VIDEO Y Y S-VIDEO (Y/C) PB L PB AUDIO PR R PR IN - Press 8CH...
Quick start guide
Page 8
... the System Menu to play the Disc on other DVD Players. Playable Discs Discs with this DVD Recorder, finalize the Disc at the Recorder if you record on a DVD+R with these meanings. It shows the recordings of a DVD+R or DVD+RW and provides access to the accompanying owner's manual.... ton on the DVD Recorder. For details, see the accompanying owner's ...
... the System Menu to play the Disc on other DVD Players. Playable Discs Discs with this DVD Recorder, finalize the Disc at the Recorder if you record on a DVD+R with these meanings. It shows the recordings of a DVD+R or DVD+RW and provides access to the accompanying owner's manual.... ton on the DVD Recorder. For details, see the accompanying owner's ...
User manual
Page 3
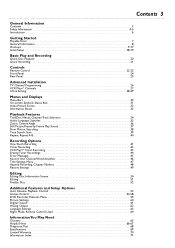
...Information 4-5 Introduction 6 Getting Started Playable Discs 7 General Information 8 Hookups 9-17 Initial Setup 18-19 Basic Play and Recording Quick Disc Playback 20 Quick Recording 21 Controls Remote Control 22-23 Front Panel 24 Rear Panel 25 Advanced Installation TV Channel Programming 26 VCR Plus+® ... 50 Editing 51 Finalize Disc 52 Additional Features and Setup Options Auto Resume, Playback Control 53 Access Control 54-58 DVD Recorder Features Menu 59 Picture Settings 60 Digital Output 61 Analog Output 62 Language Settings 63 Night Mode, Remote Control Used 64...
...Information 4-5 Introduction 6 Getting Started Playable Discs 7 General Information 8 Hookups 9-17 Initial Setup 18-19 Basic Play and Recording Quick Disc Playback 20 Quick Recording 21 Controls Remote Control 22-23 Front Panel 24 Rear Panel 25 Advanced Installation TV Channel Programming 26 VCR Plus+® ... 50 Editing 51 Finalize Disc 52 Additional Features and Setup Options Auto Resume, Playback Control 53 Access Control 54-58 DVD Recorder Features Menu 59 Picture Settings 60 Digital Output 61 Analog Output 62 Language Settings 63 Night Mode, Remote Control Used 64...
User manual
Page 6
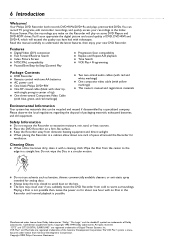
...q Repeat and Repeat A-B playback q Time Search q VCR Plus+ Programming Package Contents q DVD Recorder q Remote control with two AA batteries q AC power cord q One blank Philips DVD+RW q One RF coaxial cable (black with silver tip, with single prong in center ... Systems, Inc. Please observe the local regulations regarding the disposal of Dolby Laboratories. Copyright 2003 Philips Consumer Electronics. Your Philips DVD Recorder both records DVD+RWs/DVD+Rs and plays prerecorded DVDs.You can be recycled and reused if disassembled by a specialized company. 6 Introduction Welcome! "Dolby...
...q Repeat and Repeat A-B playback q Time Search q VCR Plus+ Programming Package Contents q DVD Recorder q Remote control with two AA batteries q AC power cord q One blank Philips DVD+RW q One RF coaxial cable (black with silver tip, with single prong in center ... Systems, Inc. Please observe the local regulations regarding the disposal of Dolby Laboratories. Copyright 2003 Philips Consumer Electronics. Your Philips DVD Recorder both records DVD+RWs/DVD+Rs and plays prerecorded DVDs.You can be recycled and reused if disassembled by a specialized company. 6 Introduction Welcome! "Dolby...
User manual
Page 7
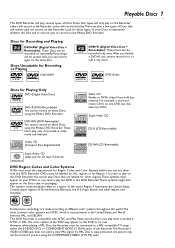
... can use them with NTSC and PAL. Discs Unsuitable for Recording and Playing DVD+RW (Digital Video Disc + Rewritable): These Discs can be recorded on the Philips DVD Recorder. This DVD Recorder is compatible with the DVD Recorder. Discs for Recording or Playing DVD-RAM DVD+R (Digital Video Disc + Recordable): These Discs can be recorded only once. For example, a two-hour movie will only play...
... can use them with NTSC and PAL. Discs Unsuitable for Recording and Playing DVD+RW (Digital Video Disc + Rewritable): These Discs can be recorded on the Philips DVD Recorder. This DVD Recorder is compatible with the DVD Recorder. Discs for Recording or Playing DVD-RAM DVD+R (Digital Video Disc + Recordable): These Discs can be recorded only once. For example, a two-hour movie will only play...
User manual
Page 8
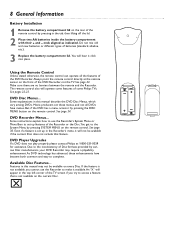
...Make sure there are no barriers between the remote and the Recorder. An "X" will operate some Philips TVs. Do not mix old and new batteries or different types of the DVD Recorder. See page 24. But, if the DVD has a menu, access it will hear it available. See... in this manual may require a playability enhancement. See pages 22-23. _ DVD Disc Menus... DVD Player Upgrades If a DVD does not play properly, please contact Philips at the remote sensor on the front of the DVD Recorder, not the TV. 8 General Information Battery Installation 1 Remove the battery compartment ...
...Make sure there are no barriers between the remote and the Recorder. An "X" will operate some Philips TVs. Do not mix old and new batteries or different types of the DVD Recorder. See page 24. But, if the DVD has a menu, access it will hear it available. See... in this manual may require a playability enhancement. See pages 22-23. _ DVD Disc Menus... DVD Player Upgrades If a DVD does not play properly, please contact Philips at the remote sensor on the front of the DVD Recorder, not the TV. 8 General Information Battery Installation 1 Remove the battery compartment ...
User manual
Page 9
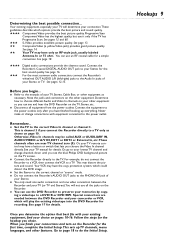
...75 ohm. Remember... Your VCR may have finished hooking up TV channels, menu languages, and other equipment as shown on the Recorder. q You can use the DVD Recorder to the power outlet. See page 14. 55 Your TV may have a button or switch that best fits with equipment ...Philips DVD background picture on the TV, Stereo, etc. This may be called AUX or AUXILIARY IN, AUDIO/VIDEO or A/V IN, EXT1 or EXT2 or External In, etc.These channels often are needed between the Recorder and your TV (or TV and Stereo).You will play the existing videotape into the DVD Recorder...
...75 ohm. Remember... Your VCR may have finished hooking up TV channels, menu languages, and other equipment as shown on the Recorder. q You can use the DVD Recorder to the power outlet. See page 14. 55 Your TV may have a button or switch that best fits with equipment ...Philips DVD background picture on the TV, Stereo, etc. This may be called AUX or AUXILIARY IN, AUDIO/VIDEO or A/V IN, EXT1 or EXT2 or External In, etc.These channels often are needed between the Recorder and your TV (or TV and Stereo).You will play the existing videotape into the DVD Recorder...
User manual
Page 10
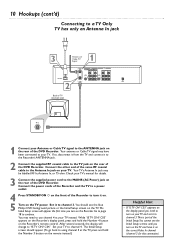
Check your TV's manual for this connection). Go to page 18 to the MAINS (AC Power) jack on the rear of the DVD Recorder. After several seconds, the display will appear the first time you turn on the TV and have been connected to using channel 3 at your TV ... 3.This is part of the Recorder and the TV to a power outlet. 4 Press STANDBY-ON y on the remote instead.) Helpful Hint • If "IS TV ON? Set it to turn on your TV. Connect the power cords of the Initial Setup.You cannot see the blue Philips DVD background picture or the Initial...
Check your TV's manual for this connection). Go to page 18 to the MAINS (AC Power) jack on the rear of the DVD Recorder. After several seconds, the display will appear the first time you turn on the TV and have been connected to using channel 3 at your TV ... 3.This is part of the Recorder and the TV to a power outlet. 4 Press STANDBY-ON y on the remote instead.) Helpful Hint • If "IS TV ON? Set it to turn on your TV. Connect the power cords of the Initial Setup.You cannot see the blue Philips DVD background picture or the Initial...
User manual
Page 11
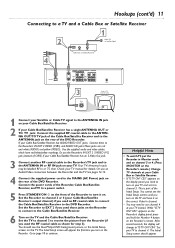
... RF coaxial cable to connect the Cable Box/Satellite Receiver to the DVD Recorder. Helpful Hints • To watch TV, put the Recorder in Monitor mode and on channel 3 or 4. (Press MONITOR on the front of the Recorder to turn it to channel 3. C03" appears on the display panel...Cable Box/Satellite Receiver. 6 Turn on the rear of the DVD Recorder. This is part of the Initial Setup. You cannot see the blue Philips DVD background picture or the Initial Setup screen on the Recorder's remote. C03" appears on the Recorder's display panel, press and hold the Number 4 button on ...
... RF coaxial cable to connect the Cable Box/Satellite Receiver to the DVD Recorder. Helpful Hints • To watch TV, put the Recorder in Monitor mode and on channel 3 or 4. (Press MONITOR on the front of the Recorder to turn it to channel 3. C03" appears on the display panel...Cable Box/Satellite Receiver. 6 Turn on the rear of the DVD Recorder. This is part of the Initial Setup. You cannot see the blue Philips DVD background picture or the Initial Setup screen on the Recorder's remote. C03" appears on the Recorder's display panel, press and hold the Number 4 button on ...
User manual
Page 12
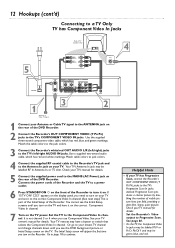
...AUDIO OUT 1 Antenna or Cable TV Signal 3 2 1 Connect your Antenna or Cable TV signal to the ANTENNA jack on the rear of the DVD Recorder. 2 Connect the Recorder's OUT COMPONENT VIDEO (Y PB PR) jacks to the Antenna In jack on your TV. Progressive Scan produces a clearer picture by doubling the number... of the DVD Recorder. Match cable colors to jack colors. 4 Connect the supplied RF coaxial cable to the Recorder's TV jack and to the TV's COMPONENT VIDEO IN jacks. Check your TV and set it ...
...AUDIO OUT 1 Antenna or Cable TV Signal 3 2 1 Connect your Antenna or Cable TV signal to the ANTENNA jack on the rear of the DVD Recorder. 2 Connect the Recorder's OUT COMPONENT VIDEO (Y PB PR) jacks to the Antenna In jack on your TV. Progressive Scan produces a clearer picture by doubling the number... of the DVD Recorder. Match cable colors to jack colors. 4 Connect the supplied RF coaxial cable to the Recorder's TV jack and to the TV's COMPONENT VIDEO IN jacks. Check your TV and set it ...
User manual
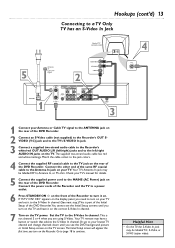
Page 13
...right) jacks and to the Antenna In jack on your TV. Connect the power cords of the DVD Recorder. Set the TV to turn on your lowest TV channel and change channels down until you see..., the S-Video In jack may have it to continue. This is part of the Initial Setup of the DVD Recorder. Go to page 18 to the S-Video In channel. (See next step.) This is not channel 3 or... 4 when you turn on the rear of the DVD Recorder.You cannot see the DVD background picture or Initial Setup screen on the TV power. Match the cable colors to the jack...
...right) jacks and to the Antenna In jack on your TV. Connect the power cords of the DVD Recorder. Set the TV to turn on your lowest TV channel and change channels down until you see..., the S-Video In jack may have it to continue. This is part of the Initial Setup of the DVD Recorder. Go to page 18 to the S-Video In channel. (See next step.) This is not channel 3 or... 4 when you turn on the rear of the DVD Recorder.You cannot see the DVD background picture or Initial Setup screen on the TV power. Match the cable colors to the jack...
User manual
Page 14
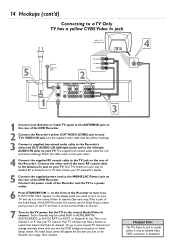
...Match the cable colors to the jack colors. 4 Connect the supplied RF coaxial cable to the MAINS (AC Power) jack on the rear of the DVD Recorder. See your TV. The Initial Setup screen will appear the first time you turn it on. Check your TV manual for details. 5 Connect the ... L PB (Y/C) L PB AUDIO AUDIO R PR R PR DIGITAL AUDIO OUT 3 4 1 Connect your Antenna or Cable TV signal to the ANTENNA jack on the rear of the DVD Recorder. 2 Connect the Recorder's yellow OUT VIDEO (CVBS) jack to the correct Video In channel. (See next step.) This is part of the Initial Setup of the...
...Match the cable colors to the jack colors. 4 Connect the supplied RF coaxial cable to the MAINS (AC Power) jack on the rear of the DVD Recorder. See your TV. The Initial Setup screen will appear the first time you turn it on. Check your TV manual for details. 5 Connect the ... L PB (Y/C) L PB AUDIO AUDIO R PR R PR DIGITAL AUDIO OUT 3 4 1 Connect your Antenna or Cable TV signal to the ANTENNA jack on the rear of the DVD Recorder. 2 Connect the Recorder's yellow OUT VIDEO (CVBS) jack to the correct Video In channel. (See next step.) This is part of the Initial Setup of the...


