

Leaflet
Page 1
... you like in lasting digital quality on DVD The perfect recording solution • FlexTime to watch the beginning while recording the end • Record up to 100 hours of TV on the 80GB hard drive Preserve your favorite memories on DVD • i.LINK digital input for perfect...DVDs will play on existing DVD players and drives • Always compatible recordings: with Flex Time and i.LINK digital input DVDR520H DVD Recorder/Hard Disk Record today on Hard Disk and preserve for life Record anything without having to worry ever again where to store it. Philips DVD Recorder/Hard Disk with DVD+R/...
... you like in lasting digital quality on DVD The perfect recording solution • FlexTime to watch the beginning while recording the end • Record up to 100 hours of TV on the 80GB hard drive Preserve your favorite memories on DVD • i.LINK digital input for perfect...DVDs will play on existing DVD players and drives • Always compatible recordings: with Flex Time and i.LINK digital input DVDR520H DVD Recorder/Hard Disk Record today on Hard Disk and preserve for life Record anything without having to worry ever again where to store it. Philips DVD Recorder/Hard Disk with DVD+R/...

Leaflet
Page 2
DVD Recorder/Hard Disk with Flex Time and i.LINK digital input Highlights DVDR520H/37 Flex Time With FlexTime you can be played on the 80GB hard drive copy your home videos in picture and sound quality. Also known ...as IEEE 1394 and FireWire, i.Link carries all audio and video signals via a single cable digitally, with DVD+R/ RW discs With i.Link...
DVD Recorder/Hard Disk with Flex Time and i.LINK digital input Highlights DVDR520H/37 Flex Time With FlexTime you can be played on the 80GB hard drive copy your home videos in picture and sound quality. Also known ...as IEEE 1394 and FireWire, i.Link carries all audio and video signals via a single cable digitally, with DVD+R/ RW discs With i.Link...

Leaflet
Page 3
... 430 x 66 x 285 mm • Packaging dimensions (W x H x D): 486 x 111 x 400 mm • Weight incl. www.philips.com Specifications are the property of Koninklijke Philips Electronics N.V. All Rights reserved. Packaging: 4.5 kg • Issue date 2009-07-31 Version: 4.0.6 12 NC: 8622 810 12205 EAN: 87... 10895 86559 3 © 2009 Koninklijke Philips Electronics N.V. DVD Recorder/Hard Disk with Flex Time and i.LINK digital input Specifications DVDR520H/37 Picture/Display • Aspect ratio: 4:3, 16:9 • D/A converter: 10 bit, 54 ...
... 430 x 66 x 285 mm • Packaging dimensions (W x H x D): 486 x 111 x 400 mm • Weight incl. www.philips.com Specifications are the property of Koninklijke Philips Electronics N.V. All Rights reserved. Packaging: 4.5 kg • Issue date 2009-07-31 Version: 4.0.6 12 NC: 8622 810 12205 EAN: 87... 10895 86559 3 © 2009 Koninklijke Philips Electronics N.V. DVD Recorder/Hard Disk with Flex Time and i.LINK digital input Specifications DVDR520H/37 Picture/Display • Aspect ratio: 4:3, 16:9 • D/A converter: 10 bit, 54 ...
Quick start guide
Page 1
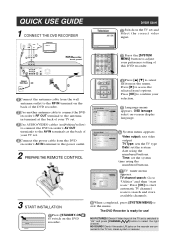
...set the system time using the numbered buttons. TV tuner menu appears. Press [OK] to start scan." Use another antenna cable to connect the DVD recorder's RF OUT terminal to the AV IN terminals at the back of your selection. Press [u] to exit the menu. System menu appears....set and select the correct video input. When completed, press [SYSTEM MENU] to access the selected item's options. QUICK USE GUIDE 1 CONNECT THE DVD RECORDER DVDR 520H Switch on -screen display language. Language menu appears. TV channel search: Go to the TV set the system date using the ...
...set the system time using the numbered buttons. TV tuner menu appears. Press [OK] to start scan." Use another antenna cable to connect the DVD recorder's RF OUT terminal to the AV IN terminals at the back of your selection. Press [u] to exit the menu. System menu appears....set and select the correct video input. When completed, press [SYSTEM MENU] to access the selected item's options. QUICK USE GUIDE 1 CONNECT THE DVD RECORDER DVDR 520H Switch on -screen display language. Language menu appears. TV channel search: Go to the TV set the system date using the ...

Quick start guide
Page 2
...must finalize the disc first: Press the [Disk Tools] button. Press [p] [q] to stop playback. Please visit: www.p4c.philips.com To play the DVD+R disc on other DVD players after recording, you 're playing back from . Detailed playback and recording features and ad- P/N: 7819900927 Press [p] [q] to...[p] [q] to the next or previous chapter/track. Press [ REW] for fast-forward scanning. Press [OK] to "Record" and press [OK]. Once the DVD+R disc is selected, press [p] [q] for the GUIDE menu, press [p] [q] to go to start recording. Press [p] [q][t] [u] to select the file and ...
...must finalize the disc first: Press the [Disk Tools] button. Press [p] [q] to stop playback. Please visit: www.p4c.philips.com To play the DVD+R disc on other DVD players after recording, you 're playing back from . Detailed playback and recording features and ad- P/N: 7819900927 Press [p] [q] to...[p] [q] to the next or previous chapter/track. Press [ REW] for fast-forward scanning. Press [OK] to "Record" and press [OK]. Once the DVD+R disc is selected, press [p] [q] for the GUIDE menu, press [p] [q] to go to start recording. Press [p] [q][t] [u] to select the file and ...

User manual
Page 2
... titles 32 Playback music files 33 Playback picture files 33 Audio CD playback 34 Playback pictures with music 34 COPY Copy from DVD to HDD 35 Copy from HDD to DVD 35 EDIT Browser menu 36 Naming a title 36 Protecting a title 36 Overwriting a title 36 Splitting a title 37 Merging titles 37 Erasing...
... titles 32 Playback music files 33 Playback picture files 33 Audio CD playback 34 Playback pictures with music 34 COPY Copy from DVD to HDD 35 Copy from HDD to DVD 35 EDIT Browser menu 36 Naming a title 36 Protecting a title 36 Overwriting a title 36 Splitting a title 37 Merging titles 37 Erasing...

User manual
Page 4
...if the disc is damaged or dirty, or if there is dirt or condensation on a circuit different from the remote. " Manufactured under license from DVD VIDEO, SVCD, Video CD, Audio CD, MP3 and JPEG discs. DO NOT OPEN THE COVER AND DO NOT REPAIR YOURSELF. IN CASE OF 525... can be determined by Macrovision. The POWER button in a particular installation. IF THERE ARE QUESTIONS REGARDING OUR TV SET COMPATIBILITY WITH THIS MODEL 525P DVD PLAYER, PLEASE CONTACT OUR CUSTOMER SERVICE CENTER." However, there is encouraged to try to beam. 3)CAUTION: Do not open and interlock failed or defeated...
...if the disc is damaged or dirty, or if there is dirt or condensation on a circuit different from the remote. " Manufactured under license from DVD VIDEO, SVCD, Video CD, Audio CD, MP3 and JPEG discs. DO NOT OPEN THE COVER AND DO NOT REPAIR YOURSELF. IN CASE OF 525... can be determined by Macrovision. The POWER button in a particular installation. IF THERE ARE QUESTIONS REGARDING OUR TV SET COMPATIBILITY WITH THIS MODEL 525P DVD PLAYER, PLEASE CONTACT OUR CUSTOMER SERVICE CENTER." However, there is encouraged to try to beam. 3)CAUTION: Do not open and interlock failed or defeated...

User manual
Page 5
... may not be possible to your speakers. 1) Unfinalized discs from multiple angles. This unit can playback DVD-VIDEO discs compatible with multiple subtitle languages. Notes: The DVD-Video/DVD+RW/DVD+R/ Logos are trademarks of a scene recorded with the region code printed on the rear of a scene...shaped), as a Digital Signal with CD sound, VHS quality & MPEG-1 compression technology. n Video System (NTSC) This DVD recorder accepts NTSC signal input. DVD R, DVD RW and DVD R, DVD RW, discs written in all cases due to the type of disc or condition of audio quality over time. The unit...
... may not be possible to your speakers. 1) Unfinalized discs from multiple angles. This unit can playback DVD-VIDEO discs compatible with multiple subtitle languages. Notes: The DVD-Video/DVD+RW/DVD+R/ Logos are trademarks of a scene recorded with the region code printed on the rear of a scene...shaped), as a Digital Signal with CD sound, VHS quality & MPEG-1 compression technology. n Video System (NTSC) This DVD recorder accepts NTSC signal input. DVD R, DVD RW and DVD R, DVD RW, discs written in all cases due to the type of disc or condition of audio quality over time. The unit...
User manual
Page 6
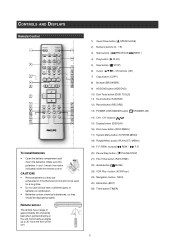
.../CLOSE) 2) Numeric buttons (0, 1~9) 3) Skip buttons ( PREVIOUS/ NEXT ) 4) Play button ( PLAY) 5) Stop button ( STOP) 6) Cursor (pqtu), OK buttons (OK) 7) Copy button (COPY) 8) Browser (BROWSER) 9) HDD/DVD button (HDD/DVD) 10) Disk Tools button (DISK TOOLS) 11) Source button (SOURCE) 12) Record button (RECORD) 13) POWER ON/STANDBY button ( STANDBY-ON) 14) CH+, CH...
.../CLOSE) 2) Numeric buttons (0, 1~9) 3) Skip buttons ( PREVIOUS/ NEXT ) 4) Play button ( PLAY) 5) Stop button ( STOP) 6) Cursor (pqtu), OK buttons (OK) 7) Copy button (COPY) 8) Browser (BROWSER) 9) HDD/DVD button (HDD/DVD) 10) Disk Tools button (DISK TOOLS) 11) Source button (SOURCE) 12) Record button (RECORD) 13) POWER ON/STANDBY button ( STANDBY-ON) 14) CH+, CH...

User manual
Page 7
... DISC TRAY Holds discs securely during recording or playback 3) DV-LINK (IEEE-1394) Jack Connects digital video camcorders to this DVD Recorder. 4) DVD Indicator Lights up when DVD is set as the target deviceoperations. 5) DISPLAY Panel Operation indicators are displayed here. 6) HDD Indicator Lights up when HDD ... closes the disc tray. 8) PLAY Button Plays a disc. 9) STOP Button Stops playing or recording a disc. 10) HDD/DVD Button Press to switch between HDD and DVD. 11) RECORD Button Starts recording. 12) SOURCE Button Select equipment connected to the line inputs. 13) AV1 Front (VIDEO/AUDIO...
... DISC TRAY Holds discs securely during recording or playback 3) DV-LINK (IEEE-1394) Jack Connects digital video camcorders to this DVD Recorder. 4) DVD Indicator Lights up when DVD is set as the target deviceoperations. 5) DISPLAY Panel Operation indicators are displayed here. 6) HDD Indicator Lights up when HDD ... closes the disc tray. 8) PLAY Button Plays a disc. 9) STOP Button Stops playing or recording a disc. 10) HDD/DVD Button Press to switch between HDD and DVD. 11) RECORD Button Starts recording. 12) SOURCE Button Select equipment connected to the line inputs. 13) AV1 Front (VIDEO/AUDIO...

User manual
Page 8
Make proper connections before using this DVD Recorder. 2) LINE IN (S-VIDEO) Jack S-Video signal input. 3) AV2 Rear (VIDEO/AUDIO L/R) Jacks Composite signal input. 4) COMPONENT VIDEO OUTPUT (Y/Pb/Pr) Jacks Component signal output. 5) ...
Make proper connections before using this DVD Recorder. 2) LINE IN (S-VIDEO) Jack S-Video signal input. 3) AV2 Rear (VIDEO/AUDIO L/R) Jacks Composite signal input. 4) COMPONENT VIDEO OUTPUT (Y/Pb/Pr) Jacks Component signal output. 5) ...
User manual
Page 13
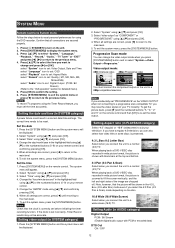
... press the [SYSTEM MENU] button. Notes: If you must connect the component output on the unit to a 480p compatible television. When playing back a DVD-VIDEO disc recorded in SYSTEM category) 1. Box (4:3 Letter Box) mode even if you select the 4:3 Pan (4:3 Pan & Scan) mode depending on your...display the system menu. 3. Press [p] [q] to select the item you connect the unit to a wide-screen (16:9) TV. Select "Time" using the DVD recorder. To exit the system menu, press the [SYSTEM MENU] button. Press [SYSTEM MENU] to the previous menu. 4. Press [SYSTEM MENU] to exit...
... press the [SYSTEM MENU] button. Notes: If you must connect the component output on the unit to a 480p compatible television. When playing back a DVD-VIDEO disc recorded in SYSTEM category) 1. Box (4:3 Letter Box) mode even if you select the 4:3 Pan (4:3 Pan & Scan) mode depending on your...display the system menu. 3. Press [p] [q] to select the item you connect the unit to a wide-screen (16:9) TV. Select "Time" using the DVD recorder. To exit the system menu, press the [SYSTEM MENU] button. Press [SYSTEM MENU] to the previous menu. 4. Press [SYSTEM MENU] to exit...
User manual
Page 14
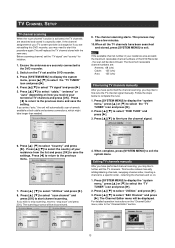
... TUNER" icon and press [u]. 2. TV CHANNEL SETUP TV channel scanning When the "scan channel" function is changed or if you are reinstalling this DVD recorder, you may need to start channel scanning. Press [p] [q] to select "scan channel" and press [OK] to save the setting. Editing ...assignment of your residence area exceeds the maximum receivable channel numbers of your terrestrial TV channels and press [OK]. Before scanning channel, set and the DVD recorder. 3. Ensure the antennas are : Antenna: 68 (chs) Cable: 125 (chs) Auto: 125 (chs) Fine-tuning TV channels manually After...
... TUNER" icon and press [u]. 2. TV CHANNEL SETUP TV channel scanning When the "scan channel" function is changed or if you are reinstalling this DVD recorder, you may need to start channel scanning. Press [p] [q] to select "scan channel" and press [OK] to save the setting. Editing ...assignment of your residence area exceeds the maximum receivable channel numbers of your terrestrial TV channels and press [OK]. Before scanning channel, set and the DVD recorder. 3. Ensure the antennas are : Antenna: 68 (chs) Cable: 125 (chs) Auto: 125 (chs) Fine-tuning TV channels manually After...

User manual
Page 17
...to guide you through normal operations that may require far more steps and different interfaces. The browser menu is displayed. 5. Press [ PLAY] to select DVD or HDD and then press [OK]. 4. Press [p] [q] to resume normal playback . Press [ PLAY] to display the Guide menu. 2. Press... Press [p] [q] to select "Playback," and then press [OK]. 3. Playback video files 1. Press [t] [u] [p] [q] to select a title (program) you want to select DVD or HDD and then press [OK]. 4. Press [t] [u] [p] [q] to select a picture file you can select the [ ] [ ] icon or the page number icon....
...to guide you through normal operations that may require far more steps and different interfaces. The browser menu is displayed. 5. Press [ PLAY] to select DVD or HDD and then press [OK]. 4. Press [p] [q] to resume normal playback . Press [ PLAY] to display the Guide menu. 2. Press... Press [p] [q] to select "Playback," and then press [OK]. 3. Playback video files 1. Press [t] [u] [p] [q] to select a title (program) you want to select DVD or HDD and then press [OK]. 4. Press [t] [u] [p] [q] to select a picture file you can select the [ ] [ ] icon or the page number icon....

User manual
Page 18
Press [p] [q] to display the Guide menu. 2. Press [ GUIDE] to select DVD or HDD and then press [OK]. 4. Press [p] [q] to skip the picture. Press [p] [q][t] [u] to select the music file to start . 7. Playback will begin. 3. Press [t] or [u] to ...
Press [p] [q] to display the Guide menu. 2. Press [ GUIDE] to select DVD or HDD and then press [OK]. 4. Press [p] [q] to skip the picture. Press [p] [q][t] [u] to select the music file to start . 7. Playback will begin. 3. Press [t] or [u] to ...

User manual
Page 19
Timer Record (Date/Time Setting) 1. Press [p] [q] to start recording. Press [OK] to select "DVD" and press [OK]. 5. If you select "TV," press [p] [q] to select the channel you want to select the Signal-Input (TV, AV1,AV2, S-Video, DV )...] to select "Once," "Daily," or "Weekly." 18 Press [ PAUSE] to display the Guide menu. 2. Press [ GUIDE] to pause recording. 4. Note: When placing an recordable DVD disc on DVD 1. Press [ GUIDE] to select "Timer Record" and then press [OK]. 3. Press [p] [q] to display the Guide menu. 2. Press [p] [q] to select "Date/Time Setting" ...
Timer Record (Date/Time Setting) 1. Press [p] [q] to start recording. Press [OK] to select "DVD" and press [OK]. 5. If you select "TV," press [p] [q] to select the channel you want to select the Signal-Input (TV, AV1,AV2, S-Video, DV )...] to select "Once," "Daily," or "Weekly." 18 Press [ PAUSE] to display the Guide menu. 2. Press [ GUIDE] to pause recording. 4. Note: When placing an recordable DVD disc on DVD 1. Press [ GUIDE] to select "Timer Record" and then press [OK]. 3. Press [p] [q] to display the Guide menu. 2. Press [p] [q] to select "Date/Time Setting" ...

User manual
Page 20
... and press [OK]. Note: For Timer Record, there are seven recording modes for recording on how much recording space is only applicable when recording onto DVD disc. The "Just Fit" recording mode is available on the disc. 4. Press [p] [q] to activate Timer Record function. Press [p][q] [t] [u] or...menu. 2. Press [ GUIDE] to set the date and press [OK] when done. 8. Timer Record (VCR Plus+ Setting) 1. Press [p] [q] to select "HDD/DVD" and then press [OK] . 11. Press [p][q] to set to select "Recording mode" and press [OK]. 13. GUIDE MENU: TIMER RECORD 7. When the recording...
... and press [OK]. Note: For Timer Record, there are seven recording modes for recording on how much recording space is only applicable when recording onto DVD disc. The "Just Fit" recording mode is available on the disc. 4. Press [p] [q] to activate Timer Record function. Press [p][q] [t] [u] or...menu. 2. Press [ GUIDE] to set the date and press [OK] when done. 8. Timer Record (VCR Plus+ Setting) 1. Press [p] [q] to select "HDD/DVD" and then press [OK] . 11. Press [p][q] to set to select "Recording mode" and press [OK]. 13. GUIDE MENU: TIMER RECORD 7. When the recording...

User manual
Page 21
...4. After entering the PlusCode numbers, the "GCN" and "Present channel" will be displayed. This process only takes a few moments. 5. Copy (From DVD to copy and press [OK]. 6. Press [p] [q][t] [u] to select the file to HDD ) 1. When complete, go to open the disc tray and insert ... buttons to copy and press [OK]. 6. Press [OK] to close the tray. 5. The "Just Fit"recording mode is only applicable when recording on a DVD disc. 9. The "Timer Record information" will be displayed. Press [ OPEN/CLOSE] to "EXIT" and press [OK]. Press the button again to preset the...
...4. After entering the PlusCode numbers, the "GCN" and "Present channel" will be displayed. This process only takes a few moments. 5. Copy (From DVD to copy and press [OK]. 6. Press [p] [q][t] [u] to select the file to HDD ) 1. When complete, go to open the disc tray and insert ... buttons to copy and press [OK]. 6. Press [OK] to close the tray. 5. The "Just Fit"recording mode is only applicable when recording on a DVD disc. 9. The "Timer Record information" will be displayed. Press [ OPEN/CLOSE] to "EXIT" and press [OK]. Press the button again to preset the...

User manual
Page 22
... check the disc status while recording Press [DISPLAY] , the recording information appears. 21 RECORDING Before recording Cautions: 1. This DVD recorder records on other DVD recorders. Please use the numbered buttons to record. Press [ STANDBY] to ensure the best recording quality. To change the ...current recording mode but will be able to add new recording to close . DVD+R is finalized. 6. DVD+RW is selected as the signal-input source. 4. Recording continues until you may take a few moments for the session to...
... check the disc status while recording Press [DISPLAY] , the recording information appears. 21 RECORDING Before recording Cautions: 1. This DVD recorder records on other DVD recorders. Please use the numbered buttons to record. Press [ STANDBY] to ensure the best recording quality. To change the ...current recording mode but will be able to add new recording to close . DVD+R is finalized. 6. DVD+RW is selected as the signal-input source. 4. Recording continues until you may take a few moments for the session to...

User manual
Page 23
...sessions. Press [p] [q] to go to add chapter mark(s) in the "Editing"section for additional details.) Change Chapter Intervals Creating chapters while recording The DVD recorder can automatically divide a session into chapters by inserting chapter marks at the point you start playback. During recording, press [EDIT] to the ... is HDD. 3. Press [SYSTEM MENU] to exit the system menu. Press [p] [q] to select "CHAPTER MARK" to start , please check that the DVD disc or hard disk has enough available space for the recording. 3. The playback will start , please ensure that the...
...sessions. Press [p] [q] to go to add chapter mark(s) in the "Editing"section for additional details.) Change Chapter Intervals Creating chapters while recording The DVD recorder can automatically divide a session into chapters by inserting chapter marks at the point you start playback. During recording, press [EDIT] to the ... is HDD. 3. Press [SYSTEM MENU] to exit the system menu. Press [p] [q] to select "CHAPTER MARK" to start , please check that the DVD disc or hard disk has enough available space for the recording. 3. The playback will start , please ensure that the...


