
Leaflet
Page 3
... connections: Antenna, ComponentVideo out Progressive, Analog audio Left/Right out, Composite video (CVBS) out, S-Video in, S-Video out, Digital coaxial out, Digital optical out Convenience • Programming/Timer Enhancements: Daily/Weekly Repeat Program, Manual Timer, One Touch Recording, VCR Plus+ • Child Protection: Parental Control Power • Power supply: 110V, 60Hz • Power consumption: 50 W • Standby power consumption: 3 Accessories • Included Accessories: AC Power Cord, Coax RF antenna cable, Quick start guide, User Manual, Remote Control, Audio/Video cable...
... connections: Antenna, ComponentVideo out Progressive, Analog audio Left/Right out, Composite video (CVBS) out, S-Video in, S-Video out, Digital coaxial out, Digital optical out Convenience • Programming/Timer Enhancements: Daily/Weekly Repeat Program, Manual Timer, One Touch Recording, VCR Plus+ • Child Protection: Parental Control Power • Power supply: 110V, 60Hz • Power consumption: 50 W • Standby power consumption: 3 Accessories • Included Accessories: AC Power Cord, Coax RF antenna cable, Quick start guide, User Manual, Remote Control, Audio/Video cable...
Quick start guide
Page 1
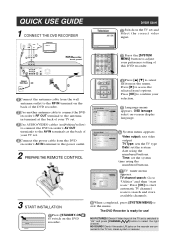
... TV set the system date using the numbered buttons. Language menu appears. NO PICTURES! Check if the audio L/R jacks on -screen display language. When completed, press [SYSTEM MENU] to adjust your TV set , stereo system or receiver. OSD lanuage: select on the recorder are con- Time: set is ready for use! Check if Video Input of your peference setting of the DVD recorder. Press the [SYSTEM MENU] button to exit the menu. QUICK USE GUIDE 1 CONNECT THE DVD RECORDER DVDR 520H Switch on the back of this DVD recorder.
... TV set the system date using the numbered buttons. Language menu appears. NO PICTURES! Check if the audio L/R jacks on -screen display language. When completed, press [SYSTEM MENU] to adjust your TV set , stereo system or receiver. OSD lanuage: select on the recorder are con- Time: set is ready for use! Check if Video Input of your peference setting of the DVD recorder. Press the [SYSTEM MENU] button to exit the menu. QUICK USE GUIDE 1 CONNECT THE DVD RECORDER DVDR 520H Switch on the back of this DVD recorder.

User manual
Page 2
... control 26 TIMER RECORDING Setting the timer 26 Timer record using the VCR Plus+® system 27 FLEX TIME Pausing Live TV 29 Record and Play 29 PLAYBACK Basic playback 30 POWER, OPEN/CLOSE, PLAY, F.F., REW. ......... 30 NEXT, PREVIOUS 30 PAUSE/STEP, STOP, DISPLAY 30 DISC MENU, PLAYLIST 30 Navigation operation 31 REPEAT, ZOOM 31 SLOW, SEARCH 31 A-B REPEAT,SUBTITLE 31 AUDIO, ANGLE 31 INFORMATION 31 Playback video titles 32 Playback music files 33 Playback picture files 33 Audio CD playback 34 Playback pictures with music 34 COPY Copy from DVD to HDD...
... control 26 TIMER RECORDING Setting the timer 26 Timer record using the VCR Plus+® system 27 FLEX TIME Pausing Live TV 29 Record and Play 29 PLAYBACK Basic playback 30 POWER, OPEN/CLOSE, PLAY, F.F., REW. ......... 30 NEXT, PREVIOUS 30 PAUSE/STEP, STOP, DISPLAY 30 DISC MENU, PLAYLIST 30 Navigation operation 31 REPEAT, ZOOM 31 SLOW, SEARCH 31 A-B REPEAT,SUBTITLE 31 AUDIO, ANGLE 31 INFORMATION 31 Playback video titles 32 Playback music files 33 Playback picture files 33 Audio CD playback 34 Playback pictures with music 34 COPY Copy from DVD to HDD...

User manual
Page 4
... to provide reasonable protection against harmful interference in your country before recording from DVD VIDEO, SVCD, Video CD, Audio CD, MP3 and JPEG discs. USE OF CONTROLS OR ADJUSTMENTS OR PERFORMANCE OF PROCEDURES OTHER THAN THOSE SPECIFIED HEREIN MAY RESULT IN HAZARDOUS RADIATION EXPOSURE. IN CASE OF 525 PROGRESSIVE SCAN PICTURE PROBLEMS, IT IS RECOMMENDED THAT THE USER SWITCH THE CONNECTION TO THE "STANDARD DEFINITION" OUTPUT. Use of the...
... to provide reasonable protection against harmful interference in your country before recording from DVD VIDEO, SVCD, Video CD, Audio CD, MP3 and JPEG discs. USE OF CONTROLS OR ADJUSTMENTS OR PERFORMANCE OF PROCEDURES OTHER THAN THOSE SPECIFIED HEREIN MAY RESULT IN HAZARDOUS RADIATION EXPOSURE. IN CASE OF 525 PROGRESSIVE SCAN PICTURE PROBLEMS, IT IS RECOMMENDED THAT THE USER SWITCH THE CONNECTION TO THE "STANDARD DEFINITION" OUTPUT. Use of the...

User manual
Page 5
... playback other DVD recorders. 2) DVD-VR, DVD AUDIO, PHOTO CD, SACD (When placing an unplayable disc on the disc tray, the DVD recorder will display "Unknown Disc" on the rear of a scene recorded with multiple subtitle languages. n Video System (NTSC) This DVD recorder accepts NTSC signal input. This unit can play back these can playback DVD-VIDEO discs compatible with the region code printed on the display panel after recording. DVD R, DVD RW and DVD R, DVD RW, discs written in all cases due to loading the disc fail.) 4:3 Pan & Scan...
... playback other DVD recorders. 2) DVD-VR, DVD AUDIO, PHOTO CD, SACD (When placing an unplayable disc on the disc tray, the DVD recorder will display "Unknown Disc" on the rear of a scene recorded with multiple subtitle languages. n Video System (NTSC) This DVD recorder accepts NTSC signal input. This unit can play back these can playback DVD-VIDEO discs compatible with the region code printed on the display panel after recording. DVD R, DVD RW and DVD R, DVD RW, discs written in all cases due to loading the disc fail.) 4:3 Pan & Scan...
User manual
Page 6
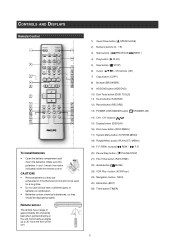
...) Edit button (EDIT) 26) Timer button (TIMER) 5 Remove batteries of they should be used for a long time - buttons ( , ) 15) Display button (DISPLAY) 16) Disc menu button (DISC MENU) 17) System Menu button (SYSTEM MENU) 18) Playlist/Menu button (PLAYLIST / MENU) 19) F.F./REW. Open the battery compartment and insert the batteries. The Remote Control 1) Open/Close button ( OPEN/CLOSE) 2) Numeric buttons (0, 1~9) 3) Skip buttons ( PREVIOUS/ NEXT ) 4) Play button ( PLAY) 5) Stop button ( STOP) 6) Cursor (pqtu), OK buttons (OK) 7) Copy button (COPY) 8) Browser (BROWSER) 9) HDD/DVD button...
...) Edit button (EDIT) 26) Timer button (TIMER) 5 Remove batteries of they should be used for a long time - buttons ( , ) 15) Display button (DISPLAY) 16) Disc menu button (DISC MENU) 17) System Menu button (SYSTEM MENU) 18) Playlist/Menu button (PLAYLIST / MENU) 19) F.F./REW. Open the battery compartment and insert the batteries. The Remote Control 1) Open/Close button ( OPEN/CLOSE) 2) Numeric buttons (0, 1~9) 3) Skip buttons ( PREVIOUS/ NEXT ) 4) Play button ( PLAY) 5) Stop button ( STOP) 6) Cursor (pqtu), OK buttons (OK) 7) Copy button (COPY) 8) Browser (BROWSER) 9) HDD/DVD button...

User manual
Page 7
... of parts and controls 1) POWER ON/OFF Button Turns the recorder on and off. 2) DISC TRAY Holds discs securely during recording or playback 3) DV-LINK (IEEE-1394) Jack Connects digital video camcorders to this DVD Recorder. 4) DVD Indicator Lights up when DVD is set as the target deviceoperations. 5) DISPLAY Panel Operation indicators are displayed here. 6) HDD Indicator Lights up when HDD is set as the target device 7) OPEN/CLOSE Button Opens or closes the disc tray. 8) PLAY Button Plays a disc. 9) STOP Button Stops playing or recording a disc. 10) HDD/DVD Button Press to switch between HDD...
... of parts and controls 1) POWER ON/OFF Button Turns the recorder on and off. 2) DISC TRAY Holds discs securely during recording or playback 3) DV-LINK (IEEE-1394) Jack Connects digital video camcorders to this DVD Recorder. 4) DVD Indicator Lights up when DVD is set as the target deviceoperations. 5) DISPLAY Panel Operation indicators are displayed here. 6) HDD Indicator Lights up when HDD is set as the target device 7) OPEN/CLOSE Button Opens or closes the disc tray. 8) PLAY Button Plays a disc. 9) STOP Button Stops playing or recording a disc. 10) HDD/DVD Button Press to switch between HDD...

User manual
Page 10
... configuration, the Red and White audio cable connections are two types of connections (S-Video, and Component video) that provide higher quality viewing. 1. When using S-Video connections, please remove all other video output connections. Notes: 1. Notes: 1. Connecting to a TV via S-Video out Connecting to a TV with component jacks Use COMPONENT cables (not supplied) to connect the COMPONENT output on the unit to the S-Video input on the television. Enter system setup to enable COMPONENT (refer to the section titled "Quick Setup"). 2.
... configuration, the Red and White audio cable connections are two types of connections (S-Video, and Component video) that provide higher quality viewing. 1. When using S-Video connections, please remove all other video output connections. Notes: 1. Notes: 1. Connecting to a TV via S-Video out Connecting to a TV with component jacks Use COMPONENT cables (not supplied) to connect the COMPONENT output on the unit to the S-Video input on the television. Enter system setup to enable COMPONENT (refer to the section titled "Quick Setup"). 2.
User manual
Page 13
...: If you connect the unit to turn on your remote control. 5. If you have a regular 4:3 television, you press [SYSTEM MENU] button and to select "System-->Video Output-->Progressive." select "System" icon to set: Video Output, Date and Time select "Language" icon to set: OSD select "Playback" icon to set: Aspect Ratio select "Record" icon to set: Quality ( M1, M2, M2x, M3, M4 and M6) select "Audio" icon to set: Digital Output (PCM / Bit Stream) (Refer to re-set before initiating the timer recording function. Notes: Check that all settings are correct, press...
...: If you connect the unit to turn on your remote control. 5. If you have a regular 4:3 television, you press [SYSTEM MENU] button and to select "System-->Video Output-->Progressive." select "System" icon to set: Video Output, Date and Time select "Language" icon to set: OSD select "Playback" icon to set: Aspect Ratio select "Record" icon to set: Quality ( M1, M2, M2x, M3, M4 and M6) select "Audio" icon to set: Digital Output (PCM / Bit Stream) (Refer to re-set before initiating the timer recording function. Notes: Check that all settings are correct, press...
User manual
Page 14
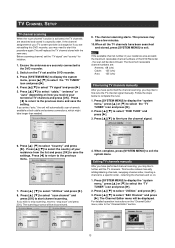
... menu, press [p] [q] to "stop scan" and press [OK]. Press [p] [q] to further edit the TV channels. TV CHANNEL SETUP TV channel scanning When the "scan channel" function is changed or if you are reinstalling this DVD recorder, you may need to save the setting. Editing TV channels manually After you have performed channel scanning, you may like to select the "TV TUNER" icon and press [u]. 2. Note: If the available channel number in a specific order. Press [SYSTEM MENU] to display...
... menu, press [p] [q] to "stop scan" and press [OK]. Press [p] [q] to further edit the TV channels. TV CHANNEL SETUP TV channel scanning When the "scan channel" function is changed or if you are reinstalling this DVD recorder, you may need to save the setting. Editing TV channels manually After you have performed channel scanning, you may like to select the "TV TUNER" icon and press [u]. 2. Note: If the available channel number in a specific order. Press [SYSTEM MENU] to display...

User manual
Page 22
... session to set the target device as the signal-input source. 4. You cannot add new recording to open the disc tray and insert a recordable DVD disc. If "DVD" is selected as the target device, press [ OPEN/ CLOSE] to DVD+R discs after the disc is full. To stop the recording or when the DVD disc or the HDD is finalized. 6. Notes: You can 't change the recording mode before recording: Press [SYSTEM MENU] button. To check the disc status while recording Press [DISPLAY] , the recording information...
... session to set the target device as the signal-input source. 4. You cannot add new recording to open the disc tray and insert a recordable DVD disc. If "DVD" is selected as the target device, press [ OPEN/ CLOSE] to DVD+R discs after the disc is full. To stop the recording or when the DVD disc or the HDD is finalized. 6. Notes: You can 't change the recording mode before recording: Press [SYSTEM MENU] button. To check the disc status while recording Press [DISPLAY] , the recording information...

User manual
Page 23
... [EDIT] to the "Last Record" icon and press [OK]. You cannot change the recording mode during the recording process. 1. Press [p] [q] to select "CHAPTER MARK" to set up the interval time. Confirm that the DVD disc or hard disk has enough available space for the recording session. 4. Before you start playback. If a power failure occurs, the program you start the playback of the last recorded title . Press [SYSTEM MENU] to finalize the disc. 22 Playback the last recorded title (on another player...
... [EDIT] to the "Last Record" icon and press [OK]. You cannot change the recording mode during the recording process. 1. Press [p] [q] to select "CHAPTER MARK" to set up the interval time. Confirm that the DVD disc or hard disk has enough available space for the recording session. 4. Before you start playback. If a power failure occurs, the program you start the playback of the last recorded title . Press [SYSTEM MENU] to finalize the disc. 22 Playback the last recorded title (on another player...

User manual
Page 24
... a recordable DVD disc or hard disk. 5.Press [ STOP] to stop recording. Examples of your video/audio signal from the red (right channel) and white (left channel) audio jacks (labeled "R" and "L", respectively) on the VCR or Camcorder. 4. If you want to restart recording, press the [ PAUSE] button to the unit's input terminals. The front panel and rear panel connection Connect a Video Cassette Recorder or Camcorder to resume recording. 23 If "DVD" is set the target device for the recording. Start to open the disc tray...
... a recordable DVD disc or hard disk. 5.Press [ STOP] to stop recording. Examples of your video/audio signal from the red (right channel) and white (left channel) audio jacks (labeled "R" and "L", respectively) on the VCR or Camcorder. 4. If you want to restart recording, press the [ PAUSE] button to the unit's input terminals. The front panel and rear panel connection Connect a Video Cassette Recorder or Camcorder to resume recording. 23 If "DVD" is set the target device for the recording. Start to open the disc tray...

User manual
Page 26
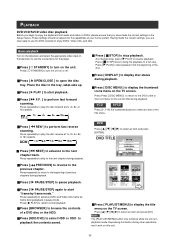
Power on the DV Camcorder. 5. Resume DV Camcorder playback and press [RECORD] on the DVD Recorder to start to record DV contents This unit allows basic DV control on screen. Press [t] [u] to select ( ) to change the "Signal-Input source" and select "DV." 7. Notes: 1. To pause recording. Press [SOURCE] to stop the DV Camcorder playing. 4. Press [t] [u] to select ( ) to fast-forward 2. To stop recording. 25 Press the [HDD/DVD] button to set as the target device, press [ OPEN/CLOSE] to...
Power on the DV Camcorder. 5. Resume DV Camcorder playback and press [RECORD] on the DVD Recorder to start to record DV contents This unit allows basic DV control on screen. Press [t] [u] to select ( ) to change the "Signal-Input source" and select "DV." 7. Notes: 1. To pause recording. Press [SOURCE] to stop the DV Camcorder playing. 4. Press [t] [u] to select ( ) to fast-forward 2. To stop recording. 25 Press the [HDD/DVD] button to set as the target device, press [ OPEN/CLOSE] to...

User manual
Page 27
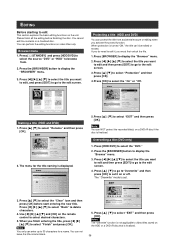
..., time, picture quality and channel of time for the Timer Record function. Press [ STANDBY] to turn the unit on the screen for each day until it is cancelled or the media is full. 3. Press [t] [u] [p][q] to select the "HDD/DVD," and then press [OK] to open the disc tray and insert a recordable DVD disc. 7. Use the numbered buttons (0~9) or [p] [q] [t] [u] to make your selection. 5. Press [p] [q] [t] [u] and [OK] to enter the date. If "DVD" is set up the list...
..., time, picture quality and channel of time for the Timer Record function. Press [ STANDBY] to turn the unit on the screen for each day until it is cancelled or the media is full. 3. Press [t] [u] [p][q] to select the "HDD/DVD," and then press [OK] to open the disc tray and insert a recordable DVD disc. 7. Use the numbered buttons (0~9) or [p] [q] [t] [u] to make your selection. 5. Press [p] [q] [t] [u] and [OK] to enter the date. If "DVD" is set up the list...

User manual
Page 28
... recording to select "Start (Start Time), " and then press [OK] . Press [t] [u] [p][q] to stop recording during Timer Record When you want to make your selection. 27 Or press [VCR Plus+] to exit the Timer Record List. 3. Press [ STANDBY] to turn the unit on the list and press [OK] if you want to activate the setup menu for the timer record item and go to activate the Timer Record function. 10. Notes: 1. Timer Record using the VCR Plus+ system 1. To stop...
... recording to select "Start (Start Time), " and then press [OK] . Press [t] [u] [p][q] to stop recording during Timer Record When you want to make your selection. 27 Or press [VCR Plus+] to exit the Timer Record List. 3. Press [ STANDBY] to turn the unit on the list and press [OK] if you want to activate the setup menu for the timer record item and go to activate the Timer Record function. 10. Notes: 1. Timer Record using the VCR Plus+ system 1. To stop...
User manual
Page 31
... playback. Press [ DISPLAY ] to open the disc tray. Press [ DISC MENU ] to display the thumbnail icons menu on the television to suit the connections for the current title during playback. Press [ STANDBY] to turn on DVDs, please ensure that you have made the correct settings, you are now ready to use the DVD recorder to enjoy DVDs, Video CDs, and CDs. VCD SVCD Press [0 ,1~9 ] the numbered buttons to the next chapter during playback. Press repeatedly to play...
... playback. Press [ DISPLAY ] to open the disc tray. Press [ DISC MENU ] to display the thumbnail icons menu on the television to suit the connections for the current title during playback. Press [ STANDBY] to turn on DVDs, please ensure that you have made the correct settings, you are now ready to use the DVD recorder to enjoy DVDs, Video CDs, and CDs. VCD SVCD Press [0 ,1~9 ] the numbered buttons to the next chapter during playback. Press repeatedly to play...

User manual
Page 36
This function is copy-once protected. 4. Press [ OPEN/CLOSE ] to open the disc tray and place a recordable DVD disc with the label side up . 3. Make sure to HDD 1. Title name, chapter markers(for video titles), as well as thumbnail picture markers you see in exact the same positions as the original when recording on a Video mode disc. 3. Unless you own the copyright or have obtained permission from the copyright owner or otherwise have...
This function is copy-once protected. 4. Press [ OPEN/CLOSE ] to open the disc tray and place a recordable DVD disc with the label side up . 3. Make sure to HDD 1. Title name, chapter markers(for video titles), as well as thumbnail picture markers you see in exact the same positions as the original when recording on a Video mode disc. 3. Unless you own the copyright or have obtained permission from the copyright owner or otherwise have...
User manual
Page 37
... edit screen. Press [p] [q] to select "EXIT" and then press [OK]. You cannot edit the contents on the unit. Protecting a title (HDD and DVD) You can NOT protect the recorded title(s) on the remote control to select the "DVD." 2. Press [p] [q] to select "Protection" and then press [OK]. 4. When protection is finalized. Press [HDD/DVD] to select desired characters. 5. If you do need to edit it on the HDD or a DVD+R disc that is displayed. 5. Use [t] [u] [p] [q] and [OK] on a DVD+R disc if the disc...
... edit screen. Press [p] [q] to select "EXIT" and then press [OK]. You cannot edit the contents on the unit. Protecting a title (HDD and DVD) You can NOT protect the recorded title(s) on the remote control to select the "DVD." 2. Press [p] [q] to select "Protection" and then press [OK]. 4. When protection is finalized. Press [HDD/DVD] to select desired characters. 5. If you do need to edit it on the HDD or a DVD+R disc that is displayed. 5. Use [t] [u] [p] [q] and [OK] on a DVD+R disc if the disc...
User manual
Page 45
... a title and similar to height ratio of the picture. It requires a DTS® decoder, either in the player or in the United States. DVD-R DVD-R is the same size as a DVD-Video. This is the committee that is a recordable disc that enables interactive use with six (5.1) channels, similar to be programmed or edited DVD+R DVD+R is a recordable disc that is done in video mode has the same format as a DVDVideo. Track SVCD, VCD, Audio...
... a title and similar to height ratio of the picture. It requires a DTS® decoder, either in the player or in the United States. DVD-R DVD-R is the same size as a DVD-Video. This is the committee that is a recordable disc that enables interactive use with six (5.1) channels, similar to be programmed or edited DVD+R DVD+R is a recordable disc that is done in video mode has the same format as a DVDVideo. Track SVCD, VCD, Audio...


