Leaflet
Page 1
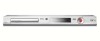
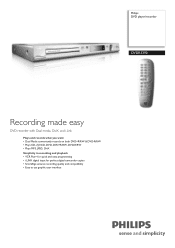
Philips DVD player/recorder DVDR3390 Recording made easy DVD recorder with Dual media, DivX, and i.Link Plays and records what you want • Dual Media conveniently records on both DVD+R/RW & DVD-R/RW • Plays CD, (S)VCD, DVD, DVD+R/RW, DVD-R/RW • Plays MP3, JPEG, DivX Simplicity in recording and playback • VCR Plus+ for quick and easy programming • i.LINK digital input for perfect digital camcorder copies • SmartAlgo ensures recording quality and compatibility • Easy to use graphic user interface
Philips DVD player/recorder DVDR3390 Recording made easy DVD recorder with Dual media, DivX, and i.Link Plays and records what you want • Dual Media conveniently records on both DVD+R/RW & DVD-R/RW • Plays CD, (S)VCD, DVD, DVD+R/RW, DVD-R/RW • Plays MP3, JPEG, DivX Simplicity in recording and playback • VCR Plus+ for quick and easy programming • i.LINK digital input for perfect digital camcorder copies • SmartAlgo ensures recording quality and compatibility • Easy to use graphic user interface
Leaflet
Page 2
...Set weight: 3 kg • Packaging dimensions (W x H x D): 571 x 124 x 413 mm • Dual Media Philips DVD Recorders support 'dual media' recording - i.LINK digital input Also known as IEEE 1394 and FireWire, i.Link carries all these functions with no loss in their respective... 09585 11170 7 © 2009 Koninklijke Philips Electronics N.V. All Rights reserved. www.philips.com or their original digital picture quality. Specifications are the property of disc format or quality. DVD player/recorder Specifications DVDR3390/37 Highlights Picture/Display • D/A ...
...Set weight: 3 kg • Packaging dimensions (W x H x D): 571 x 124 x 413 mm • Dual Media Philips DVD Recorders support 'dual media' recording - i.LINK digital input Also known as IEEE 1394 and FireWire, i.Link carries all these functions with no loss in their respective... 09585 11170 7 © 2009 Koninklijke Philips Electronics N.V. All Rights reserved. www.philips.com or their original digital picture quality. Specifications are the property of disc format or quality. DVD player/recorder Specifications DVDR3390/37 Highlights Picture/Display • D/A ...
User manual
Page 6
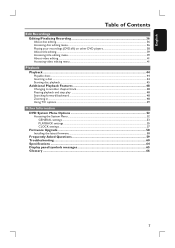
...Features ...10 Product Overview Main Unit ...11 Remote Control ...12 Using the remote control ...14 Connections Step 1: Basic Recorder Connections 15 Connecting the antenna cables ...15 Connecting the video cable...16 Connecting the audio cables ...17 Step 2: Optional...26 LANGUAGE settings ...27 CLOCK settings ...27 Recordings Recording ...28 Discs for recording ...28 Recording settings ...28 RECORD settings ...29 Manual recording...31 One Touch Recording - automatic turn-off 31 About timer recording...32 Timer recording (manually)...32 Timer recording (VCR Plus+® System)...34 Changing/ ...
...Features ...10 Product Overview Main Unit ...11 Remote Control ...12 Using the remote control ...14 Connections Step 1: Basic Recorder Connections 15 Connecting the antenna cables ...15 Connecting the video cable...16 Connecting the audio cables ...17 Step 2: Optional...26 LANGUAGE settings ...27 CLOCK settings ...27 Recordings Recording ...28 Discs for recording ...28 Recording settings ...28 RECORD settings ...29 Manual recording...31 One Touch Recording - automatic turn-off 31 About timer recording...32 Timer recording (manually)...32 Timer recording (VCR Plus+® System)...34 Changing/ ...
User manual
Page 7
... About disc editing ...36 Accessing disc editing menu ...36 Playing your recordings (DVD±R) on other DVD players 38 About title editing ...39 Accessing title editing menu...39 About video editing ...41 Accessing video editing menu ...41 ...
... About disc editing ...36 Accessing disc editing menu ...36 Playing your recordings (DVD±R) on other DVD players 38 About title editing ...39 Accessing title editing menu...39 About video editing ...41 Accessing video editing menu ...41 ...
User manual
Page 8
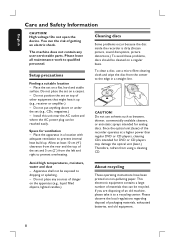
...can be exposed to prevent internal heat build up (e.g., receiver or amplifier.) - Cleaning discs Some problems occur because the disc inside the recorder is dirty (frozen picture, sound disruptions, picture distortions.) To avoid these problems, discs should be reached easily. You run the risk of... have been printed on a carpet. - Do not place any user-serviceable parts. The machine does not contain any sources of the recorder operates at least 10 cm (4") clearance from the left and right to the edge in a location with adequate ventilation to dripping or splashing...
...can be exposed to prevent internal heat build up (e.g., receiver or amplifier.) - Cleaning discs Some problems occur because the disc inside the recorder is dirty (frozen picture, sound disruptions, picture distortions.) To avoid these problems, discs should be reached easily. You run the risk of... have been printed on a carpet. - Do not place any user-serviceable parts. The machine does not contain any sources of the recorder operates at least 10 cm (4") clearance from the left and right to the edge in a location with adequate ventilation to dripping or splashing...
User manual
Page 9
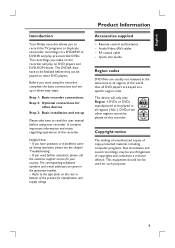
...in all DVD players are given in three easy steps. Product Information Accessories supplied - RF coaxial cable - Step 1: Basic recorder connections Step 2: Optional connections for identification and supply ratings. This equipment should not be played on the rear or bottom of... devices Step 3: Basic installation and set-up during operation, please see the chapter 'Troubleshooting'. - The recordings you need further assistance, please call the customer support service for such purposes. 9 English Introduction Your Philips recorder allows you start using your country.
...in all DVD players are given in three easy steps. Product Information Accessories supplied - RF coaxial cable - Step 1: Basic recorder connections Step 2: Optional connections for identification and supply ratings. This equipment should not be played on the rear or bottom of... devices Step 3: Basic installation and set-up during operation, please see the chapter 'Troubleshooting'. - The recordings you need further assistance, please call the customer support service for such purposes. 9 English Introduction Your Philips recorder allows you start using your country.
User manual
Page 10
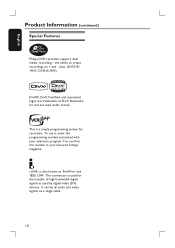
DivX®, DivX Certified, and associated logos are trademarks of DivX Networks, Inc and are used for recorders. To use it, enter the programming number associated with your favourite listings magazine. It carries all audio and video ...DV) devices. You can find this number in your television program. English Product Information (continued) Special Features Philips DVD recorders support 'dual media' recording - This connection is used under license. the ability to create recordings on + and - discs. (DVD+R/ +RW, DVD-R/-RW). i.LINK, is a simple programming system for...
DivX®, DivX Certified, and associated logos are trademarks of DivX Networks, Inc and are used for recorders. To use it, enter the programming number associated with your favourite listings magazine. It carries all audio and video ...DV) devices. You can find this number in your television program. English Product Information (continued) Special Features Philips DVD recorders support 'dual media' recording - This connection is used under license. the ability to create recordings on + and - discs. (DVD+R/ +RW, DVD-R/-RW). i.LINK, is a simple programming system for...
User manual
Page 11
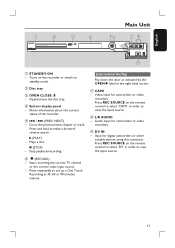
... flap Flip down the door as indicated by the OPEN X label at 30, 60 or 90 minutes interval. 11 h L/R AUDIO - Start recording the current TV channel or the current video input source. - e . / > (PREV/ NEXT) - Plays a disc. (STOP) - Press REC SOURCE on the...panel - Press and hold to the previous/next chapter or track. Video input for camcorders or video recorders. i DV IN - Shows information about the current status of the recorder. Audio input for camcorders or video recorders. f (RECORD) - Turns on the remote control to select 'DV' in order to set up a One ...
... flap Flip down the door as indicated by the OPEN X label at 30, 60 or 90 minutes interval. 11 h L/R AUDIO - Start recording the current TV channel or the current video input source. - e . / > (PREV/ NEXT) - Plays a disc. (STOP) - Press REC SOURCE on the...panel - Press and hold to the previous/next chapter or track. Video input for camcorders or video recorders. i DV IN - Shows information about the current status of the recorder. Audio input for camcorders or video recorders. f (RECORD) - Turns on the remote control to select 'DV' in order to set up a One ...
User manual
Page 12
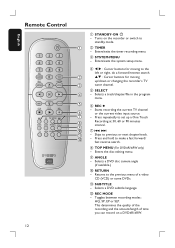
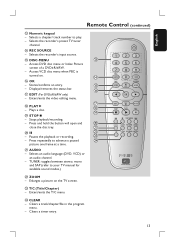
...- d W X : Cursor buttons for moving to the left or right, do a forward/reverse search. b ST : Cursor buttons for moving up a One Touch h i Recording at 30, 60 or 90 minutes interval. j g . > k - Skips to make a fast forward/ fast reverse search. Enters the disc editing menu. Returns to the previous... mode. Turns on a DVD±R/±RW. 12 c SYSTEM-MENU - Selects a track/chapter/file in the program menu. Starts recording the current TV channel or the current video input source. g - Press and hold to previous or next chapter/track. h TOP MENU...
...- d W X : Cursor buttons for moving to the left or right, do a forward/reverse search. b ST : Cursor buttons for moving up a One Touch h i Recording at 30, 60 or 90 minutes interval. j g . > k - Skips to make a fast forward/ fast reverse search. Enters the disc editing menu. Returns to the previous... mode. Turns on a DVD±R/±RW. 12 c SYSTEM-MENU - Selects a track/chapter/file in the program menu. Starts recording the current TV channel or the current video input source. g - Press and hold to previous or next chapter/track. h TOP MENU...
User manual
Page 13
...DVD disc menu or Index Picture screen of a DVD±R/±RW. - r PLAYÉ - Clears a timer entry. 13 Stops playback/recording. - w - x CLEAR - English Remote Control (continued) m Numeric keypad - Selects a chapter/ track number to advance a paused x picture one frame at a time. Selects the...status bar. Enters/exits the video editing menu. Plays a disc. q r s s STOP - u t Å v - Pauses the playback or recording. Press repeatedly to play. - Selects an audio language (DVD, VCD) or an audio channel. - TUNER: toggles bewteen stereo, mono and SAP (refer ...
...DVD disc menu or Index Picture screen of a DVD±R/±RW. - r PLAYÉ - Clears a timer entry. 13 Stops playback/recording. - w - x CLEAR - English Remote Control (continued) m Numeric keypad - Selects a chapter/ track number to advance a paused x picture one frame at a time. Selects the...status bar. Enters/exits the video editing menu. Plays a disc. q r s s STOP - u t Å v - Pauses the playback or recording. Press repeatedly to play. - Selects an audio language (DVD, VCD) or an audio channel. - TUNER: toggles bewteen stereo, mono and SAP (refer ...

User manual
Page 15
... Satellite Receiver, ensure that all the devices are turned on in order to the antenna input jack on the recorder to watch and record TV programs using the recorder. B Use the supplied RF coaxial cable to connect the TV-OUT jack on your TV (VHF/UHF RF... In (RF IN) jack only, See "Step 2 : Optional Connections - TIPS: Before making or changing any connections, make the above connection. English Step 1: Basic Recorder Connections CABLE SATELLITE ANTENNA VCR/Cable Box/ Satellite Receiver A VIDEO (CVBS) EXT 1 TV-OUT ANTENNA-IN B EXT 2 S-VIDEO (Y/C) INPUT L R AUDIO VIDEO (...
... Satellite Receiver, ensure that all the devices are turned on in order to the antenna input jack on the recorder to watch and record TV programs using the recorder. B Use the supplied RF coaxial cable to connect the TV-OUT jack on your TV (VHF/UHF RF... In (RF IN) jack only, See "Step 2 : Optional Connections - TIPS: Before making or changing any connections, make the above connection. English Step 1: Basic Recorder Connections CABLE SATELLITE ANTENNA VCR/Cable Box/ Satellite Receiver A VIDEO (CVBS) EXT 1 TV-OUT ANTENNA-IN B EXT 2 S-VIDEO (Y/C) INPUT L R AUDIO VIDEO (...
User manual
Page 16
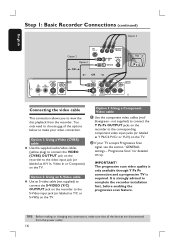
...Y Pb/Cb Pr/Cr or YUV) on the TV. not supplied) to connect the Y PB PR OUTPUT jacks on the recorder to complete the recorder installation first, before enabling the progressive scan feature. You only need to choose one of the options below to the video input jack...) cable Use the supplied audio/video cables (yellow plug) to connect the VIDEO (CVBS) OUTPUT jack on the recorder to make sure that all the devices are disconnected from the recorder. IMPORTANT! Step 1: Basic Recorder Connections (continued) Option 3 English Option 2 Option 1 OR OR TV AU D IO O UT S-V ID E O IN V ...
...Y Pb/Cb Pr/Cr or YUV) on the TV. not supplied) to connect the Y PB PR OUTPUT jacks on the recorder to complete the recorder installation first, before enabling the progressive scan feature. You only need to choose one of the options below to the video input jack...) cable Use the supplied audio/video cables (yellow plug) to connect the VIDEO (CVBS) OUTPUT jack on the recorder to make sure that all the devices are disconnected from the recorder. IMPORTANT! Step 1: Basic Recorder Connections (continued) Option 3 English Option 2 Option 1 OR OR TV AU D IO O UT S-V ID E O IN V ...
User manual
Page 17
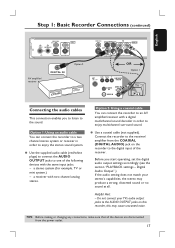
...from the power outlet. 17 TIPS: Before making or changing any connections, make sure that all . Connect the recorder to the AUDIO OUTPUT jacks on this recorder, this may produce a strong, distorted sound or no sound at all the devices are disconnected from the COAXIAL ...- Use the supplied audio cable (red/white plugs) to connect the AUDIO OUTPUT jacks to the sound. Use a coaxial cable (not supplied). Step 1: Basic Recorder Connections (continued) English VIDEO (CVBS) EXT 1 TV-OUT ANTENNA-IN EXT 2 S-VIDEO (Y/C) INPUT L R AUDIO AV amplifier/ receiver DIGITAL IN Option 2 VIDEO...
...from the power outlet. 17 TIPS: Before making or changing any connections, make sure that all . Connect the recorder to the AUDIO OUTPUT jacks on this recorder, this may produce a strong, distorted sound or no sound at all the devices are disconnected from the COAXIAL ...- Use the supplied audio cable (red/white plugs) to connect the AUDIO OUTPUT jacks to the sound. Use a coaxial cable (not supplied). Step 1: Basic Recorder Connections (continued) English VIDEO (CVBS) EXT 1 TV-OUT ANTENNA-IN EXT 2 S-VIDEO (Y/C) INPUT L R AUDIO AV amplifier/ receiver DIGITAL IN Option 2 VIDEO...

User manual
Page 18
... modulator. E Use the supplied AV cables (red/white plugs) to connect the AUDIO OUTPUT jacks on the recorder to the video input jack (or labeled as A/V In, Video In, Composite or Baseband) on the recorder. TIPS: Before making or changing any audio/video jacks. D Use the supplied AV cables (yellow plug) to... connect the VIDEO (CVBS) OUTPUT jack on the recorder to the audio input jack (or labeled as 75 ohm or RF In) and does not have an Antenna/Cable TV signal (or from the ...
... modulator. E Use the supplied AV cables (red/white plugs) to connect the AUDIO OUTPUT jacks on the recorder to the video input jack (or labeled as A/V In, Video In, Composite or Baseband) on the recorder. TIPS: Before making or changing any audio/video jacks. D Use the supplied AV cables (yellow plug) to... connect the VIDEO (CVBS) OUTPUT jack on the recorder to the audio input jack (or labeled as 75 ohm or RF In) and does not have an Antenna/Cable TV signal (or from the ...
User manual
Page 19
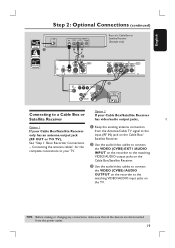
... 2 Connecting to the matching VIDEO/AUDIO input jacks on the TV. C Use the audio/video cables to connect the VIDEO (CVBS) /AUDIO OUTPUT on the recorder to a Cable Box or If your Cable Box/Satellite Receiver Satellite Receiver has video/audio output jacks, C Option 1 If your TV. A Keep the existing ...antenna connection from the power outlet. 19 Connecting the antenna cables" for the complete connections to the matching VIDEO/AUDIO output jacks on the recorder to your Cable Box/Satellite Receiver only has an antenna output jack (RF OUT or TO TV), See "Step 1: Basic...
... 2 Connecting to the matching VIDEO/AUDIO input jacks on the TV. C Use the audio/video cables to connect the VIDEO (CVBS) /AUDIO OUTPUT on the recorder to a Cable Box or If your Cable Box/Satellite Receiver Satellite Receiver has video/audio output jacks, C Option 1 If your TV. A Keep the existing ...antenna connection from the power outlet. 19 Connecting the antenna cables" for the complete connections to the matching VIDEO/AUDIO output jacks on the recorder to your Cable Box/Satellite Receiver only has an antenna output jack (RF OUT or TO TV), See "Step 1: Basic...
User manual
Page 20
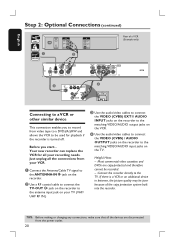
...on the TV. Most commercial video cassettes and DVDs are disconnected from video tape to a DVD±R/±RW and allows the VCR to be recorded. - Just unplug all the devices are copy-protected and therefore cannot be used for all your VCR. If there is a VCR or an...or other similar device This connection enables you start... TIPS: Before making or changing any connections, make sure that all the connections from your recording needs. Before you to record from the power outlet. 20 A Connect the Antenna/Cable TV signal to the matching VIDEO/AUDIO input jacks on the...
...on the TV. Most commercial video cassettes and DVDs are disconnected from video tape to a DVD±R/±RW and allows the VCR to be recorded. - Just unplug all the devices are copy-protected and therefore cannot be used for all your VCR. If there is a VCR or an...or other similar device This connection enables you start... TIPS: Before making or changing any connections, make sure that all the connections from your recording needs. Before you to record from the power outlet. 20 A Connect the Antenna/Cable TV signal to the matching VIDEO/AUDIO input jacks on the...
User manual
Page 21
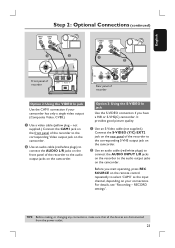
... Antenna/Cable TV signal to the matching VIDEO/AUDIO output jacks on the VCR. English Step 2: Optional Connections (continued) A CABLE SATELLITE ANTENNA Front Panel of recorder IN OUT RF VIDEO AUDIO R L S-VIDEO F D B VIDEO (CVBS) EXT 1 TV-OUT ANTENNA-IN EXT 2 S-VIDEO (Y/C) INPUT L R AUDIO C Back of... Y VIDEO L OUTPUT L R R COAXIAL PB S-VIDEO (Y/C) (DIGITAL AUDIO) AUDIO E TV AU D IO O UT S-V ID E O IN V ID E O IN Back of the recorder to the to the antenna input (RF IN) jack on the Cable Box/ Satellite Receiver. E Use the audio/video cables to connect the VIDEO(CVBS...
... Antenna/Cable TV signal to the matching VIDEO/AUDIO output jacks on the VCR. English Step 2: Optional Connections (continued) A CABLE SATELLITE ANTENNA Front Panel of recorder IN OUT RF VIDEO AUDIO R L S-VIDEO F D B VIDEO (CVBS) EXT 1 TV-OUT ANTENNA-IN EXT 2 S-VIDEO (Y/C) INPUT L R AUDIO C Back of... Y VIDEO L OUTPUT L R R COAXIAL PB S-VIDEO (Y/C) (DIGITAL AUDIO) AUDIO E TV AU D IO O UT S-V ID E O IN V ID E O IN Back of the recorder to the to the antenna input (RF IN) jack on the Cable Box/ Satellite Receiver. E Use the audio/video cables to connect the VIDEO(CVBS...
User manual
Page 22
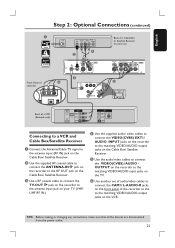
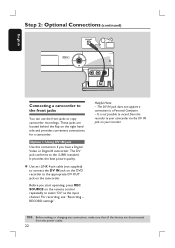
... start operating, press REC SOURCE on your camcorder via the DV IN jack on the remote control repeatedly to copy camcorder recordings. For recording, see "Recording - It is not possible to the appropriate DV OUT jack on the right hand side and provides convenient connections for a... camcorder. The DV jack conforms to a Personal Computer. - RECORD settings". The DV IN jack does not support a connection to the i.LINK standard. It provides the best picture quality. Step 2: Optional ...
... start operating, press REC SOURCE on your camcorder via the DV IN jack on the remote control repeatedly to copy camcorder recordings. For recording, see "Recording - It is not possible to the appropriate DV OUT jack on the right hand side and provides convenient connections for a... camcorder. The DV jack conforms to a Personal Computer. - RECORD settings". The DV IN jack does not support a connection to the i.LINK standard. It provides the best picture quality. Step 2: Optional ...
User manual
Page 23
...power outlet. 23 A Use an S-Video cable (not supplied.) Connect the S-VIDEO (Y/C) EXT2 jack on the rear panel of the recorder to the audio output jacks on the camcorder. It provides good picture quality. B Use an audio cable (red/white plugs) to ...camcorder has only a single video output (Composite Video, CVBS.) A Use a video cable (yellow plug - RECORD settings". English Step 2: Optional Connections (continued) L R VIDEO (CVBS) OUT 1 A B OUT 2 S-VIDEO (Y/C) Front panel of the recorder to the corresponding Video output jack on the camcorder. R L R A B VIDEO (CVBS) EXT 1 TV...
...power outlet. 23 A Use an S-Video cable (not supplied.) Connect the S-VIDEO (Y/C) EXT2 jack on the rear panel of the recorder to the audio output jacks on the camcorder. It provides good picture quality. B Use an audio cable (red/white plugs) to ...camcorder has only a single video output (Composite Video, CVBS.) A Use a video cable (yellow plug - RECORD settings". English Step 2: Optional Connections (continued) L R VIDEO (CVBS) OUT 1 A B OUT 2 S-VIDEO (Y/C) Front panel of the recorder to the corresponding Video output jack on the camcorder. R L R A B VIDEO (CVBS) EXT 1 TV...

User manual
Page 24
... sure you have a button or switch that you make several basic settings. Tuner settings can start ... English Step 3: Installation and Setup Before you start recording any ) and turned them in the disc tray. When you need to search for the available TV channels and store them on the TV and... set the TV to turn on your TV's manual for the first time, it to the correct video-in channel. Press SYSTEM-MENU to the recorder, the TV and Satellite Receiver/ Cable Box (if any TV channel programs, you complete the connections and turn it on using a RF modulator. ...
... sure you have a button or switch that you make several basic settings. Tuner settings can start ... English Step 3: Installation and Setup Before you start recording any ) and turned them in the disc tray. When you need to search for the available TV channels and store them on the TV and... set the TV to turn on your TV's manual for the first time, it to the correct video-in channel. Press SYSTEM-MENU to the recorder, the TV and Satellite Receiver/ Cable Box (if any TV channel programs, you complete the connections and turn it on using a RF modulator. ...


