Leaflet
Page 2
...8226; Sound Enhancement: 3D Virtual Surround Video Recording • Recording system: NTSC • Compression formats: MPEG2 • Recording Modes: XP : 60mins -> 9.30Mbps, SP : 120mins -> 4.43Mbps, LP : 240mins -> 2.12Mbps, EP : 360mins -> 1.31Mbps • Tape speeds: LP, SP • Recording enhancements: Append, Chapter Marker Insertion, Direct Record, Divide, Erase, Manual Chapter Marking, One Touch Record (OTR), Program Name Recording, Safe Record, Selectable Index Pictures • Audio compression: Dolby Digital, PCM Video Playback • Playback Media: DVD-Video, CD-R/CD-RW, DVD...
...8226; Sound Enhancement: 3D Virtual Surround Video Recording • Recording system: NTSC • Compression formats: MPEG2 • Recording Modes: XP : 60mins -> 9.30Mbps, SP : 120mins -> 4.43Mbps, LP : 240mins -> 2.12Mbps, EP : 360mins -> 1.31Mbps • Tape speeds: LP, SP • Recording enhancements: Append, Chapter Marker Insertion, Direct Record, Divide, Erase, Manual Chapter Marking, One Touch Record (OTR), Program Name Recording, Safe Record, Selectable Index Pictures • Audio compression: Dolby Digital, PCM Video Playback • Playback Media: DVD-Video, CD-R/CD-RW, DVD...
User manual
Page 5
... Adding Additional Title / Chapters to the Playlist 40 Deleting an Original or Playlist Title / Chapter 41 Deleting a Part 41 Naming a Title 42 Moving a Playlist Chapter 42 Divide One Titles Into Two 43 Combining Two Chapters Into One 43 Hide a Chapter / Title 44 Protect a Title 44 Overwriting Recording 45 Viewing Title list menu displayed on other DVD Recorders or Players 45 Playing Your Recordings on Other DVD Players (Finalizing a Disc 45 REFERENCE Language Codes 46 Area Codes 46 Troubleshooting 47-50 Reset the Recorder 49 Specifications 50-51...
... Adding Additional Title / Chapters to the Playlist 40 Deleting an Original or Playlist Title / Chapter 41 Deleting a Part 41 Naming a Title 42 Moving a Playlist Chapter 42 Divide One Titles Into Two 43 Combining Two Chapters Into One 43 Hide a Chapter / Title 44 Protect a Title 44 Overwriting Recording 45 Viewing Title list menu displayed on other DVD Recorders or Players 45 Playing Your Recordings on Other DVD Players (Finalizing a Disc 45 REFERENCE Language Codes 46 Area Codes 46 Troubleshooting 47-50 Reset the Recorder 49 Specifications 50-51...
User manual
Page 7
... type of DVDs may be compatible on the labels of some playback features of the unit may not be available or other discs, the message "Incorrect region code. Refer also to disc content designed by area limits. Recordings can play those discs. Playable on DVD+RW compatible players (automatically finalization) The edited contents are cases in a compatible format, there are playable on the TV screen. As this unit plays DVDs according to the instructions supplied with closed...
... type of DVDs may be compatible on the labels of some playback features of the unit may not be available or other discs, the message "Incorrect region code. Refer also to disc content designed by area limits. Recordings can play those discs. Playable on DVD+RW compatible players (automatically finalization) The edited contents are cases in a compatible format, there are playable on the TV screen. As this unit plays DVDs according to the instructions supplied with closed...
User manual
Page 8
... OF 525 PROGRESSIVE SCAN PICTURE PROBLEMS, IT IS RECOMMENDED THAT THE USER SWITCH THE CONNECTION TO THE 'STANDARD DEFINITION' OUTPUT. Each title is assigned a chapter number, enabling you to check carefully what is lawful copying in the area in a film or one track of video (with multiple angles) and several tracks of audio. Each chapter is assigned a reference number enabling you to locate it easily. Each track is a compressed file format that...
... OF 525 PROGRESSIVE SCAN PICTURE PROBLEMS, IT IS RECOMMENDED THAT THE USER SWITCH THE CONNECTION TO THE 'STANDARD DEFINITION' OUTPUT. Each title is assigned a chapter number, enabling you to check carefully what is lawful copying in the area in a film or one track of video (with multiple angles) and several tracks of audio. Each chapter is assigned a reference number enabling you to locate it easily. Each track is a compressed file format that...
User manual
Page 11
... during playback. 1 (POWER) Turns Recorder ON and OFF. DISPLAY Accesses On-Screen Display. REPEAT Selects play mode. STOP (x) Stops playback or recording. TITLE Displays the disc's Title menu, if available. TIMER Displays Timer Record menu. v/V: Selects a program. Simply press CHILD LOCK on and off. 11 Introduction Displays information of current chapter or track or go to VCR. MARKER Marks any point during the STOP mode, for use in the Title List or Chapter List menu. Press repeatedly for frame-by the TV tuner. RECORD (z) Starts recording. Displays the menu of a video CD...
... during playback. 1 (POWER) Turns Recorder ON and OFF. DISPLAY Accesses On-Screen Display. REPEAT Selects play mode. STOP (x) Stops playback or recording. TITLE Displays the disc's Title menu, if available. TIMER Displays Timer Record menu. v/V: Selects a program. Simply press CHILD LOCK on and off. 11 Introduction Displays information of current chapter or track or go to VCR. MARKER Marks any point during the STOP mode, for use in the Title List or Chapter List menu. Press repeatedly for frame-by the TV tuner. RECORD (z) Starts recording. Displays the menu of a video CD...
User manual
Page 15
... Settings Connecting to an amplifier equipped with two channel digital stereo (PCM) or to activate the Recorder 's digital output. (See [Audio Settings] on page 21). Check the receiver manual and the logos on the front panel is not compatible with digital satellite tuners or D-VHS video decks. To enjoy DTS multi channel surround, you use the S-VIDEO IN jack on the front panel, the VIDEO IN jack on the front of a DTS sound track...
... Settings Connecting to an amplifier equipped with two channel digital stereo (PCM) or to activate the Recorder 's digital output. (See [Audio Settings] on page 21). Check the receiver manual and the logos on the front panel is not compatible with digital satellite tuners or D-VHS video decks. To enjoy DTS multi channel surround, you use the S-VIDEO IN jack on the front panel, the VIDEO IN jack on the front of a DTS sound track...
User manual
Page 17
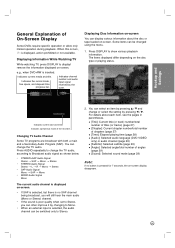
... setting at the factory. Use v / V or number buttons to select a channel to a 4:3 screen TV. Press SYSTEM MENU or RETURN (O) to the previous or next column. Use v / V to set the clock manually. 4. Add/Del] option. 2. Press B to move to the third level. [Edit] icon is set [Display Mode] below. [16:9] Select this when connecting to add or delete then press B. [Add] or [Delete] icon is turned off. 17 Select the [CH. Clock Set 1. Note : The Auto Clock Feature enables the Recorder...
... setting at the factory. Use v / V or number buttons to select a channel to a 4:3 screen TV. Press SYSTEM MENU or RETURN (O) to the previous or next column. Use v / V to set the clock manually. 4. Add/Del] option. 2. Press B to move to the third level. [Edit] icon is set [Display Mode] below. [16:9] Select this when connecting to add or delete then press B. [Add] or [Delete] icon is turned off. 17 Select the [CH. Clock Set 1. Note : The Auto Clock Feature enables the Recorder...
User manual
Page 18
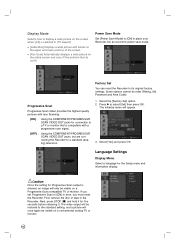
...) television. 1. Display Mode Selects how to display a wide picture on the screen when [4:3] is compatible with a progressive scan signal. [OFF] : Using the COMPONENT/PROGRESSIVE SCAN VIDEO OUT jacks, but are connecting the Recorder to the standard setting, and a picture will once again be reset (Rating, Set Password and Area Code). Caution Once the setting for the Setup menu and information display. If you set Progressive Scan to place your Recorder into an economic power save mode. Progressive Scan Progressive Scan Video provides the highest quality pictures with less...
...) television. 1. Display Mode Selects how to display a wide picture on the screen when [4:3] is compatible with a progressive scan signal. [OFF] : Using the COMPONENT/PROGRESSIVE SCAN VIDEO OUT jacks, but are connecting the Recorder to the standard setting, and a picture will once again be reset (Rating, Set Password and Area Code). Caution Once the setting for the Setup menu and information display. If you set Progressive Scan to place your Recorder into an economic power save mode. Progressive Scan Progressive Scan Video provides the highest quality pictures with less...
User manual
Page 19
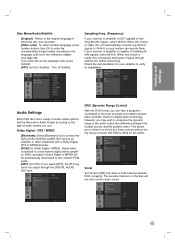
... DVD is NOT capable of handling 96 kHz signals, select 96 kHz. This allows you can decode them. Vocal Set Vocal to digital audio technology. The karaoke channels on the disc will be automatically downmixed to two-channel PCM audio. [OFF] (for DTS): If you may wish to the type of audio output options. Set DRC to the language code list in the reference chapter (see page 48). Hookup and Settings Disc Menu/Audio/Subtitle...
... DVD is NOT capable of handling 96 kHz signals, select 96 kHz. This allows you can decode them. Vocal Set Vocal to digital audio technology. The karaoke channels on the disc will be automatically downmixed to two-channel PCM audio. [OFF] (for DTS): If you may wish to the type of audio output options. Set DRC to the language code list in the reference chapter (see page 48). Hookup and Settings Disc Menu/Audio/Subtitle...
User manual
Page 21
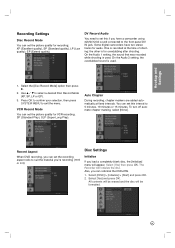
... 4:3). Use v / V to exit the menu. Select [Yes] and press OK. Record Aspect When DVD recording, you can set this if you load a completely blank disc, the [Initialize] menu will initialize the disc. Some digital camcorders have a camcorder using 32kHz/12-bit sound connected to suit the material you can reformat the DVD+RW. 1. One is used . 1. On the Audio 2 setting, the overdubbed sound is for overdubbing after shooting. Auto Chapter During recording, chapter markers...
... 4:3). Use v / V to exit the menu. Select [Yes] and press OK. Record Aspect When DVD recording, you can set this if you load a completely blank disc, the [Initialize] menu will initialize the disc. Some digital camcorders have a camcorder using 32kHz/12-bit sound connected to suit the material you can reformat the DVD+RW. 1. One is used . 1. On the Audio 2 setting, the overdubbed sound is for overdubbing after shooting. Auto Chapter During recording, chapter markers...
User manual
Page 23
... -screen. • If SAP is selected, but there is no button is inserted. Hookup and Settings Indicates current date and time. When this occurs, is selected, the audio channel can select an item by the tuner. Indicates the record mode, free space, and elapsed time progress bar. Changing TV Audio Channel Some TV programs are broadcast with both a main and a Secondary Audio Program (SAP). You can be changed using the menu. 1. Indicates channel number and audio input signal received...
... -screen. • If SAP is selected, but there is no button is inserted. Hookup and Settings Indicates current date and time. When this occurs, is selected, the audio channel can select an item by the tuner. Indicates the record mode, free space, and elapsed time progress bar. Changing TV Audio Channel Some TV programs are broadcast with both a main and a Secondary Audio Program (SAP). You can be changed using the menu. 1. Indicates channel number and audio input signal received...
User manual
Page 25
... (M) to open the disc tray. Press RETURN (O). Press OPEN/CLOSE (Z) to close disc tray or press 1 (POWER), the disc tray closes automatically and unit turns off. S-VHS Quasi Playback (SQPB) • This Recorder can move to another chapter as follows: • Press ∑ / w (SKIP) briefly during playback, press DISPLAY and use v / V to select the title icon. Input the chapter number or use the Remote Control. Press REW (m) or FWD (M) during pause mode. 2. At the point that have a region code. Continue to play discs that you...
... (M) to open the disc tray. Press RETURN (O). Press OPEN/CLOSE (Z) to close disc tray or press 1 (POWER), the disc tray closes automatically and unit turns off. S-VHS Quasi Playback (SQPB) • This Recorder can move to another chapter as follows: • Press ∑ / w (SKIP) briefly during playback, press DISPLAY and use v / V to select the title icon. Input the chapter number or use the Remote Control. Press REW (m) or FWD (M) during pause mode. 2. At the point that have a region code. Continue to play discs that you...
User manual
Page 32
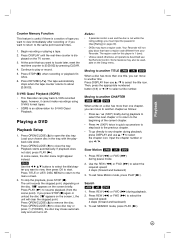
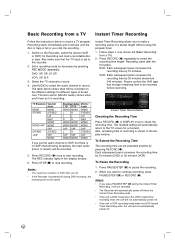
... using the program timer. 1. Instant Timer Recording allows you press PAUSE/STEP (X) during DVD recording, the recording will be recorded on the Recorder, select the device (VCR or DVD) for a moment. Press RECORD (z) repeatedly to make sure that the TV input is VCR recording mode when the DVD Instant Timer Recording ends, the unit will automatically return to SAP, but there is powered off . 32 DVD: Each subsequent press increases the recording time by 30 minutes (maximum 540 minutes). Set a recording mode...
... using the program timer. 1. Instant Timer Recording allows you press PAUSE/STEP (X) during DVD recording, the recording will be recorded on the Recorder, select the device (VCR or DVD) for a moment. Press RECORD (z) repeatedly to make sure that the TV input is VCR recording mode when the DVD Instant Timer Recording ends, the unit will automatically return to SAP, but there is powered off . 32 DVD: Each subsequent press increases the recording time by 30 minutes (maximum 540 minutes). Set a recording mode...
User manual
Page 34
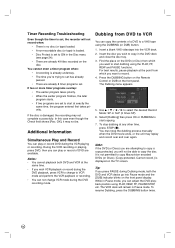
... Discs). [Copy-protected. To stop the dubbing process manually when the DVD movie ends, or the unit may not be able to record. 4. Cannot record.] is displayed on the front panel. For best results, pause playback at any other time, press STOP (x). Press the DUBBING button on the Remote Control or DUB on the TV screen. Tip: If you want to start dubbing using PLAY, REW, FF, PAUSE/STEP, etc. Timer Recording Troubleshooting Even though the timer is set, the recorder...
... Discs). [Copy-protected. To stop the dubbing process manually when the DVD movie ends, or the unit may not be able to record. 4. Cannot record.] is displayed on the front panel. For best results, pause playback at any other time, press STOP (x). Press the DUBBING button on the Remote Control or DUB on the TV screen. Tip: If you want to start dubbing using PLAY, REW, FF, PAUSE/STEP, etc. Timer Recording Troubleshooting Even though the timer is set, the recorder...

User manual
Page 35
... start recording. Set a recording mode as a camcorder or VCR, connected to record. 4. Press RECORD (z) once to stop automatically when the VHS tape ends. Press STOP (x) to start copying. 7. The DVD deck will stop recording. The REC indicator lights in Pause mode. Recording 35 The Dubbing menu appears. 5. Dubbing will remain in the display window. 6. While in the DVD deck and close the disc tray. 2. Insert a blank DVD disc in Pause mode, you will not be able to copy is copy protected, you can adjust the VCR playback position using PLAY...
... start recording. Set a recording mode as a camcorder or VCR, connected to record. 4. Press RECORD (z) once to stop automatically when the VHS tape ends. Press STOP (x) to start copying. 7. The DVD deck will stop recording. The REC indicator lights in Pause mode. Recording 35 The Dubbing menu appears. 5. Dubbing will remain in the display window. 6. While in the DVD deck and close the disc tray. 2. Insert a blank DVD disc in Pause mode, you will not be able to copy is copy protected, you can adjust the VCR playback position using PLAY...
User manual
Page 43
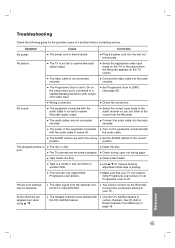
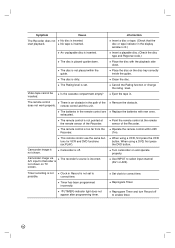
... cable is turned off . Connect the component directly to receive Recorder signal output. Check tuning, carry out tuning again. Symptom No power. Set the AUDIO options to a standard(analog) television with component video input. The playback picture is not connected securely. The power of a problem before contacting service. The video signal from the Recorder appears on the setup menu but is connected to the correct position. Troubleshooting Check the following guide for manual tracking adjustment while tape is playing. Reference 43 No sound. Check the connection. Clean...
... cable is turned off . Connect the component directly to receive Recorder signal output. Check tuning, carry out tuning again. Symptom No power. Set the AUDIO options to a standard(analog) television with component video input. The playback picture is not connected securely. The power of a problem before contacting service. The video signal from the Recorder appears on the setup menu but is connected to the correct position. Troubleshooting Check the following guide for manual tracking adjustment while tape is playing. Reference 43 No sound. Check the connection. Clean...
User manual
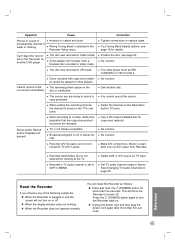
Page 44
... correct time. Point the remote control at the remote sensor of the Recorder. When using a VCR, first press the VCR button. Timer has been programmed incorrectly. (TIMER) indicator light does not appear after programming timer. Place the disc on and operate properly. Clock in the remote control are exhausted. Eject the tape in the path of the Recorder. Camcorder image is not shown on TV screen. Replace the batteries with the playback side down . Set clock to select input channel...
... correct time. Point the remote control at the remote sensor of the Recorder. When using a VCR, first press the VCR button. Timer has been programmed incorrectly. (TIMER) indicator light does not appear after programming timer. Place the disc on and operate properly. Clock in the remote control are exhausted. Eject the tape in the path of the Recorder. Camcorder image is not shown on TV screen. Replace the batteries with the playback side down . Set clock to select input channel...
User manual
Page 45
... replace cable. No solution. Recorder Audio/Video Out is not in TV tuner. Broadcast program is not selected for copy-once material. See [Changing TV Audio Channel] on the Recorder's built-in stereo format. Symptom Picture or sound of the following symptoms... Wrong Tuning Band is weak or missing. Stereo Audio Record and/or Playback not present. Recorder's TV audio channel is set to TV A/V In jacks. Finalize the disc; Recorder A/V Out jacks are loose. Set TV audio channel mode...
... replace cable. No solution. Recorder Audio/Video Out is not in TV tuner. Broadcast program is not selected for copy-once material. See [Changing TV Audio Channel] on the Recorder's built-in stereo format. Symptom Picture or sound of the following symptoms... Wrong Tuning Band is weak or missing. Stereo Audio Record and/or Playback not present. Recorder's TV audio channel is set to TV A/V In jacks. Finalize the disc; Recorder A/V Out jacks are loose. Set TV audio channel mode...
Quick start guide
Page 1
... menu and press PLAY on this recorder Type Record Playback Edit DVD+RW DVD+R DVD+R DL DVD-RW DVD-R DVD VIDEO AUDIO CD VIDEO CD DATA CD DATA CD Troubleshooting For more information about recording modes, refer to the user manual 4 Press RECORD to start guide RF coaxial cable Video cable Audio cable User manual Place in the Box 6 HEAD HI-FI STEREO ONE TOUCH RECORDING • LONG PLAY DVD recorder/VCR Remote control and 2 batteries Quick start recording Tip Press RECORD again to make a 10 minutes recording, each you are weak, replace the batteries. • Channel...
... menu and press PLAY on this recorder Type Record Playback Edit DVD+RW DVD+R DVD+R DL DVD-RW DVD-R DVD VIDEO AUDIO CD VIDEO CD DATA CD DATA CD Troubleshooting For more information about recording modes, refer to the user manual 4 Press RECORD to start guide RF coaxial cable Video cable Audio cable User manual Place in the Box 6 HEAD HI-FI STEREO ONE TOUCH RECORDING • LONG PLAY DVD recorder/VCR Remote control and 2 batteries Quick start recording Tip Press RECORD again to make a 10 minutes recording, each you are weak, replace the batteries. • Channel...
Quick start guide
Page 2
... select Auto Programming in General option menu Tip Use the recorder's remote control to make sure they are correct for the home theatre system Tip In some TVs, to find the correct viewing channel, check the connections again or check your TV's user manual GENERAL Auto Programming Program Edit Clock Set TV Aspect VCR Play Aspect VCR Play System AV2 Connection Progressive Scan Factory Set Close VHS recording 1 Insert videocassette with the record tab still intact into the cassette slot 3 Press PLAY if playback does not start automatically 4 To stop, press STOP 5 Press OPEN/CLOSE...
... select Auto Programming in General option menu Tip Use the recorder's remote control to make sure they are correct for the home theatre system Tip In some TVs, to find the correct viewing channel, check the connections again or check your TV's user manual GENERAL Auto Programming Program Edit Clock Set TV Aspect VCR Play Aspect VCR Play System AV2 Connection Progressive Scan Factory Set Close VHS recording 1 Insert videocassette with the record tab still intact into the cassette slot 3 Press PLAY if playback does not start automatically 4 To stop, press STOP 5 Press OPEN/CLOSE...


