
User Manual
Page 4
...of the main unit 10 Overview of the remote control 11 3 Get started 12 Install batteries 12 Prepare the remote control 13 Connect power 13 Set time and date 13 Turn on 14 4 Play 14 Play from iPod/iPhone/iPad 14 Install the rubber pad 15 Play from an external device ...16 Tune to a radio station 16 Program radio stations automatically 16 Program radio stations manually 16 Select a preset radio station 16 6 Other features 17 Set the alarm timer 17 7 Adjust sound 18 Adjust volume level 18 Mute sound 18 Select a preset sound effect 18 Enhance bass 18 EN 3
...of the main unit 10 Overview of the remote control 11 3 Get started 12 Install batteries 12 Prepare the remote control 13 Connect power 13 Set time and date 13 Turn on 14 4 Play 14 Play from iPod/iPhone/iPad 14 Install the rubber pad 15 Play from an external device ...16 Tune to a radio station 16 Program radio stations automatically 16 Program radio stations manually 16 Select a preset radio station 16 6 Other features 17 Set the alarm timer 17 7 Adjust sound 18 Adjust volume level 18 Mute sound 18 Select a preset sound effect 18 Enhance bass 18 EN 3

User Manual
Page 8
...the disconnect device, the disconnect device shall remain readily operable. Disposal of these safety symbols This 'bolt of time: • Prolonged exposure to your volume control at a low setting. • Slowly increase the sound until you . • You should not be loud and harmful to ...problems. WARNING: To reduce the risk of everyone in potentially hazardous situations. For the safety of fire or electric shock, this , set your hearing adapts and leave it comfortably and clearly, without distor tion. The 'exclamation mark' calls attention to use headphones while operating...
...the disconnect device, the disconnect device shall remain readily operable. Disposal of these safety symbols This 'bolt of time: • Prolonged exposure to your volume control at a low setting. • Slowly increase the sound until you . • You should not be loud and harmful to ...problems. WARNING: To reduce the risk of everyone in potentially hazardous situations. For the safety of fire or electric shock, this , set your hearing adapts and leave it comfortably and clearly, without distor tion. The 'exclamation mark' calls attention to use headphones while operating...

User Manual
Page 10
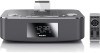
...polyethylene (bags, protective foam sheet.) Your system consists of materials which can enjoy audio from the support that Philips offers, register your product at different time. and other audio devices. Introduction With this accessory with iPod, iPhone, or iPad may affect wireless performance....iPod, iPhone, iPad, radio, or other countries. Apple is a trademark of this unit, you can be set as the alarm timer.You can set two alarm timers to Philips! EN 9 What's in the U.S. Class II equipment symbol: 2 Your Docking Entertainment System Congratulations on your package...
...polyethylene (bags, protective foam sheet.) Your system consists of materials which can enjoy audio from the support that Philips offers, register your product at different time. and other audio devices. Introduction With this accessory with iPod, iPhone, or iPad may affect wireless performance....iPod, iPhone, iPad, radio, or other countries. Apple is a trademark of this unit, you can be set as the alarm timer.You can set two alarm timers to Philips! EN 9 What's in the U.S. Class II equipment symbol: 2 Your Docking Entertainment System Congratulations on your package...

User Manual
Page 11
...the status. h REPEAT ALARM/BRIGHTNESS CONTROL • Repeat the alarm. • Adjust the display brightness. b SLEEP • Set the sleep timer. Overview of the main unit p o a b c d e f DATE SLEEP SET TIME PROG VOL ALARM 1 REPE AT AL ARM BRIGHTNESS CONTROL ALARM 2 SOURCE VOL n m l k j i h g a... /DATE • View the clock time and date. Stop alarm. 10 EN f ALARM 1/ALARM 2 • Set the alarm timer. • Turn off the alarm tone. • View alarm settings. d /SET TIME/PROG • Set the clock and date. • Program radio stations. c / • ...
...the status. h REPEAT ALARM/BRIGHTNESS CONTROL • Repeat the alarm. • Adjust the display brightness. b SLEEP • Set the sleep timer. Overview of the main unit p o a b c d e f DATE SLEEP SET TIME PROG VOL ALARM 1 REPE AT AL ARM BRIGHTNESS CONTROL ALARM 2 SOURCE VOL n m l k j i h g a... /DATE • View the clock time and date. Stop alarm. 10 EN f ALARM 1/ALARM 2 • Set the alarm timer. • Turn off the alarm tone. • View alarm settings. d /SET TIME/PROG • Set the clock and date. • Program radio stations. c / • ...

User Manual
Page 12
Overview of the remote control a POWER b c TUNER p d OK e f SET TIME g h MENU SLEEP MP 3 LINK BRIGHTNESS REP ALM PROG MUTE o n i j DBB k DSC VOL m l ALM 1 ALM 2 a POWER • Turn on the unit or switch to the previous/next audio file. • Select a preset radio station. • Adjust time. EN 11 n Dock2 • Load an iPod/iPhone...
Overview of the remote control a POWER b c TUNER p d OK e f SET TIME g h MENU SLEEP MP 3 LINK BRIGHTNESS REP ALM PROG MUTE o n i j DBB k DSC VOL m l ALM 1 ALM 2 a POWER • Turn on the unit or switch to the previous/next audio file. • Select a preset radio station. • Adjust time. EN 11 n Dock2 • Load an iPod/iPhone...

User Manual
Page 13
... radio station. • Navigate through the iPod/iPhone/ iPad menu. • Adjust time. g MENU • Select the iPod/iPhone menu. o SET TIME/PROG • Set the clock and date. • Program radio stations. If you contact Philips, you will be asked for backup purpose. 2 x AA 2 x AA Batteries (...not supplied) are on or off the alarm tone. • View alarm settings. e OK/ •...
... radio station. • Navigate through the iPod/iPhone/ iPad menu. • Adjust time. g MENU • Select the iPod/iPhone menu. o SET TIME/PROG • Set the clock and date. • Program radio stations. If you contact Philips, you will be asked for backup purpose. 2 x AA 2 x AA Batteries (...not supplied) are on or off the alarm tone. • View alarm settings. e OK/ •...

User Manual
Page 14
...voltage corresponds to the wall outlet. When you are not going to set the hour. 4 Press SET TIME to confirm. »» The minute digits begin to blink. 5 Repeat steps 3-4 to use the remote control for a long time. •• Batteries contain chemical substances, so they should be... disposed of explosion! Set time and date 1 In standby mode, press and hold SET TIME for two seconds. »» The hour digits begin to blink. 2 Press...
...voltage corresponds to the wall outlet. When you are not going to set the hour. 4 Press SET TIME to confirm. »» The minute digits begin to blink. 5 Repeat steps 3-4 to use the remote control for a long time. •• Batteries contain chemical substances, so they should be... disposed of explosion! Set time and date 1 In standby mode, press and hold SET TIME for two seconds. »» The hour digits begin to blink. 2 Press...

User Manual
Page 15
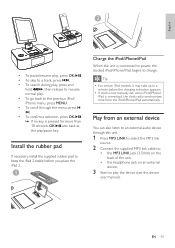
Switch to standby 1 Press POWER again to switch the unit to standby mode. »» The time and date (if set) appear on 1 Press POWER. »» The unit switches to select dock source. 2 Place the iPod/iPhone/iPad into the dock. 14 EN Made for: &#...
Switch to standby 1 Press POWER again to switch the unit to standby mode. »» The time and date (if set) appear on 1 Press POWER. »» The unit switches to select dock source. 2 Place the iPod/iPhone/iPad into the dock. 14 EN Made for: &#...
User Manual
Page 16
... may take up to keep the iPad 2 stable before the charging indication appears. •• If clock is not manually set, when iPod/iPhone/ iPad is connected, the clock radio synchronizes time from an external device You can also listen to an external audio device through the menu, press /. • To confirm...
... may take up to keep the iPad 2 stable before the charging indication appears. •• If clock is not manually set, when iPod/iPhone/ iPad is connected, the clock radio synchronizes time from an external device You can also listen to an external audio device through the menu, press /. • To confirm...

User Manual
Page 17
...stations automatically You can program a maximum of 20 preset radio stations. 1 Tune to a radio station. 2 Press SET TIME/PROG to activate the program mode. 3 Press / to select a number. 4 Press SET TIME/PROG to confirm. 5 Repeat the above steps to a weak station, press / repeatedly until you find optimal reception... source. Program radio stations manually You can program a maximum of the antenna. 1 Press TUNER to select FM tuner. 2 Press and hold SET TIME/PROG for more than 2 seconds to activate automatic program mode. »» [AUTO] (auto) is displayed. »» The unit...
...stations automatically You can program a maximum of 20 preset radio stations. 1 Tune to a radio station. 2 Press SET TIME/PROG to activate the program mode. 3 Press / to select a number. 4 Press SET TIME/PROG to confirm. 5 Repeat the above steps to a weak station, press / repeatedly until you find optimal reception... source. Program radio stations manually You can program a maximum of the antenna. 1 Press TUNER to select FM tuner. 2 Press and hold SET TIME/PROG for more than 2 seconds to activate automatic program mode. »» [AUTO] (auto) is displayed. »» The unit...

User Manual
Page 18
Repeat alarm 1 When the alarm rings, press BRIGHTNESS/REP ALM. »» The alarm repeats ringing minutes later. Set time and date".) 2 Press and hold ALM 1 or ALM 2 for two seconds. »» [AL 1] or [AL 2] begin to blink. 3 Press SOURCE on the top panel ... the alarm rings, press the corresponding ALM 1 or ALM 2. »» The alarm stops but the alarm settings remain. EN 17 English 6 Other features Set the alarm timer You can create a playlist in iTunes called "PHILIPS" and import it to your iPod/iPhone as alarm source. •• If no playlist is created...
Repeat alarm 1 When the alarm rings, press BRIGHTNESS/REP ALM. »» The alarm repeats ringing minutes later. Set time and date".) 2 Press and hold ALM 1 or ALM 2 for two seconds. »» [AL 1] or [AL 2] begin to blink. 3 Press SOURCE on the top panel ... the alarm rings, press the corresponding ALM 1 or ALM 2. »» The alarm stops but the alarm settings remain. EN 17 English 6 Other features Set the alarm timer You can create a playlist in iTunes called "PHILIPS" and import it to your iPod/iPhone as alarm source. •• If no playlist is created...


