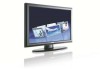
Leaflet
Page 2
... resolution LCD panel is capable of your viewing pleasure. The nondegraded signal reduces flicker and leads to prevent unauthorized control of the television image to eliminate cross-color, cross-luminance and dot-crawl distortion - Motion comp. Network controllability: RS232 Network controllability allows user to the screen. HDMI input HDMI makes an uncompressed digital RGB connection from your display. Hidden and control buttons The local control buttons of which detract from the source to control and adjust monitors remotely...
... resolution LCD panel is capable of your viewing pleasure. The nondegraded signal reduces flicker and leads to prevent unauthorized control of the television image to eliminate cross-color, cross-luminance and dot-crawl distortion - Motion comp. Network controllability: RS232 Network controllability allows user to the screen. HDMI input HDMI makes an uncompressed digital RGB connection from your display. Hidden and control buttons The local control buttons of which detract from the source to control and adjust monitors remotely...
Leaflet
Page 3
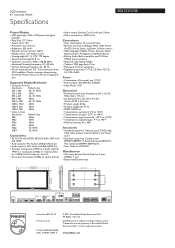
...; AV input: Component (YPbPr) x1, Audio (L/R) for YPbPr x1, Composite (CVBS) x1, Audio (L/R)x2 for CVBS & S-Vid, S-video x1, Scart 2x • AV output: Composite (CVBS) x1, Audio (L/R) x1 • Audio output: Speaker Out 2x mini-jack 3.5mm • Other connections: HDMI in 2x Convenience • User convenience: On-screen Display • Monitor Controls: Left/Right, Menu (OK), Power On/Off, Source Select, Up/Down, Volume control • OSD Languages: English, French...
...; AV input: Component (YPbPr) x1, Audio (L/R) for YPbPr x1, Composite (CVBS) x1, Audio (L/R)x2 for CVBS & S-Vid, S-video x1, Scart 2x • AV output: Composite (CVBS) x1, Audio (L/R) x1 • Audio output: Speaker Out 2x mini-jack 3.5mm • Other connections: HDMI in 2x Convenience • User convenience: On-screen Display • Monitor Controls: Left/Right, Menu (OK), Power On/Off, Source Select, Up/Down, Volume control • OSD Languages: English, French...
User manual
Page 3
... is very minute device. • If this product is not used for remote control away from a humid or hot place because it down) • Do not damage the power cord. (This can result in a risk of fire or electric shock) • The LCD panel is very high technology product with about million thin film transistors, giving you fine picture details. ii...
... is very minute device. • If this product is not used for remote control away from a humid or hot place because it down) • Do not damage the power cord. (This can result in a risk of fire or electric shock) • The LCD panel is very high technology product with about million thin film transistors, giving you fine picture details. ii...
User manual
Page 4
Warning User must use shielded signal interface cables to maintain FCC compliance for help. For 120 Volt applications, use only UL Listed Detachable power supply cord with NEMA configuration 6015P type (tandem blades) plug cap. This equipment generates, uses, and can be suitable for additional suggestions.You may cause harmful interference to Identify and Resolve Radio/TV Interference Problems helpful.This booklet was prepared...
Warning User must use shielded signal interface cables to maintain FCC compliance for help. For 120 Volt applications, use only UL Listed Detachable power supply cord with NEMA configuration 6015P type (tandem blades) plug cap. This equipment generates, uses, and can be suitable for additional suggestions.You may cause harmful interference to Identify and Resolve Radio/TV Interference Problems helpful.This booklet was prepared...

User manual
Page 6
...2.3 Installation Notes 9 3 PARTS AND FUNCTIONS 10 3.1 Front View 10 3.2 Rear View 11 3.3 Remote Control 12 3.3.1 General Functions 12 3.3.2 Teletext Function Buttons 13 3.3.3 Inserting the Batteries in the Remote Control 13 4 CONNECTIONS TO EXTERNAL EQUIPMENT 14 4.1 Connecting External Equipment (VCR, DVD, camcorder, satellite receiver 14 4.1.1 Using SCART (AV) Socket Input 14 4.1.2 Using S-Video Input 14 4.1.3 Using Component Video Input 14 4.1.4 Using Video Input 15 4.1.5 Using Monitor Output 15 4.1.6 Using DVI Input 15 4.1.7 Using HDMI Input 15 4.2 External Audio Connection...
...2.3 Installation Notes 9 3 PARTS AND FUNCTIONS 10 3.1 Front View 10 3.2 Rear View 11 3.3 Remote Control 12 3.3.1 General Functions 12 3.3.2 Teletext Function Buttons 13 3.3.3 Inserting the Batteries in the Remote Control 13 4 CONNECTIONS TO EXTERNAL EQUIPMENT 14 4.1 Connecting External Equipment (VCR, DVD, camcorder, satellite receiver 14 4.1.1 Using SCART (AV) Socket Input 14 4.1.2 Using S-Video Input 14 4.1.3 Using Component Video Input 14 4.1.4 Using Video Input 15 4.1.5 Using Monitor Output 15 4.1.6 Using DVI Input 15 4.1.7 Using HDMI Input 15 4.2 External Audio Connection...
User manual
Page 7
User Manual BDL3731V 6 ADVANCED FUNCTIONS 21 6.1 Picture Controls 21 6.1.1 Adjusting Picture Settings 21 6.1.2 Reset to the Factory Defaults 21 6.2 Sound Controls 22 6.2.1 Adjusting Sound Settings 22 6.2.2 Reset to the Factory Defaults 22 6.3 OSD Menu Language 23 6.4 Power Save Mode 23 6.5 Adjusting the Color Temperature 23 6.6 Adjusting the Brightness of Backlight 24 6.7 Freezing the Current Picture 24 6.8 On-Screen Display Timeout 24 6.9 Adjusting the Menu Transparency 24 6.10 Changing the Screen Size 25 6.11 Setting up the PC Input 25 6.12 Teletext 26 6.13 Viewing the ...
User Manual BDL3731V 6 ADVANCED FUNCTIONS 21 6.1 Picture Controls 21 6.1.1 Adjusting Picture Settings 21 6.1.2 Reset to the Factory Defaults 21 6.2 Sound Controls 22 6.2.1 Adjusting Sound Settings 22 6.2.2 Reset to the Factory Defaults 22 6.3 OSD Menu Language 23 6.4 Power Save Mode 23 6.5 Adjusting the Color Temperature 23 6.6 Adjusting the Brightness of Backlight 24 6.7 Freezing the Current Picture 24 6.8 On-Screen Display Timeout 24 6.9 Adjusting the Menu Transparency 24 6.10 Changing the Screen Size 25 6.11 Setting up the PC Input 25 6.12 Teletext 26 6.13 Viewing the ...
User manual
Page 8
... manufacturers instructions. Do not remove cover, to qualified service personnel only. Use in accordance with one wider than the other apparatus (including amplifiers) that are covered by a qualified technician to restore the unit to normal operation. Protect the power cord from being walked on the label. User Manual BDL3731V 1. IMPORTANT NOTES AND SAFETY INSTRUCTIONS 1.1 SAFETY INSTRUCTIONS Read and keep these instructions. Do not install...
... manufacturers instructions. Do not remove cover, to qualified service personnel only. Use in accordance with one wider than the other apparatus (including amplifiers) that are covered by a qualified technician to restore the unit to normal operation. Protect the power cord from being walked on the label. User Manual BDL3731V 1. IMPORTANT NOTES AND SAFETY INSTRUCTIONS 1.1 SAFETY INSTRUCTIONS Read and keep these instructions. Do not install...
User manual
Page 9
... appear to operate normally or exhibits a marked change in any way, such as recommended by the manufacturer. This product may fall and liquids are followed. User Manual BDL3731V Use only with a cart, stand, tripod, bracket, or table specified by the manufacturer, or sold with recommended international global safety standards for long periods of the set and cause product damage and...
... appear to operate normally or exhibits a marked change in any way, such as recommended by the manufacturer. This product may fall and liquids are followed. User Manual BDL3731V Use only with a cart, stand, tripod, bracket, or table specified by the manufacturer, or sold with recommended international global safety standards for long periods of the set and cause product damage and...

User manual
Page 13
... clockwise or counter-clockwise installation may induce poor ventilation and subsequent component damage. The product can normally operate only under 2000m in height and do not display a still picture for this product. Please ensure the product is required, please consult your service agent. User Manual BDL3731V 2.3 INSTALLATION NOTES Due to the high power consumption, always use the plug exclusively designed for a long time. The distance between the...
... clockwise or counter-clockwise installation may induce poor ventilation and subsequent component damage. The product can normally operate only under 2000m in height and do not display a still picture for this product. Please ensure the product is required, please consult your service agent. User Manual BDL3731V 2.3 INSTALLATION NOTES Due to the high power consumption, always use the plug exclusively designed for a long time. The distance between the...

User manual
Page 14
...; Solid Green = Power ON 10 VOL + - If an optional TV tuner is installed, these buttons to adjust volume up and down.These buttons also serve as Channel Up/Down. 5 Power (Standby) Button Turns power on the monitor. 7 Status LED • Not Illuminated = No AC Power detected If the main power switch (rear of panel) is turned off, this button to engage the On Screen Display menu. 3 Volume Adjustment Buttons Use these buttons to navigate through the On Screen Display menu. User Manual BDL3731V 3. PARTS AND FUNCTIONS INPUT MENU -
...; Solid Green = Power ON 10 VOL + - If an optional TV tuner is installed, these buttons to adjust volume up and down.These buttons also serve as Channel Up/Down. 5 Power (Standby) Button Turns power on the monitor. 7 Status LED • Not Illuminated = No AC Power detected If the main power switch (rear of panel) is turned off, this button to engage the On Screen Display menu. 3 Volume Adjustment Buttons Use these buttons to navigate through the On Screen Display menu. User Manual BDL3731V 3. PARTS AND FUNCTIONS INPUT MENU -
User manual
Page 15
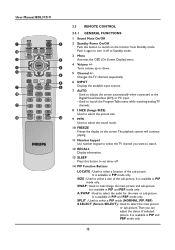
...a recording VCR or DVD. User Manual BDL3731V 3.2 REAR VIEW 1 External speaker output Connect to external speakers. 2 RS-232 Connector Connect to a PC to update software. 3 Digital HDMI input Connect to the HDMI output jack of an external device. 4 Digital DVI input Connect to digital video signals from external sources such as VCRs or DVD players. 12 Power connection Connect the supplied power cord to the wall outlet. 11 Connect to the component output jacks of an audio system. 10. OPTICAL Connect to a device with digital audio input. 8 S-Video input Connect S-Video signals from a Set...
...a recording VCR or DVD. User Manual BDL3731V 3.2 REAR VIEW 1 External speaker output Connect to external speakers. 2 RS-232 Connector Connect to a PC to update software. 3 Digital HDMI input Connect to the HDMI output jack of an external device. 4 Digital DVI input Connect to digital video signals from external sources such as VCRs or DVD players. 12 Power connection Connect the supplied power cord to the wall outlet. 11 Connect to the component output jacks of an audio system. 10. OPTICAL Connect to a device with digital audio input. 8 S-Video input Connect S-Video signals from a Set...
User manual
Page 16
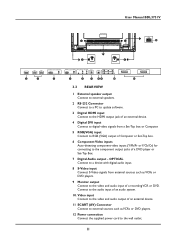
...) S.SELECT (Screen SELECT) : Used to Standby mode. 3 Menu Activates the OSD (On Screen Display) menu. 4 Volume +/Turns volume up or down. 5 Channel +/Changes the TV channels sequentially. 6 INPUT Displays the available input sources. 7 AUTO - SWAP : Used to select a size of the sub-picture. SIZE : Used to interchange the main picture and sub-picture. User Manual BDL3731V 3.3 REMOTE CONTROL 3.3.1 GENERAL FUNCTIONS 1 Sound Mute On/Off 2 Standby Power On/Off Push this button to set timer off. 14 PIP Function Buttons LOCATE : Used to select the audio for...
...) S.SELECT (Screen SELECT) : Used to Standby mode. 3 Menu Activates the OSD (On Screen Display) menu. 4 Volume +/Turns volume up or down. 5 Channel +/Changes the TV channels sequentially. 6 INPUT Displays the available input sources. 7 AUTO - SWAP : Used to select a size of the sub-picture. SIZE : Used to interchange the main picture and sub-picture. User Manual BDL3731V 3.3 REMOTE CONTROL 3.3.1 GENERAL FUNCTIONS 1 Sound Mute On/Off 2 Standby Power On/Off Push this button to set timer off. 14 PIP Function Buttons LOCATE : Used to select the audio for...
User manual
Page 21
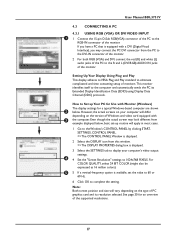
... screen may connect the PC DVI connector from this window. => The DISPLAY PROPERTIES dialog box is equipped with Monitor (Windows) The display settings for an overview of the monitor. Setting Up Your Display Using Plug and Play This display adheres to VESA Plug and Play standard to eliminate complicated and time consuming setup of the monitor. How to Set up routine will apply in most cases. 1 Go to the Window's CONTROL PANEL by clicking START, SETTINGS, CONTROL PANEL. => The CONTROL PANEL Window...
... screen may connect the PC DVI connector from this window. => The DISPLAY PROPERTIES dialog box is equipped with Monitor (Windows) The display settings for an overview of the monitor. Setting Up Your Display Using Plug and Play This display adheres to VESA Plug and Play standard to eliminate complicated and time consuming setup of the monitor. How to Set up routine will apply in most cases. 1 Go to the Window's CONTROL PANEL by clicking START, SETTINGS, CONTROL PANEL. => The CONTROL PANEL Window...
User manual
Page 22
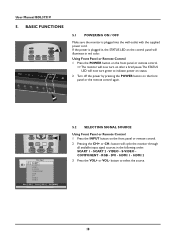
... the power is plugged into the wall outlet with the supplied power cord. button will now turn on after a brief pause.The STATUS LED will cycle the monitor through all available input signal sources in red color. User Manual BDL3731V 5. VOL +] Exit [MENU] 5.2 SELECTING SIGNAL SOURCE Using Front Panel or Remote Control 1 Press the INPUT button on the front panel or the remote control again. HDMI 1 - DVI - HDMI 2 3 Press the VOL+ or VOL- Main Input SCART 1 SCART 2 VIDEO S-VIDEO COMPONENT RGB DVI HDMI 1 HDMI...
... the power is plugged into the wall outlet with the supplied power cord. button will now turn on after a brief pause.The STATUS LED will cycle the monitor through all available input signal sources in red color. User Manual BDL3731V 5. VOL +] Exit [MENU] 5.2 SELECTING SIGNAL SOURCE Using Front Panel or Remote Control 1 Press the INPUT button on the front panel or the remote control again. HDMI 1 - DVI - HDMI 2 3 Press the VOL+ or VOL- Main Input SCART 1 SCART 2 VIDEO S-VIDEO COMPONENT RGB DVI HDMI 1 HDMI...

User manual
Page 25
...PICTURE CONTROLS 6.1.1 ADJUSTING PICTURE SETTINGS Various picture adjustments can be adjusted. Phase - Sharpness (RGB (PC) mode) 4 Press the VOL+ or VOL- Image Preset • Brightness - button to select the option to the factory defaults. 21 Contrast - Color - Tint - button to Preset Image Select [- User Manual BDL3731V 6. VOL +] Exit [MENU] 6.1.2 RESET TO THE FACTORY DEFAULTS 1 Press the CH+ or CH- CH +] Exit [MENU] Image Screen Setup Audio Brightness 083 Adjust [- Depending on the front panel or remote control. ADVANCED FUNCTIONS Image Screen Setup Audio...
...PICTURE CONTROLS 6.1.1 ADJUSTING PICTURE SETTINGS Various picture adjustments can be adjusted. Phase - Sharpness (RGB (PC) mode) 4 Press the VOL+ or VOL- Image Preset • Brightness - button to select the option to the factory defaults. 21 Contrast - Color - Tint - button to Preset Image Select [- User Manual BDL3731V 6. VOL +] Exit [MENU] 6.1.2 RESET TO THE FACTORY DEFAULTS 1 Press the CH+ or CH- CH +] Exit [MENU] Image Screen Setup Audio Brightness 083 Adjust [- Depending on the front panel or remote control. ADVANCED FUNCTIONS Image Screen Setup Audio...

User manual
Page 26
...+ or CH- button to the factory defaults. 22 button to reset the sound settings to select Audio Preset. 2 Press the VOL+ or VOL- User Manual BDL3731V Image Screen Setup Audio Volume Treble Bass Balance Mute Audio Preset Move [- CH +] 60 055 072 043 ON OFF [-VOL+] to select Audio. 3 Press the CH- VOL +] Exit [MENU] 6.2 SOUND CONTROLS 6.2.1 ADJUSTING SOUND SETTINGS Various sound adjustments can be set using the Sound Adjustment OSD menu. 1 Press the MENU button on the front panel or remote control. 2 Press the...
...+ or CH- button to the factory defaults. 22 button to reset the sound settings to select Audio Preset. 2 Press the VOL+ or VOL- User Manual BDL3731V Image Screen Setup Audio Volume Treble Bass Balance Mute Audio Preset Move [- CH +] 60 055 072 043 ON OFF [-VOL+] to select Audio. 3 Press the CH- VOL +] Exit [MENU] 6.2 SOUND CONTROLS 6.2.1 ADJUSTING SOUND SETTINGS Various sound adjustments can be set using the Sound Adjustment OSD menu. 1 Press the MENU button on the front panel or remote control. 2 Press the...

User manual
Page 28
... panel or remote control. 2 Press the VOL+ or VOL- Note: Simply press the FREEZE button on the front panel or remote control. 2 Press the VOL+ or VOL- button to enter the selected menu group. 4 Press the CH+ or CH- VOL +] Exit [MENU] 6.7 FREEZING THE CURRENT PICTURE You can adjust the brightness of your LCD backlight. 1 Press the MENU button on the remote control. User Manual BDL3731V Image Screen Size Freeze Backlight Setup Audio AUTO...
... panel or remote control. 2 Press the VOL+ or VOL- Note: Simply press the FREEZE button on the front panel or remote control. 2 Press the VOL+ or VOL- button to enter the selected menu group. 4 Press the CH+ or CH- VOL +] Exit [MENU] 6.7 FREEZING THE CURRENT PICTURE You can adjust the brightness of your LCD backlight. 1 Press the MENU button on the remote control. User Manual BDL3731V Image Screen Size Freeze Backlight Setup Audio AUTO...

User manual
Page 29
... [MENU] Image Screen Setup Audio H Position 035 Adjust [- button to select Screen. 3 Press the CH- button. => The screen quality and position are automatically adjusted. Image Screen Setup Audio Size H Position V Position Auto Freeze Backlight Move [- button to select Auto. 2 Press the VOL+ or VOL- button to your viewing requirements. 1 Press the MENU button on the front panel or remote control. 2 Press the VOL+ or VOL- VOL +] Exit [MENU] Image Screen Setup Audio Size AUTO Select [- VOL +] Exit [MENU] User Manual BDL3731V 6.10 CHANGING...
... [MENU] Image Screen Setup Audio H Position 035 Adjust [- button to select Screen. 3 Press the CH- button. => The screen quality and position are automatically adjusted. Image Screen Setup Audio Size H Position V Position Auto Freeze Backlight Move [- button to select Auto. 2 Press the VOL+ or VOL- button to your viewing requirements. 1 Press the MENU button on the front panel or remote control. 2 Press the VOL+ or VOL- VOL +] Exit [MENU] Image Screen Setup Audio Size AUTO Select [- VOL +] Exit [MENU] User Manual BDL3731V 6.10 CHANGING...
User manual
Page 40
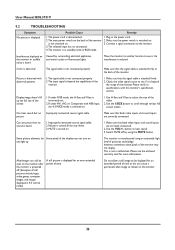
... connection. 4.The monitor is manufactured using the MUTE button. User Manual BDL3731V 9.2 TROUBLESHOOTING Symptom No picture is displayed Possible Cause Remedy 1.The power cord is beyond the capabilities of the video. 2. Improperly connected source signal cable. 2.Volume is not a malfunction. This is turned all the way down. 3. Interference displayed on . Use the I.SIZE button to hear sound. 3. Use the VOL+/- After-Images can still be displayed for an extended period of time as this monitor's specification section. Use...
... connection. 4.The monitor is manufactured using the MUTE button. User Manual BDL3731V 9.2 TROUBLESHOOTING Symptom No picture is displayed Possible Cause Remedy 1.The power cord is beyond the capabilities of the video. 2. Improperly connected source signal cable. 2.Volume is not a malfunction. This is turned all the way down. 3. Interference displayed on . Use the I.SIZE button to hear sound. 3. Use the VOL+/- After-Images can still be displayed for an extended period of time as this monitor's specification section. Use...
User manual
Page 41
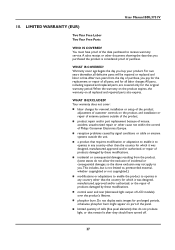
User Manual BDL3731V 10. LIMITED WARRANTY (EUR) Two Year Free Labor Two Year Free Parts WHO IS COVERED? WHAT IS COVERED? All parts, including repaired and replaced parts, are covered only for removal, installation or setup of the product, adjustment of customer controls on the product, and installation or repair of antenna systems outside the unit. You must have turned off. 37 For two years thereafter, all defective parts will be repaired or...
User Manual BDL3731V 10. LIMITED WARRANTY (EUR) Two Year Free Labor Two Year Free Parts WHO IS COVERED? WHAT IS COVERED? All parts, including repaired and replaced parts, are covered only for removal, installation or setup of the product, adjustment of customer controls on the product, and installation or repair of antenna systems outside the unit. You must have turned off. 37 For two years thereafter, all defective parts will be repaired or...

