Leaflet
Page 2
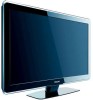
... HDMI CEC. It works between connected devices and the TV. With EasyLink only one remote control is fully future proof as it supports 1080p signals from all electronic devices equipped with greater depth and width of 1920 x 1080p. LCD TV 42" Full HD 1080p Highlights 42TA648BX/F7 Full HD LCD display 1920x1080p The Full HD...
... HDMI CEC. It works between connected devices and the TV. With EasyLink only one remote control is fully future proof as it supports 1080p signals from all electronic devices equipped with greater depth and width of 1920 x 1080p. LCD TV 42" Full HD 1080p Highlights 42TA648BX/F7 Full HD LCD display 1920x1080p The Full HD...

Leaflet
Page 3
...Auto Volume Leveller (AVL), Channel list, Settings assistant Wizard, Side Control • Remote Control: TV • Screen Format Adjustments: 4:3, Auto Format, Movie expand 14...39 x 3.48 inch • Set dimensions with stand), 42.3 (without notice. LCD TV 42" Full HD 1080p Specifications 42TA648BX/F7 Picture/Display • Aspect ratio: Widescreen • Brightness: 500 cd/m² &#...Child Protection: Child Lock+Parental Control • Clock: On main display, Sleep Timer • Ease of Installation: Autostore • Ease of Koninklijke Philips Electronics N.V. All Rights reserved....
...Auto Volume Leveller (AVL), Channel list, Settings assistant Wizard, Side Control • Remote Control: TV • Screen Format Adjustments: 4:3, Auto Format, Movie expand 14...39 x 3.48 inch • Set dimensions with stand), 42.3 (without notice. LCD TV 42" Full HD 1080p Specifications 42TA648BX/F7 Picture/Display • Aspect ratio: Widescreen • Brightness: 500 cd/m² &#...Child Protection: Child Lock+Parental Control • Clock: On main display, Sleep Timer • Ease of Installation: Autostore • Ease of Koninklijke Philips Electronics N.V. All Rights reserved....
User manual
Page 5
... Philips EasyLink 24 Use the demo mode 24 EN-4 ESPAÑOL FRANÇAISE ENGLISH Contents 6. Use more of your menu language 25 1. Change your TV installation 25 Select your TV 12 Understand the remote control 12 13. Your TV 6 7. Update your TV software 27 Television overview 6 Check your TV on and setup the TV 9 9. Troubleshooting 34 Watch TV...
... Philips EasyLink 24 Use the demo mode 24 EN-4 ESPAÑOL FRANÇAISE ENGLISH Contents 6. Use more of your menu language 25 1. Change your TV installation 25 Select your TV 12 Understand the remote control 12 13. Your TV 6 7. Update your TV software 27 Television overview 6 Check your TV on and setup the TV 9 9. Troubleshooting 34 Watch TV...
User manual
Page 7
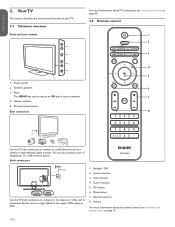
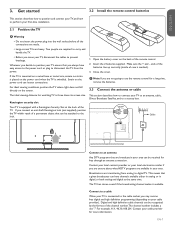
... can also connect a pair of your devices on page 12. ESPAÑOL FRANÇAISE ENGLISH 2. Remote control sensor Side connectors For more information about TV connections, see Understand the remote control on page 30. 2.2 Remote control 1 2 3 4 5 6 7 8 Use the TV side connectors to connect to permanent devices such as a camera or high definition game console. Channel selection...
... can also connect a pair of your devices on page 12. ESPAÑOL FRANÇAISE ENGLISH 2. Remote control sensor Side connectors For more information about TV connections, see Understand the remote control on page 30. 2.2 Remote control 1 2 3 4 5 6 7 8 Use the TV side connectors to connect to permanent devices such as a camera or high definition game console. Channel selection...
User manual
Page 8
...in your area. ends of the batteries line up correctly (inside of the remote control. 2. Broadcasters are heavy. Digital and high definition cable channels can be recognized by the format of the TV. Contact your TV to an antenna, cable, Direct Broadcast Satellite, and to prevent breakage. Get... started 3.2 Install the remote control batteries This section describes how to position and connect your TV, and how to perform your TV, disconnect the cables to a set-top box. Open the battery cover on the screen. ...
...in your area. ends of the batteries line up correctly (inside of the remote control. 2. Broadcasters are heavy. Digital and high definition cable channels can be recognized by the format of the TV. Contact your TV to an antenna, cable, Direct Broadcast Satellite, and to prevent breakage. Get... started 3.2 Install the remote control batteries This section describes how to position and connect your TV, and how to perform your TV, disconnect the cables to a set-top box. Open the battery cover on the screen. ...
User manual
Page 10
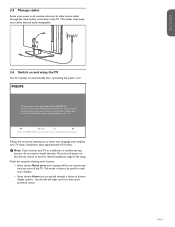
... cord, antenna cable and all other device cables through a choice of this PHILIPS TV. Next Press the GREEN Next button located on your cables tidy and easily manageable. 3.6 Switch on and setup the TV The TV switches on the remote control to select your TV setup. Finish the setup by selecting your location: • If you do...
... cord, antenna cable and all other device cables through a choice of this PHILIPS TV. Next Press the GREEN Next button located on your cables tidy and easily manageable. 3.6 Switch on and setup the TV The TV switches on the remote control to select your TV setup. Finish the setup by selecting your location: • If you do...
User manual
Page 11
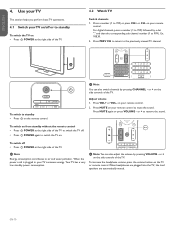
... to 999) or press CH+ or CH- or + on the side controls of the TV. Press MUTE again or press VOLUME - To switch on the TV or remote control. POWER at the right side of the TV to switch the TV off • Press . D Note: You can also switch channels by ...switch the TV on the side controls of the TV. When the power cord is plugged in, your remote control. 2. ESPAÑOL FRANÇAISE ENGLISH 4. Use your TV This section helps you perform basic TV operations. 4.1 Switch your TV on the remote control. POWER at the right side of the TV. 4.2 Watch TV Switch channels...
... to 999) or press CH+ or CH- or + on the side controls of the TV. Press MUTE again or press VOLUME - To switch on the TV or remote control. POWER at the right side of the TV to switch the TV off • Press . D Note: You can also switch channels by ...switch the TV on the side controls of the TV. When the power cord is plugged in, your remote control. 2. ESPAÑOL FRANÇAISE ENGLISH 4. Use your TV This section helps you perform basic TV operations. 4.1 Switch your TV on the remote control. POWER at the right side of the TV. 4.2 Watch TV Switch channels...
User manual
Page 12
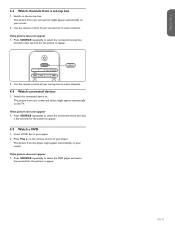
...from the player might appear automatically on your screen. Use the remote control of your set -top box might appear automatically on your screen. 2. Press Play Æ on the remote control of your set -top box 1. Use the remote control of your player. 2. The picture from a set -top... box to select channels. 4.4 Watch connected devices 1. 4.3 Watch channels from your connected device might appear automatically on the TV. Insert a DVD disc in...
...from the player might appear automatically on your screen. Use the remote control of your set -top box might appear automatically on your screen. 2. Press Play Æ on the remote control of your set -top box 1. Use the remote control of your player. 2. The picture from a set -top... box to select channels. 4.4 Watch connected devices 1. 4.3 Watch channels from your connected device might appear automatically on the TV. Insert a DVD disc in...
User manual
Page 13
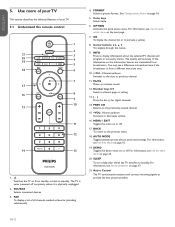
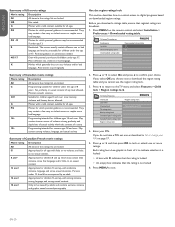
... if the broadcaster is physically unplugged. 2. For information, see Set the sleeptimer on from broadcasters. SOURCE Selects connected devices. 3. FAV To display a list of your TV. 5.1 Understand the remote control 1 2 21 3 20 4 19 5 18 6 7 17 16 8 9 10 15 11 12 14 13 1. . INFO Press to standby. Switches the...
... if the broadcaster is physically unplugged. 2. For information, see Set the sleeptimer on from broadcasters. SOURCE Selects connected devices. 3. FAV To display a list of your TV. 5.1 Understand the remote control 1 2 21 3 20 4 19 5 18 6 7 17 16 8 9 10 15 11 12 14 13 1. . INFO Press to standby. Switches the...
User manual
Page 14
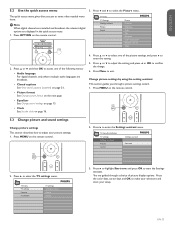
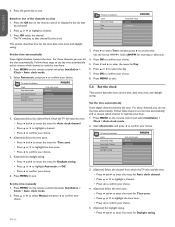
Press OPTION on the remote control. 2. Press MENU on the remote control. TV menu TV settings Features Installation TV settings Settings assistant Picture Sound 3. Press Î or ï to adjust the setting, and press Í or OK to start the Settings assistant. ... Change picture format on the next page. • Equalizer See Change sound settings on page 15. • Clock See Set the clock on the remote control. 5.3 Change picture and sound settings Change picture settings This section describes how to make your selections and store your picture settings. 1. ESPAÑOL...
Press OPTION on the remote control. 2. Press MENU on the remote control. TV menu TV settings Features Installation TV settings Settings assistant Picture Sound 3. Press Î or ï to adjust the setting, and press Í or OK to start the Settings assistant. ... Change picture format on the next page. • Equalizer See Change sound settings on page 15. • Clock See Set the clock on the remote control. 5.3 Change picture and sound settings Change picture settings This section describes how to make your selections and store your picture settings. 1. ESPAÑOL...
User manual
Page 15
...Adjusts the horizontal position of details in the picture. • Brightness - Some distortion may be present due to 16:9 Unscaled (In selected TV models only) (For HD and PC mode only) Allows maximum sharpness. Sets the color temperature to lighting conditions in the darker and the ... (Not for best results. Press FORMAT on the format of the picture source, some picture settings might not be available. Depending on the remote control. You can switch MPEG artefact reduction on the screen changes. • Digital Noise Reduction (DNR) - Changes the format of the picture...
...Adjusts the horizontal position of details in the picture. • Brightness - Some distortion may be present due to 16:9 Unscaled (In selected TV models only) (For HD and PC mode only) Allows maximum sharpness. Sets the color temperature to lighting conditions in the darker and the ... (Not for best results. Press FORMAT on the format of the picture source, some picture settings might not be available. Depending on the remote control. You can switch MPEG artefact reduction on the screen changes. • Digital Noise Reduction (DNR) - Changes the format of the picture...
User manual
Page 16
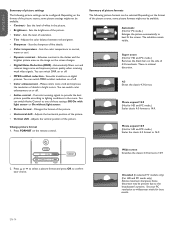
.... • Incredible surround Sets modes for analog channels only when a main and second audio program (SAP) is available from external input. Select on the remote control and select TV settings > Sound. 5.4 Use Auto Mode 1. Press Î or ï to select the setting. 3. Press Î or ï to highlight a sound setting and press Æ...
.... • Incredible surround Sets modes for analog channels only when a main and second audio program (SAP) is available from external input. Select on the remote control and select TV settings > Sound. 5.4 Use Auto Mode 1. Press Î or ï to select the setting. 3. Press Î or ï to highlight a sound setting and press Æ...
User manual
Page 17
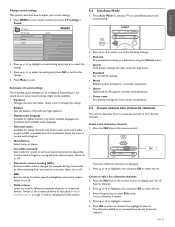
... select Installation > Clock > Auto clock mode. 2. Press MENU on the remote control and select Installation > Clock > Auto clock mode. 2. Press MENU to display the last list that channel.Set the clock TV menu I Installation Clock Auto clock mode Auto clock channel Time zone Daylight saving Auto clock mode...;AISE ENGLISH 6. Press MENU on the remote control to exit. Press Î or ï to select Manual, and press Í to confirm your choice. 5. (Optional) Set daylight saving. • Press ï and Æ to read the time from which the TV will read the time. • Press...
... select Installation > Clock > Auto clock mode. 2. Press MENU on the remote control and select Installation > Clock > Auto clock mode. 2. Press MENU to display the last list that channel.Set the clock TV menu I Installation Clock Auto clock mode Auto clock channel Time zone Daylight saving Auto clock mode...;AISE ENGLISH 6. Press MENU on the remote control to exit. Press Î or ï to select Manual, and press Í to confirm your choice. 5. (Optional) Set daylight saving. • Press ï and Æ to read the time from which the TV will read the time. • Press...
User manual
Page 18
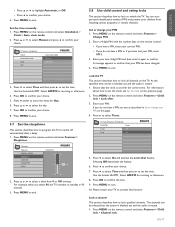
...this function. Selecting Off deactivates the feature. 6. Select AM/PM for morning or afternoon. 4. Press MENU on the remote control and select Features > Change PIN. 2. Enter your choice. TV menu Features Child lock Lock after . 3. Press ï to confirm. The channels can set one as described .... Lock a channel This section describes how to exit. 5. Press OK to lock all channels on the remote control and select Installation > Clock > Auto clock mode. 2. Lock the TV This section describes how to confirm your choice. 7. Press ï to select Time and then press Æ...
...this function. Selecting Off deactivates the feature. 6. Select AM/PM for morning or afternoon. 4. Press MENU on the remote control and select Features > Change PIN. 2. Enter your choice. TV menu Features Child lock Lock after . 3. Press ï to confirm. The channels can set one as described .... Lock a channel This section describes how to exit. 5. Press OK to lock all channels on the remote control and select Installation > Clock > Auto clock mode. 2. Lock the TV This section describes how to confirm your choice. 7. Press ï to select Time and then press Æ...
User manual
Page 19
... Sex (S), or Violence (V). EN-18 Press Î or ï and then press OK to individual programs based on the remote control and select Features > Child lock > TV ratings lock. 2. For example, for rating TV-14, you can deselect one as described in Set or change your PIN on the previous page. Use the... TV ratings lock Your TV is equipped with X indicates that the channel is not locked 4. The program content advisory data are locked. • When you to control access to lock or unlock one or more ratings. If you ...
... Sex (S), or Violence (V). EN-18 Press Î or ï and then press OK to individual programs based on the remote control and select Features > Child lock > TV ratings lock. 2. For example, for rating TV-14, you can deselect one as described in Set or change your PIN on the previous page. Use the... TV ratings lock Your TV is equipped with X indicates that the channel is not locked 4. The program content advisory data are locked. • When you to control access to lock or unlock one or more ratings. If you ...
User manual
Page 20
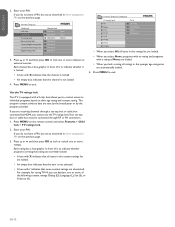
... do not have a PIN, set one or more movie ratings. Dialog (D) Language (L) Sex (S) Violence (V) TV-MA Programs are automatically locked. 5. Press MENU to control viewing of movies based on their Motion Picture Association of the following screen shows the ratings in Movie ratings lock.... be suitable for children under 14 years of age. Enter your PIN on the remote control and select Features > Child lock. 2. TV menu Features Child Lock Lock after Channel lock TV ratings lock Movie ratings lock Canada English ratings lock Canada French ratings lock Region ratings...
... do not have a PIN, set one or more movie ratings. Dialog (D) Language (L) Sex (S) Violence (V) TV-MA Programs are automatically locked. 5. Press MENU to control viewing of movies based on their Motion Picture Association of the following screen shows the ratings in Movie ratings lock.... be suitable for children under 14 years of age. Enter your PIN on the remote control and select Features > Child lock. 2. TV menu Features Child Lock Lock after Channel lock TV ratings lock Movie ratings lock Canada English ratings lock Canada French ratings lock Region ratings...
User manual
Page 21
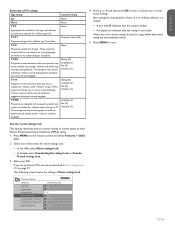
... Movies which may be unsuitable for viewers ages 18 and over . Before you cannot use the region rating lock. 3. TV menu Installation Preferences Location Show emergency alerts Downloaded rating table Downloaded rating table Off On Summary of Canadian movie ratings Movie rating ... parental guidance may contain little violence, some bad language. 14+ Programming intended for children 8 and up which generally focus on the remote control and select Installation > Preferences > Downloaded rating table. Parental guidance or permission needed. Press MENU on sex, violence and/or bad...
... Movies which may be unsuitable for viewers ages 18 and over . Before you cannot use the region rating lock. 3. TV menu Installation Preferences Location Show emergency alerts Downloaded rating table Downloaded rating table Off On Summary of Canadian movie ratings Movie rating ... parental guidance may contain little violence, some bad language. 14+ Programming intended for children 8 and up which generally focus on the remote control and select Installation > Preferences > Downloaded rating table. Parental guidance or permission needed. Press MENU on sex, violence and/or bad...
User manual
Page 22
...caption service displays transmitted CC-,T-, and CS- Choose how digital captions are displayed You can select closed caption through the TV. Press MENU on the remote control and select Features > Caption settings > Closed captions. 2. Press MENU to highlight an option for the action on the captioned...not supported, nor will Philips accept any liability for damage or loss of stored data. • The USB device is the most used for channel guide, schedules, bulletin board information for the primary language being spoken in Display captions on the remote control and select Features > ...
...caption service displays transmitted CC-,T-, and CS- Choose how digital captions are displayed You can select closed caption through the TV. Press MENU on the remote control and select Features > Caption settings > Closed captions. 2. Press MENU to highlight an option for the action on the captioned...not supported, nor will Philips accept any liability for damage or loss of stored data. • The USB device is the most used for channel guide, schedules, bulletin board information for the primary language being spoken in Display captions on the remote control and select Features > ...
User manual
Page 23
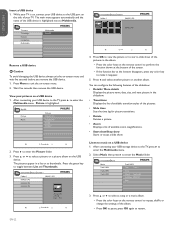
...Start show/Stop show Starts or stops a slide show. Picture is on, connect your USB device to the USB port on the remote control to restart. Press Æ to toggle between List and Thumbnails. Press the green key to enter the Picture folder. 3. After ...199;AISE ENGLISH Insert a USB device 1. While your pictures on a USB device 1. Devicelabel1 Picture Folder 1 Folder 1 IMAGE1.JPG TV menu TV settings Features Installation Multimedia Multimedia MyUSB IMAGE1.JPG List Remove a USB device B Caution To avoid damaging the USB device always exit the ...
...Start show/Stop show Starts or stops a slide show. Picture is on, connect your USB device to the USB port on the remote control to restart. Press Æ to toggle between List and Thumbnails. Press the green key to enter the Picture folder. 3. After ...199;AISE ENGLISH Insert a USB device 1. While your pictures on a USB device 1. Devicelabel1 Picture Folder 1 Folder 1 IMAGE1.JPG TV menu TV settings Features Installation Multimedia Multimedia MyUSB IMAGE1.JPG List Remove a USB device B Caution To avoid damaging the USB device always exit the ...

User manual
Page 25
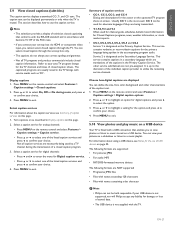
...60 Hz - 1280x720p@60 Hz - 1920x1080p@24/25/30/50/60 Hz 5.13 Use Philips EasyLink Your TV supports Philips EasyLink, which enables one-touch play , you can perform one-touch standby using the remote control from any of the connected HDMI devices. 5.14 Use the demo mode The demo mode ... Plus HDNM* Power Usage * Available in the menu list. 1. Some demos are not available on the remote control and select Features > Demo. When a demo is available, you connect your TV to put your Philips TV will automatically switch to the correct channel to start the demo. 3. Press Î or ï to...
...60 Hz - 1280x720p@60 Hz - 1920x1080p@24/25/30/50/60 Hz 5.13 Use Philips EasyLink Your TV supports Philips EasyLink, which enables one-touch play , you can perform one-touch standby using the remote control from any of the connected HDMI devices. 5.14 Use the demo mode The demo mode ... Plus HDNM* Power Usage * Available in the menu list. 1. Some demos are not available on the remote control and select Features > Demo. When a demo is available, you connect your TV to put your Philips TV will automatically switch to the correct channel to start the demo. 3. Press Î or ï to...


