Leaflet
Page 2
... menu control • Program List (100 presets) • Wake up clock • Sleep timer • Smart Lock (Child lock + Parental control) • Slim Remote Control (Universal) • Swivel and tilt stand Side Connections (AV3) • S-Video • Headphone • Video CVBS Rear Connections • AVI : AV in, CVI/YPbPr (1fh), Audio • AV2 : AV in, S-Video, CVBS, Audio • AV4 : HDMI, Digital PC/HD input, Audio • AV5 : VGA/RGB, Analog PC/HD (2fh) input Multiple PIP • Picture in Picture (PIP...
... menu control • Program List (100 presets) • Wake up clock • Sleep timer • Smart Lock (Child lock + Parental control) • Slim Remote Control (Universal) • Swivel and tilt stand Side Connections (AV3) • S-Video • Headphone • Video CVBS Rear Connections • AVI : AV in, CVI/YPbPr (1fh), Audio • AV2 : AV in, S-Video, CVBS, Audio • AV4 : HDMI, Digital PC/HD input, Audio • AV5 : VGA/RGB, Analog PC/HD (2fh) input Multiple PIP • Picture in Picture (PIP...
User manual
Page 3
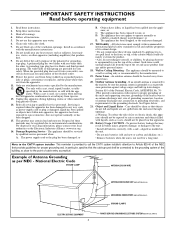
...; Install all instructions. 5. aratus. or B. or C. All televisions must comply with liquids, such as per NEC - Power Lines - See Figure below. 21. aligned as practical. A polarized plug has two blades with a dry cloth. 7. The power supply cord or the plug has been damaged; Tilt/Stability - The appliance should not be serviced by the manufacturer, or sold with a cart, stand, tripod, bracket, or table...
...; Install all instructions. 5. aratus. or B. or C. All televisions must comply with liquids, such as per NEC - Power Lines - See Figure below. 21. aligned as practical. A polarized plug has two blades with a dry cloth. 7. The power supply cord or the plug has been damaged; Tilt/Stability - The appliance should not be serviced by the manufacturer, or sold with a cart, stand, tripod, bracket, or table...
User manual
Page 5
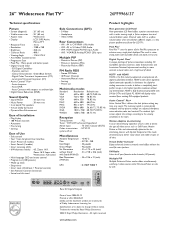
...the back of the television. Color TV Quick Use and Setup Guide CONTENTS Important Notice/Warning 1 Making Basic TV Connections Basic Cable TV Connections 1 Basic Antenna TV Connections 1 Basic TV Operation 2 Remote Battery Installation 2 Remote Control Button Descriptions 2 How to Use the Installation Features 3-4 Using the Language Control 3 Setting the Tuner Mode Control 3 How to Automatically Program Channels 3 How to Add and Delete Channels 4 How to set . Not all incoming signals to help provide the best picture quality. Refer to use the ScreenSaver Control 36 As an...
...the back of the television. Color TV Quick Use and Setup Guide CONTENTS Important Notice/Warning 1 Making Basic TV Connections Basic Cable TV Connections 1 Basic Antenna TV Connections 1 Basic TV Operation 2 Remote Battery Installation 2 Remote Control Button Descriptions 2 How to Use the Installation Features 3-4 Using the Language Control 3 Setting the Tuner Mode Control 3 How to Automatically Program Channels 3 How to Add and Delete Channels 4 How to set . Not all incoming signals to help provide the best picture quality. Refer to use the ScreenSaver Control 36 As an...

User manual
Page 6
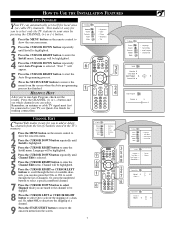
HELPFUL HINT Remember, the Language control makes only the TV's onscreen Menu items appear in either Antenna or Cable. 1 Press the MENU button on the remote control to show the onscreen menu. 2 Press the CURSOR DOWN button repeatedly until Install is set the TV's onscreen menu to access the Install menu. If Tuner Mode is highlighted. 3 Press the CURSOR RIGHT button to remove the menu from the screen. It does not change the Tv's signal input to remove the menu from the...
HELPFUL HINT Remember, the Language control makes only the TV's onscreen Menu items appear in either Antenna or Cable. 1 Press the MENU button on the remote control to show the onscreen menu. 2 Press the CURSOR DOWN button repeatedly until Install is set the TV's onscreen menu to access the Install menu. If Tuner Mode is highlighted. 3 Press the CURSOR RIGHT button to remove the menu from the screen. It does not change the Tv's signal input to remove the menu from the...
User manual
Page 7
... CHANNEL (+) or (-) button and see Quick-Use Guide for you to your area by Sound pressing the CHANNEL (+) or (-) button. Remember, an antenna or cable TV signal must first be highlighted. 6 Press the CURSOR RIGHT or CURSOR LEFT buttons to remove the onscreen menu from the list of available channels, you can also press the CH+ or CH- Brightness Color Picture Sharpness Tint TV Menu Picture Sound Features Install Mode Language Tuner Mode Auto Program Channel Edit 3 5 2 4 Install Language É Tuner Mode É Auto Program...
... CHANNEL (+) or (-) button and see Quick-Use Guide for you to your area by Sound pressing the CHANNEL (+) or (-) button. Remember, an antenna or cable TV signal must first be highlighted. 6 Press the CURSOR RIGHT or CURSOR LEFT buttons to remove the onscreen menu from the list of available channels, you can also press the CH+ or CH- Brightness Color Picture Sharpness Tint TV Menu Picture Sound Features Install Mode Language Tuner Mode Auto Program Channel Edit 3 5 2 4 Install Language É Tuner Mode É Auto Program...
User manual
Page 10
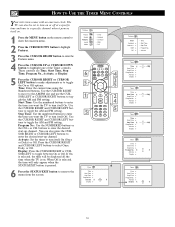
... time using the Numbered buttons. You can also be displayed all the time when the TV is pressed. 6 Press the STATUS/EXIT button to a specific channel when it powers itself On. TV Menu Picture Sound Features Install Mode Timer Autolock Contrast + DNR PIP 6 4 5 3 5 1 2 4 5 5 Timer Time É Start Time É Stop Time É Program No. É Activate Ñ Display É Once ▼ É Features Timer Autolock É Contrast + É DNR É PIP É Time Start Time Stop Time Program No. PMÉ Timer Time...
... time using the Numbered buttons. You can also be displayed all the time when the TV is pressed. 6 Press the STATUS/EXIT button to a specific channel when it powers itself On. TV Menu Picture Sound Features Install Mode Timer Autolock Contrast + DNR PIP 6 4 5 3 5 1 2 4 5 5 Timer Time É Start Time É Stop Time É Program No. É Activate Ñ Display É Once ▼ É Features Timer Autolock É Contrast + É DNR É PIP É Time Start Time Stop Time Program No. PMÉ Timer Time...

User manual
Page 12
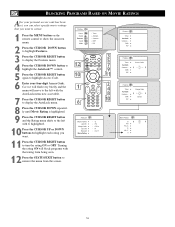
... screen briefly and the highlight bar goes back to AutoLock. 10 Press the STATUS/EXIT button to enter the AutoLock mode. When "Correct" appears, the AutoLock menu is accessible and you will become aware that 0711 is the default AutoLockTM code. Enter a new four-digit code using the number buttons, "Confirm Code----" will appear on the remote control, enter the access code. TV Menu Picture Sound Features Install Mode 10 1 6 7 8 9 Timer Autolock Contrast + DNR PIP...
... screen briefly and the highlight bar goes back to AutoLock. 10 Press the STATUS/EXIT button to enter the AutoLock mode. When "Correct" appears, the AutoLock menu is accessible and you will become aware that 0711 is the default AutoLockTM code. Enter a new four-digit code using the number buttons, "Confirm Code----" will appear on the remote control, enter the access code. TV Menu Picture Sound Features Install Mode 10 1 6 7 8 9 Timer Autolock Contrast + DNR PIP...

User manual
Page 13
... 6 time. For individual channels, press the CURSOR RIGHT to remove the menu from the screen. AutoLock Block Channel Ñ Lock HD É Change Code É Clear All É Block All É Movie Rating É On É 11Press the STATUS/EXIT button to enter the Lock Channel menu. 8 Using the numbered buttons or the CH+ or CH- TV Menu Picture Sound Features Install Mode • Timer • Autolock • Contrast + • DNR • PIP Features Timer...
... 6 time. For individual channels, press the CURSOR RIGHT to remove the menu from the screen. AutoLock Block Channel Ñ Lock HD É Change Code É Clear All É Block All É Movie Rating É On É 11Press the STATUS/EXIT button to enter the Lock Channel menu. 8 Using the numbered buttons or the CH+ or CH- TV Menu Picture Sound Features Install Mode • Timer • Autolock • Contrast + • DNR • PIP Features Timer...

User manual
Page 15
... CLEAR ALL LOCKED CHANNELS AT THE SAME TIME Various onscreen messages will briefly appear on the screen. 9 Press the CURSOR RIGHT button to activate the clearing of the AutoLock™ Rating options, simply enter your four-digit Access Code, "Correct" will appear when someone tries to view blocked programming. The message is blocked. TV Menu Picture Sound Features Install Mode 10 1 6 Timer Autolock Contrast + DNR PIP 3 5 7 9 2 4 8 Features Timer É...
... CLEAR ALL LOCKED CHANNELS AT THE SAME TIME Various onscreen messages will briefly appear on the screen. 9 Press the CURSOR RIGHT button to activate the clearing of the AutoLock™ Rating options, simply enter your four-digit Access Code, "Correct" will appear when someone tries to view blocked programming. The message is blocked. TV Menu Picture Sound Features Install Mode 10 1 6 Timer Autolock Contrast + DNR PIP 3 5 7 9 2 4 8 Features Timer É...
User manual
Page 16
TV Menu Picture Sound Features Install Mode 12 10 1 6 Timer Autolock Contrast + DNR PIP 3 5 7 9 11 2 4 8 10 ▼ AutoLock Block Channel É Lock HD É Change Code É Clear All É Block All É Movie RatIng É G PG PG-13 R NC-17 Features Timer É Autolock É Contrast + É DNR É PIP É Features Timer É Access Code Autolock Contrast DNR É PIP É Features Timer É Change Code Autolock * * * * Ñ É Contrast...
TV Menu Picture Sound Features Install Mode 12 10 1 6 Timer Autolock Contrast + DNR PIP 3 5 7 9 11 2 4 8 10 ▼ AutoLock Block Channel É Lock HD É Change Code É Clear All É Block All É Movie RatIng É G PG PG-13 R NC-17 Features Timer É Autolock É Contrast + É DNR É PIP É Features Timer É Access Code Autolock Contrast DNR É PIP É Features Timer É Change Code Autolock * * * * Ñ É Contrast...

User manual
Page 25
The number of the current channel will appear on the screen. HELPFUL HINT Along with regularly programmed channels, the external video source connections can be added to the SURF list. 2 Press the SURF button on the remote control. The left hand side of the screen show the picture without PixelPlus™. This means that currently interest you. Note: You cannot turn Pixel Plus™ off, it is shown...
The number of the current channel will appear on the screen. HELPFUL HINT Along with regularly programmed channels, the external video source connections can be added to the SURF list. 2 Press the SURF button on the remote control. The left hand side of the screen show the picture without PixelPlus™. This means that currently interest you. Note: You cannot turn Pixel Plus™ off, it is shown...
User manual
Page 26
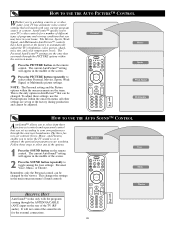
... cannot be adjusted. HOW TO USE THE AUTO PICTURE™ CONTROL Whether you're watching a movie or a video game, your TV has automatic video control settings that will match with the programs coming through the ANTENNA/CABLE (ANT) input on the rear of the TV (RF audio). The Movies, Sports, Weak Signal, and Multimedia AutoPicture™ controls have in the main onscreen menu's Sound controls Theatre HELPFUL HINT AutoSoundTM works only with your current program source or...
... cannot be adjusted. HOW TO USE THE AUTO PICTURE™ CONTROL Whether you're watching a movie or a video game, your TV has automatic video control settings that will match with the programs coming through the ANTENNA/CABLE (ANT) input on the rear of the TV (RF audio). The Movies, Sports, Weak Signal, and Multimedia AutoPicture™ controls have in the main onscreen menu's Sound controls Theatre HELPFUL HINT AutoSoundTM works only with your current program source or...

User manual
Page 27
... of a tape or to view the picture moving rapidly in certain onscreen menu feature settings. BUTTONS Press to scan back through the channel numbers if your accessory's remote control. May be used for direct channel selections. A light will operate the same as with the original remote control provided with your accessory device if those features are not found on DVD movies. FAST FORWARD BUTTON Press to release Pause...
... of a tape or to view the picture moving rapidly in certain onscreen menu feature settings. BUTTONS Press to scan back through the channel numbers if your accessory's remote control. May be used for direct channel selections. A light will operate the same as with the original remote control provided with your accessory device if those features are not found on DVD movies. FAST FORWARD BUTTON Press to release Pause...
User manual
Page 34
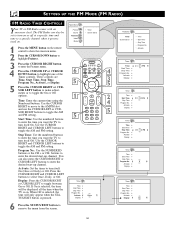
... buttons to toggle the AM and PM setting. Display: Press the CURSOR RIGHT or CURSOR LEFT to toggle the On or Off options. Radio Menu Picture Sound Features Install Mode Timer Screen Saver 6 5 1 5 Timer Time É Start Time É Stop Time É Program No. É Activate Ñ Once É Display É 4 3 5 2 4 5 ▼ Features Timer Screen Saver É Time Start Time Stop Time Program No. SETTING UP THE FM MODE (FM RADIO) FM RADIO TIMER CONTROLS Your TV...
... buttons to toggle the AM and PM setting. Display: Press the CURSOR RIGHT or CURSOR LEFT to toggle the On or Off options. Radio Menu Picture Sound Features Install Mode Timer Screen Saver 6 5 1 5 Timer Time É Start Time É Stop Time É Program No. É Activate Ñ Once É Display É 4 3 5 2 4 5 ▼ Features Timer Screen Saver É Time Start Time Stop Time Program No. SETTING UP THE FM MODE (FM RADIO) FM RADIO TIMER CONTROLS Your TV...

User manual
Page 44
...; Clean the remote control and the remote control sensor win- S-VHS color becomes faint • If S-VHS is being used . button on the TV. TROUBLESHOOTING TIPS No Power • Check the TV power cord. Are they properly secured to hook up followed by a channel down. 44 If necessary, replace them with RF only type connections, the signal coming from the cable box will be sure the TUNER MODES are set - dow on the remote control. • If...
...; Clean the remote control and the remote control sensor win- S-VHS color becomes faint • If S-VHS is being used . button on the TV. TROUBLESHOOTING TIPS No Power • Check the TV power cord. Are they properly secured to hook up followed by a channel down. 44 If necessary, replace them with RF only type connections, the signal coming from the cable box will be sure the TUNER MODES are set - dow on the remote control. • If...
User manual
Page 46
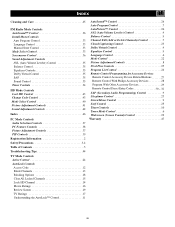
...Control 40 Picture Adjustment Controls 41 Sound Adjustment Controls 42 Index 46 PC Mode Controls Audio Selection Controls 37 PC Feature Controls 38 Picture Adjustment Controls 37 PIP Controls 39 Registration Information 2 Safety/Precautions 3-4 Table of Contents 5 Troubleshooting Tips 44 TV Mode Controls Active Control 24 AutoLock Controls Access Code 12 Block Channels 13 Blocking Options 18 Clear All Locked Channels 15 Lock HD Channel 14 Movie Ratings 16 Review Screen 19 TV Ratings 17 Understanding the AutoLock™ Control 11 AutoSound™ Control 26 Auto Program...
...Control 40 Picture Adjustment Controls 41 Sound Adjustment Controls 42 Index 46 PC Mode Controls Audio Selection Controls 37 PC Feature Controls 38 Picture Adjustment Controls 37 PIP Controls 39 Registration Information 2 Safety/Precautions 3-4 Table of Contents 5 Troubleshooting Tips 44 TV Mode Controls Active Control 24 AutoLock Controls Access Code 12 Block Channels 13 Blocking Options 18 Clear All Locked Channels 15 Lock HD Channel 14 Movie Ratings 16 Review Screen 19 TV Ratings 17 Understanding the AutoLock™ Control 11 AutoSound™ Control 26 Auto Program...
Quick start guide
Page 1
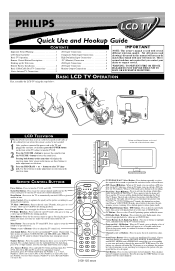
...button on the TV screen. Press to display a list of a program that has a weak signal. Alternately, press AV+ button followed by pressing the SURF button you can place up to improve the picture of channel numbers. Likewise, when in memory. LCD TV Quick Use and Hookup Guide CONTENTS Important Notice/Warning 1 LCD Stand Assemble 1 Basic TV Operation 1 Remote Control Button Descriptions 1 Hooking up the Television Remote Battery Installation 2 Basic Cable/Cable Box TV Connections 2 Basic Antenna TV Connections 2 AV1 Input Connections 3 Component Video Input Connections...
...button on the TV screen. Press to display a list of a program that has a weak signal. Alternately, press AV+ button followed by pressing the SURF button you can place up to improve the picture of channel numbers. Likewise, when in memory. LCD TV Quick Use and Hookup Guide CONTENTS Important Notice/Warning 1 LCD Stand Assemble 1 Basic TV Operation 1 Remote Control Button Descriptions 1 Hooking up the Television Remote Battery Installation 2 Basic Cable/Cable Box TV Connections 2 Basic Antenna TV Connections 2 AV1 Input Connections 3 Component Video Input Connections...

Quick start guide
Page 2
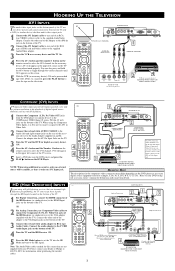
CABLE/CABLE BOX TV Your Cable TV input into your cable box may be removed for the cable box signal. Company Jack Panel Back of Cable Box 2 Using a separate round coaxial cable, connect one 75Ω (ohm) antenna plug on the back of TV Once tuned, change channels at the cable box, not the television. Jack Panel Bottom of TV Cable Box (w/Audio/Video Outputs): This connection will supply Stereo sound to the TV. 1 Connect the open end of the round Cable Company supplied cable to the cable signal IN(put ) plug on the TV remote control to tune...
CABLE/CABLE BOX TV Your Cable TV input into your cable box may be removed for the cable box signal. Company Jack Panel Back of Cable Box 2 Using a separate round coaxial cable, connect one 75Ω (ohm) antenna plug on the back of TV Once tuned, change channels at the cable box, not the television. Jack Panel Bottom of TV Cable Box (w/Audio/Video Outputs): This connection will supply Stereo sound to the TV. 1 Connect the open end of the round Cable Company supplied cable to the cable signal IN(put ) plug on the TV remote control to tune...
Quick start guide
Page 3
... TV AUDIO CABLES (RED/WHITE) 2 COMPONENT VIDEO CABLES (Green, Blue, Red) 4 4 S-VIDEO VIDEO AUDIO OUT OUT OUT L 3 COMP VIDEO Y Pr Pb 5 ACCESSORY DEVICE EQUIPPED WITH COMPONENT VIDEO OUTPUTS. When using additional accessories, only one external source will appear in jack on the remote control to select the AV1 channel for example, Y, Pb, Pr; Connect the adapter into the AV1 In Input Jacks on the TV. 3 Turn the TV and the DVD (or digital accessory device) ON. 4 Press the AV+ button and the Number 1 button...
... TV AUDIO CABLES (RED/WHITE) 2 COMPONENT VIDEO CABLES (Green, Blue, Red) 4 4 S-VIDEO VIDEO AUDIO OUT OUT OUT L 3 COMP VIDEO Y Pr Pb 5 ACCESSORY DEVICE EQUIPPED WITH COMPONENT VIDEO OUTPUTS. When using additional accessories, only one external source will appear in jack on the remote control to select the AV1 channel for example, Y, Pb, Pr; Connect the adapter into the AV1 In Input Jacks on the TV. 3 Turn the TV and the DVD (or digital accessory device) ON. 4 Press the AV+ button and the Number 1 button...

Quick start guide
Page 4
... rear of the TV to the AUDIO IN plugs on the side of the TV. 1 Connect the VIDEO (yellow) adapter cable to the VIDEO AV3 in place of the yellow Video cable if your device is equiped with AUDIO INPUTS MONITOR OUTPUTS Audio System Connection: The Monitor (Audio/Video) out jacks are located on the VCR. 5 Turn the VCR ON, insert a black VHS tape and it . 3 Connect one end of the yellow Video Cable to an RCA type VIDEO Cable. Connect...
... rear of the TV to the AUDIO IN plugs on the side of the TV. 1 Connect the VIDEO (yellow) adapter cable to the VIDEO AV3 in place of the yellow Video cable if your device is equiped with AUDIO INPUTS MONITOR OUTPUTS Audio System Connection: The Monitor (Audio/Video) out jacks are located on the VCR. 5 Turn the VCR ON, insert a black VHS tape and it . 3 Connect one end of the yellow Video Cable to an RCA type VIDEO Cable. Connect...


