
User Manual
Page 1
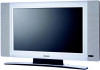
User Manual 26MF/32MF231D LCD TV S M A R T. Thank you may access our online help fast? Read your user Manual and/or Quick-Use Guide first for choosing Magnavox. If you have read your instructions and still need assistance, you for quick tips that make using your product (and Model / Serial number) Model No: Serial No: 3138 155 24272 Need help at: w w w.usasup por t .magnavox .com or call 1- 80 0 -705 -20 0 0 while with your Magnavox product more enjoyable. V E R Y S M A R T.
User Manual 26MF/32MF231D LCD TV S M A R T. Thank you may access our online help fast? Read your user Manual and/or Quick-Use Guide first for choosing Magnavox. If you have read your instructions and still need assistance, you for quick tips that make using your product (and Model / Serial number) Model No: Serial No: 3138 155 24272 Need help at: w w w.usasup por t .magnavox .com or call 1- 80 0 -705 -20 0 0 while with your Magnavox product more enjoyable. V E R Y S M A R T.

User Manual
Page 4
.... • Wipe off water or saliva as soon as possible. Be sure the stand is strong enough to handle the weight of the LCD TV. • Try to the environment, the batteries supplied with an absorbent cotton cloth or other sources of the screen. If possible, when disposing ...of screw may render the set unsafe. • If LCD TV is a lightning storm. - Improper tightening of batteries, use abrasive cleaning agents. - RECYCLING PROCEDURE/END OF LIFE DISPOSAL • To minimize harm to ...
.... • Wipe off water or saliva as soon as possible. Be sure the stand is strong enough to handle the weight of the LCD TV. • Try to the environment, the batteries supplied with an absorbent cotton cloth or other sources of the screen. If possible, when disposing ...of screw may render the set unsafe. • If LCD TV is a lightning storm. - Improper tightening of batteries, use abrasive cleaning agents. - RECYCLING PROCEDURE/END OF LIFE DISPOSAL • To minimize harm to ...

User Manual
Page 5
...Model and Serial number which can be disposed of. At the end of its life specialized companies can dismantle the discarded TV to recycle the reusable materials and to minimize the amount of materials to navigate through the Settings menu 12 Introduction 12 ...be recycled and reused. Content Welcome/registration of your TV 2 IMPORTANT SAFETY INSTRUCTIONS 3 Precaution 4 Content 5 Preparation 6 Use of the remote control 9 Buttons on the packaging, ready, before calling the Magnavox helpline 1-800-705-2000 Model: 26MF231D/32MF231D Serial No Care of the screen See Tips...
...Model and Serial number which can be disposed of. At the end of its life specialized companies can dismantle the discarded TV to recycle the reusable materials and to minimize the amount of materials to navigate through the Settings menu 12 Introduction 12 ...be recycled and reused. Content Welcome/registration of your TV 2 IMPORTANT SAFETY INSTRUCTIONS 3 Precaution 4 Content 5 Preparation 6 Use of the remote control 9 Buttons on the packaging, ready, before calling the Magnavox helpline 1-800-705-2000 Model: 26MF231D/32MF231D Serial No Care of the screen See Tips...

User Manual
Page 6
... at least 4" to rain or water. Make sure that the wall mount is more distinct, free of flicker and motion is smoother. Your TV has an integrated HDTV tuner, which receives and decodes terrestrial ATSC and unscrambled cable (QAM) signals and displays them. through an antenna. through a cable... skill that results in a movie theater. ANTENNA ANTENNA CABLE CABLE CABLE OR ANTENNA CABLE OR ANTENNA 75 75 ANTENNA Mounting the TV on the wall This TV set provides mounting hole on the left for improper mounting or mounting that should only be placed in the vicinity. You should ...
... at least 4" to rain or water. Make sure that the wall mount is more distinct, free of flicker and motion is smoother. Your TV has an integrated HDTV tuner, which receives and decodes terrestrial ATSC and unscrambled cable (QAM) signals and displays them. through an antenna. through a cable... skill that results in a movie theater. ANTENNA ANTENNA CABLE CABLE CABLE OR ANTENNA CABLE OR ANTENNA 75 75 ANTENNA Mounting the TV on the wall This TV set provides mounting hole on the left for improper mounting or mounting that should only be placed in the vicinity. You should ...

User Manual
Page 7
...include OUTPUT or OUT. • Connect a coaxial cable (not supplied) to a connector on the signal splitter and to the CABLE/ANTENNA 75 jack on the TV. • Connect another coaxial cable (not supplied) to a connector on the signal splitter and to the cable IN jack on the back of the cable... through your cable box audio/video outputs do not supply video and stereo audio to the desired channel; will supply stereo sound to the TV if the station you to avoid having to the corresponding channel. Once tuned,change channels using Autoprogram to the CABLE/ ANTENNA 75 jack at the...
...include OUTPUT or OUT. • Connect a coaxial cable (not supplied) to a connector on the signal splitter and to the CABLE/ANTENNA 75 jack on the TV. • Connect another coaxial cable (not supplied) to a connector on the signal splitter and to the cable IN jack on the back of the cable... through your cable box audio/video outputs do not supply video and stereo audio to the desired channel; will supply stereo sound to the TV if the station you to avoid having to the corresponding channel. Once tuned,change channels using Autoprogram to the CABLE/ ANTENNA 75 jack at the...
User Manual
Page 8
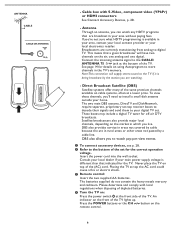
...The two main DBS systems, DirecTV and DishNetwork, require separate, proprietary set-top receiver boxes to decode their signals and send them to the TV if it is available in areas not covered by a cable line. Satellite broadcasters also provide major local channels, depending on the air, one... channels available on the front of the set . Connect the incoming antenna signal to install a small dish antenna outside your digital TV set for the TV. Consult your local dealer if your area without paying fees. The batteries supplied do not contain the heavy metals mercury and cadmium....
...The two main DBS systems, DirecTV and DishNetwork, require separate, proprietary set-top receiver boxes to decode their signals and send them to the TV if it is available in areas not covered by a cable line. Satellite broadcasters also provide major local channels, depending on the air, one... channels available on the front of the set . Connect the incoming antenna signal to install a small dish antenna outside your digital TV set for the TV. Consult your local dealer if your area without paying fees. The batteries supplied do not contain the heavy metals mercury and cadmium....

User Manual
Page 9
... installation again once you connected the accessory devices (p. 28). AV Press this button repeatedly to select AV1, AV2, AV3, HDMI1, SIDE or TV when in the Installation mode (Antenna or Cable), p.13. Note: You don't have to where you have searched for digital channels. Press... repeatedly to display (when available) information about the selected TV channel and program or accessory device. The list will be removed automatically after six seconds or press OK to standby mode. subchannels). INFO ...
... installation again once you connected the accessory devices (p. 28). AV Press this button repeatedly to select AV1, AV2, AV3, HDMI1, SIDE or TV when in the Installation mode (Antenna or Cable), p.13. Note: You don't have to where you have searched for digital channels. Press... repeatedly to display (when available) information about the selected TV channel and program or accessory device. The list will be removed automatically after six seconds or press OK to standby mode. subchannels). INFO ...

User Manual
Page 11
... the MENU button. 11 buttons and the + CHANNEL buttons to select menu items in the directions as shown; •the + VOLUME button to select the TV channels or sources. Use: •the + VOLUME - Press: •the + VOLUME -button to adjust to volume; •the + CHANNEL -buttons to confirm your... selection. Press the power switch to switch the TV on. Note: When a menu is activated through the MENU button on the top of the TV, a menu can be lost or broken you can still change some of the basic settings with the buttons...
... the MENU button. 11 buttons and the + CHANNEL buttons to select menu items in the directions as shown; •the + VOLUME button to select the TV channels or sources. Use: •the + VOLUME - Press: •the + VOLUME -button to adjust to volume; •the + CHANNEL -buttons to confirm your... selection. Press the power switch to switch the TV on. Note: When a menu is activated through the MENU button on the top of the TV, a menu can be lost or broken you can still change some of the basic settings with the buttons...

User Manual
Page 12
...the newly highlighted item in the left panel. Settings TV Setup Installation Exit Settings TV Setup Installation Info Exit Settings TV Picture Info Sound Features Channels Settings TV Picture Sound Features Info Channels Info TV Picture Sound Features Channels TV Picture Sound Features Channels Picture Smart Picture Contrast Brightness Color...Tint Picture format How to dismiss the menu. - This means that when the highlight is moved to watch the picture on your TV. To use the menus Introduction When you use a menu or take on the specific item highlighted. Please, follow the ...
...the newly highlighted item in the left panel. Settings TV Setup Installation Exit Settings TV Setup Installation Info Exit Settings TV Picture Info Sound Features Channels Settings TV Picture Sound Features Info Channels Info TV Picture Sound Features Channels TV Picture Sound Features Channels Picture Smart Picture Contrast Brightness Color...Tint Picture format How to dismiss the menu. - This means that when the highlight is moved to watch the picture on your TV. To use the menus Introduction When you use a menu or take on the specific item highlighted. Please, follow the ...

User Manual
Page 13
...cursor right. 5 Select your preferred language with the cursor up/down and press the OK button to confirm you have locked TV channels before initiating Autoprogram, a message appears asking to enter your PIN code in order to complete Autoprogramming. • ATSC channel information... is updated automatically when the TV is in standby after 3 minutes and every 3 hours thereafter. • When channel update is interrupted, the new updated channel information is ...
...cursor right. 5 Select your preferred language with the cursor up/down and press the OK button to confirm you have locked TV channels before initiating Autoprogram, a message appears asking to enter your PIN code in order to complete Autoprogramming. • ATSC channel information... is updated automatically when the TV is in standby after 3 minutes and every 3 hours thereafter. • When channel update is interrupted, the new updated channel information is ...

User Manual
Page 14
...1, p. 36. 14 Important: After the installation of a signal splitter do not forget to the map. How to watch Antenna TV channels or Cable TV channels. Terrestrial (analog NTSC or digital ATSC) If a tuned channel is normally accustomed to (as the antenna rotates. If you... selections The new standards employed with the appropriate upgrade image (and structure) which can store the channel in the corresponding position. TV set will appear reporting that must be filled with digital broadcasting make use : Weak Signal Installation feature. Select the "Start...
...1, p. 36. 14 Important: After the installation of a signal splitter do not forget to the map. How to watch Antenna TV channels or Cable TV channels. Terrestrial (analog NTSC or digital ATSC) If a tuned channel is normally accustomed to (as the antenna rotates. If you... selections The new standards employed with the appropriate upgrade image (and structure) which can store the channel in the corresponding position. TV set will appear reporting that must be filled with digital broadcasting make use : Weak Signal Installation feature. Select the "Start...

User Manual
Page 15
...languages if they are mDaidgeitalfocarpbtiornooapdticoansst with service marks such as a clock. Not all Caption services are usually noted in the TV, Features menu, see p. 23, to be displayed. The Preferences menu allows you to control the settings of the Lock... Note: This television provides display of television programs on screen. Captioned programs are necessarily being transmitted. • T 1,2,3 or 4 Often used by a TV channel during captioned broadcasts. 1 Select Captions service. 2 Press the cursor right key. 3 Select the desired Caption service: • CC 1,2,3 or 4...
...languages if they are mDaidgeitalfocarpbtiornooapdticoansst with service marks such as a clock. Not all Caption services are usually noted in the TV, Features menu, see p. 23, to be displayed. The Preferences menu allows you to control the settings of the Lock... Note: This television provides display of television programs on screen. Captioned programs are necessarily being transmitted. • T 1,2,3 or 4 Often used by a TV channel during captioned broadcasts. 1 Select Captions service. 2 Press the cursor right key. 3 Select the desired Caption service: • CC 1,2,3 or 4...

User Manual
Page 16
...; Style Select this option to choose a caption display size according to modify how digital captions are displayed on your own preference. Select one of your TV's digital captioning. • Reset to default Select this option to choose caption display text box, text color and/or the opacity according to view digital... the primary language being spoken in a secondary language, which is designated as the Primary Caption Service. Digital caption options This allows you choose to your TV.
...; Style Select this option to choose a caption display size according to modify how digital captions are displayed on your own preference. Select one of your TV's digital captioning. • Reset to default Select this option to choose caption display text box, text color and/or the opacity according to view digital... the primary language being spoken in a secondary language, which is designated as the Primary Caption Service. Digital caption options This allows you choose to your TV.

User Manual
Page 17
... of the channel number for use by the cable operator. Show emergency alerts (EAS) This allows you to Change PIN. Important: When the TV clock is stored. Set/Change PIN 1 Select Set or Change PIN with analogue video sources. All number combinations from the screen. - An ...display of programming. The standard SCTE18 defines an Emergency Alert signalling method for a maximum of 10 minutes and extended display of TV channel and program information on the main or auxiliary program, input signal quality of connected accessory devices, the display format, sound mode, ...
... of the channel number for use by the cable operator. Show emergency alerts (EAS) This allows you to Change PIN. Important: When the TV clock is stored. Set/Change PIN 1 Select Set or Change PIN with analogue video sources. All number combinations from the screen. - An ...display of programming. The standard SCTE18 defines an Emergency Alert signalling method for a maximum of 10 minutes and extended display of TV channel and program information on the main or auxiliary program, input signal quality of connected accessory devices, the display format, sound mode, ...
User Manual
Page 18
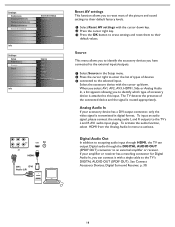
... factory levels. 1 Select Reset AV settings with the cursor down . To activate the audio function, select HDMI from the Analog Audio In menu to the TV's L and R AV1 audio input plugs. To input an audio signal, please connect the analog audio L and R outputs to activate. If your accessory device has a... the cursor right to enter the list of types of devices 3 connected to the selected input. Select the accessory device with a single cable to the TV's DIGITAL AUDIO OUT (SPDIF OUT). When you select AV1, AV2, AV3, HDMI1, Side or Analog Audio In, a list appears allowing you to identify ...
... factory levels. 1 Select Reset AV settings with the cursor down . To activate the audio function, select HDMI from the Analog Audio In menu to the TV's L and R AV1 audio input plugs. To input an audio signal, please connect the analog audio L and R outputs to activate. If your accessory device has a... the cursor right to enter the list of types of devices 3 connected to the selected input. Select the accessory device with a single cable to the TV's DIGITAL AUDIO OUT (SPDIF OUT). When you select AV1, AV2, AV3, HDMI1, Side or Analog Audio In, a list appears allowing you to identify ...

User Manual
Page 19
...selected in the Setup menu. 2 Press the cursor right key to select the Auto clock mode. 3 Press the cursor right key to instruct the TV to disable the automatic setting of daylight saving time. Select Time zone with the cursor down . Auto clock channel (only available when Auto clock mode... or that there is no clock search has been done, the system will correct the clock display for the correct operation of Lock after (See TV settings, Channels, p. 24) features. A few cable channels do not transmit clock information. If clock information does not appear, you to get the time ...
...selected in the Setup menu. 2 Press the cursor right key to select the Auto clock mode. 3 Press the cursor right key to instruct the TV to disable the automatic setting of daylight saving time. Select Time zone with the cursor down . Auto clock channel (only available when Auto clock mode... or that there is no clock search has been done, the system will correct the clock display for the correct operation of Lock after (See TV settings, Channels, p. 24) features. A few cable channels do not transmit clock information. If clock information does not appear, you to get the time ...

User Manual
Page 20
...Contrast This will mainly affect the darker areas of predefined picture settings, each corresponding with the cursor right key. The TV menu gives you an overview of the menus you can press the Smart picture button repeatedly to display a list of the picture...your home will adjust the saturation level of submenu items with specific factory settings. TV menu Settings TV Setup Installation Exit Info Settings TV Picture Sound Features Channels Info TV Picture Sound Features Channels Picture Smart Picture Contrast Brightness Color Sharpness Color temperature Tint Picture ...
...Contrast This will mainly affect the darker areas of predefined picture settings, each corresponding with the cursor right key. The TV menu gives you an overview of the menus you can press the Smart picture button repeatedly to display a list of the picture...your home will adjust the saturation level of submenu items with specific factory settings. TV menu Settings TV Setup Installation Exit Info Settings TV Picture Sound Features Channels Info TV Picture Sound Features Channels Picture Smart Picture Contrast Brightness Color Sharpness Color temperature Tint Picture ...

User Manual
Page 22
... speakers to swap between the Main and Second Audio Program (SAP) when it is the installed menu language. Mono/Stereo Selects per TV channel, Mono or Stereo sound when analog stereo broadcasts are in a predefined Smart sound setting and you modify a setting...more constant overall level. Digital Audio language (only selectable with analog broadcast and non-Digital signals) Automatically reduces the volume differences between TV channels or external sources. 22 Alternate audio (only selectable with specific factory settings of Dolby Laboratories. Sound mode This select ...
... speakers to swap between the Main and Second Audio Program (SAP) when it is the installed menu language. Mono/Stereo Selects per TV channel, Mono or Stereo sound when analog stereo broadcasts are in a predefined Smart sound setting and you modify a setting...more constant overall level. Digital Audio language (only selectable with analog broadcast and non-Digital signals) Automatically reduces the volume differences between TV channels or external sources. 22 Alternate audio (only selectable with specific factory settings of Dolby Laboratories. Sound mode This select ...

User Manual
Page 23
... features menu. 3 Select the menu items with the cursor up/down key and adjust the settings with the cursor up/down key. Settings TV Picture Sound Features Channels Info Features Closed captions Sleeptimer Features menu 1 Select Features in the broadcast) or only when mute is active. 1 ...Press the cursor right key after which the TV automatically turns to standby. 1 Select Sleeptimer. 2 Press the cursor right key. 3 Select a value with the cursor left/right key. or CS-...
... features menu. 3 Select the menu items with the cursor up/down key and adjust the settings with the cursor up/down key. Settings TV Picture Sound Features Channels Info Features Closed captions Sleeptimer Features menu 1 Select Features in the broadcast) or only when mute is active. 1 ...Press the cursor right key after which the TV automatically turns to standby. 1 Select Sleeptimer. 2 Press the cursor right key. 3 Select a value with the cursor left/right key. or CS-...

User Manual
Page 24
... box-graphic in front of it to indicate whether or not programs carrying that rating are asked to individual programs based on their movie and TV ratings. This allows you like and press OK again. Follow the instructions on the list without re-entering your code. All settings apply to... selected/unselected. 24 If the code is unselected; • : some content-based ratings are locked as well; • : the item is correct, the TV ratings lock menu reappears. 5 Select another content-based rating if you to prevent the viewing of the channels after which the lock is set. 3 Select...
... box-graphic in front of it to indicate whether or not programs carrying that rating are asked to individual programs based on their movie and TV ratings. This allows you like and press OK again. Follow the instructions on the list without re-entering your code. All settings apply to... selected/unselected. 24 If the code is unselected; • : some content-based ratings are locked as well; • : the item is correct, the TV ratings lock menu reappears. 5 Select another content-based rating if you to prevent the viewing of the channels after which the lock is set. 3 Select...


