

Owner's Manual
Page 2
...; Keep fingers away machine needle. To unplug, grasp the plug, not the cord. where aerosol (spray) products are being • To disconnect, turn all moving parts. Ak IMPORTANT SAFETY INSTRUCTIONS When using an electrical including the following: appliance, basic safety precautions should sewing machine from the never be left unattended when...
...; Keep fingers away machine needle. To unplug, grasp the plug, not the cord. where aerosol (spray) products are being • To disconnect, turn all moving parts. Ak IMPORTANT SAFETY INSTRUCTIONS When using an electrical including the following: appliance, basic safety precautions should sewing machine from the never be left unattended when...

Owner's Manual
Page 7
... joining and one operation. 33 Edge binding stitch For hemming and decorative edge finishing on stretch fabrics. for blouses and shirts. For basting cut-out parts together. serging very stretchy and easily fraying fabrics in 32 Closed overedge stitch For joining and serging in one 37 Light-knit fabric mending stitch...
... joining and one operation. 33 Edge binding stitch For hemming and decorative edge finishing on stretch fabrics. for blouses and shirts. For basting cut-out parts together. serging very stretchy and easily fraying fabrics in 32 Closed overedge stitch For joining and serging in one 37 Light-knit fabric mending stitch...
Owner's Manual
Page 18
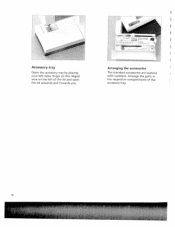
L - Arrange the parts in the respective compartments of the lid and open the lid upwards and towards you. Arranging the accessories The standard accessories are marked with numbers. Accessory tray Open the accessory tray by placing your left index finger on the ridged area on the left of the accessory tray. 18
L - Arrange the parts in the respective compartments of the lid and open the lid upwards and towards you. Arranging the accessories The standard accessories are marked with numbers. Accessory tray Open the accessory tray by placing your left index finger on the ridged area on the left of the accessory tray. 18

Owner's Manual
Page 27
11% .i Changing the presser foot Press the front part of the foot snap in the presser foot shank. Snap on the presser foot • Place the presser foot under the presser foot shank, so that the presser foot is lowered, the pins of the presser foot upwards and at the same time the rear part downwards until it disengages from the presser foot holder. Check that when the presser foot lifter is properly attached by raising the presser foot lifter.
11% .i Changing the presser foot Press the front part of the foot snap in the presser foot shank. Snap on the presser foot • Place the presser foot under the presser foot shank, so that the presser foot is lowered, the pins of the presser foot upwards and at the same time the rear part downwards until it disengages from the presser foot holder. Check that when the presser foot lifter is properly attached by raising the presser foot lifter.
Owner's Manual
Page 66
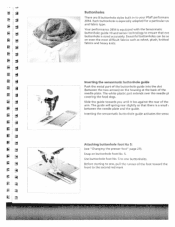
... the senso Attaching buttonhole foot No 5: (see "Changinu the presser foot" page 27). Use buttonhole foot No. 5 to your Pfaff performanc 2054. Your performance 2054 is equipped with the Sensormatic buttonhole guide 10 and sensor technology to ensure that there is a small between the two arrows) on... Beautiful buttonholes can be se on buttonhole foot No. 5. Each buttonhole is sized accurately. Inserting the sensormatic buttonhole guide Push the metal part of the buttonhole guide into the slot (between the needle plate and the guide. Before starting to the second red mark - : ...
... the senso Attaching buttonhole foot No 5: (see "Changinu the presser foot" page 27). Use buttonhole foot No. 5 to your Pfaff performanc 2054. Your performance 2054 is equipped with the Sensormatic buttonhole guide 10 and sensor technology to ensure that there is a small between the two arrows) on... Beautiful buttonholes can be se on buttonhole foot No. 5. Each buttonhole is sized accurately. Inserting the sensormatic buttonhole guide Push the metal part of the buttonhole guide into the slot (between the needle plate and the guide. Before starting to the second red mark - : ...
Owner's Manual
Page 79
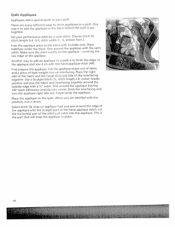
... together. Set your quilt. Choose stitch 10, stitch length 0.4 - 0.5, stitch width 3 - 6, presser foot 2. Place the applique on interfacing. Let the horizontal part of light weight iron on the quilt. This is put together. Cut the applique shape out of fabric and a piece of the stitch just catch...;" seam. First prepare the applique. Fuse the applique piece to your performance 2054 for a satin stitch. Place stabilizer under the block. One way is to add the applique to the block before the quilt is the part that will keep the applique in place. 78 Sew around the outside ...
... together. Set your quilt. Choose stitch 10, stitch length 0.4 - 0.5, stitch width 3 - 6, presser foot 2. Place the applique on interfacing. Let the horizontal part of light weight iron on the quilt. This is put together. Cut the applique shape out of fabric and a piece of the stitch just catch...;" seam. First prepare the applique. Fuse the applique piece to your performance 2054 for a satin stitch. Place stabilizer under the block. One way is to add the applique to the block before the quilt is the part that will keep the applique in place. 78 Sew around the outside ...


