

Owner's Manual
Page 2
...this household Sewing machine. where aerosol (spray) products are being used as threading needle, changing ("0") when making any adjustment in needle, threading bobbin, or changing the needle area, such presser foot, etc. • Ailnulsbwtrraiucycasttiiuonnngp,mlouargnwtuhhaeel.nsemwainkgingmaacnhyinoethferor mustehreseerlveicctirnigcaal dojuutsltemt ewnhtsenmreenmtioovniendg covers, in the • Never drop or insert any object into any opening. • Do not use outdoors. • Do not operate administrated. DANGER - WARNING - SAVE THESE INSTRUCTIONS electric outlet...
...this household Sewing machine. where aerosol (spray) products are being used as threading needle, changing ("0") when making any adjustment in needle, threading bobbin, or changing the needle area, such presser foot, etc. • Ailnulsbwtrraiucycasttiiuonnngp,mlouargnwtuhhaeel.nsemwainkgingmaacnhyinoethferor mustehreseerlveicctirnigcaal dojuutsltemt ewnhtsenmreenmtioovniendg covers, in the • Never drop or insert any object into any opening. • Do not use outdoors. • Do not operate administrated. DANGER - WARNING - SAVE THESE INSTRUCTIONS electric outlet...

Owner's Manual
Page 6
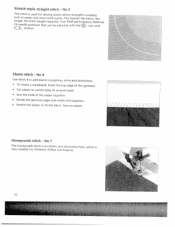
Stitch chart Utility stitches 'F Stitch Description No. 1 Straight stitch with 19 needle positions 2 Stretch triple straight stitch with 19 needle positions 3 Zigzag stitch 4 Elastic stitch with two perforations > i! :' -- -: (% [ > Ic 3456 >>> <
Stitch chart Utility stitches 'F Stitch Description No. 1 Straight stitch with 19 needle positions 2 Stretch triple straight stitch with 19 needle positions 3 Zigzag stitch 4 Elastic stitch with two perforations > i! :' -- -: (% [ > Ic 3456 >>> <
Owner's Manual
Page 12
... the machine 19 for bobbin winding Winding the bobbin from the spool pin 20 Winding from the second spool pin 21 Inserting the bobbin 22 Taking out the bobbin case 22 Setting the needle thread tension 23 Threading the needle 24 Integrated Needle Threader 25 Changing the presser foot 27 Winding a bobbin through the needle 28 Threading the twin needle 29 Changing the needle 29 IDT (Integrated Dual Feed) 30 Lowering the feed dog 32 Electronic knee lift 33 Operating your performance 2054 Instructions on operating your Pfaff performance 2054 Function buttons Sewing menu...
... the machine 19 for bobbin winding Winding the bobbin from the spool pin 20 Winding from the second spool pin 21 Inserting the bobbin 22 Taking out the bobbin case 22 Setting the needle thread tension 23 Threading the needle 24 Integrated Needle Threader 25 Changing the presser foot 27 Winding a bobbin through the needle 28 Threading the twin needle 29 Changing the needle 29 IDT (Integrated Dual Feed) 30 Lowering the feed dog 32 Electronic knee lift 33 Operating your performance 2054 Instructions on operating your Pfaff performance 2054 Function buttons Sewing menu...
Owner's Manual
Page 13
...Stitch 88 Twin needle sewing 90 Tapering 91 Appliqué designs 93 Accessories page Standard presser feet 96 and accessories Felling foot 98 Appliqué foot 98 Pintuck foot 99 Pintuck blade Cording foot Gathering foot Knit edge/piping/beading foot Ruffle r Open toe appliqué foot Quilting guide Eyelet plate Bridging guide 1/4 inch Quilting foot with IDT Quilting of the fabric layers Free motion quilt foot Bias binder Pintuck Foot with Decorative Stitch Guide Non-stick Foot with IDT 7/9 Hole Cord Foot with IDT Couching/Braiding Foot with IDT Circular Embroidery Guide...
...Stitch 88 Twin needle sewing 90 Tapering 91 Appliqué designs 93 Accessories page Standard presser feet 96 and accessories Felling foot 98 Appliqué foot 98 Pintuck foot 99 Pintuck blade Cording foot Gathering foot Knit edge/piping/beading foot Ruffle r Open toe appliqué foot Quilting guide Eyelet plate Bridging guide 1/4 inch Quilting foot with IDT Quilting of the fabric layers Free motion quilt foot Bias binder Pintuck Foot with Decorative Stitch Guide Non-stick Foot with IDT 7/9 Hole Cord Foot with IDT Couching/Braiding Foot with IDT Circular Embroidery Guide...
Owner's Manual
Page 29
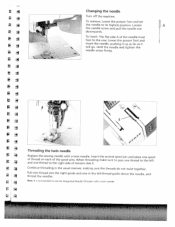
... position. To insert: The flat side A of tension disk E. Insert the second spool pin and place one thread to use the Integrated Needle Threader with a twin needle. Continue threading in the left and one spool of thread on each of the spool pins. To remove: Lower the presser foot and set the needle to the rear. Hold the needle and tighten the needle screw firmly. Changing the need 'e Replace the sewing needle with a twin needle. Pull one in the usual manner, making sure the threads...
... position. To insert: The flat side A of tension disk E. Insert the second spool pin and place one thread to use the Integrated Needle Threader with a twin needle. Continue threading in the left and one spool of thread on each of the spool pins. To remove: Lower the presser foot and set the needle to the rear. Hold the needle and tighten the needle screw firmly. Changing the need 'e Replace the sewing needle with a twin needle. Pull one in the usual manner, making sure the threads...
Owner's Manual
Page 59
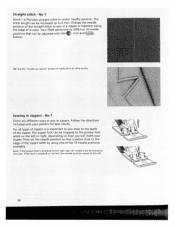
Sewing in center needle position. The zipper foot can be snapped to 6 mm. Your Pfaff performance 2054 has 19 needle positions that it is attached on the left . 58 For all types of the 19 needle positions available. icon and button. Tip: Use the "needle up to the presser foot ankle on the left or right, depending on how you will insert your pattern for best results. Note: If the presser foot is important...
Sewing in center needle position. The zipper foot can be snapped to 6 mm. Your Pfaff performance 2054 has 19 needle positions that it is attached on the left . 58 For all types of the 19 needle positions available. icon and button. Tip: Use the "needle up to the presser foot ankle on the left or right, depending on how you will insert your pattern for best results. Note: If the presser foot is important...
Owner's Manual
Page 63
... suitable for sewing seams where strength is needed, such as under arm and crotch seams. The heavier the fabric, the longer the stitch length required. Your Pfaff performance 2054 has 19 needle positions that can be adjusted with the o. icon and button. Sew on elastic. No 2 This stitch is used for stitch is 62 Honeycomb stitch - hem, which is an elastic and decorative childrens clothes and lingerie. Stretch trip'e straight stitch - No 4 Use stitch 4 to add elastic to pajamas...
... suitable for sewing seams where strength is needed, such as under arm and crotch seams. The heavier the fabric, the longer the stitch length required. Your Pfaff performance 2054 has 19 needle positions that can be adjusted with the o. icon and button. Sew on elastic. No 2 This stitch is used for stitch is 62 Honeycomb stitch - hem, which is an elastic and decorative childrens clothes and lingerie. Stretch trip'e straight stitch - No 4 Use stitch 4 to add elastic to pajamas...

Owner's Manual
Page 68
... way Tip: This thread. Linen buttonholes are particularly attractive if you use presser foot 1A with gimp cord is important to a reinforced edg may sometimes not feed optimally with a straight stitc pin. Pull the gimp cord on th same fabric/stabilizer as your project. Carefufly sew the curve, guiding thE gimp cord under the stitching. In this case, use a heaviE weight thread through a topstitch needle. Buttonholes arc normally selected a little...
... way Tip: This thread. Linen buttonholes are particularly attractive if you use presser foot 1A with gimp cord is important to a reinforced edg may sometimes not feed optimally with a straight stitc pin. Pull the gimp cord on th same fabric/stabilizer as your project. Carefufly sew the curve, guiding thE gimp cord under the stitching. In this case, use a heaviE weight thread through a topstitch needle. Buttonholes arc normally selected a little...
Owner's Manual
Page 71
... the project and continue sewing. the darning foot automatically engages in a round embroidery hoop. will guide arm Lower the feed dog. Touch and select As you begin sewing, the darning position. Free motion darning Attach highest darning foot No. 6. Select the straight or zigzag stitch. Clip Repair the damaged area/hole by guiding the fabric evenly forwards and repair area. backwards slightly longer than the length of the presser foot holder. Make sure the needle is at its position. Insert the pin of the darning foot as far as...
... the project and continue sewing. the darning foot automatically engages in a round embroidery hoop. will guide arm Lower the feed dog. Touch and select As you begin sewing, the darning position. Free motion darning Attach highest darning foot No. 6. Select the straight or zigzag stitch. Clip Repair the damaged area/hole by guiding the fabric evenly forwards and repair area. backwards slightly longer than the length of the presser foot holder. Make sure the needle is at its position. Insert the pin of the darning foot as far as...
Owner's Manual
Page 75
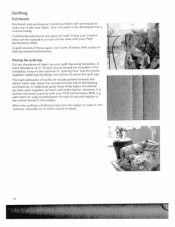
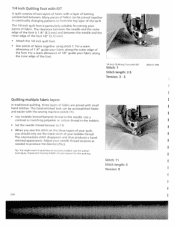
A seam allowance of ¼" (6 mm) should already be realized in a much shorter time with a layer of fabric for your Pfaff performance 2054, e.g. When the quilting is quicker and more practical with your quilt top using monofilament thread on the optional 1/4" quilting foot, Sew the pieces together following the design instructions to piece the quilt top. Traditionally patchwork was sewn by hand with stitch 41 using templates. Piedng the quNt...
A seam allowance of ¼" (6 mm) should already be realized in a much shorter time with a layer of fabric for your Pfaff performance 2054, e.g. When the quilting is quicker and more practical with your quilt top using monofilament thread on the optional 1/4" quilting foot, Sew the pieces together following the design instructions to piece the quilt top. Traditionally patchwork was sewn by hand with stitch 41 using templates. Piedng the quNt...
Owner's Manual
Page 77
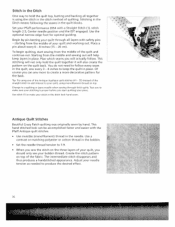
... the fabric. Stitching in the Ditch means following the seams in the needle. The intermediate stitch disappears and thus produces a handstitched appearance. L. 76 Stitch in the Ditch One way to hold the quilt together it will also create the pattern on the quilt back. Test sew to make your quilt, using the stitch in place. Antique Quilt Stitches Beutiful Crazy Patch quilting was originally sewn by pin basting your Pfaff performance 2054...
... the fabric. Stitching in the Ditch means following the seams in the needle. The intermediate stitch disappears and thus produces a handstitched appearance. L. 76 Stitch in the Ditch One way to hold the quilt together it will also create the pattern on the quilt back. Test sew to make your quilt, using the stitch in place. Antique Quilt Stitches Beutiful Crazy Patch quilting was originally sewn by pin basting your Pfaff performance 2054...
Owner's Manual
Page 78
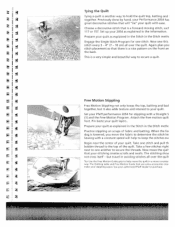
... th bobbin thread to the top of fabric and batting. Previously done by hand, your Performance 2054 has great decorative stitches that your 2054 as explained in the Stitch in the Ditch methc Engage the Single Stitch Program for stippling with a Straight S (1) and the Free Motion Program. Set up your stitching creates scrolls and swirls, The stitching shou not cross itself - The Quilting table and Free Motion Guide foot are extra accessories...
... th bobbin thread to the top of fabric and batting. Previously done by hand, your Performance 2054 has great decorative stitches that your 2054 as explained in the Stitch in the Ditch methc Engage the Single Stitch Program for stippling with a Straight S (1) and the Free Motion Program. Set up your stitching creates scrolls and swirls, The stitching shou not cross itself - The Quilting table and Free Motion Guide foot are extra accessories...
Owner's Manual
Page 80
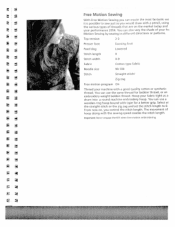
... can use the same thread for a better grip. The movement of your machine with the sewing speed creates the stitch length. mportant: Never engage the IDT when free motion embroidering. Select ei the straight stitch or the zig zag and set the stitch length to sew just as a drum into a round machine embroidery hoop. You can a!so vary the shade of hoop along with a good quality cotton or synthetic thread. Top tension 2-3 Presser foot Darning foot Feed dog Lowered Stitch length 0 Stitch width 0-9 Fabric Cotton type fabric Needle size...
... can use the same thread for a better grip. The movement of your machine with the sewing speed creates the stitch length. mportant: Never engage the IDT when free motion embroidering. Select ei the straight stitch or the zig zag and set the stitch length to sew just as a drum into a round machine embroidery hoop. You can a!so vary the shade of hoop along with a good quality cotton or synthetic thread. Top tension 2-3 Presser foot Darning foot Feed dog Lowered Stitch length 0 Stitch width 0-9 Fabric Cotton type fabric Needle size...
Owner's Manual
Page 84
... sew tucks before cutting out to the Twin need'e Pintucks Twin needle Pintucks performance 2054. to double the amount of where fade away or wash away pen. top and bobbin with a center needle straight stitch, fabric along the next line way as above . garment pieces. the optional Pfaff Pintuck needed. Tucks Create a great Pintucks. Stitch (1), stitch Thread both your performance 2054 for length 2.0 - 2.5, presser foot 0, normal Straight IDT engaged. Unfold the fabric. Set your performance 2054 for length 2.5 - 3.0, presser foot 2, normal Straight...
... sew tucks before cutting out to the Twin need'e Pintucks Twin needle Pintucks performance 2054. to double the amount of where fade away or wash away pen. top and bobbin with a center needle straight stitch, fabric along the next line way as above . garment pieces. the optional Pfaff Pintuck needed. Tucks Create a great Pintucks. Stitch (1), stitch Thread both your performance 2054 for length 2.0 - 2.5, presser foot 0, normal Straight IDT engaged. Unfold the fabric. Set your performance 2054 for length 2.5 - 3.0, presser foot 2, normal Straight...
Owner's Manual
Page 92
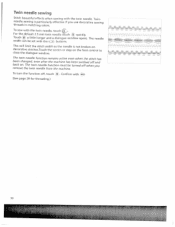
... machine has been swithed off , touch . Twin needle sewing Stitch beautiful effects when sewing with the buttons. To turn the function off and back on the foot control to close the dialogue window. The twin needle function must be set with the twin needle. Twin needle sewing is not broken on decorative stitches.Touch the screen or step on . The needle width can be turned off when you use decorative sewing threads...
... machine has been swithed off , touch . Twin needle sewing Stitch beautiful effects when sewing with the buttons. To turn the function off and back on the foot control to close the dialogue window. The twin needle function must be set with the twin needle. Twin needle sewing is not broken on decorative stitches.Touch the screen or step on . The needle width can be turned off when you use decorative sewing threads...

Owner's Manual
Page 100
.... • Position and press your base fabric. • Place a stabilizer under the presser foot. • Sew along the edge. Applique Foot Stitch: 3 Stitch length: 0.35 Stitch width: 1.5 2 Tension: 2 3 - 8202111-096 98 The fabric must be drawn as jeans seams. Seams on your appliqué pieces in two different widths. By using a sewing thread of a contrasting color. Sew dense satin stitches with a straight stitch. • Separate the fabric and feed the extending hem into the felling foot. The hem is...
.... • Position and press your base fabric. • Place a stabilizer under the presser foot. • Sew along the edge. Applique Foot Stitch: 3 Stitch length: 0.35 Stitch width: 1.5 2 Tension: 2 3 - 8202111-096 98 The fabric must be drawn as jeans seams. Seams on your appliqué pieces in two different widths. By using a sewing thread of a contrasting color. Sew dense satin stitches with a straight stitch. • Separate the fabric and feed the extending hem into the felling foot. The hem is...
Owner's Manual
Page 106
... polyester or cotton thread in the bobbin. • Set the needle thread tension to T9. • When you sew the stitch on the three layers of your quilt, you should only see the triple stitch of your needle thread tensions as needed to produce the desired effect. Adjust your bobbin thread. Many pieces of fabric can be joined together in continually changing patterns to purchase an accessory bobbin case for this quilting. This handstitched...
... polyester or cotton thread in the bobbin. • Set the needle thread tension to T9. • When you sew the stitch on the three layers of your quilt, you should only see the triple stitch of your needle thread tensions as needed to produce the desired effect. Adjust your bobbin thread. Many pieces of fabric can be joined together in continually changing patterns to purchase an accessory bobbin case for this quilting. This handstitched...

Owner's Manual
Page 107
... binder Stitch: optional Tension: 3-5 820242M96 Free motion quilt foot The free-motion quilt foot in both curved and straight lines. Practice this you the more consistent and uniform your qui are guided manually during sewing. Guide the pin of the free-motion quilt foot into the hole of your stitches will become. Tip: You can also be positioned behind the needle clai • Tighten the notched screw. • Bring the free motion quilt foot into the slot of the presser foot shank...
... binder Stitch: optional Tension: 3-5 820242M96 Free motion quilt foot The free-motion quilt foot in both curved and straight lines. Practice this you the more consistent and uniform your qui are guided manually during sewing. Guide the pin of the free-motion quilt foot into the hole of your stitches will become. Tip: You can also be positioned behind the needle clai • Tighten the notched screw. • Bring the free motion quilt foot into the slot of the presser foot shank...

Owner's Manual
Page 120
... use good quality threads. Do not wind thread by hand. Make sure thread is sewn unevenly Insert new needle and push fully in thread tension system. 118 See needle table (Page 92, 93) Only guide the fabric lightly. Thread is not properly inserted. Thread tension is too small for thread. Thread is in it fully into bobbin tension spring. Needle thread breaks Push needle fully upwards. Pull lightly on the end of fabric. Wrong needle is too thick, Needle breaks off See above . The tension needs adjusting. Thread...
... use good quality threads. Do not wind thread by hand. Make sure thread is sewn unevenly Insert new needle and push fully in thread tension system. 118 See needle table (Page 92, 93) Only guide the fabric lightly. Thread is not properly inserted. Thread tension is too small for thread. Thread is in it fully into bobbin tension spring. Needle thread breaks Push needle fully upwards. Pull lightly on the end of fabric. Wrong needle is too thick, Needle breaks off See above . The tension needs adjusting. Thread...

Owner's Manual
Page 121
... hook Remove the threads. The contrast on the display may fail. Set the contrast using the contrast adjustment. Raise feed dogs (see page xx-yy). Switch off the main switch. Have your Pfaff performance 2054 serviced regularly by your Pfaff dealer. This is being discharged some segments of the sewing operation and then turn it back on again. Select the desired stitch again. I The machine does not sew...
... hook Remove the threads. The contrast on the display may fail. Set the contrast using the contrast adjustment. Raise feed dogs (see page xx-yy). Switch off the main switch. Have your Pfaff performance 2054 serviced regularly by your Pfaff dealer. This is being discharged some segments of the sewing operation and then turn it back on again. Select the desired stitch again. I The machine does not sew...


