
Owner's Manual
Page 2
...near be left unattended when plugged in. manual. The wrong plate can cause the needle to break. • Switch the sewing machine off ("0") position, then remove plug from the Keep ventilation accumulation of burns, fire, electric shock, or injury to persons: ...; Do not use the proper needle plate. Ak IMPORTANT SAFETY INSTRUCTIONS When using this household Sewing machine. DANGER - Close attention is necessary when this sewing machine is required around the Sewing • Always use bent needles. • Do not pull or push fabric while stitching...
...near be left unattended when plugged in. manual. The wrong plate can cause the needle to break. • Switch the sewing machine off ("0") position, then remove plug from the Keep ventilation accumulation of burns, fire, electric shock, or injury to persons: ...; Do not use the proper needle plate. Ak IMPORTANT SAFETY INSTRUCTIONS When using this household Sewing machine. DANGER - Close attention is necessary when this sewing machine is required around the Sewing • Always use bent needles. • Do not pull or push fabric while stitching...
Owner's Manual
Page 12
...Electrical connection 17 Connecting the foot control 17 On / Off switch 17 Voltage switch 17 Accessory tray 18 Sewing with free arm 19 Preparing the machine 19 for bobbin winding Winding the bobbin from the spool pin 20 Winding from the second spool pin 21...Integrated Dual Feed) 30 Lowering the feed dog 32 Electronic knee lift 33 Operating your performance 2054 Instructions on operating your Pfaff performance 2054 Function buttons Sewing menu Altering the stitch settings More options for sewing 12 page 36 36 38 39 Selecting a stitch 43 Selection by category 43 All ...
...Electrical connection 17 Connecting the foot control 17 On / Off switch 17 Voltage switch 17 Accessory tray 18 Sewing with free arm 19 Preparing the machine 19 for bobbin winding Winding the bobbin from the spool pin 20 Winding from the second spool pin 21...Integrated Dual Feed) 30 Lowering the feed dog 32 Electronic knee lift 33 Operating your performance 2054 Instructions on operating your Pfaff performance 2054 Function buttons Sewing menu Altering the stitch settings More options for sewing 12 page 36 36 38 39 Selecting a stitch 43 Selection by category 43 All ...
Owner's Manual
Page 16
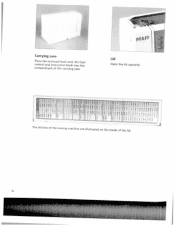
PFRFF Lid Open the lid upwards. pL ' 0 L IF The stitches of the sewing machine are illustrated on the inside of the carrying case. Carrying case Place the enclosed lead cord, the foot control and instruction book into the compartment of the lid. 16 fi jj -
PFRFF Lid Open the lid upwards. pL ' 0 L IF The stitches of the sewing machine are illustrated on the inside of the carrying case. Carrying case Place the enclosed lead cord, the foot control and instruction book into the compartment of the lid. 16 fi jj -
Owner's Manual
Page 17
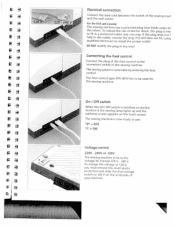
... other), To reduce the risk of the sewing macb vI and the wall outlet. The sewing machine is now ready to sew. = OFF = ON Voftage swrch 220V-24OVorl2OV The sewing machine is inte to 120 V on the underside of the sewing machine. Electrkal connection Connect the lead cord between ... still does not fit, cont qualified electrician to the voltage for this sewing machine. On I Off switch When the On I connection socket of your machine. The sewing speed is switched on (switch function I - Er F / I ) the sewing lamp lights up and the welcome screen appears on the touch screen.
... other), To reduce the risk of the sewing macb vI and the wall outlet. The sewing machine is now ready to sew. = OFF = ON Voftage swrch 220V-24OVorl2OV The sewing machine is inte to 120 V on the underside of the sewing machine. Electrkal connection Connect the lead cord between ... still does not fit, cont qualified electrician to the voltage for this sewing machine. On I Off switch When the On I connection socket of your machine. The sewing speed is switched on (switch function I - Er F / I ) the sewing lamp lights up and the welcome screen appears on the touch screen.
Owner's Manual
Page 19
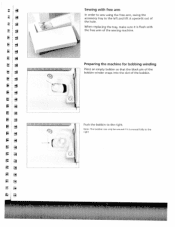
Sewing with 0 the free arm of the sewing machine. 8) 188 189 190 191 192 193 194 195 J Preparing the machine for bobbing winding Place an empty bobbin so that the black pin of the bobbin winder snaps into the slot of the bobbin. E E Push the bobbin to the left and lift it upwards out of the hole. 0 When replacing the tray, make sure it is flush with free arm 1 In order to sew using the free arm, swing the 0 accessory tray to the right. Note: The bobbin can only be wound if it is moved fully to the right -i dh 88
Sewing with 0 the free arm of the sewing machine. 8) 188 189 190 191 192 193 194 195 J Preparing the machine for bobbing winding Place an empty bobbin so that the black pin of the bobbin winder snaps into the slot of the bobbin. E E Push the bobbin to the left and lift it upwards out of the hole. 0 When replacing the tray, make sure it is flush with free arm 1 In order to sew using the free arm, swing the 0 accessory tray to the right. Note: The bobbin can only be wound if it is moved fully to the right -i dh 88

Owner's Manual
Page 20
... Threading da(dpPfireulrroavolelcuimccentietidtobchBnaote.ch.ukPetnhuttlbreoleortcafbhlrdboeoicnintknth)wtsr.oeeiWvsageeduirniaadudrleonttiudhAmneerdefrsstotthahimenrettathpohcrrfeleeot-ahfctrdeekonwngtshituisoriaeednnaeddC Turn on the spool than the the pin. Winding the bobbin from the spool pin Place the sewing thread spool cap, slightly larger against the spool. on the machine tbwfHhooioeobnltdbdbiicotnnohbgnefbrtiaorencomntltid.ootAnhotshefwsetwiohllloeiennbftdteh,aersrsce.tutaohtdpetphfbeierdomtbhalbyruientaaondmisdaafutpnilrcdle,aslrtslehytme.hoePvuesh 20
... Threading da(dpPfireulrroavolelcuimccentietidtobchBnaote.ch.ukPetnhuttlbreoleortcafbhlrdboeoicnintknth)wtsr.oeeiWvsageeduirniaadudrleonttiudhAmneerdefrsstotthahimenrettathpohcrrfeleeot-ahfctrdeekonwngtshituisoriaeednnaeddC Turn on the spool than the the pin. Winding the bobbin from the spool pin Place the sewing thread spool cap, slightly larger against the spool. on the machine tbwfHhooioeobnltdbdbiicotnnohbgnefbrtiaorencomntltid.ootAnhotshefwsetwiohllloeiennbftdteh,aersrsce.tutaohtdpetphfbeierdomtbhalbyruientaaondmisdaafutpnilrcdle,aslrtslehytme.hoePvuesh 20

Owner's Manual
Page 22
... Taking out the bobbin case Lift the latch of the bobbin case and pull the bobbin case out of the machine. Release the latch and take the empty bobbin out of the sewing hook. The bobbin case must face upwards. Bobbin door Open the bobbin door at the left side swinging it...
... Taking out the bobbin case Lift the latch of the bobbin case and pull the bobbin case out of the machine. Release the latch and take the empty bobbin out of the sewing hook. The bobbin case must face upwards. Bobbin door Open the bobbin door at the left side swinging it...
Owner's Manual
Page 29
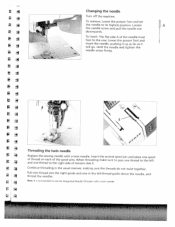
... spool of thread on each of the spool pins. To insert: The flat side A of tension disk E. F ii F F F F F F Threading the twin need 'e Turn off the machine. Lower the presser foot and insert the needle, pushing it up as far as it will go. When threading make sure to pass one thread... sure the threads do not twist together. To remove: Lower the presser foot and set the needle to the rear. Changing the need 'e Replace the sewing needle with a twin needle. Continue threading in the left and one thread to the left thread guide above the needle, and Note: It is not...
... spool of thread on each of the spool pins. To insert: The flat side A of tension disk E. F ii F F F F F F Threading the twin need 'e Turn off the machine. Lower the presser foot and insert the needle, pushing it up as far as it will go. When threading make sure to pass one thread... sure the threads do not twist together. To remove: Lower the presser foot and set the needle to the rear. Changing the need 'e Replace the sewing needle with a twin needle. Continue threading in the left and one thread to the left thread guide above the needle, and Note: It is not...

Owner's Manual
Page 30
The IDT keeps all layers of quilt projects aligned to prevent stretching of the seam. The material is fed precisely. r 30 As on industrial machines, the IDT feeds the fabric from the top and bottom at the same time. On light or difficult fabrics such as silk or rayon the dual fabric feed prevents puckering of the top layers. The even feeding action also ensures perfect matching of checked and striped fabrics. IDT (Integrated Duai Feed) For sewing difficult materials PFAFF provides the ideal solution: the Integrated Dual Feed, IDT system.
The IDT keeps all layers of quilt projects aligned to prevent stretching of the seam. The material is fed precisely. r 30 As on industrial machines, the IDT feeds the fabric from the top and bottom at the same time. On light or difficult fabrics such as silk or rayon the dual fabric feed prevents puckering of the top layers. The even feeding action also ensures perfect matching of checked and striped fabrics. IDT (Integrated Duai Feed) For sewing difficult materials PFAFF provides the ideal solution: the Integrated Dual Feed, IDT system.

Owner's Manual
Page 31
Raise the presser foot. Engaging the IDT Important: For all sewing with the center back cut out. Stripes and plaids match perfectly due to the even feed of the IDT with two fingers. Integrated Dual Feed, use presser feet with the IDT - Press the black elbow of the IDT down , then back away from the machine and release the IDT slowly upward. Pull the IDT down until it engages. \ '- 4jjE: \ Disengaging the IDT Hold the black elbow of the IDT.
Raise the presser foot. Engaging the IDT Important: For all sewing with the center back cut out. Stripes and plaids match perfectly due to the even feed of the IDT with two fingers. Integrated Dual Feed, use presser feet with the IDT - Press the black elbow of the IDT down , then back away from the machine and release the IDT slowly upward. Pull the IDT down until it engages. \ '- 4jjE: \ Disengaging the IDT Hold the black elbow of the IDT.
Owner's Manual
Page 36
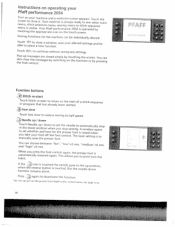
... otut rins the If the icon is when the reverse function remains tbouutctohnedisthtoeucnheeedd.leBguot etshetonteheedluepdpoowsnition, active. save your Pfaff performance 2054 tmsmTocuueerrenncnehuuno,ininsstgotvyittioccshulhieobrslseaeme.pliaeYpt,ccrohtYoiuiopornnruePirafmaatmnefefdanicupcaho,einwrnsfeeoeowlrnicmsiontahamglnewecmatesoyecusn2rc0uerhe5eno4asrdcaiyssrpteoitpetopcenhea.srreasswe.teqTwduoehubnecychnetmheain Sewing functions for the machine can be Touch esc , to continue without saving any settings. instructions on operating your altered settings and be...
... otut rins the If the icon is when the reverse function remains tbouutctohnedisthtoeucnheeedd.leBguot etshetonteheedluepdpoowsnition, active. save your Pfaff performance 2054 tmsmTocuueerrenncnehuuno,ininsstgotvyittioccshulhieobrslseaeme.pliaeYpt,ccrohtYoiuiopornnruePirafmaatmnefefdanicupcaho,einwrnsfeeoeowlrnicmsiontahamglnewecmatesoyecusn2rc0uerhe5eno4asrdcaiyssrpteoitpetopcenhea.srreasswe.teqTwduoehubnecychnetmheain Sewing functions for the machine can be Touch esc , to continue without saving any settings. instructions on operating your altered settings and be...

Owner's Manual
Page 37
... parameter icon or stitch balance on the touch screen. • If you have several functions e If you press this button while sewing, the machine sews in reverse for as long as you keep the button pressed. • For permanent reverse, press this button before starting to s the... machine sews in numerical order. • Fonts. More options button Opens the more than one information page is activated, a reverse sewing arrow appe on the display adjust them with this button to switch back step by ...
... parameter icon or stitch balance on the touch screen. • If you have several functions e If you press this button while sewing, the machine sews in reverse for as long as you keep the button pressed. • For permanent reverse, press this button before starting to s the... machine sews in numerical order. • Fonts. More options button Opens the more than one information page is activated, a reverse sewing arrow appe on the display adjust them with this button to switch back step by ...

Owner's Manual
Page 39
... end of the seam and raise it to trigger the Tie off end function The machine ties off with furth functions functions displayed for sewing By touching iEE you exit a settings. in a stitch sequence. End to side. The machine will lower the presser foot at the end of the seam or Reverse button...
... end of the seam and raise it to trigger the Tie off end function The machine ties off with furth functions functions displayed for sewing By touching iEE you exit a settings. in a stitch sequence. End to side. The machine will lower the presser foot at the end of the seam or Reverse button...

Owner's Manual
Page 40
...(straewpdieutrhcset)th.oeT0hnemeemwdildewthhineontfhtethheelorwzeivegrezrapsgeossittiitocnh 40 window appears, to the on the foot control. acnkgoend,aginacilnu.ding This function must be switched needle from the machine. Free motion sewing When lowered automatically to change confirm by stepping ssssetiinanaStggmiullneesgolbssrettaiisrtts.tcctihihtTtc.ecihsheT...YohfPeofauntistucemaarnunbtoaealrmnsodoaftdsicrteieaftpcilnlheyetisptaeieoqnrnufuoesmnramcbreeeesrddcoiaasfntpsltatbhiyetecehsdeeenwsidnnatoshafaesthe c÷ Touch ) a little longer and a the number of the zigzag reaches...
...(straewpdieutrhcset)th.oeT0hnemeemwdildewthhineontfhtethheelorwzeivegrezrapsgeossittiitocnh 40 window appears, to the on the foot control. acnkgoend,aginacilnu.ding This function must be switched needle from the machine. Free motion sewing When lowered automatically to change confirm by stepping ssssetiinanaStggmiullneesgolbssrettaiisrtts.tcctihihtTtc.ecihsheT...YohfPeofauntistucemaarnunbtoaealrmnsodoaftdsicrteieaftpcilnlheyetisptaeieoqnrnufuoesmnramcbreeeesrddcoiaasfntpsltatbhiyetecehsdeeenwsidnnatoshafaesthe c÷ Touch ) a little longer and a the number of the zigzag reaches...

Owner's Manual
Page 41
... control once at this point, the corresponding sewing menu opens. The closed overedge stitches can use fc a variety sewing techniques. Crosstitches Stitches 72 -89 Pre-programmed cross stitches allow you press the foot control once more the machine starts to create traditional borders. lndividual cross... different categories for ease of all stitch types suitable for qraz patch quilting. Stitches 100- 113 if you can be used for sewing decorative edges on table liner clothing. OVerCastrng Stitches 31 - 40 This menu provides a selection of selection. Note. Antique quift stitches...
... control once at this point, the corresponding sewing menu opens. The closed overedge stitches can use fc a variety sewing techniques. Crosstitches Stitches 72 -89 Pre-programmed cross stitches allow you press the foot control once more the machine starts to create traditional borders. lndividual cross... different categories for ease of all stitch types suitable for qraz patch quilting. Stitches 100- 113 if you can be used for sewing decorative edges on table liner clothing. OVerCastrng Stitches 31 - 40 This menu provides a selection of selection. Note. Antique quift stitches...
Owner's Manual
Page 47
...parameters (available from pattern selection menu) This function deletes all changed parameters in your sewing machine to default settings. Depending on can be deactivated. Machine test (available from main menu) This function is for Pfaff certified service technicians only. Wekorne screen (available from main menu) This function is ...when you ; it can be cahed up at any orne by pressing the button. An "info" text may appear in your performance settings to help you the cfo ourton the information may extend over sm'erai paces. if the Context menu" is closed with care...
...parameters (available from pattern selection menu) This function deletes all changed parameters in your sewing machine to default settings. Depending on can be deactivated. Machine test (available from main menu) This function is for Pfaff certified service technicians only. Wekorne screen (available from main menu) This function is ...when you ; it can be cahed up at any orne by pressing the button. An "info" text may appear in your performance settings to help you the cfo ourton the information may extend over sm'erai paces. if the Context menu" is closed with care...
Owner's Manual
Page 106
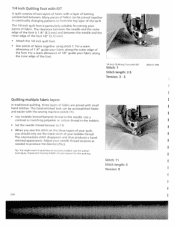
...between the needle and the inner edge of the foot 1/8" (3.15 mm). • Attach the 1/4 inch quilt foot. • Sew pieces of fabric together using stitch 1. Use a contrast or matching polyester or cotton thread in continually changing patterns to purchase an accessory ...form the top layer of fabric. Stitch: 11 Stitch length: 3 Tension: 9 104 This handstitched look can be accomplished faster and easier with the sewing machine (stitch 11). • Use invisible (monofilament) thread in traditional quilting, three layers of fabric are joined with IDT Stitch: 1 Stitch !ength: ...
...between the needle and the inner edge of the foot 1/8" (3.15 mm). • Attach the 1/4 inch quilt foot. • Sew pieces of fabric together using stitch 1. Use a contrast or matching polyester or cotton thread in continually changing patterns to purchase an accessory ...form the top layer of fabric. Stitch: 11 Stitch length: 3 Tension: 9 104 This handstitched look can be accomplished faster and easier with the sewing machine (stitch 11). • Use invisible (monofilament) thread in traditional quilting, three layers of fabric are joined with IDT Stitch: 1 Stitch !ength: ...
Owner's Manual
Page 118
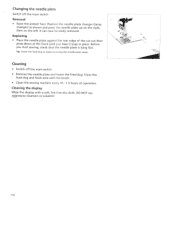
... right, then on the left. Cleaning the display Wipe the display with the brush. • Clean the sewing machine every 10 - 1 5 hours of the cut-out then \\ press down at the front until you start sewing, check that the needle plate is lying flat. Before you hear it snap in place. Tip: Lower...
... right, then on the left. Cleaning the display Wipe the display with the brush. • Clean the sewing machine every 10 - 1 5 hours of the cut-out then \\ press down at the front until you start sewing, check that the needle plate is lying flat. Before you hear it snap in place. Tip: Lower...

Owner's Manual
Page 119
... of the bulb is 5 watts, wV Bulbs can be purchased from the machine. Remove the bulb changer f the bulb, the bulb is located inside t[ sewing machine near the needie 'threader. Disconnect the lead cord and th foot control plug from your PFAFF dealer Guide the bulb into the holder as far as it w go...
... of the bulb is 5 watts, wV Bulbs can be purchased from the machine. Remove the bulb changer f the bulb, the bulb is located inside t[ sewing machine near the needie 'threader. Disconnect the lead cord and th foot control plug from your PFAFF dealer Guide the bulb into the holder as far as it w go...
Owner's Manual
Page 122
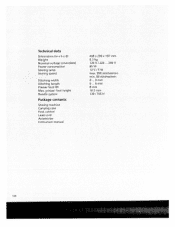
Technical data Dimensions (w x h x d) Weight Nominal voltage (reversible) Power consumption Sewinglamp Sewing speed Stitching width Stitching length Presser foot lift Max. presser foot height Needle System Package contents Sewing machine Carrying case Foot control Lead cord Accessories Instruction manual 408 x 290 X 187 mm 8.3 kg 120 V 0 /22 ... 24o V 85 W 1 V/52 W max 950 Stitches/mm mi,i. 80 stitches/mm 0 ... 9 mm 0 ... 6 mm 8 mm 10.5 mm 130 / 705 H 120
Technical data Dimensions (w x h x d) Weight Nominal voltage (reversible) Power consumption Sewinglamp Sewing speed Stitching width Stitching length Presser foot lift Max. presser foot height Needle System Package contents Sewing machine Carrying case Foot control Lead cord Accessories Instruction manual 408 x 290 X 187 mm 8.3 kg 120 V 0 /22 ... 24o V 85 W 1 V/52 W max 950 Stitches/mm mi,i. 80 stitches/mm 0 ... 9 mm 0 ... 6 mm 8 mm 10.5 mm 130 / 705 H 120


