

Owner's Manual
Page 3
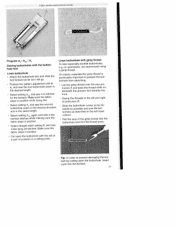
...of the sewing machine hobby 1016 1 Thread guide 2 Bobbin winder tension 3 Needle thread tension 4 Adjustment field 5 Spool holder 6 Bobbin winder 7 Handwheel 8 Stitch pattern chart with presser foot 9 Pattern adjustment button 10 Reverse key 11 Connection bushing 12 Master switch 13 Detachable work support with accessory box 14 Needle plate 15 Thread guide 16 Thread guide 17 Thread cutter 18 Threading slot 19 Hook cover (enclosing sewing hook) 20 Presser foot holder with presser foot 21 Free-arm 22 Feed dog 23 Needle holder with fixing screw 25 Thread guide 26 Presser bar lifter 27 Sewing lamp...
...of the sewing machine hobby 1016 1 Thread guide 2 Bobbin winder tension 3 Needle thread tension 4 Adjustment field 5 Spool holder 6 Bobbin winder 7 Handwheel 8 Stitch pattern chart with presser foot 9 Pattern adjustment button 10 Reverse key 11 Connection bushing 12 Master switch 13 Detachable work support with accessory box 14 Needle plate 15 Thread guide 16 Thread guide 17 Thread cutter 18 Threading slot 19 Hook cover (enclosing sewing hook) 20 Presser foot holder with presser foot 21 Free-arm 22 Feed dog 23 Needle holder with fixing screw 25 Thread guide 26 Presser bar lifter 27 Sewing lamp...
Owner's Manual
Page 6
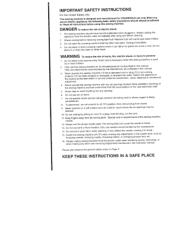
... use bent or blunt needles. Always unplug this sewing machine for HOUSEHOLD use only. Never operate the sewing machine with same type rated 5 Watts. 3. Do not place in the needle area, threading bobbin, or changing presser foot, etc. Do not use needles recommended by pulling on Page 3. Only use out of electric shock: 1 The sewing machine should always When you be pulled into water. Unplug immediately. 4. Switch the sewing machine threading needle, changing off ( 0 ) position then remove...
... use bent or blunt needles. Always unplug this sewing machine for HOUSEHOLD use only. Never operate the sewing machine with same type rated 5 Watts. 3. Do not place in the needle area, threading bobbin, or changing presser foot, etc. Do not use needles recommended by pulling on Page 3. Only use out of electric shock: 1 The sewing machine should always When you be pulled into water. Unplug immediately. 4. Switch the sewing machine threading needle, changing off ( 0 ) position then remove...
Owner's Manual
Page 7
... user must be made to +140°F (60°C). To unplug lead cord from the wall outlet, 3. The maximum permissible wattage for cleaning the housing. When leaving the machine, during work or when changing mechanical parts or accessories, always disconnect the machine from the main power by protecting it . The machine must adjust the tension of a non-electroni cally controlled foot control can occur when a cold machine...
... user must be made to +140°F (60°C). To unplug lead cord from the wall outlet, 3. The maximum permissible wattage for cleaning the housing. When leaving the machine, during work or when changing mechanical parts or accessories, always disconnect the machine from the main power by protecting it . The machine must adjust the tension of a non-electroni cally controlled foot control can occur when a cold machine...

Owner's Manual
Page 8
...D Darning Detachable work support Drawing up the bobbin thread 31 L 9 Lace-work 35 16 Linen buttonhole 27 Linen buttonhole with the straight stitch 30 26-27 General sewing aids 22 24 H Handwheel. Index A Accessories and needles Accessory compartment B Bias tape binder Bobbin case Bobbin thread tension Buttonholes Buttons C Changing the needle Changing the sewing lamp Cleaning and oiling Control panel Cording foot hobby - Sewingforfun F 41 Feed dog, lowering 18 9 Felling foot 45 Foot control 8 Free arm 9 44 12-13 G 13 Gathering with gimp thread 27 E Edge guide 22...
...D Darning Detachable work support Drawing up the bobbin thread 31 L 9 Lace-work 35 16 Linen buttonhole 27 Linen buttonhole with the straight stitch 30 26-27 General sewing aids 22 24 H Handwheel. Index A Accessories and needles Accessory compartment B Bias tape binder Bobbin case Bobbin thread tension Buttonholes Buttons C Changing the needle Changing the sewing lamp Cleaning and oiling Control panel Cording foot hobby - Sewingforfun F 41 Feed dog, lowering 18 9 Felling foot 45 Foot control 8 Free arm 9 44 12-13 G 13 Gathering with gimp thread 27 E Edge guide 22...
Owner's Manual
Page 9
...chart 43 Spool placement 10 Stitch chart 6 Straight stitch 23 T Thread cutter 16 Thread tension 12 Threading 14-15 Threading the needle thread 14 Topstitching 22 Traditional embroidery techniques 37 Troubleshooting 52 Twin needle 28 W Winding the bobbin 10-11 S Safety notes Serging with the zigzag stitch z 2 Zigzag stitch 23 Zippers 23 32-33 N Needle charts Needle plate, removing Needle thread tension O Oiling the machine Optional accessories p Patchwork quilt Practical sewing Presser bar lifter o Quilt and patchwork foot R Repairing tears Reverse sewing Richelieu...
...chart 43 Spool placement 10 Stitch chart 6 Straight stitch 23 T Thread cutter 16 Thread tension 12 Threading 14-15 Threading the needle thread 14 Topstitching 22 Traditional embroidery techniques 37 Troubleshooting 52 Twin needle 28 W Winding the bobbin 10-11 S Safety notes Serging with the zigzag stitch z 2 Zigzag stitch 23 Zippers 23 32-33 N Needle charts Needle plate, removing Needle thread tension O Oiling the machine Optional accessories p Patchwork quilt Practical sewing Presser bar lifter o Quilt and patchwork foot R Repairing tears Reverse sewing Richelieu...
Owner's Manual
Page 10
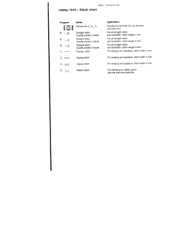
Elastic stitch Application Standard buttonhole for fun hobby 1016- Stitch chart Program 1 23 B 83 9 C, -"-"--" Name Buttonhole A3 A 42 A1 Straight stitch needle position middle Straight stitch needle position middle Straight stitch needle position middle Zigzag- blouses and bed linen For all straight stitch and lockstitch, stitch length 1 mm For all straight stitch and lockstitch, stitch length 2 mm For all straight stitch and lockstitch, stitch length 4 mm For serging and appliqué, stitch width 2 mm For serging and appliqué, stitch width 4 mm For serging and appliqué...
Elastic stitch Application Standard buttonhole for fun hobby 1016- Stitch chart Program 1 23 B 83 9 C, -"-"--" Name Buttonhole A3 A 42 A1 Straight stitch needle position middle Straight stitch needle position middle Straight stitch needle position middle Zigzag- blouses and bed linen For all straight stitch and lockstitch, stitch length 1 mm For all straight stitch and lockstitch, stitch length 2 mm For all straight stitch and lockstitch, stitch length 4 mm For serging and appliqué, stitch width 2 mm For serging and appliqué, stitch width 4 mm For serging and appliqué...
Owner's Manual
Page 11
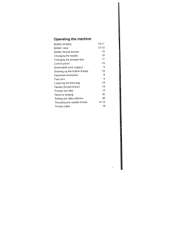
Operating the machine Bobbin winding Bobbin case Bobbin thread tension Changing the needle Changing the presser foot Control panel Detachable work support Drawing up the bobbin thread Electrical connection Free arm Lowering the feed dog Needle thread tension Presser bar lifter Reverse serging Setting the utility stitches Threading the needle thread Thread cutter 10-11 12-13 13 18 17 19 9 16 8 9 18 18 15 20 20 14-15 16
Operating the machine Bobbin winding Bobbin case Bobbin thread tension Changing the needle Changing the presser foot Control panel Detachable work support Drawing up the bobbin thread Electrical connection Free arm Lowering the feed dog Needle thread tension Presser bar lifter Reverse serging Setting the utility stitches Threading the needle thread Thread cutter 10-11 12-13 13 18 17 19 9 16 8 9 18 18 15 20 20 14-15 16
Owner's Manual
Page 15
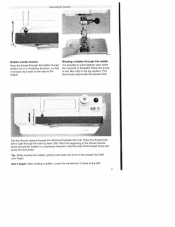
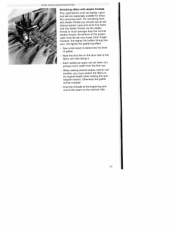
... the thread firmly and press the foot pedal. Pull the thread underneath the presser foot. Place the thread from left ! Wind the beginning of the thread several times around the bobbin in a clockwise direction, so that it crosses over itself on the way to the top position. Raise the press er bar lifter (26) to the bobbin. Operating the machine I #i Bobbin winder tension Pass the thread through the take-up lever (28...
... the thread firmly and press the foot pedal. Pull the thread underneath the presser foot. Place the thread from left ! Wind the beginning of the thread several times around the bobbin in a clockwise direction, so that it crosses over itself on the way to the top position. Raise the press er bar lifter (26) to the bobbin. Operating the machine I #i Bobbin winder tension Pass the thread through the take-up lever (28...
Owner's Manual
Page 16
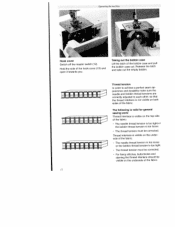
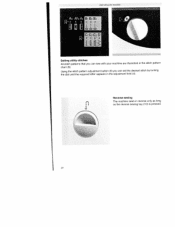
... for general sewing work: Thread interlace is visible on the under side of the fabric. 12 Thread interlace is visible on the top side of the fabric. Taking out the bobbin case Lift the latch of the hook cover (19) and open it towards you. For fancy stitches, buttonholes and darning the thread interlace should be visible on both sides of the fabric: • The needle thread tension is...
... for general sewing work: Thread interlace is visible on the under side of the fabric. 12 Thread interlace is visible on the top side of the fabric. Taking out the bobbin case Lift the latch of the hook cover (19) and open it towards you. For fancy stitches, buttonholes and darning the thread interlace should be visible on both sides of the fabric: • The needle thread tension is...
Owner's Manual
Page 17
Inserting the bobbin case Lift latch D and push the bobbin case fully onto pin E of the hook. 13 Adjusting the setting: Using the screwdriver from the bob bin case and pull the thread upwards sharply. The bobbin case must not fall out of the sewing hook. Turn setting screw C just a little to the right to decrease the bobbin thread ten sion. Check: Pull the bobbin thread sharply. Checking the bobbin thread tension Hold the thread protruding from...
Inserting the bobbin case Lift latch D and push the bobbin case fully onto pin E of the hook. 13 Adjusting the setting: Using the screwdriver from the bob bin case and pull the thread upwards sharply. The bobbin case must not fall out of the sewing hook. Turn setting screw C just a little to the right to decrease the bobbin thread ten sion. Check: Pull the bobbin thread sharply. Checking the bobbin thread tension Hold the thread protruding from...
Owner's Manual
Page 22
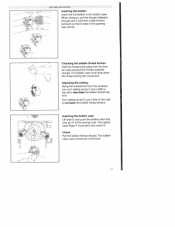
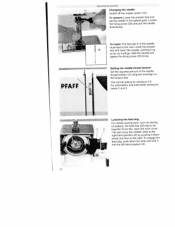
... presser foot and set the needle to the rear. Lower the presser foot and insert the needle, pushing it up as far as sewing on the tension dial. For embroidery and buttonhole sewing be lowered. Setting the neecile thread tension Set the required amount of the needle must face to its highest point. Loosen the fixing screw (23) and pull the needle downwards. I 18 J PFAFF To insert: The flat side A of the needle thread tension (3) using the markings on buttons, the feed dog...
... presser foot and set the needle to the rear. Lower the presser foot and insert the needle, pushing it up as far as sewing on the tension dial. For embroidery and buttonhole sewing be lowered. Setting the neecile thread tension Set the required amount of the needle must face to its highest point. Loosen the fixing screw (23) and pull the needle downwards. I 18 J PFAFF To insert: The flat side A of the needle thread tension (3) using the markings on buttons, the feed dog...
Owner's Manual
Page 24
Operating the machine Setting utitity stitches All stitch patterns that you can sew with your machine are illustrated in the adjustment field (4). Using the stitch pattern adjustment button (9) you can set the desired stitch by turning the dial until the required letter appears in the stitch pattern chart (8). Reverse sewing The machine sews in reverse only as long as the reverse sewing key (10) is pressed. 20
Operating the machine Setting utitity stitches All stitch patterns that you can sew with your machine are illustrated in the adjustment field (4). Using the stitch pattern adjustment button (9) you can set the desired stitch by turning the dial until the required letter appears in the stitch pattern chart (8). Reverse sewing The machine sews in reverse only as long as the reverse sewing key (10) is pressed. 20
Owner's Manual
Page 26
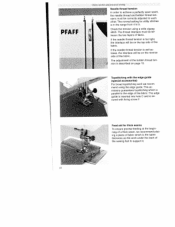
... seam, we recom mend using a wide zigzag stitch. If the needle thread tension is in the range from 4 to support it. 22 Topstitching with fixing screw F Feed aid for utility stitches is set too loose, the interlace will be on the reverse side of the fabric. The edge guide is inserted into hole C and is se cured with the edge guide (special accessories) For broad topstitching work under the back of fabric. The thread...
... seam, we recom mend using a wide zigzag stitch. If the needle thread tension is in the range from 4 to support it. 22 Topstitching with fixing screw F Feed aid for utility stitches is set too loose, the interlace will be on the reverse side of the fabric. The edge guide is inserted into hole C and is se cured with the edge guide (special accessories) For broad topstitching work under the back of fabric. The thread...

Owner's Manual
Page 28
Select the 4 mm zigzag stitch, stitch 02, by turning the stitch adjustment button (9). page 20). Sewing on buttons with the sewing thread and knot it. 24 Utility stitches wtd practtctd sewing fi Sewing on buttons For sewing on this page. • Remove the match and pull the fabric and the button apart. • Wrap the shank with a thread shank • Attach the presser foot. • Place a match between the holes in the button and sew as described in the left hand column on buttons, the presser foot must be removed and the feed dog must be lowered (ci.
Select the 4 mm zigzag stitch, stitch 02, by turning the stitch adjustment button (9). page 20). Sewing on buttons with the sewing thread and knot it. 24 Utility stitches wtd practtctd sewing fi Sewing on buttons For sewing on this page. • Remove the match and pull the fabric and the button apart. • Wrap the shank with a thread shank • Attach the presser foot. • Place a match between the holes in the button and sew as described in the left hand column on buttons, the presser foot must be removed and the feed dog must be lowered (ci.
Owner's Manual
Page 30
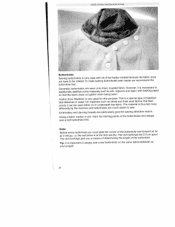
... pin, mark the starting points of the hobby models because the fabric buttonholes even easier we recommend does the buttonhole foot. On materials such as your project. 26 Generally, buttonholes are particularly good for this purpose. Embroidery and darning threads are additionally stabilize some sewn onto lined, doubled fabric, However, materials such as silk, organza and rayon it is necessary to with all To make sewing...
... pin, mark the starting points of the hobby models because the fabric buttonholes even easier we recommend does the buttonhole foot. On materials such as your project. 26 Generally, buttonholes are particularly good for this purpose. Embroidery and darning threads are additionally stabilize some sewn onto lined, doubled fabric, However, materials such as silk, organza and rayon it is necessary to with all To make sewing...
Owner's Manual
Page 31
... Sewing buttonholes with the button hole foot Linen buttonhole • Attach the buttonhole foot and slide the foot forward as far as it will go. • Position the pattern adjustment dial at A1 and sew the first buttonhole seam in the desired length. • Select setting A 112 and sew 4-6 stitches for wards as described in position while doing this. - Utility stitches mu! Select setting A3 and sew the second buttonhole seam in the reverse direction and in the same length...
... Sewing buttonholes with the button hole foot Linen buttonhole • Attach the buttonhole foot and slide the foot forward as far as it will go. • Position the pattern adjustment dial at A1 and sew the first buttonhole seam in the desired length. • Select setting A 112 and sew 4-6 stitches for wards as described in position while doing this. - Utility stitches mu! Select setting A3 and sew the second buttonhole seam in the reverse direction and in the same length...
Owner's Manual
Page 33
... elastic threads Fine, light fabrics such as batiste, rayon and silk are especially suitable for beau tiful smocking work with elastic thread you should use an ad ditional bobbin case and wind it . • Each additional seam can be sewn at a presser foot's width from the first row. • When sewing several seams next to its original length when sewing the sub sequent seams. Otherwise the gather will be set very loose...
... elastic threads Fine, light fabrics such as batiste, rayon and silk are especially suitable for beau tiful smocking work with elastic thread you should use an ad ditional bobbin case and wind it . • Each additional seam can be sewn at a presser foot's width from the first row. • When sewing several seams next to its original length when sewing the sub sequent seams. Otherwise the gather will be set very loose...

Owner's Manual
Page 49
... the pattern adjustment button (9). Accessories and needles I . 2 ,$ - The felling foot is known as jeans seams. Seams on sportswear and chil dren's wear, blouses and shirts are more effective with this seam. • Attach the cording foot. • Place the pearl thread in two different widths. • Attach the felling foot to the presser foot holder. • Place the fabrics wrong sides together. • Overlap the raw edge of the lower...
... the pattern adjustment button (9). Accessories and needles I . 2 ,$ - The felling foot is known as jeans seams. Seams on sportswear and chil dren's wear, blouses and shirts are more effective with this seam. • Attach the cording foot. • Place the pearl thread in two different widths. • Attach the felling foot to the presser foot holder. • Place the fabrics wrong sides together. • Overlap the raw edge of the lower...
Owner's Manual
Page 55
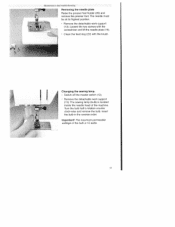
... sewing lamp (bulb) is 15 watts. 5' The maximum permissible wattage of the bulb is located inside the needle head of the machine. Wainienance and troubleshooting Removing the needle plate Raise the presser foot holder (26) and remove the presser foot. The needle must be at its highest position. • Remove the detachable work support (13). I : Changing the sewing lamp. Important! Loosen the two screws with the screwdriver and lift the needle plate (14). • Clean the feed dog...
... sewing lamp (bulb) is 15 watts. 5' The maximum permissible wattage of the bulb is located inside the needle head of the machine. Wainienance and troubleshooting Removing the needle plate Raise the presser foot holder (26) and remove the presser foot. The needle must be at its highest position. • Remove the detachable work support (13). I : Changing the sewing lamp. Important! Loosen the two screws with the screwdriver and lift the needle plate (14). • Clean the feed dog...

Owner's Manual
Page 56
... H. Needle breaks off Needle is bent. Needle is not pushed fully in . Do not wind thread by hand. Check the needle and bobbin thread tensions. 5. Do not attempt to sew without fabric under the presser foot. Adjust thread tension. The bobbin case is too thick. Only use good quality threads. Insert new needle. When leaving the machine, even for thread. Thread is not properly inserted, Insert new needle and push fully in . When you are thread remnants Remove the threads and apply a drop in use. See...
... H. Needle breaks off Needle is bent. Needle is not pushed fully in . Do not wind thread by hand. Check the needle and bobbin thread tensions. 5. Do not attempt to sew without fabric under the presser foot. Adjust thread tension. The bobbin case is too thick. Only use good quality threads. Insert new needle. When leaving the machine, even for thread. Thread is not properly inserted, Insert new needle and push fully in . When you are thread remnants Remove the threads and apply a drop in use. See...


