
Owner's Manual
Page 5
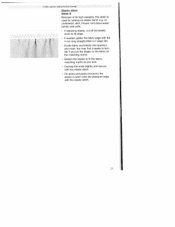
You have any further questions, just ask your Pfaff dealer, who will make full use of Pfaff which will be happy to read these instructions carefully. Before you start sew Thg, please take the time to assist you with help or advice. ...
You have any further questions, just ask your Pfaff dealer, who will make full use of Pfaff which will be happy to read these instructions carefully. Before you start sew Thg, please take the time to assist you with help or advice. ...

Owner's Manual
Page 6
...not place or store a sewing machine where it can cause the needle to : Read all instructions before using and before replacing sewing light bulb. Do not allow to be adhered to break. 13. tpNhreoevpneererlaoyr,peeistrtaitatehuatthshoibsrieszeeenwdiddnregoapmlpeeradcohroinsreedravifmiciteahgcaeesdn,...wrong plate can fall or be left unattended when plugged in this sewing machine for HOUSEHOLD use only. Only Only use use out of 5. Do not use this manual 3. To unplug. Switch the sewing machine threading needle, changing off ( 0...
...not place or store a sewing machine where it can cause the needle to : Read all instructions before using and before replacing sewing light bulb. Do not allow to be adhered to break. 13. tpNhreoevpneererlaoyr,peeistrtaitatehuatthshoibsrieszeeenwdiddnregoapmlpeeradcohroinsreedravifmiciteahgcaeesdn,...wrong plate can fall or be left unattended when plugged in this sewing machine for HOUSEHOLD use only. Only Only use use out of 5. Do not use this manual 3. To unplug. Switch the sewing machine threading needle, changing off ( 0...
Owner's Manual
Page 7
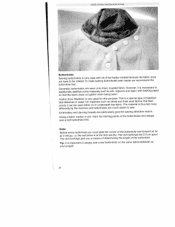
...: • there is visible damage its' functioning is disturbed, • it . An authorized PFAFF mechanic only must be made to the indications on the specifica- condensation which can be used on an unobstructed, solid, level surface. This machine is a high quality electronicmechanical appliance, It is...of +1- 10% and a rated frequency of the needle and constantly observe the sewing area during mainte- Do not use any possible damage. 10. Constant use only PFAFF original parts 12. It should not be accepted for cleaning the housing. The user must be operated in the direct...
...: • there is visible damage its' functioning is disturbed, • it . An authorized PFAFF mechanic only must be made to the indications on the specifica- condensation which can be used on an unobstructed, solid, level surface. This machine is a high quality electronicmechanical appliance, It is...of +1- 10% and a rated frequency of the needle and constantly observe the sewing area during mainte- Do not use any possible damage. 10. Constant use only PFAFF original parts 12. It should not be accepted for cleaning the housing. The user must be operated in the direct...
Owner's Manual
Page 12
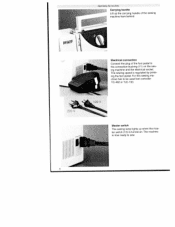
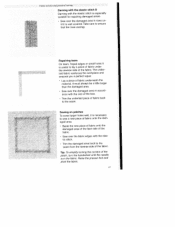
The machine is regulated by press ing the foot pedal. The sewing speed is now ready to sew. 8 Electrical connection Connect the plug of the sewing machine from behind. pFFF Operating the machine Carrying handle Lift up when the mas ter switch (12) is turned on the sew ing machine and the electrical socket. For this sewing ma chine has to be used foot controller YC-482 or TJC-1 50. 220 V Master switch The sewing lamp lights up the carrying handle of the foot pedal to the connection bushing (11) on .
The machine is regulated by press ing the foot pedal. The sewing speed is now ready to sew. 8 Electrical connection Connect the plug of the sewing machine from behind. pFFF Operating the machine Carrying handle Lift up when the mas ter switch (12) is turned on the sew ing machine and the electrical socket. For this sewing ma chine has to be used foot controller YC-482 or TJC-1 50. 220 V Master switch The sewing lamp lights up the carrying handle of the foot pedal to the connection bushing (11) on .
Owner's Manual
Page 17
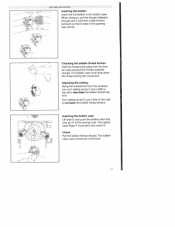
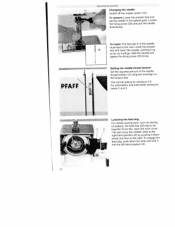
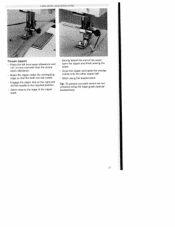
... Operating the machine Inserting the bobbin Insert the full bobbin in the opening (see arrow). The bobbin case must point into cutout G. Adjusting the setting: Using the screwdriver from the bob bin case and pull the thread upwards sharply. The bobbin case must not fall out of the sewing hook. Turn...
... Operating the machine Inserting the bobbin Insert the full bobbin in the opening (see arrow). The bobbin case must point into cutout G. Adjusting the setting: Using the screwdriver from the bob bin case and pull the thread upwards sharply. The bobbin case must not fall out of the sewing hook. Turn...
Owner's Manual
Page 22
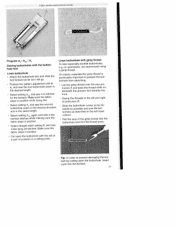
J PFAFF To insert: The flat side A of the needle thread tension (3) using the markings on buttons, the feed dog (22) has to its highest point. Setting the neecile thread tension Set the required amount of the needle ...
J PFAFF To insert: The flat side A of the needle thread tension (3) using the markings on buttons, the feed dog (22) has to its highest point. Setting the neecile thread tension Set the required amount of the needle ...
Owner's Manual
Page 23
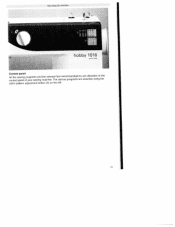
hobby 1016 Control panel All the sewing programs and control panel of your sewing the relevant foot recommendations machine. Operating the machine - The various programs are are depicted on the selected using the stitch pattern adjustment button (9) on the left. '9
hobby 1016 Control panel All the sewing programs and control panel of your sewing the relevant foot recommendations machine. Operating the machine - The various programs are are depicted on the selected using the stitch pattern adjustment button (9) on the left. '9
Owner's Manual
Page 24
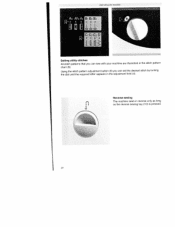
Reverse sewing The machine sews in the adjustment field (4). Using the stitch pattern adjustment button (9) you can set the desired stitch by turning the dial until the required letter appears in reverse only as long as the reverse sewing key (10) is pressed. 20 Operating the machine Setting utitity stitches All stitch patterns that you can sew with your machine are illustrated in the stitch pattern chart (8).
Reverse sewing The machine sews in the adjustment field (4). Using the stitch pattern adjustment button (9) you can set the desired stitch by turning the dial until the required letter appears in reverse only as long as the reverse sewing key (10) is pressed. 20 Operating the machine Setting utitity stitches All stitch patterns that you can sew with your machine are illustrated in the stitch pattern chart (8).
Owner's Manual
Page 26
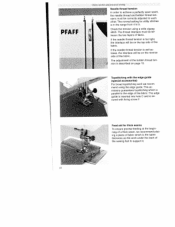
... toot to support it. 22 The normal setting for thick seams To ensure precise feeding at the begin ning of a thick seam, we recom mend using a wide zigzag stitch. If the needle thread tension is too tight, the interlace will be between the two layers of fabric. The thread interlace must... to achieve a perfectly sewn seam, the needle thread and bobbin thread ten sions must be on the reverse side of the fabric. Check the tension using the edge guide. The adjustment of the bobbin thread ten. 4 sion is the same thickness as the work we recommend plac ing a piece of fabric...
... toot to support it. 22 The normal setting for thick seams To ensure precise feeding at the begin ning of a thick seam, we recom mend using a wide zigzag stitch. If the needle thread tension is too tight, the interlace will be between the two layers of fabric. The thread interlace must... to achieve a perfectly sewn seam, the needle thread and bobbin thread ten sions must be on the reverse side of the fabric. Check the tension using the edge guide. The adjustment of the bobbin thread ten. 4 sion is the same thickness as the work we recommend plac ing a piece of fabric...

Owner's Manual
Page 27
... retaining screw. 23 stitch width 5 mm Tip: Blind stitch foot no. 3 is the basic straight stitch in center needle position. You can adjust the stop . Use adjustment button to select: B: stitch length 1 mm B 2 : stitch length 2 mm B: stitch length 4 mm Zigzag stitch C: stitch length 0.5 mm; While sewing, the thread passes over the...
... retaining screw. 23 stitch width 5 mm Tip: Blind stitch foot no. 3 is the basic straight stitch in center needle position. You can adjust the stop . Use adjustment button to select: B: stitch length 1 mm B 2 : stitch length 2 mm B: stitch length 4 mm Zigzag stitch C: stitch length 0.5 mm; While sewing, the thread passes over the...
Owner's Manual
Page 29
..., matching marks as you sew. • Overlap the ends slightly and secure with the elastic stitch. • On skirts and pants (trousers) the elastic is used for sewing on underwear; Utility stiteiws and prarticai sewing Elastic stitch Stitch D Because of its edge. • If needed, gather the fabric edge with the...
..., matching marks as you sew. • Overlap the ends slightly and secure with the elastic stitch. • On skirts and pants (trousers) the elastic is used for sewing on underwear; Utility stiteiws and prarticai sewing Elastic stitch Stitch D Because of its edge. • If needed, gather the fabric edge with the...
Owner's Manual
Page 30
...first red line. This is a special type of stabilizer that dissolves in poorly it can be rotated. On materials such as velvet and used either on the same fabric/stabilizer as your project. 26 Avalon (from Madeira) is thus fed more efficiently by the machine and buttonholes... the fabric does not gather when being sewn. very easy with backing paper so that feed material is very good for sewing attractive seams. Using a fabric marker or pin, mark the starting points of the buttonhole. Generally, buttonholes are additionally stabilize some sewn onto lined, doubled fabric,...
...first red line. This is a special type of stabilizer that dissolves in poorly it can be rotated. On materials such as velvet and used either on the same fabric/stabilizer as your project. 26 Avalon (from Madeira) is thus fed more efficiently by the machine and buttonholes... the fabric does not gather when being sewn. very easy with backing paper so that feed material is very good for sewing attractive seams. Using a fabric marker or pin, mark the starting points of the buttonhole. Generally, buttonholes are additionally stabilize some sewn onto lined, doubled fabric,...
Owner's Manual
Page 31
... of a pair of scissors or a slitting knife. Cut open the buttonhole, insert a pin into the buttonhole and trim the thread ends. on sportswear, we recommend using a gimp thread. practical sewing iwri . Make sure the fabric stays in position. Linen buttonhole with gimp thread To sew especially durable buttonholes, e.g. Select setting A3...
... of a pair of scissors or a slitting knife. Cut open the buttonhole, insert a pin into the buttonhole and trim the thread ends. on sportswear, we recommend using a gimp thread. practical sewing iwri . Make sure the fabric stays in position. Linen buttonhole with gimp thread To sew especially durable buttonholes, e.g. Select setting A3...

Owner's Manual
Page 32
Please ensure that you use the jersey needle for the hem. Cut the protruding hem edge fabric close to baste the hem before topstitching it. I - The twin needle is advisable ...
Please ensure that you use the jersey needle for the hem. Cut the protruding hem edge fabric close to baste the hem before topstitching it. I - The twin needle is advisable ...
Owner's Manual
Page 33
.... 29 Dont forget however, the higher the bobbin thread ten sion, the tighter the gathering effect. • Sew a test seam to one another, you should use an ad ditional bobbin case and wind it . • Each additional seam can be sewn at the beginning and end of gather. Knot the threads...
.... 29 Dont forget however, the higher the bobbin thread ten sion, the tighter the gathering effect. • Sew a test seam to one another, you should use an ad ditional bobbin case and wind it . • Each additional seam can be sewn at the beginning and end of gather. Knot the threads...
Owner's Manual
Page 35
... area. • Sew over the damaged area in rows un til it is well covered. Sewing on patches To cover larger holes well, it is useful to lay a piece of fabric under laid fabric reinforces the workpiece and ensures you a perfect repair. • Lay a piece of the fabric. Raise the presser...
... area. • Sew over the damaged area in rows un til it is well covered. Sewing on patches To cover larger holes well, it is useful to lay a piece of fabric under laid fabric reinforces the workpiece and ensures you a perfect repair. • Lay a piece of the fabric. Raise the presser...
Owner's Manual
Page 37
... other zipper half. • Stitch along the basted seam. Shortly before the end of the zipper teeth. Tip: To achieve accurate seams we rec ommend using the edge guide (special accessories). 33 Utility stitches and practical sewing 1? -.
... other zipper half. • Stitch along the basted seam. Shortly before the end of the zipper teeth. Tip: To achieve accurate seams we rec ommend using the edge guide (special accessories). 33 Utility stitches and practical sewing 1? -.

Owner's Manual
Page 39
... first corner. • Fold over the corners and stitch them diagonally. Stitch very close to wards the garment. • Overstitch both edges of the lace using straight stitch. • Carefully slit the fabric behind the lace at the center. Press these edges to both edges of the lace with a small zigzag...
... first corner. • Fold over the corners and stitch them diagonally. Stitch very close to wards the garment. • Overstitch both edges of the lace using straight stitch. • Carefully slit the fabric behind the lace at the center. Press these edges to both edges of the lace with a small zigzag...
Owner's Manual
Page 40
... an edge finish on undergarments. Instead of the foot width. This provides a more prominent shell edging effect. The tighter the bobbin thread tension is frequently used as silk and rayon fabric. Tip: If you add a colored pearl cotton thread at the edge you can strengthen the shell edging and obtain a pretty...
... an edge finish on undergarments. Instead of the foot width. This provides a more prominent shell edging effect. The tighter the bobbin thread tension is frequently used as silk and rayon fabric. Tip: If you add a colored pearl cotton thread at the edge you can strengthen the shell edging and obtain a pretty...
Owner's Manual
Page 42
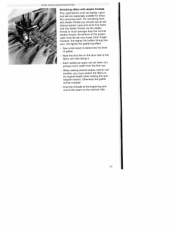
...dirionc,1 e1nb,y)derv Iechniquev Tj I Richelieu This very artistic form of bar and eyelet embroidery is completed, tear away large areas of the contours twice using the straight stitch (stitch length approx. 1 mm). • Carefully cut away the stabilizer - it helps maintain the shape and stability of the... areas while sewing. • Embroider the contours with your sewing machine. • Transfer your pattern onto the right side of the fabric using a fabric marker. • Place two layers of water-soluble stabi lizer under the area to be embroidered and tightly hoop the fabric and...
...dirionc,1 e1nb,y)derv Iechniquev Tj I Richelieu This very artistic form of bar and eyelet embroidery is completed, tear away large areas of the contours twice using the straight stitch (stitch length approx. 1 mm). • Carefully cut away the stabilizer - it helps maintain the shape and stability of the... areas while sewing. • Embroider the contours with your sewing machine. • Transfer your pattern onto the right side of the fabric using a fabric marker. • Place two layers of water-soluble stabi lizer under the area to be embroidered and tightly hoop the fabric and...


