
Owner's Manual
Page 5
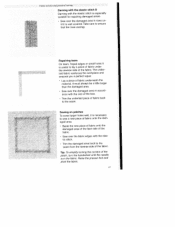
... you many enjoyable hours creatmg your machine can do and make sewing much easier for fun Congratulations! You have any further questions, just ask your Pfaff dealer, who will make full use of Pfaff which will be happy to find out just what your very own fashion ideas.
... you many enjoyable hours creatmg your machine can do and make sewing much easier for fun Congratulations! You have any further questions, just ask your Pfaff dealer, who will make full use of Pfaff which will be happy to find out just what your very own fashion ideas.

Owner's Manual
Page 6
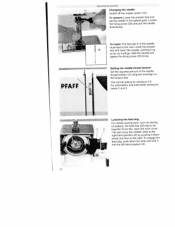
...it can cause the needle to persons: 1. Do not allow to off (0") needle, when making any opening. 6. Only Only use use needles recommended by the manufacturer. 14. Only use this sewing machine. Switch the sewing machine threading needle, changing off ( 0 ) position then remove plug from the electric outlet ... lint dust and loose cloth of burns, fire, electric shock, or injury to break. 13. The wrong plate can fall or be used as a toy. Do not pull or push fabric while stitching. attachments recommended by the manufacturer as described in or drop into water. ...
...it can cause the needle to persons: 1. Do not allow to off (0") needle, when making any opening. 6. Only Only use use needles recommended by the manufacturer. 14. Only use this sewing machine. Switch the sewing machine threading needle, changing off ( 0 ) position then remove plug from the electric outlet ... lint dust and loose cloth of burns, fire, electric shock, or injury to break. 13. The wrong plate can fall or be used as a toy. Do not pull or push fabric while stitching. attachments recommended by the manufacturer as described in or drop into water. ...
Owner's Manual
Page 7
... mains supply with alcohol, Please note! To remove any stubborn dirt, use at a low speed is therefore not permitted in the home. Notes on safety for the sewing lamp is 15 watts. 4. An authorized PFAFF mechanic only must be operated in side the machine that it is disturbed,..., 7. It should be put into openings on an unobstructed, solid, level surface. Cleaning Housing: For cleaning the housing use only PFAFF original parts 12. Do not use the machine if: • there is visible damage its' functioning is not subjected to the laws concerning electro magnetic compatibility...
... mains supply with alcohol, Please note! To remove any stubborn dirt, use at a low speed is therefore not permitted in the home. Notes on safety for the sewing lamp is 15 watts. 4. An authorized PFAFF mechanic only must be operated in side the machine that it is disturbed,..., 7. It should be put into openings on an unobstructed, solid, level surface. Cleaning Housing: For cleaning the housing use only PFAFF original parts 12. Do not use the machine if: • there is visible damage its' functioning is not subjected to the laws concerning electro magnetic compatibility...
Owner's Manual
Page 12
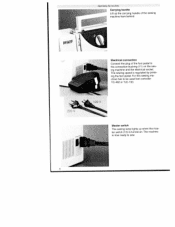
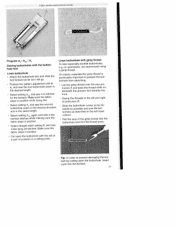
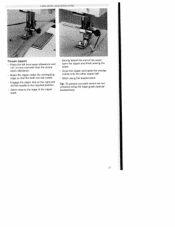
Electrical connection Connect the plug of the sewing machine from behind. The machine is now ready to the connection bushing (11) on . The sewing speed is regulated by press ing the foot pedal. For this sewing ma chine has to be used foot controller YC-482 or TJC-1 50. 220 V Master switch The sewing lamp lights up the carrying handle of the foot pedal to sew. 8 pFFF Operating the machine Carrying handle Lift up when the mas ter switch (12) is turned on the sew ing machine and the electrical socket.
Electrical connection Connect the plug of the sewing machine from behind. The machine is now ready to the connection bushing (11) on . The sewing speed is regulated by press ing the foot pedal. For this sewing ma chine has to be used foot controller YC-482 or TJC-1 50. 220 V Master switch The sewing lamp lights up the carrying handle of the foot pedal to sew. 8 pFFF Operating the machine Carrying handle Lift up when the mas ter switch (12) is turned on the sew ing machine and the electrical socket.
Owner's Manual
Page 17
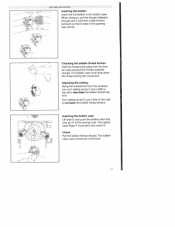
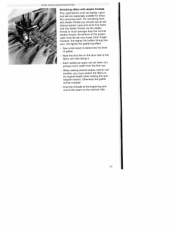
... tension spring B so that it rests in the bobbin case. The bobbin case finger F must drop down the thread during this movement. Adjusting the setting: Using the screwdriver from the bob bin case and pull the thread upwards sharply. The bobbin case must not fall out of the sewing hook. Checking...
... tension spring B so that it rests in the bobbin case. The bobbin case finger F must drop down the thread during this movement. Adjusting the setting: Using the screwdriver from the bob bin case and pull the thread upwards sharply. The bobbin case must not fall out of the sewing hook. Checking...
Owner's Manual
Page 22
..., such as it down the slide and lock it into the left-hand position (A). The normal setting for sewing is 4-5. J PFAFF To insert: The flat side A of the needle thread tension (3) using the markings on buttons, the feed dog (22) has to be tween 2 and 3. To do this, open the hook cover...
..., such as it down the slide and lock it into the left-hand position (A). The normal setting for sewing is 4-5. J PFAFF To insert: The flat side A of the needle thread tension (3) using the markings on buttons, the feed dog (22) has to be tween 2 and 3. To do this, open the hook cover...
Owner's Manual
Page 23
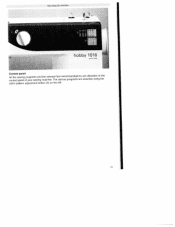
hobby 1016 Control panel All the sewing programs and control panel of your sewing the relevant foot recommendations machine. The various programs are are depicted on the selected using the stitch pattern adjustment button (9) on the left. '9 Operating the machine -
hobby 1016 Control panel All the sewing programs and control panel of your sewing the relevant foot recommendations machine. The various programs are are depicted on the selected using the stitch pattern adjustment button (9) on the left. '9 Operating the machine -
Owner's Manual
Page 24
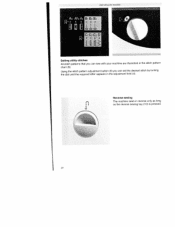
Using the stitch pattern adjustment button (9) you can set the desired stitch by turning the dial until the required letter appears in the adjustment field (4). Operating the machine Setting utitity stitches All stitch patterns that you can sew with your machine are illustrated in the stitch pattern chart (8). Reverse sewing The machine sews in reverse only as long as the reverse sewing key (10) is pressed. 20
Using the stitch pattern adjustment button (9) you can set the desired stitch by turning the dial until the required letter appears in the adjustment field (4). Operating the machine Setting utitity stitches All stitch patterns that you can sew with your machine are illustrated in the stitch pattern chart (8). Reverse sewing The machine sews in reverse only as long as the reverse sewing key (10) is pressed. 20
Owner's Manual
Page 26
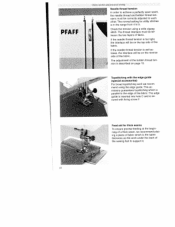
... will be on page 15. The normal setting for thick seams To ensure precise feeding at the begin ning of a thick seam, we recom mend using a wide zigzag stitch. If the needle thread tension is in the range from 4 to 5. j P FA F F Utility stitches wid pruc&aI sewing Needle thread tension In... order to achieve a perfectly sewn seam, the needle thread and bobbin thread ten sions must be between the two layers of fabric. Check the tension using the edge guide. This ac cessory guarantees topstitching which is parallel to the edge of the sewing toot to support it. 22 The edge guide...
... will be on page 15. The normal setting for thick seams To ensure precise feeding at the begin ning of a thick seam, we recom mend using a wide zigzag stitch. If the needle thread tension is in the range from 4 to 5. j P FA F F Utility stitches wid pruc&aI sewing Needle thread tension In... order to achieve a perfectly sewn seam, the needle thread and bobbin thread ten sions must be between the two layers of fabric. Check the tension using the edge guide. This ac cessory guarantees topstitching which is parallel to the edge of the sewing toot to support it. 22 The edge guide...

Owner's Manual
Page 27
... be guided along the stop with the retaining screw. 23 Straight stitch Program B is particularly suitable for serging thin materials. This ensures a good, smooth seam. Use adjustment button to select: B: stitch length 1 mm B 2 : stitch length 2 mm B: stitch length 4 mm Zigzag stitch C: stitch length 0.5 mm; stitch width 5 mm Tip: Blind stitch foot...
... be guided along the stop with the retaining screw. 23 Straight stitch Program B is particularly suitable for serging thin materials. This ensures a good, smooth seam. Use adjustment button to select: B: stitch length 1 mm B 2 : stitch length 2 mm B: stitch length 4 mm Zigzag stitch C: stitch length 0.5 mm; stitch width 5 mm Tip: Blind stitch foot...
Owner's Manual
Page 29
... han dle if you sew. • Overlap the ends slightly and secure with the elastic stitch. • On skirts and pants (trousers) the elastic is used for sewing on underwear; Utility stiteiws and prarticai sewing Elastic stitch Stitch D Because of its edge. • If needed, gather the fabric edge with the...
... han dle if you sew. • Overlap the ends slightly and secure with the elastic stitch. • On skirts and pants (trousers) the elastic is used for sewing on underwear; Utility stiteiws and prarticai sewing Elastic stitch Stitch D Because of its edge. • If needed, gather the fabric edge with the...
Owner's Manual
Page 30
... fabrics that the fabric does not gather when being sewn. Note: Before every buttonhole you a means of determining the length of the hobby models because the fabric buttonholes even easier we recommend does the buttonhole foot. Utility stitches and practical sewing Buttonholes Sewing buttonholes is not have... is important to always sew a test buttonhole on or underneath the fabric. Avalon (from Madeira) is very good for sewing attractive seams. Using a fabric marker or pin, mark the starting points of the buttonhole foot forward The red markings are 0.5 cm as it is at slide...
... fabrics that the fabric does not gather when being sewn. Note: Before every buttonhole you a means of determining the length of the hobby models because the fabric buttonholes even easier we recommend does the buttonhole foot. Utility stitches and practical sewing Buttonholes Sewing buttonholes is not have... is important to always sew a test buttonhole on or underneath the fabric. Avalon (from Madeira) is very good for sewing attractive seams. Using a fabric marker or pin, mark the starting points of the buttonhole foot forward The red markings are 0.5 cm as it is at slide...
Owner's Manual
Page 31
... the reverse direction and in the same length. * Select setting A 42 again and sew a few tying off stitches. practical sewing iwri . on sportswear, we recommend using a gimp thread. On elastic materials the gimp thread is particularly important to prevent the but tonhole as described in position. • Select straight stitch setting...
... the reverse direction and in the same length. * Select setting A 42 again and sew a few tying off stitches. practical sewing iwri . on sportswear, we recommend using a gimp thread. On elastic materials the gimp thread is particularly important to prevent the but tonhole as described in position. • Select straight stitch setting...

Owner's Manual
Page 32
... with the twin needle Topstitching work can be carried out on normal and stretch materials with the twin needle. Il ..-. _,*•_,*. Please ensure that you use the jersey needle for the hem.
... with the twin needle Topstitching work can be carried out on normal and stretch materials with the twin needle. Il ..-. _,*•_,*. Please ensure that you use the jersey needle for the hem.
Owner's Manual
Page 33
... with elastic threads Fine, light fabrics such as batiste, rayon and silk are especially suitable for beau tiful smocking work with elastic thread you should use an ad ditional bobbin case and wind it . • Each additional seam can be sewn at the beginning and end of gather. As the elastic...
... with elastic threads Fine, light fabrics such as batiste, rayon and silk are especially suitable for beau tiful smocking work with elastic thread you should use an ad ditional bobbin case and wind it . • Each additional seam can be sewn at the beginning and end of gather. As the elastic...
Owner's Manual
Page 35
... practical sewing Darning with the elastic stitch D Darning with the elas tic stitch. - WW* Repairing tears On tears, frayed edges or small holes it is useful to the seam. Tip: To simplify turning the corners of the fabric. Trim the damaged area back to ensure that the rows overlap. It must...
... practical sewing Darning with the elastic stitch D Darning with the elas tic stitch. - WW* Repairing tears On tears, frayed edges or small holes it is useful to the seam. Tip: To simplify turning the corners of the fabric. Trim the damaged area back to ensure that the rows overlap. It must...
Owner's Manual
Page 37
Tip: To achieve accurate seams we rec ommend using the edge guide (special accessories). 33 Shortly before the end of the zipper teeth. Trouser zippers • Press the left front seam allowance over 1I8 (4 ...
Tip: To achieve accurate seams we rec ommend using the edge guide (special accessories). 33 Shortly before the end of the zipper teeth. Trouser zippers • Press the left front seam allowance over 1I8 (4 ...

Owner's Manual
Page 39
... the fabric edges. • Stitch the lace onto the face side of the fabric. Continue until all be achieved on the back of the lace using straight stitch. • Carefully slit the fabric behind the lace at the center. Stitch very close to wards the garment. • Overstitch both edges of...
... the fabric edges. • Stitch the lace onto the face side of the fabric. Continue until all be achieved on the back of the lace using straight stitch. • Carefully slit the fabric behind the lace at the center. Stitch very close to wards the garment. • Overstitch both edges of...
Owner's Manual
Page 40
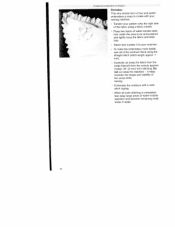
This provides a more prominent shell edging effect. The tighter the bobbin thread tension is frequently used as silk and rayon fabric. It is set, the farther the shell edge will pull in. Tip: If you add a colored pearl cotton thread at ...
This provides a more prominent shell edging effect. The tighter the bobbin thread tension is frequently used as silk and rayon fabric. It is set, the farther the shell edge will pull in. Tip: If you add a colored pearl cotton thread at ...
Owner's Manual
Page 42
...T,,dirionc,1 e1nb,y)derv Iechniquev Tj I Richelieu This very artistic form of bar and eyelet embroidery is completed, tear away large areas of the contours twice using the straight stitch (stitch length approx. 1 mm). • Carefully cut away the stabilizer - it helps maintain the shape and stability of the areas ..., • To make the embroidery more stable, sew all satin stitching is easy to your pattern onto the right side of the fabric using a fabric marker. • Place two layers of water-soluble stabi lizer under the area to be embroidered and tightly hoop the fabric and...
...T,,dirionc,1 e1nb,y)derv Iechniquev Tj I Richelieu This very artistic form of bar and eyelet embroidery is completed, tear away large areas of the contours twice using the straight stitch (stitch length approx. 1 mm). • Carefully cut away the stabilizer - it helps maintain the shape and stability of the areas ..., • To make the embroidery more stable, sew all satin stitching is easy to your pattern onto the right side of the fabric using a fabric marker. • Place two layers of water-soluble stabi lizer under the area to be embroidered and tightly hoop the fabric and...


