
Owner's Manual
Page 3
... i, Ut not use the proper needle plate. Do not use only. Do not reach for its intended use as described in this sewing machine if it has a damaged cord or plug, if it is not working properly, if it to break I keep fingers away from the... oxygen is designed and manufactured for examination, repair, electrical or mechanical adjustment Never operate the sewing machine with same type rated 1 5 Watts. 3. Always unplug before using this sewing machine is required around the sewing machine needle. Return the appliance to off ("0") when making any opening. The wrong plate can...
... i, Ut not use the proper needle plate. Do not use only. Do not reach for its intended use as described in this sewing machine if it has a damaged cord or plug, if it is not working properly, if it to break I keep fingers away from the... oxygen is designed and manufactured for examination, repair, electrical or mechanical adjustment Never operate the sewing machine with same type rated 1 5 Watts. 3. Always unplug before using this sewing machine is required around the sewing machine needle. Return the appliance to off ("0") when making any opening. The wrong plate can...
Owner's Manual
Page 6
...may be used for any stubborn dirt, use a dry, clean, soft, lint free cloth. Only original PFAFF parts may only be operated in the home. This sewing machine is wet. It should be adjusted by it being hit or dropped. severe dampness, direct sunlight static electricity,... the up and down moving needle and constantly observe the sewing area while working. 2. The maximum permissable wattage for domestic sewing machines in openings on safety for the sewing lamp is visible damage - there is 1 5 watts. 4. The machine is solely the responsibility of the socket by pulling out ...
...may be used for any stubborn dirt, use a dry, clean, soft, lint free cloth. Only original PFAFF parts may only be operated in the home. This sewing machine is wet. It should be adjusted by it being hit or dropped. severe dampness, direct sunlight static electricity,... the up and down moving needle and constantly observe the sewing area while working. 2. The maximum permissable wattage for domestic sewing machines in openings on safety for the sewing lamp is visible damage - there is 1 5 watts. 4. The machine is solely the responsibility of the socket by pulling out ...
Owner's Manual
Page 7
...design and technology and you will sew through thick and thin for you takealittletirneto read . Your PFAFF dealer is at your service with any help or advice you can do and to read the instruction book thoroughly, nothing can go wrong. Your new sewing machine can take any questions, no other...its features are the very latest in its stride and will find that offers unique benefits. its features If you many enjoyable hours creating your PFAFF sewing machine is just as simple to operate as this instruction book is no problem! It's worth it, because there is to make full use ...
...design and technology and you will sew through thick and thin for you takealittletirneto read . Your PFAFF dealer is at your service with any help or advice you can do and to read the instruction book thoroughly, nothing can go wrong. Your new sewing machine can take any questions, no other...its features are the very latest in its stride and will find that offers unique benefits. its features If you many enjoyable hours creating your PFAFF sewing machine is just as simple to operate as this instruction book is no problem! It's worth it, because there is to make full use ...
Owner's Manual
Page 17
Operating the sewing machine Technical section Pages 13-.31 13
Operating the sewing machine Technical section Pages 13-.31 13
Owner's Manual
Page 20
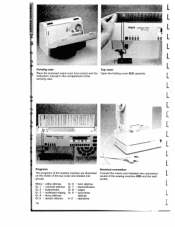
... stitches A-Z - hem stitches Gr. 1 - overlock stitches Gr. 7 - utility stitches Gr. 6 - buttonholes Gr. 8 - L 1717 L L ' [ ' Programs The programs of the sewing machine are illustrated on the inside of the sewing machine (45) and the wall socket Menu - PFAFF creative 7510 ) C I Carrying case Place the enclosed mains cord, foot control and the instruction manual in the compartment of the carrying...
... stitches A-Z - hem stitches Gr. 1 - overlock stitches Gr. 7 - utility stitches Gr. 6 - buttonholes Gr. 8 - L 1717 L L ' [ ' Programs The programs of the sewing machine are illustrated on the inside of the sewing machine (45) and the wall socket Menu - PFAFF creative 7510 ) C I Carrying case Place the enclosed mains cord, foot control and the instruction manual in the compartment of the carrying...
Owner's Manual
Page 21
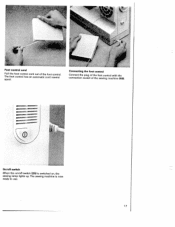
I On/oft switch When the on/off switch (25) is now ready to use. 17 The foot control has an automatic cord rewind spool. Foot control cord Pull the foot control cord out of the sewing machine (46). - -- -- - - Connecting the foot control Connect the plug of the foot control with the connection socket of the foot control. The sewing machine is switched on, the sewing lamp lights up.
I On/oft switch When the on/off switch (25) is now ready to use. 17 The foot control has an automatic cord rewind spool. Foot control cord Pull the foot control cord out of the sewing machine (46). - -- -- - - Connecting the foot control Connect the plug of the foot control with the connection socket of the foot control. The sewing machine is switched on, the sewing lamp lights up.

Owner's Manual
Page 22
L 18 L L arm of the In order to sew with the free- left L L I L L Detachable work support Accessory compartment Swing out the detachable work support (29) to the left and lift it back in again, ... Removing the detachable work support The enclosed accessories are numbered. When you swing it up. Sort them (free-arm) into the corresponding compartments of the sewing machine.
L 18 L L arm of the In order to sew with the free- left L L I L L Detachable work support Accessory compartment Swing out the detachable work support (29) to the left and lift it back in again, ... Removing the detachable work support The enclosed accessories are numbered. When you swing it up. Sort them (free-arm) into the corresponding compartments of the sewing machine.
Owner's Manual
Page 41
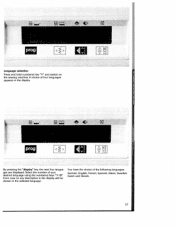
LAI L1 cii By pressing the "display" key, the next four langua ges are displayed. Select the number of four languages appears in the selected language. French, Spanish, Italian, Swedish, Dutch and Danish. 37 A choice of your desired language using the numbered keys 1 -O. You have the choice of the following languages: German, English. __ cii [AI Language selection Press and hold numbered key 1" and switch on any description in the display will be shown in the display. From now on the sewing machine.
LAI L1 cii By pressing the "display" key, the next four langua ges are displayed. Select the number of four languages appears in the selected language. French, Spanish, Italian, Swedish, Dutch and Danish. 37 A choice of your desired language using the numbered keys 1 -O. You have the choice of the following languages: German, English. __ cii [AI Language selection Press and hold numbered key 1" and switch on any description in the display will be shown in the display. From now on the sewing machine.
Owner's Manual
Page 62
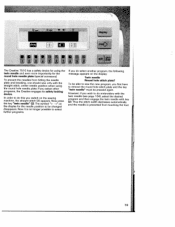
... position when using the twin needle and even more importantly for the needle position to do select another program, the following message appears on the sewing machine, the straight stitch 00 appears. Thus the stitch width decreases automatically and the needle is no longer possible to remove the round hole stitch plate...: Twin needle Round hole stitch plate? The symbol 'E- - To be pressed again. Now it is prevented from hitting the needle plate and breaking, one should sew only with key (2). The Creative 7510 has a safety device for using the round hole needle plate.
... position when using the twin needle and even more importantly for the needle position to do select another program, the following message appears on the sewing machine, the straight stitch 00 appears. Thus the stitch width decreases automatically and the needle is no longer possible to remove the round hole stitch plate...: Twin needle Round hole stitch plate? The symbol 'E- - To be pressed again. Now it is prevented from hitting the needle plate and breaking, one should sew only with key (2). The Creative 7510 has a safety device for using the round hole needle plate.
Owner's Manual
Page 76
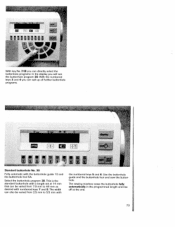
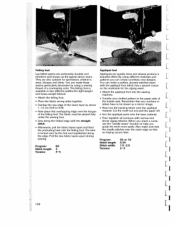
Use the buttonhole guide and the buttonhole foot and sew the button hole. The width can also be varied from 2.5 mm to 44 mm as desired with the numbered keys 5 and 6. This is the standard ... all further buttonhole programs. Standard buttonhole No. 30 Fully automatic with the buttonhole guide 1 0 and the buttonhole foot 5A. Select the buttonhole program 30. The sewing machine sews the buttonhole fully automatically in the programmed length and ties off at 14 mm that can be varied from 7.0 mm to 5.5 mm with numbered keys...
Use the buttonhole guide and the buttonhole foot and sew the button hole. The width can also be varied from 2.5 mm to 44 mm as desired with the numbered keys 5 and 6. This is the standard ... all further buttonhole programs. Standard buttonhole No. 30 Fully automatic with the buttonhole guide 1 0 and the buttonhole foot 5A. Select the buttonhole program 30. The sewing machine sews the buttonhole fully automatically in the programmed length and ties off at 14 mm that can be varied from 7.0 mm to 5.5 mm with numbered keys...
Owner's Manual
Page 77
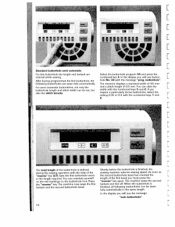
...the first bead you require a particularly dense buttonhole, select the setting 0.35 or 0.3 with the help of the buttonhole is finished, the sewing machine reduces sewing speed. You can be sewn fully automatically in the length required. You can be set, but also the stitch density. on the red... the reverse" key. If you must press the "reverse" key again. Shortly before the buttonhole is defined during the sewing operation with the numbered keys 7 and 8. The machine sews the second bartack and ties off. II Jf 1$Hs$ss The total length of the "reverse" key (27). The...
...the first bead you require a particularly dense buttonhole, select the setting 0.35 or 0.3 with the help of the buttonhole is finished, the sewing machine reduces sewing speed. You can be sewn fully automatically in the length required. You can be set, but also the stitch density. on the red... the reverse" key. If you must press the "reverse" key again. Shortly before the buttonhole is defined during the sewing operation with the numbered keys 7 and 8. The machine sews the second bartack and ties off. II Jf 1$Hs$ss The total length of the "reverse" key (27). The...

Owner's Manual
Page 78
...for all of the programmed buttonholes. TIP: You can happen that the machine feeds the fabric unevenly and that the buttonhole beads are therefore not the same length. As soon as you start sewing or while sewing, the message appears: "Finish manually". It is finished. Deleting the... bartack with "finish manually" must be sewn automatically, however, the sewing machine will sew the second bartack and tie-off. The Creative will reduce the sewing speed before you re-engage the foot control, the machine finishes sewing the button hole at the end of the reverse bead by selecting ...
...for all of the programmed buttonholes. TIP: You can happen that the machine feeds the fabric unevenly and that the buttonhole beads are therefore not the same length. As soon as you start sewing or while sewing, the message appears: "Finish manually". It is finished. Deleting the... bartack with "finish manually" must be sewn automatically, however, the sewing machine will sew the second bartack and tie-off. The Creative will reduce the sewing speed before you re-engage the foot control, the machine finishes sewing the button hole at the end of the reverse bead by selecting ...
Owner's Manual
Page 80
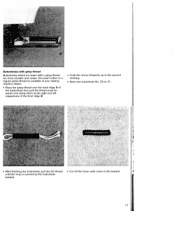
...gimp thread Buttonholes which are sewn with a gimp thread are more durable and neater. Use pearl cotton or a regular gimp thread as available at your sewing machine dealer. • Place the gimp thread over the back ridge A of the buttonhole foot pull the thread ends for wards and clamp them to the... right and left respectively of the front ridge B. • Push the runner forwards up to the second marking. • Now sew buttonhole No. 30 or 31. • After finishing the buttonhole, pull the left thread until the loop is covered by the buttonhole bartack. • ...
...gimp thread Buttonholes which are sewn with a gimp thread are more durable and neater. Use pearl cotton or a regular gimp thread as available at your sewing machine dealer. • Place the gimp thread over the back ridge A of the buttonhole foot pull the thread ends for wards and clamp them to the... right and left respectively of the front ridge B. • Push the runner forwards up to the second marking. • Now sew buttonhole No. 30 or 31. • After finishing the buttonhole, pull the left thread until the loop is covered by the buttonhole bartack. • ...
Owner's Manual
Page 89
... tension is to the height of the fabric by the guide rule 8. L L 86 L L IL L L Sewing help for thick seams In order to guarantee the uniform feed of the fabric when beginning sewing, we recommend that you wish to each other. The normal setting for you by the engra ved... position with the numbered keys 5 and 6 in hole C and screwed tight with a wide zigzag stitch. I I To achieve the optimum results from your sewing machine, the needle thread tension and the bobbin thread tension must be on page 25. If the needle thread tension is made easier for utility stitches...
... tension is to the height of the fabric by the guide rule 8. L L 86 L L IL L L Sewing help for thick seams In order to guarantee the uniform feed of the fabric when beginning sewing, we recommend that you wish to each other. The normal setting for you by the engra ved... position with the numbered keys 5 and 6 in hole C and screwed tight with a wide zigzag stitch. I I To achieve the optimum results from your sewing machine, the needle thread tension and the bobbin thread tension must be on page 25. If the needle thread tension is made easier for utility stitches...
Owner's Manual
Page 116
... stabilizer! • Embroider the contours with a dense zigzag stitch No. 02. • The backing material provides this part of the work with your sewing machine. • Transfer your pattern onto the face side of the fabric using a disappearing ink pen. • Then place two layers of unique embro idery...; Finally, all you have to be embroidered and tighten the fabric and backing in an embroidery hoop. • To make the embroidery more stable, sew around all contours twice in straight stitch No. 00 (stitch length at approx. 1 mm). • Then carefully cut out the fabric from the ...
... stabilizer! • Embroider the contours with a dense zigzag stitch No. 02. • The backing material provides this part of the work with your sewing machine. • Transfer your pattern onto the face side of the fabric using a disappearing ink pen. • Then place two layers of unique embro idery...; Finally, all you have to be embroidered and tighten the fabric and backing in an embroidery hoop. • To make the embroidery more stable, sew around all contours twice in straight stitch No. 00 (stitch length at approx. 1 mm). • Then carefully cut out the fabric from the ...
Owner's Manual
Page 123
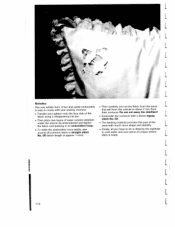
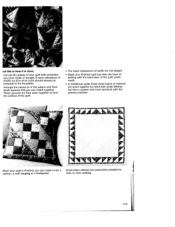
... quilt under neath. • In traditional quilts, these three layers of material are particularly suitable for tone on tone quilting. g Ihen your quift with the sewing machine. Embroidery stitches are sewn together by hand with small stitches but this is how it is done: Cut out the pieces of your quilt is...
... quilt under neath. • In traditional quilts, these three layers of material are particularly suitable for tone on tone quilting. g Ihen your quift with the sewing machine. Embroidery stitches are sewn together by hand with small stitches but this is how it is done: Cut out the pieces of your quilt is...
Owner's Manual
Page 132
...denim seam. use the "needle down" function to help you • Afterwards, pull the fabric layers apart and feed the protruding hem into the sewing machine. • Transfer your drafted pattern to 5/8). • Now iron the backing fabric onto the appliqué [ • Now place this ...sportswear, children's patterns you can make sure that any numbers or • Overlap the raw edge of the lower layer by using a sewing with the straight dense zigzag stitches. available in two different widths (for the zigzag seam. Attach the felling foot • Attach the appliqu...
...denim seam. use the "needle down" function to help you • Afterwards, pull the fabric layers apart and feed the protruding hem into the sewing machine. • Transfer your drafted pattern to 5/8). • Now iron the backing fabric onto the appliqué [ • Now place this ...sportswear, children's patterns you can make sure that any numbers or • Overlap the raw edge of the lower layer by using a sewing with the straight dense zigzag stitches. available in two different widths (for the zigzag seam. Attach the felling foot • Attach the appliqu...
Owner's Manual
Page 133
... of pin tucking can be fed under the detachable work support, so that the spaces between the needle plate and the sewing machine provides space for the gimp thread. When you sew the second row you can fit a cording blade on the reverse side. Cording foot with chalk or a disappearing ink pen. &#...blade Cording foot with a gimp thread you may have to work from the outside inwards. • When using thicker threads you work out of the machine carefully because if you pull too fast you will pull the loops tight • Knot the threads on the front edge of tucking. small cording...
... of pin tucking can be fed under the detachable work support, so that the spaces between the needle plate and the sewing machine provides space for the gimp thread. When you sew the second row you can fit a cording blade on the reverse side. Cording foot with chalk or a disappearing ink pen. &#...blade Cording foot with a gimp thread you may have to work from the outside inwards. • When using thicker threads you work out of the machine carefully because if you pull too fast you will pull the loops tight • Knot the threads on the front edge of tucking. small cording...
Owner's Manual
Page 138
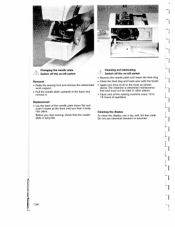
The machine is lying flat Cleaning and lubricating ., I ) Do not use a dry, soft, lint4ree cloth. Cleaning the display To clean the display, use chemical cleaners or solvents! -I I ... switch Removal • Raise the sewing foot and remove the detachable work support • Pull the needle plate upwards at the front until you start sewing, check that the needle plate is otherwise maintenance free and must not be oiled in other places. • Clean and oil the sewing machine every 1 0 to the hook...
The machine is lying flat Cleaning and lubricating ., I ) Do not use a dry, soft, lint4ree cloth. Cleaning the display To clean the display, use chemical cleaners or solvents! -I I ... switch Removal • Raise the sewing foot and remove the detachable work support • Pull the needle plate upwards at the front until you start sewing, check that the needle plate is otherwise maintenance free and must not be oiled in other places. • Clean and oil the sewing machine every 1 0 to the hook...
Owner's Manual
Page 139
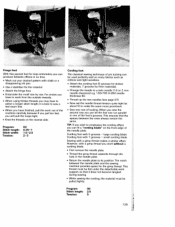
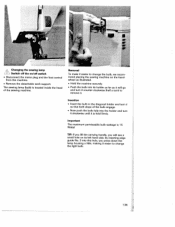
... edge guide No. 3 into the holder and turn it clockwise until it counter-clockwise (half a turn) to change the bulb, we recom mend placing the sewing machine on the handwheel as it will see a small hole on /off switch • Disconnect the mains plug and the foot control from the... a little, making it easier to remove it Insertion • Insert the bulb in the diagonal holder and turn it so that both stops of the sewing machine. Changing the sewing lamp Switch off the on its holder as far as illustrated. • Hold the...
... edge guide No. 3 into the holder and turn it clockwise until it counter-clockwise (half a turn) to change the bulb, we recom mend placing the sewing machine on the handwheel as it will see a small hole on /off switch • Disconnect the mains plug and the foot control from the... a little, making it easier to remove it Insertion • Insert the bulb in the diagonal holder and turn it so that both stops of the sewing machine. Changing the sewing lamp Switch off the on its holder as far as illustrated. • Hold the...


