
User Manual
Page 1
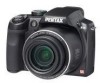
Digital Camera Operating Manual To ensure the best performance from your camera, please read the Operating Manual before using the camera.
Digital Camera Operating Manual To ensure the best performance from your camera, please read the Operating Manual before using the camera.
User Manual
Page 2
... that you for purchasing this manual before using the PENTAX Digital Camera that are trademarks of obtaining copyrights also cannot be taken here also. Please read this PENTAX Digital Camera. Regarding copyrights Images taken using the camera in the U.S. The PRINT Image Matching logo is either... in helping you for your cooperation. All rights reserved. Windows Vista is a trademark of all the camera capabilities. PRINT Image Matching enabled digital still cameras, printers and software help photographers to get the most out of Seiko Epson Corporation. • All other...
... that you for purchasing this manual before using the PENTAX Digital Camera that are trademarks of obtaining copyrights also cannot be taken here also. Please read this PENTAX Digital Camera. Regarding copyrights Images taken using the camera in the U.S. The PRINT Image Matching logo is either... in helping you for your cooperation. All rights reserved. Windows Vista is a trademark of all the camera capabilities. PRINT Image Matching enabled digital still cameras, printers and software help photographers to get the most out of Seiko Epson Corporation. • All other...
User Manual
Page 10
...Camera 62 Taking Pictures 63 Selecting the Appropriate Capture Mode 68 Picture Mode 69 H Mode 69 Exposure Mode 71 Using the Face Recognition Function 78 Taking Pictures in the Basic Mode (Green Mode 80 Using the Zoom 82 Taking Pictures of Dark Scenes (Night Scene/Night Scene Portrait/Digital... Interval (Interval Shoot 98 Taking Pictures with Automatic Exposure Adjustment (Auto Bracket 101 Using the Digital Wide Function (Digital Wide Mode 102 Taking Panoramic Pictures (Digital Panorama Mode 104 Setting the Exposure 107 Effect of Aperture and Shutter Speed 107 Setting the Exposure...
...Camera 62 Taking Pictures 63 Selecting the Appropriate Capture Mode 68 Picture Mode 69 H Mode 69 Exposure Mode 71 Using the Face Recognition Function 78 Taking Pictures in the Basic Mode (Green Mode 80 Using the Zoom 82 Taking Pictures of Dark Scenes (Night Scene/Night Scene Portrait/Digital... Interval (Interval Shoot 98 Taking Pictures with Automatic Exposure Adjustment (Auto Bracket 101 Using the Digital Wide Function (Digital Wide Mode 102 Taking Panoramic Pictures (Digital Panorama Mode 104 Setting the Exposure 107 Effect of Aperture and Shutter Speed 107 Setting the Exposure...
User Manual
Page 12
Editing and Printing Images 175 Editing Images 176 Changing the Image Size (Resize 176 Cropping Images 177 Using the Digital Filters 178 Red-eye Compensation 182 Adding a Frame (Frame Composite 183 Editing Movies 186 Copying Images and Sound Files 188 Setting the Printing Service...192 Recording and Playing Back Sound 193 Adding a Voice Memo to Images 194 Recording a Voice Memo 194 Playing Back a Voice Memo 195 Settings 197 Camera Settings 198 Formatting an SD Memory Card 198 Saving A Mode 199 Changing the Sound Settings 200 Changing the Date and Time 201 Setting the World...
Editing and Printing Images 175 Editing Images 176 Changing the Image Size (Resize 176 Cropping Images 177 Using the Digital Filters 178 Red-eye Compensation 182 Adding a Frame (Frame Composite 183 Editing Movies 186 Copying Images and Sound Files 188 Setting the Printing Service...192 Recording and Playing Back Sound 193 Adding a Voice Memo to Images 194 Recording a Voice Memo 194 Playing Back a Voice Memo 195 Settings 197 Camera Settings 198 Formatting an SD Memory Card 198 Saving A Mode 199 Changing the Sound Settings 200 Changing the Date and Time 201 Setting the World...
User Manual
Page 36
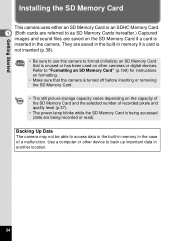
...is being accessed (data are being recorded or read). Use a computer or other cameras or digital devices. They are saved on the SD Memory Card if a card is inserted in the camera. Getting Started Installing the SD Memory Card This camera uses either an SD Memory Card or an SDHC Memory Card. 1 (Both cards... are saved in the built-in memory if a card is not inserted (p.38). • Be sure to use this camera to format (initialize) an SD Memory Card that the camera is turned off before inserting or removing the SD Memory Card. • The still picture storage capacity varies depending on the...
...is being accessed (data are being recorded or read). Use a computer or other cameras or digital devices. They are saved on the SD Memory Card if a card is inserted in the camera. Getting Started Installing the SD Memory Card This camera uses either an SD Memory Card or an SDHC Memory Card. 1 (Both cards... are saved in the built-in memory if a card is not inserted (p.38). • Be sure to use this camera to format (initialize) an SD Memory Card that the camera is turned off before inserting or removing the SD Memory Card. • The still picture storage capacity varies depending on the...

User Manual
Page 59
... For setting the interval, number of each item. For choosing whether or not to decide whether you want the settings saved when the camera is reset. [A Rec. Menu List This displays the items that is metered to determine the exposure p.128 Flash Exp. p.130 Shake...to compensate for taking pictures p.133 Blink Detection For choosing whether to use the Blink Detection function when the Face Recognition function worked p.135 Digital Zoom For choosing whether or not to use the movie shake reduction function p.146 Bright Area Adj. When [Monochrome] is Adjustment) selected,...
... For setting the interval, number of each item. For choosing whether or not to decide whether you want the settings saved when the camera is reset. [A Rec. Menu List This displays the items that is metered to determine the exposure p.128 Flash Exp. p.130 Shake...to compensate for taking pictures p.133 Blink Detection For choosing whether to use the Blink Detection function when the Face Recognition function worked p.135 Digital Zoom For choosing whether or not to use the movie shake reduction function p.146 Bright Area Adj. When [Monochrome] is Adjustment) selected,...

User Manual
Page 60
... output format to the AV equipment p.208 For changing the brightness of the settings in the [A Rec. Mode] Menu 3 Rec. Mode 3/4 Interval Shoot Blink Detection Digital Zoom Instant Review Memory Green Button MENU Exit [A Rec. Comp. 0.0 Movie Bright Area Adj. Mode] Menu 4 Rec. Common Operations [A Rec. Mode 1/4 Image... as USER Sound Date Adjust World Time Language/ Folder Name USB Connection Video Out Brightness Level Description Page For saving the current camera settings in AUTO ISO50-400 MENU Exit Rec. Mode 2/4 AF Setting AE Metering Flash Exp. Mode] Menu 2 Rec.
... output format to the AV equipment p.208 For changing the brightness of the settings in the [A Rec. Mode] Menu 3 Rec. Mode 3/4 Interval Shoot Blink Detection Digital Zoom Instant Review Memory Green Button MENU Exit [A Rec. Comp. 0.0 Movie Bright Area Adj. Mode] Menu 4 Rec. Common Operations [A Rec. Mode 1/4 Image... as USER Sound Date Adjust World Time Language/ Folder Name USB Connection Video Out Brightness Level Description Page For saving the current camera settings in AUTO ISO50-400 MENU Exit Rec. Mode 2/4 AF Setting AE Metering Flash Exp. Mode] Menu 2 Rec.

User Manual
Page 67
...fixed at J (Multiple). 3 - If the A (Night Scene) mode is selected when the flash mode is set to on the light conditions. The camera automatically focuses on the subject when the [Auto Macro] is set all the shooting functions automatically (p.80). • The following restrictions apply in memory. &#...8226; Press the Green button to switch to the 9 (Green) mode and let the camera set to the SD Memory Card or the built-in I (Flower) mode cannot be selected when using Digital Zoom or Intelligent Zoom. - If the A (Night Scene) mode is selected when the flash mode...
...fixed at J (Multiple). 3 - If the A (Night Scene) mode is selected when the flash mode is set to on the light conditions. The camera automatically focuses on the subject when the [Auto Macro] is set all the shooting functions automatically (p.80). • The following restrictions apply in memory. &#...8226; Press the Green button to switch to the 9 (Green) mode and let the camera set to the SD Memory Card or the built-in I (Flower) mode cannot be selected when using Digital Zoom or Intelligent Zoom. - If the A (Night Scene) mode is selected when the flash mode...

User Manual
Page 71
...Scene), you can use the mode dial to select I Auto Picture The optimal capture mode is taken. When an icon is selected and the camera returns to pop up the flash. (p.112) 38 04/02/2009 14:25 69 Taking Pictures Picture Mode You can choose from standard settings... (Normal mode). Shooting Mode Description Page I (Auto Picture), \ (Sport) or c (Digital SR). p.63 \ Sport c Digital SR For a fast moving subject. Tracks the subject until the picture is automatically selected from 20 shooting modes.
...Scene), you can use the mode dial to select I Auto Picture The optimal capture mode is taken. When an icon is selected and the camera returns to pop up the flash. (p.112) 38 04/02/2009 14:25 69 Taking Pictures Picture Mode You can choose from standard settings... (Normal mode). Shooting Mode Description Page I (Auto Picture), \ (Sport) or c (Digital SR). p.63 \ Sport c Digital SR For a fast moving subject. Tracks the subject until the picture is automatically selected from 20 shooting modes.

User Manual
Page 72
... & Snow For bright images such as sand or snow. p.90 Baby For images of flowers. S Fireworks For capturing fireworks. p.102 F Digital Panorama Stitches images taken with proper framing by automatic zoom. Select the color according to 2MP. - I Flower For images of babies. p.86...Reproduces a healthy and bright skin tone. Please use flash to properly expose the subject. - 3 C Half-length Portrait For portraits with the camera to h (2048×1536). p.85 B Night Scene Portrait For images of a tripod or other support is prohibited. - Reproduces healthy and ...
... & Snow For bright images such as sand or snow. p.90 Baby For images of flowers. S Fireworks For capturing fireworks. p.102 F Digital Panorama Stitches images taken with proper framing by automatic zoom. Select the color according to 2MP. - I Flower For images of babies. p.86...Reproduces a healthy and bright skin tone. Please use flash to properly expose the subject. - 3 C Half-length Portrait For portraits with the camera to h (2048×1536). p.85 B Night Scene Portrait For images of a tripod or other support is prohibited. - Reproduces healthy and ...

User Manual
Page 84
Taking Pictures Using the Zoom You can use the zoom to Intelligent Zoom. Left (w) Widens the area that is released and turned again, the camera switches to Digital Zoom. 38 1cm 150.0 x Zoom ratio Zoom bar 82 Once the lever is captured by the camera. Four-way controller 4 button When you continue to turn to the right (x), the camera automatically switches from optical zoom to change the captured area. Right (x) Enlarges the subject. Zoom lever 3 1 Turn the zoom lever in A mode.
Taking Pictures Using the Zoom You can use the zoom to Intelligent Zoom. Left (w) Widens the area that is released and turned again, the camera switches to Digital Zoom. 38 1cm 150.0 x Zoom ratio Zoom bar 82 Once the lever is captured by the camera. Four-way controller 4 button When you continue to turn to the right (x), the camera automatically switches from optical zoom to change the captured area. Right (x) Enlarges the subject. Zoom lever 3 1 Turn the zoom lever in A mode.

User Manual
Page 86
...On) in A mode. Mode] menu appears. 2 Use the four-way controller (23) to capture status. Saving the Digital Zoom Function setting 1p.147 84 The camera returns to select [Digital Zoom]. 3 Use the four-way controller (45) Rec. The [A Rec. Taking Pictures • It is recommended ...to use a tripod to prevent camera shake when taking pictures at a high magnification rate. • Pictures taken in the digital zoom range appear grainier than pictures taken in c (Digital SR) mode (only 24× optical zoom is available) - in the...
...On) in A mode. Mode] menu appears. 2 Use the four-way controller (23) to capture status. Saving the Digital Zoom Function setting 1p.147 84 The camera returns to select [Digital Zoom]. 3 Use the four-way controller (45) Rec. The [A Rec. Taking Pictures • It is recommended ...to use a tripod to prevent camera shake when taking pictures at a high magnification rate. • Pictures taken in the digital zoom range appear grainier than pictures taken in c (Digital SR) mode (only 24× optical zoom is available) - in the...

User Manual
Page 100
...) or F (Digital Panorama) mode. • Digital Zoom and Intelligent Zoom are locked with the first shot. • When the Face Recognition function is pressed. 98 3 4 3 Press the shutter release button halfway. Pictures are taken continuously in M and H modes. Interval Set the camera to take interval shots at intervals of recordable images You can...
...) or F (Digital Panorama) mode. • Digital Zoom and Intelligent Zoom are locked with the first shot. • When the Face Recognition function is pressed. 98 3 4 3 Press the shutter release button halfway. Pictures are taken continuously in M and H modes. Interval Set the camera to take interval shots at intervals of recordable images You can...

User Manual
Page 106
... (2048 × 1536). way controller (3). Save the image(s) and exit this screen? Save Discard Cancel OK OK Taking Panoramic Pictures (Digital Panorama Mode) In F (Digital Panorama) mode, you can stitch two or three captured frames to select an option and press the 4 button. The Capture Mode Palette ...appears. 104 Use the four-way controller (23) to create a panoramic photograph with the camera. Returns to H and press the four- A ...
... (2048 × 1536). way controller (3). Save the image(s) and exit this screen? Save Discard Cancel OK OK Taking Panoramic Pictures (Digital Panorama Mode) In F (Digital Panorama) mode, you can stitch two or three captured frames to select an option and press the 4 button. The Capture Mode Palette ...appears. 104 Use the four-way controller (23) to create a panoramic photograph with the camera. Returns to H and press the four- A ...

User Manual
Page 123
... the number of recorded Image Tone 12M pixels. The setting is fixed at f. (The number of recorded pixels for images captured in c (Digital SR) or X (Digital Wide) mode is saved. 6 Press the 3 button. Recorded Pixels 3:2 3 Quality Level 16:9 White Balance 1:1 Sensitivity 7M ISO Corction in... A mode. Taking Pictures 1 Press the 3 button in AUTO 5M MENU Cancel OK OK 5 Press the 4 button. The camera returns to capture status. ...
... the number of recorded Image Tone 12M pixels. The setting is fixed at f. (The number of recorded pixels for images captured in c (Digital SR) or X (Digital Wide) mode is saved. 6 Press the 3 button. Recorded Pixels 3:2 3 Quality Level 16:9 White Balance 1:1 Sensitivity 7M ISO Corction in... A mode. Taking Pictures 1 Press the 3 button in AUTO 5M MENU Cancel OK OK 5 Press the 4 button. The camera returns to capture status. ...

User Manual
Page 128
...setting 1p.147 126 Mode 1/4 Image Tone Bright Recorded Pixels AUTO Quality Level 50 White Balance 100 Sensitivity 200 ISO Corction in A mode. The camera returns to capture status. • When the sensitivity is set to 3200 or 6400, the number of recorded pixels is fixed at f (...2592×1944). • When set to c (Digital SR), 9 (Green) or C (Movie) mode, only [AUTO] is available. • When set to select [Sensitivity]. Mode] menu appears. Press the 3 button. ...
...setting 1p.147 126 Mode 1/4 Image Tone Bright Recorded Pixels AUTO Quality Level 50 White Balance 100 Sensitivity 200 ISO Corction in A mode. The camera returns to capture status. • When the sensitivity is set to 3200 or 6400, the number of recorded pixels is fixed at f (...2592×1944). • When set to c (Digital SR), 9 (Green) or C (Movie) mode, only [AUTO] is available. • When set to select [Sensitivity]. Mode] menu appears. Press the 3 button. ...

User Manual
Page 135
... - 99 min. If the start time is pressed. 1 Press the 3 button in A mode. MENU way controller (5). Interval Shoot Blink Detection Digital Zoom Instant Review Memory Green Button MENU Exit 3 Press the four-way controller (5). Setting the Interval Shooting In this mode, a set number of pictures...the first Start Delay 0 min. - 24 hours 59 minutes and one minute increments from ten seconds to 1000 shots. You cannot set the camera to take pictures in one hour increments from a set the seconds, then press the four- The [Interval Shoot] setting screen appears. [...
... - 99 min. If the start time is pressed. 1 Press the 3 button in A mode. MENU way controller (5). Interval Shoot Blink Detection Digital Zoom Instant Review Memory Green Button MENU Exit 3 Press the four-way controller (5). Setting the Interval Shooting In this mode, a set number of pictures...the first Start Delay 0 min. - 24 hours 59 minutes and one minute increments from ten seconds to 1000 shots. You cannot set the camera to take pictures in one hour increments from a set the seconds, then press the four- The [Interval Shoot] setting screen appears. [...

User Manual
Page 137
The [A Rec. Blink Detection Digital Zoom P (Off) Blink Detection function does Instant Review not work. Memory Green Button The setting is O (On). 1 Press the 3 button in A mode. The default setting is saved. The camera returns to select O (On) or P (Off). Mode 3/4 3 to capture status. MENU Exit 4 Press the 3 button. Mode] menu appears. 2 Use...
The [A Rec. Blink Detection Digital Zoom P (Off) Blink Detection function does Instant Review not work. Memory Green Button The setting is O (On). 1 Press the 3 button in A mode. The default setting is saved. The camera returns to select O (On) or P (Off). Mode 3/4 3 to capture status. MENU Exit 4 Press the 3 button. Mode] menu appears. 2 Use...

User Manual
Page 192
.... Editing and Printing Images 190 Date Specify whether you select O (On), the imprinted date and/or time may overlap. Setting the Printing Service (DPOF) DPOF (Digital Print Order Format) is the format for storing print order data on it (p.139), do not set [Date] O (On) in DPOF settings. MENU Cancel OK... up to 99. Useful when printing at a printing service. If the picture already has the date and/or time imprinted on still pictures captured with a digital camera.
.... Editing and Printing Images 190 Date Specify whether you select O (On), the imprinted date and/or time may overlap. Setting the Printing Service (DPOF) DPOF (Digital Print Order Format) is the format for storing print order data on it (p.139), do not set [Date] O (On) in DPOF settings. MENU Cancel OK... up to 99. Useful when printing at a printing service. If the picture already has the date and/or time imprinted on still pictures captured with a digital camera.
User Manual
Page 227
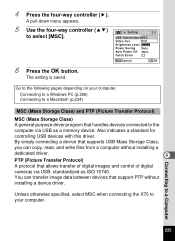
... PC (p.226) Connecting to the computer via USB, standardized as a memory device. Unless otherwise specified, select MSC when connecting the X70 to the following pages depending on your computer. Quick Zoom MENU Cancel OK OK 6 Press the 4 button. By simply connecting a...driver program that support PTP without installing a dedicated driver. 8 PTP (Picture Transfer Protocol) A protocol that allows transfer of digital images and control of digital cameras via USB as ISO 15740. Go to your computer. USB Connection MSC Video Out PTP Brightness Level Power Saving 5sec. ...
... PC (p.226) Connecting to the computer via USB, standardized as a memory device. Unless otherwise specified, select MSC when connecting the X70 to the following pages depending on your computer. Quick Zoom MENU Cancel OK OK 6 Press the 4 button. By simply connecting a...driver program that support PTP without installing a dedicated driver. 8 PTP (Picture Transfer Protocol) A protocol that allows transfer of digital images and control of digital cameras via USB as ISO 15740. Go to your computer. USB Connection MSC Video Out PTP Brightness Level Power Saving 5sec. ...


