
User Manual
Page 1
Digital Camera Operating Manual To ensure the best performance from your camera, please read the Operating Manual before using the camera.
Digital Camera Operating Manual To ensure the best performance from your camera, please read the Operating Manual before using the camera.

User Manual
Page 2
...to a Computer" (p.217) for more faithful to get the most out of all the camera capabilities. Thank you for purchasing this manual before using the PENTAX Digital Camera that you complete the product registration, which can be a valuable tool in helping you to ...are registered trademarks of Microsoft Corporation in the United States and other countries. Regarding trademarks • PENTAX is a trademark of their intentions. Please read this PENTAX Digital Camera. and other brands or product names are trademarks or registered trademarks of Seiko Epson Corporation. •...
...to a Computer" (p.217) for more faithful to get the most out of all the camera capabilities. Thank you for purchasing this manual before using the PENTAX Digital Camera that you complete the product registration, which can be a valuable tool in helping you to ...are registered trademarks of Microsoft Corporation in the United States and other countries. Regarding trademarks • PENTAX is a trademark of their intentions. Please read this PENTAX Digital Camera. and other brands or product names are trademarks or registered trademarks of Seiko Epson Corporation. •...

User Manual
Page 3
... we request your special attention regarding items marked with the monitor, damage the stored data, or affect the product's internal circuitry and cause camera misoperation. • The liquid crystal panel used in the vicinity of equipment that the illustrations and the display screen in this manual are ..., both an SD Memory Card and an SDHC Memory Card are referred to as radio transmitters could interfere with the following symbols. USING YOUR CAMERA SAFELY We have paid close attention to either a Windows PC or a Macintosh hereafter. Caution This symbol indicates that 0.01% or fewer of...
... we request your special attention regarding items marked with the monitor, damage the stored data, or affect the product's internal circuitry and cause camera misoperation. • The liquid crystal panel used in the vicinity of equipment that the illustrations and the display screen in this manual are ..., both an SD Memory Card and an SDHC Memory Card are referred to as radio transmitters could interfere with the following symbols. USING YOUR CAMERA SAFELY We have paid close attention to either a Windows PC or a Macintosh hereafter. Caution This symbol indicates that 0.01% or fewer of...

User Manual
Page 4
..., remove the battery and contact your neck is accidentally swallowed. • Wrapping the strap of the camera may cause fire or electric shocks. • If the camera emits smoke or a strange smell, or in the event of any circumstances touch such exposed portions, as there is of the power... and voltage specified for use of the camera around your nearest PENTAX Service Center. About the Camera Warning • Do not attempt to take care that small children do not under any other than that is a ...
..., remove the battery and contact your neck is accidentally swallowed. • Wrapping the strap of the camera may cause fire or electric shocks. • If the camera emits smoke or a strange smell, or in the event of any circumstances touch such exposed portions, as there is of the power... and voltage specified for use of the camera around your nearest PENTAX Service Center. About the Camera Warning • Do not attempt to take care that small children do not under any other than that is a ...

User Manual
Page 5
... to the skin. DO NOT CRUSH OR MODIFY. • Remove the battery from the camera immediately if it becomes hot or begins to burn yourself during removal. • Some portions of the camera heat up during use of any leakage from the battery should come in your mouth. &#... or physical condition, the use , so please take care, as there is a risk of discoloring. • If any abnormality, stop using the camera and get medical attention immediately. 3 Wash the affected areas thoroughly with water. • Precautions for long periods of sight. DO NOT CHARGE EXCEPT SPECIFIED...
... to the skin. DO NOT CRUSH OR MODIFY. • Remove the battery from the camera immediately if it becomes hot or begins to burn yourself during removal. • Some portions of the camera heat up during use of any leakage from the battery should come in your mouth. &#... or physical condition, the use , so please take care, as there is a risk of discoloring. • If any abnormality, stop using the camera and get medical attention immediately. 3 Wash the affected areas thoroughly with water. • Precautions for long periods of sight. DO NOT CHARGE EXCEPT SPECIFIED...
User Manual
Page 7
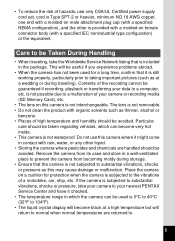
...that is included in which can be used for protection when the camera is subjected to the vibrations of a motorbike, car, ship, etc. Care to be Taken During Handling • When traveling, take your camera to your nearest PENTAX Service Center and have it checked. • The temperature range... in the package. Remove the camera from its case and store in contact with rain, water, or any other is provided with...
...that is included in which can be used for protection when the camera is subjected to the vibrations of a motorbike, car, ship, etc. Care to be Taken During Handling • When traveling, take your camera to your nearest PENTAX Service Center and have it checked. • The temperature range... in the package. Remove the camera from its case and store in contact with rain, water, or any other is provided with...
User Manual
Page 8
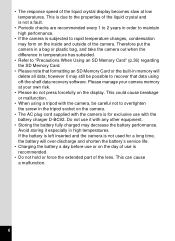
...to "Precautions When Using an SD Memory Card" (p.36) regarding the SD Memory Card. • Please note that data using a tripod with the camera, be possible to rapid temperature changes, condensation may decrease the battery performance. Do not use is for a long time, the battery will delete all data...; Therefore put the camera in a bag or plastic bag, and take the camera out when the difference in temperature has subsided. • Refer to overtighten the screw in the tripod socket on the ...
...to "Precautions When Using an SD Memory Card" (p.36) regarding the SD Memory Card. • Please note that data using a tripod with the camera, be possible to rapid temperature changes, condensation may decrease the battery performance. Do not use is for a long time, the battery will delete all data...; Therefore put the camera in a bag or plastic bag, and take the camera out when the difference in temperature has subsided. • Refer to overtighten the screw in the tripod socket on the ...

User Manual
Page 9
... 17 Names of Parts 18 Names of Operating Parts 19 Monitor Indications 20 Getting Started 27 Attaching the Lens Cap and Strap 28 Powering the Camera 29 Charging the Battery 29 Installing the Battery 30 Using the AC Adapter 33 Installing the SD Memory Card 34 Number of Images Recordable on... an SD Memory Card 37 Turning the Camera On and Off 38 Starting-up in the Playback Mode 39 Initial Settings 40 Setting the Display Language 40 Setting the Date and Time 44...
... 17 Names of Parts 18 Names of Operating Parts 19 Monitor Indications 20 Getting Started 27 Attaching the Lens Cap and Strap 28 Powering the Camera 29 Charging the Battery 29 Installing the Battery 30 Using the AC Adapter 33 Installing the SD Memory Card 34 Number of Images Recordable on... an SD Memory Card 37 Turning the Camera On and Off 38 Starting-up in the Playback Mode 39 Initial Settings 40 Setting the Display Language 40 Setting the Date and Time 44...
User Manual
Page 10
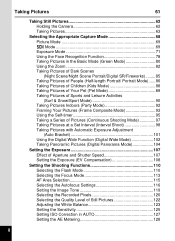
...Camera 62 Taking Pictures 63 Selecting the Appropriate Capture Mode 68 Picture Mode 69 H Mode 69 Exposure Mode 71 Using the Face Recognition Function 78 Taking Pictures in the Basic Mode (Green Mode 80 Using the Zoom 82 Taking Pictures of Dark Scenes (Night Scene/Night Scene Portrait/Digital... Interval (Interval Shoot 98 Taking Pictures with Automatic Exposure Adjustment (Auto Bracket 101 Using the Digital Wide Function (Digital Wide Mode 102 Taking Panoramic Pictures (Digital Panorama Mode 104 Setting the Exposure 107 Effect of Aperture and Shutter Speed 107 Setting the Exposure...
...Camera 62 Taking Pictures 63 Selecting the Appropriate Capture Mode 68 Picture Mode 69 H Mode 69 Exposure Mode 71 Using the Face Recognition Function 78 Taking Pictures in the Basic Mode (Green Mode 80 Using the Zoom 82 Taking Pictures of Dark Scenes (Night Scene/Night Scene Portrait/Digital... Interval (Interval Shoot 98 Taking Pictures with Automatic Exposure Adjustment (Auto Bracket 101 Using the Digital Wide Function (Digital Wide Mode 102 Taking Panoramic Pictures (Digital Panorama Mode 104 Setting the Exposure 107 Effect of Aperture and Shutter Speed 107 Setting the Exposure...
User Manual
Page 11
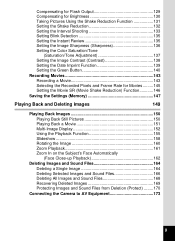
... Sound Files 166 Deleting All Images and Sound Files 168 Recovering Deleted Images 169 Protecting Images and Sound Files from Deletion (Protect) ........170 Connecting the Camera to AV Equipment 173 9
... Sound Files 166 Deleting All Images and Sound Files 168 Recovering Deleted Images 169 Protecting Images and Sound Files from Deletion (Protect) ........170 Connecting the Camera to AV Equipment 173 9
User Manual
Page 12
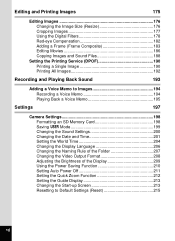
Editing and Printing Images 175 Editing Images 176 Changing the Image Size (Resize 176 Cropping Images 177 Using the Digital Filters 178 Red-eye Compensation 182 Adding a Frame (Frame Composite 183 Editing Movies 186 Copying Images and Sound Files 188 Setting the Printing Service...192 Recording and Playing Back Sound 193 Adding a Voice Memo to Images 194 Recording a Voice Memo 194 Playing Back a Voice Memo 195 Settings 197 Camera Settings 198 Formatting an SD Memory Card 198 Saving A Mode 199 Changing the Sound Settings 200 Changing the Date and Time 201 Setting the World...
Editing and Printing Images 175 Editing Images 176 Changing the Image Size (Resize 176 Cropping Images 177 Using the Digital Filters 178 Red-eye Compensation 182 Adding a Frame (Frame Composite 183 Editing Movies 186 Copying Images and Sound Files 188 Setting the Printing Service...192 Recording and Playing Back Sound 193 Adding a Voice Memo to Images 194 Recording a Voice Memo 194 Playing Back a Voice Memo 195 Settings 197 Camera Settings 198 Formatting an SD Memory Card 198 Saving A Mode 199 Changing the Sound Settings 200 Changing the Date and Time 201 Setting the World...

User Manual
Page 13
... a Windows PC 226 Transferring Images 227 Disconnecting the Camera from Your Windows PC 230 Starting "ACDSee for PENTAX 3.0 231 Viewing Images 232 Details on How to Use "ACDSee for PENTAX 3.0 233 Connecting to a Macintosh 234 Connecting the Camera and a Macintosh 234 Transferring Images 235 Disconnecting the Camera from Your Macintosh 235 Starting "ACDSee 2 for Mac...
... a Windows PC 226 Transferring Images 227 Disconnecting the Camera from Your Windows PC 230 Starting "ACDSee for PENTAX 3.0 231 Viewing Images 232 Details on How to Use "ACDSee for PENTAX 3.0 233 Connecting to a Macintosh 234 Connecting the Camera and a Macintosh 234 Transferring Images 235 Disconnecting the Camera from Your Macintosh 235 Starting "ACDSee 2 for Mac...
User Manual
Page 14
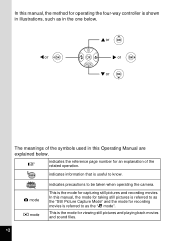
... still pictures is referred to as the "Still Picture Capture Mode" and the mode for recording movies is useful to be taken when operating the camera.
... still pictures is referred to as the "Still Picture Capture Mode" and the mode for recording movies is useful to be taken when operating the camera.

User Manual
Page 15
..., and how to play back sound files. 8 7 Settings This chapter explains how to set the camera-related functions. 8 Connecting to a Computer 9 This chapter explains how to connect the camera to a computer, and includes installation instructions and a general overview of the Operating Manual This Operating Manual... Back and Deleting Images This chapter explains how to view still pictures and movies on the camera 5 or on TV and how to delete images, sound files, and movies from the camera. 5 Editing and Printing Images 6 This chapter explains the various ways of printing still pictures...
..., and how to play back sound files. 8 7 Settings This chapter explains how to set the camera-related functions. 8 Connecting to a Computer 9 This chapter explains how to connect the camera to a computer, and includes installation instructions and a general overview of the Operating Manual This Operating Manual... Back and Deleting Images This chapter explains how to view still pictures and movies on the camera 5 or on TV and how to delete images, sound files, and movies from the camera. 5 Editing and Printing Images 6 This chapter explains the various ways of printing still pictures...
User Manual
Page 16
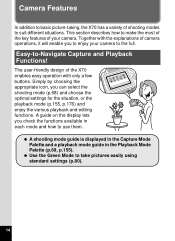
... addition to basic picture-taking, the X70 has a variety of the X70 enables easy operation with the explanations of your camera to take pictures easily using standard settings (p.80). 14 Easy-to use them. Simply by choosing the appropriate icon, you to enjoy your camera. A guide on the display lets ...guide in each mode and how to -Navigate Capture and Playback Functions! This section describes how to make the most of the key features of camera operations, it will enable you can select the shooting mode (p.68) and choose the optimal settings for the situation, or the playback mode ...
... addition to basic picture-taking, the X70 has a variety of the X70 enables easy operation with the explanations of your camera to take pictures easily using standard settings (p.80). 14 Easy-to use them. Simply by choosing the appropriate icon, you to enjoy your camera. A guide on the display lets ...guide in each mode and how to -Navigate Capture and Playback Functions! This section describes how to make the most of the key features of camera operations, it will enable you can select the shooting mode (p.68) and choose the optimal settings for the situation, or the playback mode ...
User Manual
Page 18
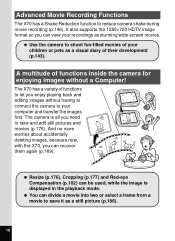
... and editing images without a Computer! A multitude of functions inside the camera for enjoying images without having to connect the camera to your children or pets as a visual diary of their development (p.143). The X70 has a variety of your computer and transfer the images first. You ... no more worries about accidentally deleting images, because now, with the X70, you need to save it as stunning wide-screen movies. The camera is displayed in the playback mode. Advanced Movie Recording Functions The X70 has a Shake Reduction function to let you can view your recordings ...
... and editing images without a Computer! A multitude of functions inside the camera for enjoying images without having to connect the camera to your children or pets as a visual diary of their development (p.143). The X70 has a variety of your computer and transfer the images first. You ... no more worries about accidentally deleting images, because now, with the X70, you need to save it as stunning wide-screen movies. The camera is displayed in the playback mode. Advanced Movie Recording Functions The X70 has a Shake Reduction function to let you can view your recordings ...
User Manual
Page 19
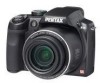
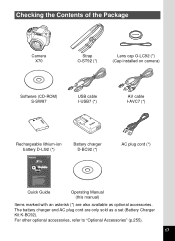
For other optional accessories, refer to "Optional Accessories" (p.255). 17 Checking the Contents of the Package Camera X70 Strap O-ST92 (*) Lens cap O-LC92 (*) (Cap installed on camera) Software (CD-ROM) S-SW87 USB cable I-USB7 (*) AV cable I-AVC7 (*) Rechargeable lithium-ion battery D-LI92 (*) Battery charger D-BC92 (*) AC plug cord (*) Quick Guide Operating Manual (this manual) Items marked with an asterisk (*) are only sold as optional accessories. The battery charger and AC plug cord are also available as a set (Battery Charger Kit K-BC92).
For other optional accessories, refer to "Optional Accessories" (p.255). 17 Checking the Contents of the Package Camera X70 Strap O-ST92 (*) Lens cap O-LC92 (*) (Cap installed on camera) Software (CD-ROM) S-SW87 USB cable I-USB7 (*) AV cable I-AVC7 (*) Rechargeable lithium-ion battery D-LI92 (*) Battery charger D-BC92 (*) AC plug cord (*) Quick Guide Operating Manual (this manual) Items marked with an asterisk (*) are only sold as optional accessories. The battery charger and AC plug cord are also available as a set (Battery Charger Kit K-BC92).

User Manual
Page 29
1 Getting Started Attaching the Lens Cap and Strap .......... 28 Powering the Camera 29 Installing the SD Memory Card 34 Turning the Camera On and Off 38 Initial Settings 40
1 Getting Started Attaching the Lens Cap and Strap .......... 28 Powering the Camera 29 Installing the SD Memory Card 34 Turning the Camera On and Off 38 Initial Settings 40

User Manual
Page 30
Getting Started Attaching the Lens Cap and Strap Attach the lens cap (O-LC92) and strap (O-ST92) supplied with the camera. 1 1 Attach the string provided to the lens cap. 2 Pass the end of the strap through the strap lug, then secure it on the inside of the clasp. As shown in the bottom-left illustration, passing the strap through the other end of the strap through the lens cap's string prevents the lens cap from being lost. Pass the other strap lug on the camera, then secure it on the inside of the clasp (bottom-right illustration). 28
Getting Started Attaching the Lens Cap and Strap Attach the lens cap (O-LC92) and strap (O-ST92) supplied with the camera. 1 1 Attach the string provided to the lens cap. 2 Pass the end of the strap through the strap lug, then secure it on the inside of the clasp. As shown in the bottom-left illustration, passing the strap through the other end of the strap through the lens cap's string prevents the lens cap from being lost. Pass the other strap lug on the camera, then secure it on the inside of the clasp (bottom-right illustration). 28
User Manual
Page 31
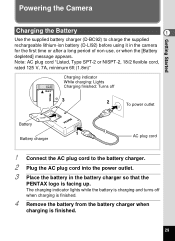
...Use the supplied battery charger (D-BC92) to the battery charger. 2 Plug the AC plug cord into the power outlet. 3 Place the battery in the camera for the first time or after a long period of non-use, or when the [Battery depleted] message appears. The charging indicator lights while the battery... cord 1 Connect the AC plug cord to charge the supplied rechargeable lithium-ion battery (D-LI92) before using it in the battery charger so that the PENTAX logo is finished. 29 Note: AC plug cord "Listed, Type SPT-2 or NISPT-2, 18/2 flexible cord, rated 125 V, 7A, minimum 6ft (1.8m)" ...
...Use the supplied battery charger (D-BC92) to the battery charger. 2 Plug the AC plug cord into the power outlet. 3 Place the battery in the camera for the first time or after a long period of non-use, or when the [Battery depleted] message appears. The charging indicator lights while the battery... cord 1 Connect the AC plug cord to charge the supplied rechargeable lithium-ion battery (D-LI92) before using it in the battery charger so that the PENTAX logo is finished. 29 Note: AC plug cord "Listed, Type SPT-2 or NISPT-2, 18/2 flexible cord, rated 125 V, 7A, minimum 6ft (1.8m)" ...


