
User Manual
Page 2
... erased or that the illustrations and the display screen of the LCD monitor in this manual safe, as installations generating strong electromagnetic radiation or magnetic fields. • The liquid crystal panel used in the LCD display is a possibility that the camera may not function correctly when used in surroundings such as it can print images directly from the actual product. Regarding trademarks • PENTAX and smc PENTAX...
... erased or that the illustrations and the display screen of the LCD monitor in this manual safe, as installations generating strong electromagnetic radiation or magnetic fields. • The liquid crystal panel used in the LCD display is a possibility that the camera may not function correctly when used in surroundings such as it can print images directly from the actual product. Regarding trademarks • PENTAX and smc PENTAX...
User Manual
Page 7
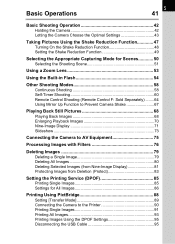
...Modes 58 Continuous Shooting 58 Self-Timer Shooting 60 Remote Control Shooting (Remote Control F: Sold Separately) ........64 Using Mirror Up Function to Prevent Camera Shake 67 Playing Back Still Pictures 68 Playing Back Images 68 Enlarging Playback Images 70 Nine-Image Display 71 Slideshow 73 Connecting the Camera to AV Equipment 75 Processing Images with Filters 76 Deleting Images 79 Deleting a Single Image 79 Deleting All Images 80 Deleting Selected Images (from Nine-Image Display 81 Protecting Images from Deletion (Protect 83 Setting the Printing Service (DPOF 85 Printing...
...Modes 58 Continuous Shooting 58 Self-Timer Shooting 60 Remote Control Shooting (Remote Control F: Sold Separately) ........64 Using Mirror Up Function to Prevent Camera Shake 67 Playing Back Still Pictures 68 Playing Back Images 68 Enlarging Playback Images 70 Nine-Image Display 71 Slideshow 73 Connecting the Camera to AV Equipment 75 Processing Images with Filters 76 Deleting Images 79 Deleting a Single Image 79 Deleting All Images 80 Deleting Selected Images (from Nine-Image Display 81 Protecting Images from Deletion (Protect 83 Setting the Printing Service (DPOF 85 Printing...

User Manual
Page 23
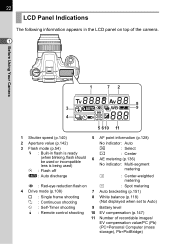
... and recorded pixel setting. Show the number of recordable images is available or in the viewfinder. (p.126) Adjusted value appears where number of continuous shooting recordable images. (p.106) EV compensation value appears when EV compensation is set to [Confirm Sensitivity] in the [A Custom Setting] menu, press the 4 button to display the sensitivity in use. Blinks slowly when compensating flash output. 1 Blinks quickly when compensating exposure and flash output. 21 10 Aperture value (p.142) Aperture value...
... and recorded pixel setting. Show the number of recordable images is available or in the viewfinder. (p.126) Adjusted value appears where number of continuous shooting recordable images. (p.106) EV compensation value appears when EV compensation is set to [Confirm Sensitivity] in the [A Custom Setting] menu, press the 4 button to display the sensitivity in use. Blinks slowly when compensating flash output. 1 Blinks quickly when compensating exposure and flash output. 21 10 Aperture value (p.142) Aperture value...
User Manual
Page 24
...: Built-in flash is ready M : Center (when blinking, flash should be used or incompatible lens is being used) 6 AE metering (p.136) No indicator: Multi-segment a : Flash off metering E : Auto discharge M : Center-weighted metering > : Red-eye reduction flash on N : Spot metering 4 Drive mode (p.108) 7 Auto bracketing (p.151) 9 : Single frame shooting 8 White balance (p.118) j : Continuous shooting (Not displayed when set to Auto) g : Self-Timer shooting 9 Battery level h : Remote control shooting 10 EV compensation (p.147) 11 Number of recordable images/ EV compensation...
...: Built-in flash is ready M : Center (when blinking, flash should be used or incompatible lens is being used) 6 AE metering (p.136) No indicator: Multi-segment a : Flash off metering E : Auto discharge M : Center-weighted metering > : Red-eye reduction flash on N : Spot metering 4 Drive mode (p.108) 7 Auto bracketing (p.151) 9 : Single frame shooting 8 White balance (p.118) j : Continuous shooting (Not displayed when set to Auto) g : Self-Timer shooting 9 Battery level h : Remote control shooting 10 EV compensation (p.147) 11 Number of recordable images/ EV compensation...
User Manual
Page 32
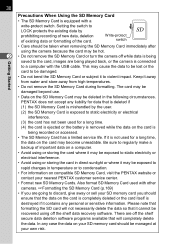
... necessarily delete the data so that it is equipped with a write-protect switch. Write-protect switch • Care should ensure that is deleted if (1) the SD Memory Card is being saved to condensation. • For information on compatible SD Memory Card, visit the PENTAX website or contact your nearest PENTAX customer service center. • Format new SD Memory Cards. Be sure to regularly make a backup of the card. Also format SD Memory Card used with the USB cable. Keep...
... necessarily delete the data so that it is equipped with a write-protect switch. Write-protect switch • Care should ensure that is deleted if (1) the SD Memory Card is being saved to condensation. • For information on compatible SD Memory Card, visit the PENTAX website or contact your nearest PENTAX customer service center. • Format new SD Memory Cards. Be sure to regularly make a backup of the card. Also format SD Memory Card used with the USB cable. Keep...
User Manual
Page 34
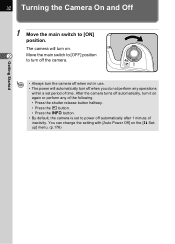
... Started • Always turn the camera off when not in use. • The power will turn on the [H Setup] menu. (p.176) You can change the setting with [Auto Power Off] on . The camera will automatically turn it on again or perform any operations within a set to power off automatically after 1 minute of time. After the camera turns off the camera. Move the main switch to [OFF] position to [ON] position. 32 Turning the Camera...
... Started • Always turn the camera off when not in use. • The power will turn on the [H Setup] menu. (p.176) You can change the setting with [Auto Power Off] on . The camera will automatically turn it on again or perform any operations within a set to power off automatically after 1 minute of time. After the camera turns off the camera. Move the main switch to [OFF] position to [ON] position. 32 Turning the Camera...
User Manual
Page 49
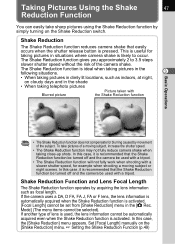
... take sharp pictures using the Shake Reduction function by simply turning on the [Shake Reduction] menu. 1 Setting the Shake Reduction Function (p.49) In this case, it is likely to 3.5 steps slower shutter speed without the risk of the camera shake. If another type of lens is used, the lens information cannot be used with a tripod. • The Shake Reduction function will not fully work when shooting with a slower shutter speed...
... take sharp pictures using the Shake Reduction function by simply turning on the [Shake Reduction] menu. 1 Setting the Shake Reduction Function (p.49) In this case, it is likely to 3.5 steps slower shutter speed without the risk of the camera shake. If another type of lens is used, the lens information cannot be used with a tripod. • The Shake Reduction function will not fully work when shooting with a slower shutter speed...
User Manual
Page 65
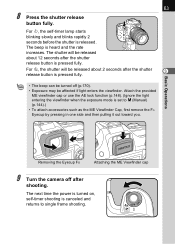
... Viewfinder cap 9 Turn the camera off (p.170). • Exposure may be released about 12 seconds after shooting. The shutter will be affected if light enters the viewfinder. The next time the power is turned on, self-timer shooting is set to single frame shooting. Attach the provided ME viewfinder cap or use the AE lock function (p.148). (Ignore the light entering the viewfinder when the exposure mode is canceled and...
... Viewfinder cap 9 Turn the camera off (p.170). • Exposure may be released about 12 seconds after shooting. The shutter will be affected if light enters the viewfinder. The next time the power is turned on, self-timer shooting is set to single frame shooting. Attach the provided ME viewfinder cap or use the AE lock function (p.148). (Ignore the light entering the viewfinder when the exposure mode is canceled and...
User Manual
Page 68
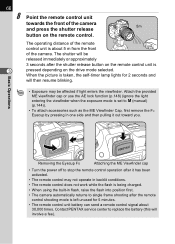
... blinking. The shutter will involve a fee). Removing the Eyecup FO Attaching the ME Viewfinder cap • Turn the power off to stop the remote control operation after it out toward you. Attach the provided ME viewfinder cap or use the AE lock function (p.148) (ignore the light entering the viewfinder when the exposure mode is about 30,000 times. The operating distance of the remote control unit is set...
... blinking. The shutter will involve a fee). Removing the Eyecup FO Attaching the ME Viewfinder cap • Turn the power off to stop the remote control operation after it out toward you. Attach the provided ME viewfinder cap or use the AE lock function (p.148) (ignore the light entering the viewfinder when the exposure mode is about 30,000 times. The operating distance of the remote control unit is set...

User Manual
Page 71
Basic Operations Rotating Images 3 You can rotate images 90° counterclockwise at a time. Make images shot vertically easier to view. 100-0001 100-0001 100-0001 OK OK OK OK 1 Press the Q button after taking a picture. The most recently captured image (image with the largest file number) is pressed. p : The next image appears. The image is rotated 90° counterclockwise each time the button is displayed on the LCD monitor. 2 Press the four-way controller (n). o : The previous image appears. 69 2 Press the four-way controller (op).
Basic Operations Rotating Images 3 You can rotate images 90° counterclockwise at a time. Make images shot vertically easier to view. 100-0001 100-0001 100-0001 OK OK OK OK 1 Press the Q button after taking a picture. The most recently captured image (image with the largest file number) is pressed. p : The next image appears. The image is rotated 90° counterclockwise each time the button is displayed on the LCD monitor. 2 Press the four-way controller (n). o : The previous image appears. 69 2 Press the four-way controller (op).
User Manual
Page 90
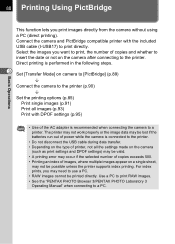
... need to a PC. Select the images you print images directly from the camera without using a PC (direct printing). Connect the camera and PictBridge compatible printer with DPOF settings (p.95) • Use of the AC adapter is connected to the printer. • Do not disconnect the USB cable during data transfer. • Depending on the type of printer, not all images (p.93) Print with the included USB cable (I-USB17) to print directly. Use a PC to print RAW images. • See the "PENTAX PHOTO Browser 3/PENTAX PHOTO Laboratory 3 Operating Manual...
... need to a PC. Select the images you print images directly from the camera without using a PC (direct printing). Connect the camera and PictBridge compatible printer with DPOF settings (p.95) • Use of the AC adapter is connected to the printer. • Do not disconnect the USB cable during data transfer. • Depending on the type of printer, not all images (p.93) Print with the included USB cable (I-USB17) to print directly. Use a PC to print RAW images. • See the "PENTAX PHOTO Browser 3/PENTAX PHOTO Laboratory 3 Operating Manual...
User Manual
Page 107
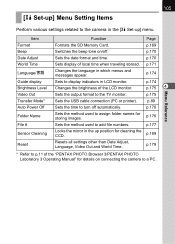
... 4 Video Out Sets the output format to display indicators in LCD monitor. p.175 Transfer Mode* Sets the USB cable connection (PC or printer). p.176 Folder Name Sets the method used to add file numbers. p.189 Reset Resets all settings other than Date Adjust, Language, Video Out and World Time. p.177 Sensor Cleaning Locks the mirror in which menus and messages appear. p.169 Beep Switches the beep tone on connecting the camera to assign folder names for details on /off automatically. p.171 Language/ Changes the language...
... 4 Video Out Sets the output format to display indicators in LCD monitor. p.175 Transfer Mode* Sets the USB cable connection (PC or printer). p.176 Folder Name Sets the method used to add file numbers. p.189 Reset Resets all settings other than Date Adjust, Language, Video Out and World Time. p.177 Sensor Cleaning Locks the mirror in which menus and messages appear. p.169 Beep Switches the beep tone on connecting the camera to assign folder names for details on /off automatically. p.171 Language/ Changes the language...
User Manual
Page 118
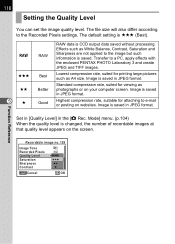
... format. 116 Setting the Quality Level You can set the image quality level. Mode] menu. (p.104) When the quality level is saved in JPEG format. Transfer to the Recorded Pixels settings. Image is changed, the number of recordable images at that quality level appears on your computer screen. Image is CCD output data saved without processing. Function Reference Recordable image no. 128 Image Tone Recorded Pixels Quality Level Saturation Sharpness Contrast Cancel OK OK The file size...
... format. 116 Setting the Quality Level You can set the image quality level. Mode] menu. (p.104) When the quality level is saved in JPEG format. Transfer to the Recorded Pixels settings. Image is changed, the number of recordable images at that quality level appears on your computer screen. Image is CCD output data saved without processing. Function Reference Recordable image no. 128 Image Tone Recorded Pixels Quality Level Saturation Sharpness Contrast Cancel OK OK The file size...
User Manual
Page 153
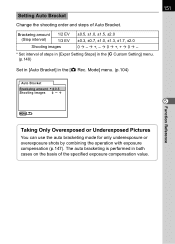
... basis of steps in [Expsr Setting Steps] in the [A Custom Setting] menu. (p.148) Set in [Auto Bracket] in the [A Rec. Mode] menu. (p.104) Auto Bracket Bracketng amount Shooting images 0.5 0 5 Function Reference Taking Only Overexposed or Underexposed Pictures You can use the auto bracketing mode for only underexposure or overexposure shots by combining the operation with exposure compensation (p.147). Bracketng amount (Step interval) 1/2 EV 1/3 EV Shooting images ±0.5, ±1.0, ±1.5, ±2.0 ±...
... basis of steps in [Expsr Setting Steps] in the [A Custom Setting] menu. (p.148) Set in [Auto Bracket] in the [A Rec. Mode] menu. (p.104) Auto Bracket Bracketng amount Shooting images 0.5 0 5 Function Reference Taking Only Overexposed or Underexposed Pictures You can use the auto bracketing mode for only underexposure or overexposure shots by combining the operation with exposure compensation (p.147). Bracketng amount (Step interval) 1/2 EV 1/3 EV Shooting images ±0.5, ±1.0, ±1.5, ±2.0 ±...
User Manual
Page 158
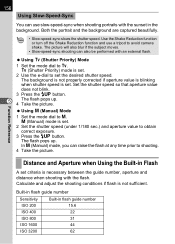
...) mode is set. 2 Use the e-dial to a. Using a (Manual) Mode 1 Set the mode dial to set the desired shutter speed. a (Manual) mode is set. 2 Set the shutter speed (under 1/180 sec.) and aperture value to shooting. 4 Take the picture. In a (Manual) mode, you can raise the flash at any time prior to obtain correct exposure. 3 Press the K button. Calculate and adjust the shooting conditions if flash is set. Function Reference Distance and Aperture when Using the Built-in the background. The flash pops up . 4 Take the picture. Use...
...) mode is set. 2 Use the e-dial to a. Using a (Manual) Mode 1 Set the mode dial to set the desired shutter speed. a (Manual) mode is set. 2 Set the shutter speed (under 1/180 sec.) and aperture value to shooting. 4 Take the picture. In a (Manual) mode, you can raise the flash at any time prior to obtain correct exposure. 3 Press the K button. Calculate and adjust the shooting conditions if flash is set. Function Reference Distance and Aperture when Using the Built-in the background. The flash pops up . 4 Take the picture. Use...

User Manual
Page 185
...) Same as Hometown Yes No Destination (DST) Same as Hometown Yes No Language/ Guide display According to default setting Yes O (On) Yes No p.174 Yes p.174 Brightness Level Video Out 0 Yes According to default setting Yes Yes p.175 No p.175 Transfer Mode Auto Power Off PC 1min Yes Yes p.89 Yes Yes p.176 Folder Name Std. O (On) - - Appendix [H Set-up] Menu Item Default Setting Last Memory Setting Reset Setting Page Format Beep -
...) Same as Hometown Yes No Destination (DST) Same as Hometown Yes No Language/ Guide display According to default setting Yes O (On) Yes No p.174 Yes p.174 Brightness Level Video Out 0 Yes According to default setting Yes Yes p.175 No p.175 Transfer Mode Auto Power Off PC 1min Yes Yes p.89 Yes Yes p.176 Folder Name Std. O (On) - - Appendix [H Set-up] Menu Item Default Setting Last Memory Setting Reset Setting Page Format Beep -
User Manual
Page 198
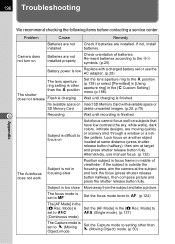
... [Using aperture ring] in middle of batteries. 196 Troubleshooting Appendix We recommend checking the following items before contacting a service center. Camera does not turn on SD Memory Card Set the lens aperture ring to k (Continuous mode) Set the [AF Mode] in the [A Rec. Alternatively, use the AC adapter. (p.28) The lens aperture ring setting is other than the s position The shutter does not release Flash is charging No available space on Batteries are moving quickly Subject...
... [Using aperture ring] in middle of batteries. 196 Troubleshooting Appendix We recommend checking the following items before contacting a service center. Camera does not turn on SD Memory Card Set the lens aperture ring to k (Continuous mode) Set the [AF Mode] in the [A Rec. Alternatively, use the AC adapter. (p.28) The lens aperture ring setting is other than the s position The shutter does not release Flash is charging No available space on Batteries are moving quickly Subject...
User Manual
Page 199
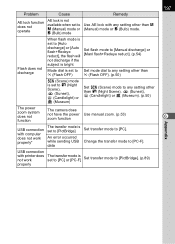
...) mode. Change the transfer mode to [PC-F]. Problem Cause Remedy AE lock function does not operate AE lock is not available when set to a (Manual) mode or p (Bulb) mode Use AE lock with any setting other than A (Night Scene), K (Sunset), D (Candlelight) or E (Museum). (p.50) The power zoom system does not function The camera does not have the power Use manual zoom. (p.53) zoom function USB connection with printer does not work properly* The transfer mode is set to [PictBridge] An error occurred while sending USB data Set transfer mode...
...) mode. Change the transfer mode to [PC-F]. Problem Cause Remedy AE lock function does not operate AE lock is not available when set to a (Manual) mode or p (Bulb) mode Use AE lock with any setting other than A (Night Scene), K (Sunset), D (Candlelight) or E (Museum). (p.50) The power zoom system does not function The camera does not have the power Use manual zoom. (p.53) zoom function USB connection with printer does not work properly* The transfer mode is set to [PictBridge] An error occurred while sending USB data Set transfer mode...

User Manual
Page 202
... appears when the USB cable is being used, Shutter speed, Viewfinder Indication Confirm Sensitivity, Aperture value, e-dial enabled indicator, @=AE lock, Capacity remaining, m=Exposure compensation, k=Continuous mode, Picture mode icon, Scene mode icon, \=Manual focus, o=ISO warning, Shake Reduction display LCD Panel Display b is lit=Built-in all exposure modes) Self-timer Electronically controlled with delay time of view: 96%, Magnification 0.85× (with 50 mm f/1.4 lens at ISO 100 with f/1.4 lens), Focus lock available, Focus Mode: l (Single)/k (Continuous)/\, Adjustable AF point...
... appears when the USB cable is being used, Shutter speed, Viewfinder Indication Confirm Sensitivity, Aperture value, e-dial enabled indicator, @=AE lock, Capacity remaining, m=Exposure compensation, k=Continuous mode, Picture mode icon, Scene mode icon, \=Manual focus, o=ISO warning, Shake Reduction display LCD Panel Display b is lit=Built-in all exposure modes) Self-timer Electronically controlled with delay time of view: 96%, Magnification 0.85× (with 50 mm f/1.4 lens at ISO 100 with f/1.4 lens), Focus lock available, Focus Mode: l (Single)/k (Continuous)/\, Adjustable AF point...
User Manual
Page 211
Mode] Menu ...104, 182 Recorded Pixels 31, 115 Red-eye reduction ..........57, 164 Remaining image storage capacity 27 Remote Control 64 Reset 179, 180 Rotate 69 S Saturation 117 H (Scene 50 SD Memory Card 29 Select&Delete 81 Self-Timer 60 Sensitivity 121 Sepia (Digital Filter 76 [H Set-up] Menu ..........105, 183 Shade (White Balance) ........118 Shake Reduction 47 Sharpness 117 Shutter Priority Mode b ......140 Shutter release button 45, 98, 100 Shutter speed 134 Single mode l 127 Slideshow...
Mode] Menu ...104, 182 Recorded Pixels 31, 115 Red-eye reduction ..........57, 164 Remaining image storage capacity 27 Remote Control 64 Reset 179, 180 Rotate 69 S Saturation 117 H (Scene 50 SD Memory Card 29 Select&Delete 81 Self-Timer 60 Sensitivity 121 Sepia (Digital Filter 76 [H Set-up] Menu ..........105, 183 Shade (White Balance) ........118 Shake Reduction 47 Sharpness 117 Shutter Priority Mode b ......140 Shutter release button 45, 98, 100 Shutter speed 134 Single mode l 127 Slideshow...


