
Operation Manual
Page 1
Digital Camera Operating Manual To ensure the best performance from your camera, please read the Operating Manual before using the camera.
Digital Camera Operating Manual To ensure the best performance from your camera, please read the Operating Manual before using the camera.

Operation Manual
Page 2
...169; 2001 Seiko Epson Corporation. Although the level of functioning pixels is 99.99% or better, you for buying the PENTAX Optio 33WR Digital Camera. PRINT Image Matching is a possibility that the illustrations and the display screen of the LCD monitor in combination, PRINT Image Matching II... even for display. Regarding trademarks • SD logo is a trademark. • PENTAX is a trademark of PENTAX Corporation. • Optio is a possibility that recorded data may be erased or that the camera may illuminate when they should be used outside the scope of use of the copyright ...
...169; 2001 Seiko Epson Corporation. Although the level of functioning pixels is 99.99% or better, you for buying the PENTAX Optio 33WR Digital Camera. PRINT Image Matching is a possibility that the illustrations and the display screen of the LCD monitor in combination, PRINT Image Matching II... even for display. Regarding trademarks • SD logo is a trademark. • PENTAX is a trademark of PENTAX Corporation. • Optio is a possibility that recorded data may be erased or that the camera may illuminate when they should be used outside the scope of use of the copyright ...

Operation Manual
Page 8
Editing/Settings 85 Editing Images 85 Changing the Image Size 85 Trimming Images 87 Editing Images with Digital Filters 88 Camera Settings 90 Formatting an SD Memory Card / MultiMediaCard 90 Changing the Sound Settings 91 Changing the Date Style and Date / Time 92 Setting World Time ...
Editing/Settings 85 Editing Images 85 Changing the Image Size 85 Trimming Images 87 Editing Images with Digital Filters 88 Camera Settings 90 Formatting an SD Memory Card / MultiMediaCard 90 Changing the Sound Settings 91 Changing the Date Style and Date / Time 92 Setting World Time ...
Operation Manual
Page 10
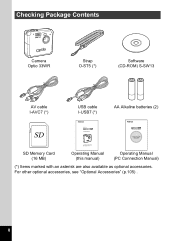
Checking Package Contents Camera Optio 33WR Strap O-ST5 (*) Software (CD-ROM) S-SW13 AV cable I-AVC7 (*) USB cable I-USB7 (*) AA Alkaline batteries (2) (PC Connection Manual) Viewing Your Digital Camera Images On Your PC SD Memory Card (16 MB) Operating Manual (this manual) Operating Manual (PC Connection Manual) (*) Items marked with an asterisk are also available as optional accessories. For other optional accessories, see "Optional Accessories" (p.105) . 8
Checking Package Contents Camera Optio 33WR Strap O-ST5 (*) Software (CD-ROM) S-SW13 AV cable I-AVC7 (*) USB cable I-USB7 (*) AA Alkaline batteries (2) (PC Connection Manual) Viewing Your Digital Camera Images On Your PC SD Memory Card (16 MB) Operating Manual (this manual) Operating Manual (PC Connection Manual) (*) Items marked with an asterisk are also available as optional accessories. For other optional accessories, see "Optional Accessories" (p.105) . 8

Operation Manual
Page 12
The buttons are indicated as shown below. Four-way controller (2) 2 Zoom/f/y button Four-way controller (3) 3 (Digital zoom and magnified y Four-way controller (4) 4 playback only) Four-way controller (5) 5 i button MENU button Z button Shutter release button OK button 10 Names of Operating Parts AF status lamp (green) Flash status lamp (red) Zoom/f/y button Playback Q button OK button Four-way controller MENU button )/i button b/Z button O button Guide display A button operation guide is displayed on the LCD monitor during operation.
The buttons are indicated as shown below. Four-way controller (2) 2 Zoom/f/y button Four-way controller (3) 3 (Digital zoom and magnified y Four-way controller (4) 4 playback only) Four-way controller (5) 5 i button MENU button Z button Shutter release button OK button 10 Names of Operating Parts AF status lamp (green) Flash status lamp (red) Zoom/f/y button Playback Q button OK button Four-way controller MENU button )/i button b/Z button O button Guide display A button operation guide is displayed on the LCD monitor during operation.

Operation Manual
Page 30
... Start Using an SD Memory Card / MultiMediaCard Images taken with the AV cable. To view images on your TV, connect the camera to your pictures on the camera One advantage of a digital camera is handy for those group occasions. Viewing images on a TV is that you can check the picture as soon as you... again if you take it. Playing Back Still Pictures1p.70 Viewing Images on a TV Displaying your PC, and print them out. You can use the camera to view the images recorded on the 2 card, transfer the images to the TV with the...
... Start Using an SD Memory Card / MultiMediaCard Images taken with the AV cable. To view images on your TV, connect the camera to your pictures on the camera One advantage of a digital camera is handy for those group occasions. Viewing images on a TV is that you can check the picture as soon as you... again if you take it. Playing Back Still Pictures1p.70 Viewing Images on a TV Displaying your PC, and print them out. You can use the camera to view the images recorded on the 2 card, transfer the images to the TV with the...
Operation Manual
Page 31
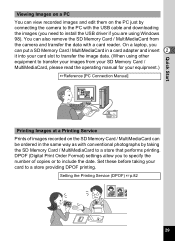
Setting the Printing Service (DPOF) 1p.82 29 DPOF (Digital Print Order Format) settings allow you to specify the number of images recorded on the ... Viewing Images on a PC You can view recorded images and edit them on the PC just by connecting the camera to the PC with the USB cable and downloading the images (you need to install the USB driver if you... are using other equipment to transfer your images from the camera and transfer the data with conventional photographs by taking your card to a store providing DPOF printing. On a laptop,...
Setting the Printing Service (DPOF) 1p.82 29 DPOF (Digital Print Order Format) settings allow you to specify the number of images recorded on the ... Viewing Images on a PC You can view recorded images and edit them on the PC just by connecting the camera to the PC with the USB cable and downloading the images (you need to install the USB driver if you... are using other equipment to transfer your images from the camera and transfer the data with conventional photographs by taking your card to a store providing DPOF printing. On a laptop,...

Operation Manual
Page 35
...Metering 2048 1536 AWB Multiple 1/3 MENU Exit OK OK 3 Next menu screen • If you press the shutter release button halfway and move the camera to Capture mode, any changes to the setting will not be saved. • When you display the menu from Capture mode, the [A Rec....OK Rec. Mode Recorded Pixels Quality Level White Balance Focusing Area AE Metering 2048 1536 AWB Multiple 1/3 MENU Exit OK OK 2 Playback Playback Message Digital Filter Resize Trimming Alarm Off 1/2 MENU Exit OK OK Format Sound Data Adjust World Time Language/ Set-up ] Menu Rec. Example of menu ...
...Metering 2048 1536 AWB Multiple 1/3 MENU Exit OK OK 3 Next menu screen • If you press the shutter release button halfway and move the camera to Capture mode, any changes to the setting will not be saved. • When you display the menu from Capture mode, the [A Rec....OK Rec. Mode Recorded Pixels Quality Level White Balance Focusing Area AE Metering 2048 1536 AWB Multiple 1/3 MENU Exit OK OK 2 Playback Playback Message Digital Filter Resize Trimming Alarm Off 1/2 MENU Exit OK OK Format Sound Data Adjust World Time Language/ Set-up ] Menu Rec. Example of menu ...

Operation Manual
Page 36
...Shoot Takes pictures at a specified time. Mode settings when the camera is turned off. Resize Changs the image size. p.57 Movie Sets the recorded pixels of recorded pixels. Digital Filter Sets the digital filter. p.41 White Balance Adjusts color balance according to determine exposure...Sets the contrast. p.40 Quality level Selects the image compression rate. p.44 AE Metering Sets the metering method to lighting. p.46 Digital Zoom Takes digital zoom pictures. p.63 Memory Saves the Rec. Trimming Trims images. Refere nce p.75 p.88 p.85 p.87 p.100 p.72 ...
...Shoot Takes pictures at a specified time. Mode settings when the camera is turned off. Resize Changs the image size. p.57 Movie Sets the recorded pixels of recorded pixels. Digital Filter Sets the digital filter. p.41 White Balance Adjusts color balance according to determine exposure...Sets the contrast. p.40 Quality level Selects the image compression rate. p.44 AE Metering Sets the metering method to lighting. p.46 Digital Zoom Takes digital zoom pictures. p.63 Memory Saves the Rec. Trimming Trims images. Refere nce p.75 p.88 p.85 p.87 p.100 p.72 ...

Operation Manual
Page 40
... default setting is the Autofocus mode. • In Movie Picture mode (1p.63), only the fixed focus is not available near maximum magnification in digital zoom. The camera will switch to the standard Capture screen. • When focusing, hold down the four-way controller (23) to focus quickly. • Enlarged display is...
... default setting is the Autofocus mode. • In Movie Picture mode (1p.63), only the fixed focus is not available near maximum magnification in digital zoom. The camera will switch to the standard Capture screen. • When focusing, hold down the four-way controller (23) to focus quickly. • Enlarged display is...

Operation Manual
Page 48
... the sensitivity. 4 Press the OK button. Mode] menu will be displayed. 2 Select [Sensitivity] on the [A Rec. Mode Sensitivity Auto Digital Zoom On Interval Shoot Movie Memory 2/3 MENU Exit OK OK The only available AUTO settings are 50, 100, and 200. Mode Recorded Pixels Quality...the Sensitivity (larger number), the faster the shutter speed in Capture mode. Saving the Sensitivity 1p.68 46 Auto 50 100 200 400 The camera makes the adjustment automatically. • The lower the Sensitivity (smaller number), the smaller the noise and sharper the image. Taking Pictures Four-...
... the sensitivity. 4 Press the OK button. Mode] menu will be displayed. 2 Select [Sensitivity] on the [A Rec. Mode Sensitivity Auto Digital Zoom On Interval Shoot Movie Memory 2/3 MENU Exit OK OK The only available AUTO settings are 50, 100, and 200. Mode Recorded Pixels Quality...the Sensitivity (larger number), the faster the shutter speed in Capture mode. Saving the Sensitivity 1p.68 46 Auto 50 100 200 400 The camera makes the adjustment automatically. • The lower the Sensitivity (smaller number), the smaller the noise and sharper the image. Taking Pictures Four-...

Operation Manual
Page 61
When the digital zoom function is disabled, the optical zoom can be used to enlarge the subject Zoom bar up to 11.2 times. 100 Digital zoom range Saving the Zoom Position 1p.68 59 Taking Pictures Zoom button Four-way controller OK button MENU button e Using the Zoom You can further enlarge the subject up to 2.8 times. F 4 100 When the digital zoom function is enabled, you can use the Zoom to take pictures in Tele or Wide mode. 1 Press the Zoom button in Capture mode. w Wide: Subject becomes smaller. x Tele: Subject becomes larger.
When the digital zoom function is disabled, the optical zoom can be used to enlarge the subject Zoom bar up to 11.2 times. 100 Digital zoom range Saving the Zoom Position 1p.68 59 Taking Pictures Zoom button Four-way controller OK button MENU button e Using the Zoom You can further enlarge the subject up to 2.8 times. F 4 100 When the digital zoom function is enabled, you can use the Zoom to take pictures in Tele or Wide mode. 1 Press the Zoom button in Capture mode. w Wide: Subject becomes smaller. x Tele: Subject becomes larger.

Operation Manual
Page 62
Enabling the Digital Zoom Function 1 Press the MENU button in Capture mode. Rec. The [A Rec. Mode] menu will be displayed. 2 Press the four-way controller (3) to select [Digital Zoom]. 3 Press the four-way controller (5) to take the picture. 4 Saving the Digital Zoom Function Setting 1p.68 Taking Pictures 60 Mode Sensitivity Digital Zoom Interval Shoot Movie Memory 2/3 Auto On MENU Exit OK OK The camera is ready to select On. 4 Press the OK button.
Enabling the Digital Zoom Function 1 Press the MENU button in Capture mode. Rec. The [A Rec. Mode] menu will be displayed. 2 Press the four-way controller (3) to select [Digital Zoom]. 3 Press the four-way controller (5) to take the picture. 4 Saving the Digital Zoom Function Setting 1p.68 Taking Pictures 60 Mode Sensitivity Digital Zoom Interval Shoot Movie Memory 2/3 Auto On MENU Exit OK OK The camera is ready to select On. 4 Press the OK button.

Operation Manual
Page 66
The remaining available recording time is fixed in movie picture mode. • When shooting in Movie Picture mode, only the digital zoom can be operated. 5 Press the shutter release button. Recording by holding down the shutter release button If you hold down the button. Taking ...Movie Pictures 1p.73 • The flash will end. Recording stops when you hold down the shutter release button for one second or more, the camera will record while you release the shutter release button. Recording will not fire in Movie Picture mode. • Continuous shooting and interval shooting are ...
The remaining available recording time is fixed in movie picture mode. • When shooting in Movie Picture mode, only the digital zoom can be operated. 5 Press the shutter release button. Recording by holding down the shutter release button If you hold down the button. Taking ...Movie Pictures 1p.73 • The flash will end. Recording stops when you hold down the shutter release button for one second or more, the camera will record while you release the shutter release button. Recording will not fire in Movie Picture mode. • Continuous shooting and interval shooting are ...

Operation Manual
Page 70
... position set values when the camera is turned off . Saves the file numbers. Item Description Default Setting Flash Saves the Flash mode setting selected with the settings selected on the menus for each function. • Zoom positions set within the digital zoom range will not be ...Settings Saving the Menu Items (Memory) You can choose whether to save the set by Manual Focus is saved. If you select On, the camera saves the settings in Memory. 68 P File No. Mode menu. P EV compensation Saves the EV compensation settings. P Zoom Position Saves the ...
... position set values when the camera is turned off . Saves the file numbers. Item Description Default Setting Flash Saves the Flash mode setting selected with the settings selected on the menus for each function. • Zoom positions set within the digital zoom range will not be ...Settings Saving the Menu Items (Memory) You can choose whether to save the set by Manual Focus is saved. If you select On, the camera saves the settings in Memory. 68 P File No. Mode menu. P EV compensation Saves the EV compensation settings. P Zoom Position Saves the ...

Operation Manual
Page 71
The Memory menu will be displayed. Memory Flash White Balance EV Compensation Digital Zoom AE Metering 6 Press the OK button 2 times. Rec. Mode Sensitivity Digital Zoom Interval Shoot Movie Memory 2/3 Auto On MENU Exit OK OK 4 Press the four-way controller (23) to select the item. 5 Press the four-way controller (45) to select [Memory]. 3 Press the four-way controller (5). 1 Press the MENU button in Capture mode. 2 Press the four-way controller (23) to select O (On) or P (Off). The camera is ready to take a picture. 1/2 MENU Exit OK OK 4 Taking Pictures 69
The Memory menu will be displayed. Memory Flash White Balance EV Compensation Digital Zoom AE Metering 6 Press the OK button 2 times. Rec. Mode Sensitivity Digital Zoom Interval Shoot Movie Memory 2/3 Auto On MENU Exit OK OK 4 Press the four-way controller (23) to select the item. 5 Press the four-way controller (45) to select [Memory]. 3 Press the four-way controller (5). 1 Press the MENU button in Capture mode. 2 Press the four-way controller (23) to select O (On) or P (Off). The camera is ready to take a picture. 1/2 MENU Exit OK OK 4 Taking Pictures 69

Operation Manual
Page 84
... MENU Exit OK OK 82 The frame will be displayed. Specify whether you want the date imprinted on the SD Memory Card / MultiMediaCard using a DPOF (Digital Print Order Format) compatible printer or at a printing service. You can print the images on the print or not. 1 Enter the Playback mode and use...
... MENU Exit OK OK 82 The frame will be displayed. Specify whether you want the date imprinted on the SD Memory Card / MultiMediaCard using a DPOF (Digital Print Order Format) compatible printer or at a printing service. You can print the images on the print or not. 1 Enter the Playback mode and use...

Operation Manual
Page 90
... mode, the display on the LCD monitor is filtered with the selected color, and the images are provided for the color filters. In Digital Filter mode, these filters can be used to edit an image. • Color Filters (%) Eight colors, black-and-white, sepia, red, pink, violet, ... color. • Soft Filter ($) Images edited with the soft filter can be given a fuzzy effect and saved. • Brightness Filter (&) Images edited with Digital Filters The filters consist of color filters such as red, blue, and green, a soft filter that produces a fuzzy effect, and a brightness filter that adjusts ...
... mode, the display on the LCD monitor is filtered with the selected color, and the images are provided for the color filters. In Digital Filter mode, these filters can be used to edit an image. • Color Filters (%) Eight colors, black-and-white, sepia, red, pink, violet, ... color. • Soft Filter ($) Images edited with the soft filter can be given a fuzzy effect and saved. • Brightness Filter (&) Images edited with Digital Filters The filters consist of color filters such as red, blue, and green, a soft filter that produces a fuzzy effect, and a brightness filter that adjusts ...

Operation Manual
Page 91
Zoom/f/y button (w) Makes the image darker. 6 Press the OK button. 6 7 Press the four-way controller (23) to select [Digital Filter]. 3 Press the four-way controller (5). 1 Press the MENU button in Playback mode. 2 Press the four-way controller (23) to select [Overwrite] or...The image edited with the brightness filter [&] Zoom/f/y button (x) Makes image brighter. MENU Exit OK OK • Operations available with the digital filters will be saved. The digital filter setup screen will be displayed. 4 Use the four-way controller (45) to select the image you want to edit. 5 ...
Zoom/f/y button (w) Makes the image darker. 6 Press the OK button. 6 7 Press the four-way controller (23) to select [Digital Filter]. 3 Press the four-way controller (5). 1 Press the MENU button in Playback mode. 2 Press the four-way controller (23) to select [Overwrite] or...The image edited with the brightness filter [&] Zoom/f/y button (x) Makes image brighter. MENU Exit OK OK • Operations available with the digital filters will be saved. The digital filter setup screen will be displayed. 4 Use the four-way controller (45) to select the image you want to edit. 5 ...

Operation Manual
Page 110
WIDE position) Digital Zoom Capture Mode Max 4× (Combines with a primary color filter Recorded Pixels Still 2048x1536 pixels, 1600x1200 pixels, 1024x768 pixels, 640x480 pixels...max. 8×), scroll, slideshow, movie playback, sound playback, histogram display, trimming, resize, digital filters Appendix 108 f/3.9 Lens Composition 10 elements in 35mm format) Max. Main Specifications Model Fully-automatic compact weather-resistant (JIS class 5) digital still camera with housed zoom lens Effective Pixels 3.2 megapixels Sensor 3.34 megapixels (total pixels), 1/2.7 inch ...
WIDE position) Digital Zoom Capture Mode Max 4× (Combines with a primary color filter Recorded Pixels Still 2048x1536 pixels, 1600x1200 pixels, 1024x768 pixels, 640x480 pixels...max. 8×), scroll, slideshow, movie playback, sound playback, histogram display, trimming, resize, digital filters Appendix 108 f/3.9 Lens Composition 10 elements in 35mm format) Max. Main Specifications Model Fully-automatic compact weather-resistant (JIS class 5) digital still camera with housed zoom lens Effective Pixels 3.2 megapixels Sensor 3.34 megapixels (total pixels), 1/2.7 inch ...

