
Operation Manual
Page 6
... Functions 36 Changing the Mode 36 Changing Focus Settings 37 Selecting the Flash Mode 39 Selecting the Recorded Pixels 40 4 CONTENTS FOR YOUR SAFETY 1 Handling the Camera 2 Water-resistant Feature 3 CONTENTS 4 Contents of This Manual 7 Checking Package Contents 8 Names of Parts 9 Names of Operating Parts 10 Getting Started 11 Attaching the Strap 11 Powering the Camera 12 Installing the Batteries 12 Using the AC Adapter 15 Installing / Removing the SD Memory Card / MultiMediaCard........16 Turning the Camera...
... Functions 36 Changing the Mode 36 Changing Focus Settings 37 Selecting the Flash Mode 39 Selecting the Recorded Pixels 40 4 CONTENTS FOR YOUR SAFETY 1 Handling the Camera 2 Water-resistant Feature 3 CONTENTS 4 Contents of This Manual 7 Checking Package Contents 8 Names of Parts 9 Names of Operating Parts 10 Getting Started 11 Attaching the Strap 11 Powering the Camera 12 Installing the Batteries 12 Using the AC Adapter 15 Installing / Removing the SD Memory Card / MultiMediaCard........16 Turning the Camera...

Operation Manual
Page 7
... (Panorama Assist Mode 53 Using the Self-Timer 55 Continuous Shooting (Continuous Shooting/Multi Continuous Shooting 56 Taking Pictures at Fixed Intervals (Interval Shoot 57 Using the Zoom 59 Recording Sound (Voice Recording Mode 61 EV Compensation 62 Taking Movie Pictures (Movie Picture Mode 63 Changing the Recorded Pixels Setting When Taking Movie Pictures 65 Changing the Color Mode Setting When Taking Movie Pictures....66 Taking Fast Forward Movie Pictures (Fast Fwd Movie 67 Saving the Settings 68 Saving the Menu Items (Memory 68 Playback/Deleting 70 Playing Back Images 70...
... (Panorama Assist Mode 53 Using the Self-Timer 55 Continuous Shooting (Continuous Shooting/Multi Continuous Shooting 56 Taking Pictures at Fixed Intervals (Interval Shoot 57 Using the Zoom 59 Recording Sound (Voice Recording Mode 61 EV Compensation 62 Taking Movie Pictures (Movie Picture Mode 63 Changing the Recorded Pixels Setting When Taking Movie Pictures 65 Changing the Color Mode Setting When Taking Movie Pictures....66 Taking Fast Forward Movie Pictures (Fast Fwd Movie 67 Saving the Settings 68 Saving the Menu Items (Memory 68 Playback/Deleting 70 Playing Back Images 70...

Operation Manual
Page 8
... Images 85 Changing the Image Size 85 Trimming Images 87 Editing Images with Digital Filters 88 Camera Settings 90 Formatting an SD Memory Card / MultiMediaCard 90 Changing the Sound Settings 91 Changing the Date Style and Date / Time 92 Setting World Time 93 Changing the Display Language 94 Setting the Display Mode 95 Changing the Start-up Screen 97 Setting the Background Color 98 Selecting the Video Output Format 99 Setting Auto Power Off 99 Resetting to Default Settings [Reset 99 Setting the Alarm 100 Checking the Alarm 100 Setting the Alarm 101 Turning...
... Images 85 Changing the Image Size 85 Trimming Images 87 Editing Images with Digital Filters 88 Camera Settings 90 Formatting an SD Memory Card / MultiMediaCard 90 Changing the Sound Settings 91 Changing the Date Style and Date / Time 92 Setting World Time 93 Changing the Display Language 94 Setting the Display Mode 95 Changing the Start-up Screen 97 Setting the Background Color 98 Selecting the Video Output Format 99 Setting Auto Power Off 99 Resetting to Default Settings [Reset 99 Setting the Alarm 100 Checking the Alarm 100 Setting the Alarm 101 Turning...

Operation Manual
Page 9
... to taking pictures. Shows information useful to get started right away. Shows reference page number explaining a related operation. It also explains how to use an SD Memory Card and MultiMediaCard. 3 3 Common Operations Explains common operations such as setting the virtual mode dial to change capture modes, and selecting the right picture mode for more details. 4 Taking Pictures 5 Explains various ways to capture images, and how to set up the functions of the camera...
... to taking pictures. Shows information useful to get started right away. Shows reference page number explaining a related operation. It also explains how to use an SD Memory Card and MultiMediaCard. 3 3 Common Operations Explains common operations such as setting the virtual mode dial to change capture modes, and selecting the right picture mode for more details. 4 Taking Pictures 5 Explains various ways to capture images, and how to set up the functions of the camera...

Operation Manual
Page 18
... lens, insert the card into the card slot until the card clicks. If the card is not inserted properly, images and sound may not be recorded correctly. 3 Wipe away any sand or debris on the SD Memory Card / MultiMediaCard. Do not set or remove the card with a dry cloth before inserting or removing the SD Memory Card / MultiMediaCard. Installing / Removing the SD Memory Card / MultiMediaCard 1 c SD Memory Card/ MultiMediaCard d Battery/card cover e Getting Started The image...
... lens, insert the card into the card slot until the card clicks. If the card is not inserted properly, images and sound may not be recorded correctly. 3 Wipe away any sand or debris on the SD Memory Card / MultiMediaCard. Do not set or remove the card with a dry cloth before inserting or removing the SD Memory Card / MultiMediaCard. Installing / Removing the SD Memory Card / MultiMediaCard 1 c SD Memory Card/ MultiMediaCard d Battery/card cover e Getting Started The image...

Operation Manual
Page 20
... card is not used for a long time • When the card, the AC adapter, or battery is removed while recording or reading data on a PC or device other than the camera cannot be used in a high temperature location. • New cards or cards used . Please periodically backup important data onto your card where it in another camera must be formatted before opening the battery/card cover. • The SD Memory Card has a write-protect switch. The stored data...
... card is not used for a long time • When the card, the AC adapter, or battery is removed while recording or reading data on a PC or device other than the camera cannot be used in a high temperature location. • New cards or cards used . Please periodically backup important data onto your card where it in another camera must be formatted before opening the battery/card cover. • The SD Memory Card has a write-protect switch. The stored data...

Operation Manual
Page 22
... the menus, error messages, etc. Refer to set the display language, Home Town, DST, video output format and current date and time. Initial Setting Language/ City DST Video Out English NYC NTSC MENU Exit OK OK The screen for "Changing the Date Style and Date / Time" (p.92) to "Changing the Display Language" (p.94). 20 Initial Settings 1 Power switch Getting Started Four-way controller OK button MENU button If the initial settings screen appears when you turn the camera on for the first time is English. 3 Press...
... the menus, error messages, etc. Refer to set the display language, Home Town, DST, video output format and current date and time. Initial Setting Language/ City DST Video Out English NYC NTSC MENU Exit OK OK The screen for "Changing the Date Style and Date / Time" (p.92) to "Changing the Display Language" (p.94). 20 Initial Settings 1 Power switch Getting Started Four-way controller OK button MENU button If the initial settings screen appears when you turn the camera on for the first time is English. 3 Press...

Operation Manual
Page 30
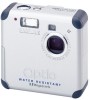
... Pictures1p.70 Viewing Images on a TV Displaying your PC, and print them out. To view images on the 2 card, transfer the images to the TV with the camera are not satisfied. Quick Start Quick Start Using an SD Memory Card / MultiMediaCard Images taken with the AV cable. You can use the camera to view the images recorded on your TV, connect the camera to your pictures on the SD Memory Card / MultiMediaCard. Viewing Images on the camera One advantage of a digital camera is handy...
... Pictures1p.70 Viewing Images on a TV Displaying your PC, and print them out. To view images on the 2 card, transfer the images to the TV with the camera are not satisfied. Quick Start Quick Start Using an SD Memory Card / MultiMediaCard Images taken with the AV cable. You can use the camera to view the images recorded on your TV, connect the camera to your pictures on the SD Memory Card / MultiMediaCard. Viewing Images on the camera One advantage of a digital camera is handy...
Operation Manual
Page 31
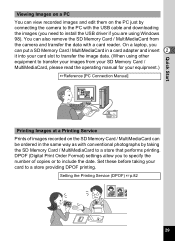
... (Digital Print Order Format) settings allow you can put a SD Memory Card / MultiMediaCard in a card adapter and insert 2 it into your card slot to transfer the image data. (When using Windows 98). Quick Start Viewing Images on a PC You can view recorded images and edit them on the SD Memory Card / MultiMediaCard can be ordered in the same way as with conventional photographs by connecting the camera to the PC with the USB cable and downloading the images (you need...
... (Digital Print Order Format) settings allow you can put a SD Memory Card / MultiMediaCard in a card adapter and insert 2 it into your card slot to transfer the image data. (When using Windows 98). Quick Start Viewing Images on a PC You can view recorded images and edit them on the SD Memory Card / MultiMediaCard can be ordered in the same way as with conventional photographs by connecting the camera to the PC with the USB cable and downloading the images (you need...
Operation Manual
Page 34
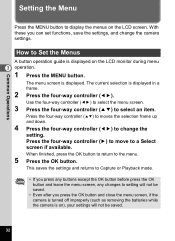
... an item. The menu screen is displayed in a frame. 2 Press the four-way controller (45). Use the four-way controller (45) to select the menu screen. 3 Press the four-way controller (23) to a Select screen if available. Common Operations Setting the Menu Press the MENU button to display the menus on the LCD monitor during menu 3 operation. 1 Press the MENU button. This saves the settings and returns to Capture or Playback mode. • If you...
... an item. The menu screen is displayed in a frame. 2 Press the four-way controller (45). Use the four-way controller (45) to select the menu screen. 3 Press the four-way controller (23) to a Select screen if available. Common Operations Setting the Menu Press the MENU button to display the menus on the LCD monitor during menu 3 operation. 1 Press the MENU button. This saves the settings and returns to Capture or Playback mode. • If you...

Operation Manual
Page 35
... Operations Rec. Mode Recorded Pixels Quality Level White Balance Focusing Area AE Metering 2048 1536 AWB Multiple 1/3 MENU Exit OK OK 3 4 Rec. Mode Recorded Pixels Quality Level White Balance Focusing Area AE Metering 2048 1536 AWB Multiple 1/3 MENU Exit OK OK Rec. Mode Recorded Pixels Quality Level White Balance Focusing Area AE Metering 2048 1536 AWB Multiple 1/3 MENU Exit OK OK 2 Playback Playback Message Digital Filter Resize Trimming Alarm Off 1/2 MENU Exit OK OK Format Sound Data Adjust World Time Language/ Set-up ] Menu Rec...
... Operations Rec. Mode Recorded Pixels Quality Level White Balance Focusing Area AE Metering 2048 1536 AWB Multiple 1/3 MENU Exit OK OK 3 4 Rec. Mode Recorded Pixels Quality Level White Balance Focusing Area AE Metering 2048 1536 AWB Multiple 1/3 MENU Exit OK OK Rec. Mode Recorded Pixels Quality Level White Balance Focusing Area AE Metering 2048 1536 AWB Multiple 1/3 MENU Exit OK OK 2 Playback Playback Message Digital Filter Resize Trimming Alarm Off 1/2 MENU Exit OK OK Format Sound Data Adjust World Time Language/ Set-up ] Menu Rec...
Operation Manual
Page 39
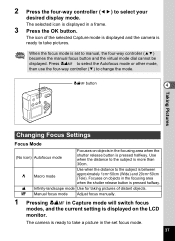
...-way controller (3) to take a picture in the set to take pictures. s Infinity-landscape mode Use for taking pictures of the selected Capture mode is displayed and the camera is ready to change the mode. ) button 4 Taking Pictures Changing Focus Settings Focus Mode (No icon) Autofocus mode Focuses on objects in Capture mode will switch focus modes, and the current setting is pressed halfway. z Manual focus mode Adjust focus manually. 1 Pressing ) in the focusing area when the shutter release button is more than 30cm. The icon of distant objects. q Macro mode Use when...
...-way controller (3) to take a picture in the set to take pictures. s Infinity-landscape mode Use for taking pictures of the selected Capture mode is displayed and the camera is ready to change the mode. ) button 4 Taking Pictures Changing Focus Settings Focus Mode (No icon) Autofocus mode Focuses on objects in Capture mode will switch focus modes, and the current setting is pressed halfway. z Manual focus mode Adjust focus manually. 1 Pressing ) in the focusing area when the shutter release button is more than 30cm. The icon of distant objects. q Macro mode Use when...

Operation Manual
Page 48
... the Sensitivity (larger number), the faster the shutter speed in Capture mode. Auto 50 100 200 400 The camera makes the adjustment automatically. • The lower the Sensitivity (smaller number), the smaller the noise and sharper the image. Mode Sensitivity Auto Digital Zoom On Interval Shoot Movie Memory 2/3 MENU Exit OK OK The only available AUTO settings are 50, 100, and 200. Taking Pictures Four-way controller OK button MENU button Rec. Mode] menu will be displayed. 2 Select [Sensitivity...
... the Sensitivity (larger number), the faster the shutter speed in Capture mode. Auto 50 100 200 400 The camera makes the adjustment automatically. • The lower the Sensitivity (smaller number), the smaller the noise and sharper the image. Mode Sensitivity Auto Digital Zoom On Interval Shoot Movie Memory 2/3 MENU Exit OK OK The only available AUTO settings are 50, 100, and 200. Taking Pictures Four-way controller OK button MENU button Rec. Mode] menu will be displayed. 2 Select [Sensitivity...

Operation Manual
Page 55
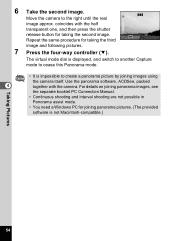
... described below indicates that 5 is set the shift direction. 4 joins the images at the left of images taken in Panorama Assist mode and create a panorama image. 1 Press the four-way controller (3) in half transparent form at the bottom. Set shift direction 5 joins the images at the right. 2 joins the images at the top. 3 joins the images at the left . Shutter release button Four-way controller OK button Taking Pictures Taking Panorama Pictures (Panorama Assist Mode) 4 Using the included software (ACDSee...
... described below indicates that 5 is set the shift direction. 4 joins the images at the left of images taken in Panorama Assist mode and create a panorama image. 1 Press the four-way controller (3) in half transparent form at the bottom. Set shift direction 5 joins the images at the right. 2 joins the images at the top. 3 joins the images at the left . Shutter release button Four-way controller OK button Taking Pictures Taking Panorama Pictures (Panorama Assist Mode) 4 Using the included software (ACDSee...
Operation Manual
Page 56
... PC Connection Manual. • Continuous shooting and interval shooting are not possible in Panorama assist mode. • You need a Windows PC for joining panorama pictures. (The provided software is impossible to the right until the real image approx. Move the camera to create a panorama picture by joining images using the camera itself. The virtual mode dial is displayed, and switch to another Capture mode to cease this Panorama mode. • It is not Macintosh-compatible.) Taking Pictures 54 Use the panorama software...
... PC Connection Manual. • Continuous shooting and interval shooting are not possible in Panorama assist mode. • You need a Windows PC for joining panorama pictures. (The provided software is impossible to the right until the real image approx. Move the camera to create a panorama picture by joining images using the camera itself. The virtual mode dial is displayed, and switch to another Capture mode to cease this Panorama mode. • It is not Macintosh-compatible.) Taking Pictures 54 Use the panorama software...

Operation Manual
Page 58
.... • The interval between continuous shots differs according to 100 display aj or a_ on the LCD monitor. 2 Press the shutter release button. There are Continuous Shooting and Multi Continuous Shooting as a Shooting single image. 1 Press the four-way controller (2) to recorded pixels and quality level settings. • The flash will not fire in Continuous Shooting or Multi Continuous Shooting mode. • Continuous Shooting and Multi Continuous Shooting cannot be used in Movie Picture, Panorama Assist, Night-Scene, Night-Scene...
.... • The interval between continuous shots differs according to 100 display aj or a_ on the LCD monitor. 2 Press the shutter release button. There are Continuous Shooting and Multi Continuous Shooting as a Shooting single image. 1 Press the four-way controller (2) to recorded pixels and quality level settings. • The flash will not fire in Continuous Shooting or Multi Continuous Shooting mode. • Continuous Shooting and Multi Continuous Shooting cannot be used in Movie Picture, Panorama Assist, Night-Scene, Night-Scene...

Operation Manual
Page 60
...-way controller (5). 4. Use the four-way controller (23) to 99 minutes in units of memory, interval shooting stops and the camera turns off automatically. will be set at intervals of 10 seconds to 4 minutes in units of 1 second, and intervals of 4 minutes to change the number of pictures and interval time will be set between 0 minutes and 23 hours 59 minutes in Movie Picture or Panorama Assist mode...
...-way controller (5). 4. Use the four-way controller (23) to 99 minutes in units of memory, interval shooting stops and the camera turns off automatically. will be set at intervals of 10 seconds to 4 minutes in units of 1 second, and intervals of 4 minutes to change the number of pictures and interval time will be set between 0 minutes and 23 hours 59 minutes in Movie Picture or Panorama Assist mode...

Operation Manual
Page 70
...is set to On in Memory. 68 O 4 White Balance Saves the White Balance settings on the Rec. O AE Metering Saves the AE Metering settings on the Rec. P Digital Zoom Saves the Digital Zoom settings on the Rec. If you select Off, the settings return to default settings when the camera is turned off. Mode menu. P EV compensation Saves the EV compensation settings. Mode menu. Mode menu. P File No. Mode menu. Saves the file numbers. Taking Pictures Saving the Settings Saving the Menu Items (Memory) You can choose whether to save the set values...
...is set to On in Memory. 68 O 4 White Balance Saves the White Balance settings on the Rec. O AE Metering Saves the AE Metering settings on the Rec. P Digital Zoom Saves the Digital Zoom settings on the Rec. If you select Off, the settings return to default settings when the camera is turned off. Mode menu. P EV compensation Saves the EV compensation settings. Mode menu. Mode menu. P File No. Mode menu. Saves the file numbers. Taking Pictures Saving the Settings Saving the Menu Items (Memory) You can choose whether to save the set values...

Operation Manual
Page 106
... formatted. Battery depleted The battery is full, and no more be created images or sound can be saved.Insert a new SD Memory Card / MultiMediaCard or delete unwanted images or sound.(p.16, 77) You may be displayed on the LCD monitor during camera operation. Setting being changed. 7 Settings not stored The SD Memory Card / MultiMediaCard is exhausted.Replace the battery.(p.12) Memory card error Shooting and playback are trying to play back an image not supported by changing the quality level or recorded...
... formatted. Battery depleted The battery is full, and no more be created images or sound can be saved.Insert a new SD Memory Card / MultiMediaCard or delete unwanted images or sound.(p.16, 77) You may be displayed on the LCD monitor during camera operation. Setting being changed. 7 Settings not stored The SD Memory Card / MultiMediaCard is exhausted.Replace the battery.(p.12) Memory card error Shooting and playback are trying to play back an image not supported by changing the quality level or recorded...
Operation Manual
Page 111
...full zoom range) Focus Lock By pressing the shutter release button halfway Manual Focus 0.01m - ∞ (Wide), 0.2m - ∞ (Tele) Exposure Mechanism AE Metering TTL metering by sensor (multi-segment, centerweighted, spot) Exposure Modes Program, Picture mode, Movie Picture, Panorama Assist, Voice Recording EV Compensation ±2EV (Can be set in 1/3EV steps) Movie Picture Recording time by vacant memory Shutter Model Electronic/Mechanical shutter Speed Approx. 1/2000 sec - 4 sec. Flash Model Automatic flash with red-eye reduction function Flash Modes Auto, Flash Off...
...full zoom range) Focus Lock By pressing the shutter release button halfway Manual Focus 0.01m - ∞ (Wide), 0.2m - ∞ (Tele) Exposure Mechanism AE Metering TTL metering by sensor (multi-segment, centerweighted, spot) Exposure Modes Program, Picture mode, Movie Picture, Panorama Assist, Voice Recording EV Compensation ±2EV (Can be set in 1/3EV steps) Movie Picture Recording time by vacant memory Shutter Model Electronic/Mechanical shutter Speed Approx. 1/2000 sec - 4 sec. Flash Model Automatic flash with red-eye reduction function Flash Modes Auto, Flash Off...

