User Guide
Page 3
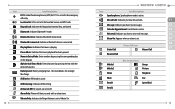
......49 SPEED DIALS...53 IN CASE OF EMERGENCY 54 FAVORITES...56 MY NAME CARD 59 3 CHAPTER 1. BASIC OPERATION BASIC OPERATION 22 TURNING THE PHONE ON/OFF 22 ACCESSING THE MENU 22 USING THE TASK BAR 23 QUICK SWITCHING BETWEENTHE MAIN MENUS 23 MENU SUMMARY 24 MAKING A CALL...29 ...LOCK FUNCTIONL 33 AVAILABLE OPTIONS DURING A CALL 33 MAKING AN EMERGENCY CALL 35 DIALING LETTERS 35 CHAPTER 3. MEMORY FUNCTION MEMORY FUNCTION 38 STORING A PHONE NUMBER 38 EDITING CONTACT ENTRIES 41 DEFAULT NUMBERS 43 ENTERING LETTERS, NUMBERS & SYMBOLS 44 ONE,TWO,THREE -TOUCH DIALING 45 CHAPTER 4.
......49 SPEED DIALS...53 IN CASE OF EMERGENCY 54 FAVORITES...56 MY NAME CARD 59 3 CHAPTER 1. BASIC OPERATION BASIC OPERATION 22 TURNING THE PHONE ON/OFF 22 ACCESSING THE MENU 22 USING THE TASK BAR 23 QUICK SWITCHING BETWEENTHE MAIN MENUS 23 MENU SUMMARY 24 MAKING A CALL...29 ...LOCK FUNCTIONL 33 AVAILABLE OPTIONS DURING A CALL 33 MAKING AN EMERGENCY CALL 35 DIALING LETTERS 35 CHAPTER 3. MEMORY FUNCTION MEMORY FUNCTION 38 STORING A PHONE NUMBER 38 EDITING CONTACT ENTRIES 41 DEFAULT NUMBERS 43 ENTERING LETTERS, NUMBERS & SYMBOLS 44 ONE,TWO,THREE -TOUCH DIALING 45 CHAPTER 4.

User Guide
Page 4
... CLOCK...80 STOPWATCH...81 WORLD CLOCK...82 NOTEPAD +...83 USB MASS STORAGE 84 SETTINGS...85 MYVERIZON...85 BLUETOOTH...85 SOUNDS SETTINGS 89 DISPLAY SETTINGS 93 PHONE SETTINGS 98 CALL SETTINGS 104 4 TOUCH KEY SETTINGS 107 MEMORY ...107 USB MODE...110...
... CLOCK...80 STOPWATCH...81 WORLD CLOCK...82 NOTEPAD +...83 USB MASS STORAGE 84 SETTINGS...85 MYVERIZON...85 BLUETOOTH...85 SOUNDS SETTINGS 89 DISPLAY SETTINGS 93 PHONE SETTINGS 98 CALL SETTINGS 104 4 TOUCH KEY SETTINGS 107 MEMORY ...107 USB MODE...110...
User Guide
Page 5
SAFETY AND WARRANTY SAFETY ...149 SAFETY INFORMATION FORWIRELESS HANDHELD PHONES 149 SAFETY INFORMATION FOR FCC RF EXPOSURE 153 SAR INFORMATION 154 HEARING AID COMPATIBILITY (HAC) FOR WIRELESS TELECOMMUNICATIONS DEVICES 156 FDA CONSUMER UPDATE 158 AVOID ...
SAFETY AND WARRANTY SAFETY ...149 SAFETY INFORMATION FORWIRELESS HANDHELD PHONES 149 SAFETY INFORMATION FOR FCC RF EXPOSURE 153 SAR INFORMATION 154 HEARING AID COMPATIBILITY (HAC) FOR WIRELESS TELECOMMUNICATIONS DEVICES 156 FDA CONSUMER UPDATE 158 AVOID ...
User Guide
Page 6
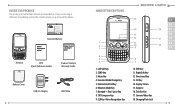
... Key 4. Vibration Mode Key 7. OK Key 14. Camera/Video Key 18. If any are missing or different, immediately contact the retailer where you purchased the phone. Caution:Do not expose to high temperature (140 /60 ). Left Soft Key 2. CLR Key / Voice Recognition Key 15 01 02 14 18 03 13 04...
... Key 4. Vibration Mode Key 7. OK Key 14. Camera/Video Key 18. If any are missing or different, immediately contact the retailer where you purchased the phone. Caution:Do not expose to high temperature (140 /60 ). Left Soft Key 2. CLR Key / Voice Recognition Key 15 01 02 14 18 03 13 04...

User Guide
Page 7
...menu. Press and hold to clear all characters. Wrist Strap Eyelet 22. Speakerphone Key 10 KEY DESCRIPTIONS The following list correlates to the previous page's phone illustration. 1. [ ] Left Soft Key: Press to turn Vibration Mode on or off . 7. From idle mode, press to 02 access the All.../Mode Change Key: Press to change the character input type. 05 5. Notepad + Key: Press to access the Notepad + menu or to phone functions from the display. HANDSET DESCRIPTIONS 21 22 20 23 19 24 25 26 19. microSD Card Slot 23. Vibration Mode Key: Press and...
...menu. Press and hold to clear all characters. Wrist Strap Eyelet 22. Speakerphone Key 10 KEY DESCRIPTIONS The following list correlates to the previous page's phone illustration. 1. [ ] Left Soft Key: Press to turn Vibration Mode on or off . 7. From idle mode, press to 02 access the All.../Mode Change Key: Press to change the character input type. 05 5. Notepad + Key: Press to access the Notepad + menu or to phone functions from the display. HANDSET DESCRIPTIONS 21 22 20 23 19 24 25 26 19. microSD Card Slot 23. Vibration Mode Key: Press and...

User Guide
Page 8
...microSD Card Slot: Insert a microSD card(sold separately) here to access the built-in a dormant state during data communication using encryption. No Service: Phone cannot receive signal from the system. Task Bar Key: Press to access the Task Bar menu. 17. [ ] Camera/Video Key: Press to...capacity. 23. More 02 bars indicate a stronger signal. 03 Airplane Mode: Transmitting and receiving information is restricted. 04 Roaming: The phone is outside of your phone is internet accessed area and you can make and receive calls. 13. Press and hold to activate the Video Camera. 18. [ ...
...microSD Card Slot: Insert a microSD card(sold separately) here to access the built-in a dormant state during data communication using encryption. No Service: Phone cannot receive signal from the system. Task Bar Key: Press to access the Task Bar menu. 17. [ ] Camera/Video Key: Press to...capacity. 23. More 02 bars indicate a stronger signal. 03 Airplane Mode: Transmitting and receiving information is restricted. 04 Roaming: The phone is outside of your phone is internet accessed area and you can make and receive calls. 13. Press and hold to activate the Video Camera. 18. [ ...
User Guide
Page 9
.... Keypad Lock: Indicates the keypad and external keys are set to On for emergency calls only. All Sounds Off: All sounds are locked. Alarm Only: Phone will alert you have a voice mail message. 04 Alarm On: Appears when an alarm is active. Playing Music: Indicates that music playback has been paused...
.... Keypad Lock: Indicates the keypad and external keys are set to On for emergency calls only. All Sounds Off: All sounds are locked. Alarm Only: Phone will alert you have a voice mail message. 04 Alarm On: Appears when an alarm is active. Playing Music: Indicates that music playback has been paused...
User Guide
Page 11
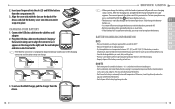
...• Try to perform normally, you will see a charging status screen. DON'TS • Don't attempt to the charging connector and the phone may critically damage the battery. • Don't leave the battery in your pocket or purse with no serviceable parts. • Don't accidentally ...short circuit the battery by placing into place. You cannot operate the phone until it is not properly aligned, damage could significantly reduce the capacity and lifetime of the battery. • Don't dispose of purchase....
...• Try to perform normally, you will see a charging status screen. DON'TS • Don't attempt to the charging connector and the phone may critically damage the battery. • Don't leave the battery in your pocket or purse with no serviceable parts. • Don't accidentally ...short circuit the battery by placing into place. You cannot operate the phone until it is not properly aligned, damage could significantly reduce the capacity and lifetime of the battery. • Don't dispose of purchase....

User Guide
Page 12
... provided to improve the usability by reducing searching time. 20 2 BASIC OPERATION This chapter addresses and explains the basic features for JESTTM including: Turning the phone on/off Accessing the menu Using the Task Bar Quick switching between the main menus Menu summary Making a call Answering calls Missed Call notification Wait...
... provided to improve the usability by reducing searching time. 20 2 BASIC OPERATION This chapter addresses and explains the basic features for JESTTM including: Turning the phone on/off Accessing the menu Using the Task Bar Quick switching between the main menus Menu summary Making a call Answering calls Missed Call notification Wait...
User Guide
Page 13
... down or press the number that Display Themes is set to switch between the menus (except Social Beat, Search and VZ Navigator). 23 Slide the phone up and press the OK Key [MENU]. 2. Each function can quickly switch between the following main menus: Media Center, Messaging, Contacts, Email, Social Beat, ... OK Key to unlock the keypad, and enter your Contact List. 22 This manual assumes that corresponds to the desired menu item. 3. If the phone is on, unsaved data may possibly be lost. USING THE TASK BAR 01 The Task Bar is the last 4 digits of your display turns off...
... down or press the number that Display Themes is set to switch between the menus (except Social Beat, Search and VZ Navigator). 23 Slide the phone up and press the OK Key [MENU]. 2. Each function can quickly switch between the following main menus: Media Center, Messaging, Contacts, Email, Social Beat, ... OK Key to unlock the keypad, and enter your Contact List. 22 This manual assumes that corresponds to the desired menu item. 3. If the phone is on, unsaved data may possibly be lost. USING THE TASK BAR 01 The Task Bar is the last 4 digits of your display turns off...
User Guide
Page 15
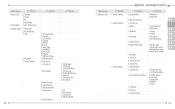
... 2. Keypad 04 1. Menu Font Size 0. View Timers Launch VZ Navigator 9. Tools 4. World Clock 0. Multimedia Message 3. Emergency Tone 5. Power Off 0. Bluetooth 5. Settings & Tools 5. Replace Menu Items 3. Phone Settings 1. Voice Commands Settings 1. Dialed 4. All 5. Notepad + *. Easy Set-up 2. Missed Call 1. Airplane Mode 2. Adapt Voice 4. Banner 3. Font Type 8. Main Menu 7. Recent Calls 8. Stop Watch...
... 2. Keypad 04 1. Menu Font Size 0. View Timers Launch VZ Navigator 9. Tools 4. World Clock 0. Multimedia Message 3. Emergency Tone 5. Power Off 0. Bluetooth 5. Settings & Tools 5. Replace Menu Items 3. Phone Settings 1. Voice Commands Settings 1. Dialed 4. All 5. Notepad + *. Easy Set-up 2. Missed Call 1. Airplane Mode 2. Adapt Voice 4. Banner 3. Font Type 8. Main Menu 7. Recent Calls 8. Stop Watch...
User Guide
Page 16
... • To erase the entire number, press and hold the CLR Key . • When you activate the AUTO RETRY function, the phone will be displayed. 2. To ignore incoming calls, press the Right Soft Key [Ignore]. 29 Card Memory *. Videos 3. Sounds 1. My... Ringtones 5. My Contacts 8. Any Key is the default setting for more details. Phone Settings 3RD DEPTH 7. Sensitivity 2. Phone Memory 3. Edit Codes 2. NAM Selection 8. Auto Retry 3. Directional Key Tutorial 1. Change NAM 1. Check New 03 . Press the SEND ...
... • To erase the entire number, press and hold the CLR Key . • When you activate the AUTO RETRY function, the phone will be displayed. 2. To ignore incoming calls, press the Right Soft Key [Ignore]. 29 Card Memory *. Videos 3. Sounds 1. My... Ringtones 5. My Contacts 8. Any Key is the default setting for more details. Phone Settings 3RD DEPTH 7. Sensitivity 2. Phone Memory 3. Edit Codes 2. NAM Selection 8. Auto Retry 3. Directional Key Tutorial 1. Change NAM 1. Check New 03 . Press the SEND ...
User Guide
Page 17
...WAIT/PAUSE FEATURE Pauses are the first to view, then press the OK Key [OPEN]. 4. Press 1. Enter the country code, area code, and phone number, then press the SEND 05 Key . 06 3. If Answer Options is useful for 04 international calls appears. 2. The second set to "Auto...call details. or OK Key to advance to save. 02 MAKING AN INTERNATIONAL CALL 03 1. To end a call is dialed automatically after a phone number and then enter another group of digits automatically. 30 1. When using this feature, normal airtime rates will be applied for automated systems (i.e., ...
...WAIT/PAUSE FEATURE Pauses are the first to view, then press the OK Key [OPEN]. 4. Press 1. Enter the country code, area code, and phone number, then press the SEND 05 Key . 06 3. If Answer Options is useful for 04 international calls appears. 2. The second set to "Auto...call details. or OK Key to advance to save. 02 MAKING AN INTERNATIONAL CALL 03 1. To end a call is dialed automatically after a phone number and then enter another group of digits automatically. 30 1. When using this feature, normal airtime rates will be applied for automated systems (i.e., ...
User Guide
Page 18
... will appear on hold . To deactivate, press the Speakerphone Key again. Press the OK Key to activate vibration mode. 05 2. Slide the phone up, then press and hold the Vibration Mode Key . 06 SPEAKERPHONE MODE 07 The Speakerphone feature lets you can access the following options and...To activate 03 Vibrate Mode: 04 1. CALL WAITING FUNCTION If you are locked. This places the first call on the external display with the phone in the Recent Calls menu. 01 VIBRATE MODE 02 Vibrate Mode mutes key tones and alerts for an incoming call or message. CALLING A NUMBER...
... will appear on hold . To deactivate, press the Speakerphone Key again. Press the OK Key to activate vibration mode. 05 2. Slide the phone up, then press and hold the Vibration Mode Key . 06 SPEAKERPHONE MODE 07 The Speakerphone feature lets you can access the following options and...To activate 03 Vibrate Mode: 04 1. CALL WAITING FUNCTION If you are locked. This places the first call on the external display with the phone in the Recent Calls menu. 01 VIBRATE MODE 02 Vibrate Mode mutes key tones and alerts for an incoming call or message. CALLING A NUMBER...
User Guide
Page 19
... Right Soft Key Key. [Options], select Notepad + and press the OK 34 VOICE PRIVACY To turn the voice privacy feature On or Off: 1. The phone will stay in the options menu instead of the service area. 04 911 IN LOCK MODE 05 To make outgoing calls even in the Emergency.... 35 Press the Right Soft Key [Options], select Contact List and press the OK Key. MAIN MENU To access the Main Menu during a call : 1. The phone maintains Emergency Mode for 5 minutes. Press the Right Soft Key [Options], with a specific word. Press the Right Soft Key [Options], select Recent Calls and press...
... Right Soft Key Key. [Options], select Notepad + and press the OK 34 VOICE PRIVACY To turn the voice privacy feature On or Off: 1. The phone will stay in the options menu instead of the service area. 04 911 IN LOCK MODE 05 To make outgoing calls even in the Emergency.... 35 Press the Right Soft Key [Options], select Contact List and press the OK Key. MAIN MENU To access the Main Menu during a call : 1. The phone maintains Emergency Mode for 5 minutes. Press the Right Soft Key [Options], with a specific word. Press the Right Soft Key [Options], select Recent Calls and press...
User Guide
Page 20
2. Enter"FLOWERS"with the QWERTY Keypad and press the SEND Key to connect. • If the Alphabetical Entry Mode icon is turned on, only capital letters will be appeared. • Pressing the Mode Change Key will change between Numeric Entry Mode and Alphabetical Entry Mode. 3 MEMORY FUNCTION This chapter addresses memory functions including: Storing a phone number Editing contact entries Default numbers Entering letters, numbers & symbols One, Two, Three-touch dialing 36
2. Enter"FLOWERS"with the QWERTY Keypad and press the SEND Key to connect. • If the Alphabetical Entry Mode icon is turned on, only capital letters will be appeared. • Pressing the Mode Change Key will change between Numeric Entry Mode and Alphabetical Entry Mode. 3 MEMORY FUNCTION This chapter addresses memory functions including: Storing a phone number Editing contact entries Default numbers Entering letters, numbers & symbols One, Two, Three-touch dialing 36
User Guide
Page 21
...RINGTONE 07 To identify who is stored in memory. 5. Press the OK Key [SAVE] to save , then press the OK Key. Slide the phone up to edit. 2. Swipe the Directional Key up and press the Right Soft Key [Contacts], then highlight the Contact entry you want to 32 ... From idle mode, press the OK Key to access the Edit Contact screen. 3. Select Family or Work, then press the OK Key [MARK]. STORING A PHONE NUMBER The Contact List stores up , press the Right Soft Key [Contacts], then highlight the desired Contact entry. 01 2. Press the Left Soft Key [Edit...
...RINGTONE 07 To identify who is stored in memory. 5. Press the OK Key [SAVE] to save , then press the OK Key. Slide the phone up to edit. 2. Swipe the Directional Key up and press the Right Soft Key [Contacts], then highlight the Contact entry you want to 32 ... From idle mode, press the OK Key to access the Edit Contact screen. 3. Select Family or Work, then press the OK Key [MARK]. STORING A PHONE NUMBER The Contact List stores up , press the Right Soft Key [Contacts], then highlight the desired Contact entry. 01 2. Press the Left Soft Key [Edit...
User Guide
Page 22
...press the Send Key to Speed Dial: 1. Highlight the Contact entry you want to select the desired speed dial location. 40 EDITING CONTACT ENTRIES ADDING A PHONE NUMBER FROM IDLE MODE 1. A confirmation message appears. Select 1. When completed, press the OK Key [SAVE] to a Contact entry: 1. ADDING OR ... the corresponding speed dial number to edit, then press the Left Soft Key [Edit]. 3. Press the Left Soft Key [Edit]. 3. Highlight the phone number you want to add to update the contact entry. Set Speed Dial, then press the OK Key. 5. Select a Speed Dial location, then...
...press the Send Key to Speed Dial: 1. Highlight the Contact entry you want to select the desired speed dial location. 40 EDITING CONTACT ENTRIES ADDING A PHONE NUMBER FROM IDLE MODE 1. A confirmation message appears. Select 1. When completed, press the OK Key [SAVE] to a Contact entry: 1. ADDING OR ... the corresponding speed dial number to edit, then press the Left Soft Key [Edit]. 3. Press the Left Soft Key [Edit]. 3. Highlight the phone number you want to add to update the contact entry. Set Speed Dial, then press the OK Key. 5. Select a Speed Dial location, then...
User Guide
Page 23
...you want to be deleted. 4. Your Contacts are displayed alphabetically. 2. From idle mode, press the OK Key to update the contact entry. Select the desired phone number to be deleted. 3. Press the OK Key [SAVE] to unlock the keypad, then press the Right Soft Key [Contacts]. 2. From idle mode,... Number. The entire Contact entry can be deleted or 07 another number can be deleted. 5. Select Yes and press the OK Key. Slide the phone up, then press the Right Soft Key [Contacts]. Highlight the Contact entry you to edit, then press the Left Soft Key [Edit]. 3. Press...
...you want to be deleted. 4. Your Contacts are displayed alphabetically. 2. From idle mode, press the OK Key to update the contact entry. Select the desired phone number to be deleted. 3. Press the OK Key [SAVE] to unlock the keypad, then press the Right Soft Key [Contacts]. 2. From idle mode,... Number. The entire Contact entry can be deleted or 07 another number can be deleted. 5. Select Yes and press the OK Key. Slide the phone up, then press the Right Soft Key [Contacts]. Highlight the Contact entry you to edit, then press the Left Soft Key [Edit]. 3. Press...

User Guide
Page 24
... - TOUCH DIALING Ideal for frequently dialed numbers, this feature allows contact entries to Verizon Wireless Account Information. 45 TOUCH DIALING: 10-94: Slide the phone up , then press and hold the second digit of the cursor. Press to page 95 for more than 1 second. (Voicemail) is already assgned to... to change between entering numbers and letters that appear on the same key. • When in Numeric entry mode - TOUCH DIALING: 1-9: Slide the phone up , then press the first digit and press and hold the number you wish to connect to for more details on Backlight.) 07 ONE, TWO...
... - TOUCH DIALING Ideal for frequently dialed numbers, this feature allows contact entries to Verizon Wireless Account Information. 45 TOUCH DIALING: 10-94: Slide the phone up , then press and hold the second digit of the cursor. Press to page 95 for more than 1 second. (Voicemail) is already assgned to... to change between entering numbers and letters that appear on the same key. • When in Numeric entry mode - TOUCH DIALING: 1-9: Slide the phone up , then press the first digit and press and hold the number you wish to connect to for more details on Backlight.) 07 ONE, TWO...


