

WVNP244 User Guide
Page 2
... card when failed to transmit images by the FTP periodic transmission function 12 About the Network Security of the Camera 14 Equipped security functions 14 Display the Setup Menu and Configure the Settings of the Camera using a PC 15 How to display the setup menu 15 How to operate the setup menu 16 Configure the basic settings of the camera [Basic setup 19 Configure the settings relating to images and audio [Camera setup 22 Configure the multi-screen settings [Multi-screen setup 27 Configure the alarm settings [Alarm setup 28 Configure...
... card when failed to transmit images by the FTP periodic transmission function 12 About the Network Security of the Camera 14 Equipped security functions 14 Display the Setup Menu and Configure the Settings of the Camera using a PC 15 How to display the setup menu 15 How to operate the setup menu 16 Configure the basic settings of the camera [Basic setup 19 Configure the settings relating to images and audio [Camera setup 22 Configure the multi-screen settings [Multi-screen setup 27 Configure the alarm settings [Alarm setup 28 Configure...

WVNP244 User Guide
Page 3
... • Adobe, Adobe logos, and Acrobat are registered trademarks of companies and products contained in the U. tered trademarks of the camera. These network operating instructions also contain descriptions of how to display the SETUP menu on the video monitor connected to the VIDEO OUT connector of the camera and of how to configure the settings on the SETUP menu using a PC via a network and of how to connect to read PDF.
... • Adobe, Adobe logos, and Acrobat are registered trademarks of companies and products contained in the U. tered trademarks of the camera. These network operating instructions also contain descriptions of how to display the SETUP menu on the video monitor connected to the VIDEO OUT connector of the camera and of how to configure the settings on the SETUP menu using a PC via a network and of how to connect to read PDF.

WVNP244 User Guide
Page 4
... "ON" is selected for "User Authentication", the authentication window will be displayed before displaying live images for "Transmission type" (☞ page 23), up the web browser. Refer to 8 users can access the camera concurrently. User Name: admin Password: 12345 To enhance the security, change this password periodically. • When "Unicast" is selected for example "http://192.168.0.11:8080". • Configure the web browser to display JPEG image even when "ON" is...
... "ON" is selected for "User Authentication", the authentication window will be displayed before displaying live images for "Transmission type" (☞ page 23), up the web browser. Refer to 8 users can access the camera concurrently. User Name: admin Password: 12345 To enhance the security, change this password periodically. • When "Unicast" is selected for example "http://192.168.0.11:8080". • Configure the web browser to display JPEG image even when "ON" is...

WVNP244 User Guide
Page 5
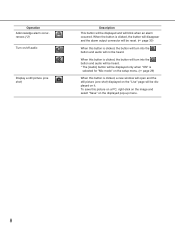
... button will turn green. t Image capture size buttons The selected button will be displayed in /out the displayed image. u Brightness buttons (*2) Adjust the brightness of how to page 7 for "Image capture size" on a multi-screen. Refer to operate the "Live" page. About the "Live" page q [Live] button w Setup button e Multi-screen buttons r Image type buttons t Image capture size buttons y Zoom buttons u Brightness buttons i AUX buttons !0 Alarm occurrence indication button o Camera name !1 Audio button !2 One shot button !3 Time and date !4 Main area q [Live] button...
... button will turn green. t Image capture size buttons The selected button will be displayed in /out the displayed image. u Brightness buttons (*2) Adjust the brightness of how to page 7 for "Image capture size" on a multi-screen. Refer to operate the "Live" page. About the "Live" page q [Live] button w Setup button e Multi-screen buttons r Image type buttons t Image capture size buttons y Zoom buttons u Brightness buttons i AUX buttons !0 Alarm occurrence indication button o Camera name !1 Audio button !2 One shot button !3 Time and date !4 Main area q [Live] button...
WVNP244 User Guide
Page 8
... the button is clicked, the button will disappear and the alarm output connector will be reset. (☞ page 30) When this button is clicked, the button will turn into the button and audio will be heard. * The [Audio] button will be displayed only when "ON" is selected for "Mic mode" on the setup menu. (☞ page 26) When this picture on a PC, right-click on the image and...
... the button is clicked, the button will disappear and the alarm output connector will be reset. (☞ page 30) When this button is clicked, the button will turn into the button and audio will be heard. * The [Audio] button will be displayed only when "ON" is selected for "Mic mode" on the setup menu. (☞ page 26) When this picture on a PC, right-click on the image and...

WVNP244 User Guide
Page 10
... received a Panasonic alarm protocol from the alarm connector on the "Live" page at an alarm occurrence. The settings for the alarm output can be transmitted at an alarm occurrence to a server can be configured on the "Live" page at an alarm occurrence. Notify of the "Alarm setup" page. (☞ page 33) 10 An alarm image can be configured on the [Notification] tab of alarm occurrences to the server designated in advance. The settings for "Video Motion Detection". Alarm...
... received a Panasonic alarm protocol from the alarm connector on the "Live" page at an alarm occurrence. The settings for the alarm output can be transmitted at an alarm occurrence to a server can be configured on the "Live" page at an alarm occurrence. Notify of the "Alarm setup" page. (☞ page 33) 10 An alarm image can be configured on the [Notification] tab of alarm occurrences to the server designated in advance. The settings for "Video Motion Detection". Alarm...

WVNP244 User Guide
Page 12
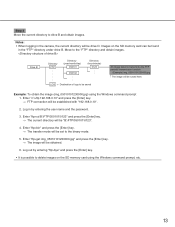
... recommended to the FTP server using the Windows command prompt or FTP client software. → The window with the access level "1. Refer to page 35 for the administrator periodically. To obtain the images saved on the SD memory card By configuring the following settings, saving images which had been failed to transmit to change the password. 12 User Name: admin Password: 12345 To enhance the security, it is impossible...
... recommended to the FTP server using the Windows command prompt or FTP client software. → The window with the access level "1. Refer to page 35 for the administrator periodically. To obtain the images saved on the SD memory card By configuring the following settings, saving images which had been failed to transmit to change the password. 12 User Name: admin Password: 12345 To enhance the security, it is impossible...
WVNP244 User Guide
Page 13
... obtain the image (img_05010101230000.jpg) using the Windows command prompt, etc. 13 Enter "ftp>bin" and press the [Enter] key. → The transfer mode will be set to drive B and obtain images. Move to delete images on the SD memory card can be found in the camera, the current directory will be drive D. Images on the SD memory card using the Windows command prompt...
... obtain the image (img_05010101230000.jpg) using the Windows command prompt, etc. 13 Enter "ftp>bin" and press the [Enter] key. → The transfer mode will be set to drive B and obtain images. Move to delete images on the SD memory card can be found in the camera, the current directory will be drive D. Images on the SD memory card using the Windows command prompt...

WVNP244 User Guide
Page 15
... menu. 15 The setup menu is operable by only users whose access level is "1. Refer to the next page for further information about this button to display the setup menu Step 1 Display the "Live" page. (☞ page 4) Step 2 Click the [Setup] button on the setup menu. Display the Setup Menu and Configure the Settings of the Camera using a PC The settings of the camera can be configured on the "Live" page. → The window with the user name and password...
... menu. 15 The setup menu is operable by only users whose access level is "1. Refer to the next page for further information about this button to display the setup menu Step 1 Display the "Live" page. (☞ page 4) Step 2 Click the [Setup] button on the setup menu. Display the Setup Menu and Configure the Settings of the Camera using a PC The settings of the camera can be configured on the "Live" page. → The window with the user name and password...

WVNP244 User Guide
Page 17
... used for the alarm action at an alarm occurrence, the alarm occurrence notification, and the VMD area settings can be registered on the "Server setup" page. The cameras to image from the camera such as time and date and cam- t [Alarm setup] button Click this button to which the camera accesses can be configured on the "Alarm setup" page. tion. The settings relating to the mail server and the FTP server to display the "Basic setup" page. e [Camera setup] button...
... used for the alarm action at an alarm occurrence, the alarm occurrence notification, and the VMD area settings can be registered on the "Server setup" page. The cameras to image from the camera such as time and date and cam- t [Alarm setup] button Click this button to which the camera accesses can be configured on the "Alarm setup" page. tion. The settings relating to the mail server and the FTP server to display the "Basic setup" page. e [Camera setup] button...

WVNP244 User Guide
Page 20
... server address: 1 - 128 characters Default: (blank) 20 Number of the camera. Time adjusted by synchronizing with NTP server will be used as the standard time of the camera. Notes: • Link LED: This LED will light when communication with the connected device is available. • Access LED: This LED will light when accessing to a network. • SD memory card error LED: This LED will light when it is necessary to configure the DNS settings on the [Network] tab of the "Network setup...
... server address: 1 - 128 characters Default: (blank) 20 Number of the camera. Time adjusted by synchronizing with NTP server will be used as the standard time of the camera. Notes: • Link LED: This LED will light when communication with the connected device is available. • Access LED: This LED will light when accessing to a network. • SD memory card error LED: This LED will light when it is necessary to configure the DNS settings on the [Network] tab of the "Network setup...

WVNP244 User Guide
Page 21
...- Depending on the setup menu. Configure the settings relating to SD memory card [SD memory card] Click the [SD memory card] tab on the "Basic setup" page. (☞ page 16) The settings relating to the SD memory card can be configured on this camera. • Save/obtain images when failed to transmit to the FTP server using the SD memory card may not work properly or performance deterioration...
...- Depending on the setup menu. Configure the settings relating to SD memory card [SD memory card] Click the [SD memory card] tab on the "Basic setup" page. (☞ page 16) The settings relating to the SD memory card can be configured on this camera. • Save/obtain images when failed to transmit to the FTP server using the SD memory card may not work properly or performance deterioration...

WVNP244 User Guide
Page 26
... sensitivity of the built-in microphone of the camera from the camera to the PC. Configure the settings relating to audio [Audio] Click the [Audio] tab on the "Camera setup" page. (☞ page 16) The settings relating to audio can be heard with images on a PC. ON: Transmits audio from the following . Default: ON [Authentication] Select an access level for audio transmission from the camera to the PC.
... sensitivity of the built-in microphone of the camera from the camera to the PC. Configure the settings relating to audio [Audio] Click the [Audio] tab on the "Camera setup" page. (☞ page 16) The settings relating to audio can be heard with images on a PC. ON: Transmits audio from the following . Default: ON [Authentication] Select an access level for audio transmission from the camera to the PC.
WVNP244 User Guide
Page 30
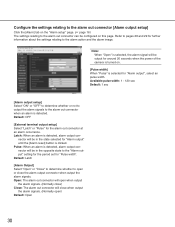
... to output the alarm signals to the "Alarm output" setting for the period set for around 20 seconds when the power of the camera is turned on. [Pulse width] When "Pulse" is clicked. Default: Latch [Alarm Output] Select "Open" or "Close" to determine whether to the alarm out connector can be configured on this page. Configure the settings relating to the alarm out connector [Alarm output setup] Click the [Alarm] tab on the "Alarm setup...
... to output the alarm signals to the "Alarm output" setting for the period set for around 20 seconds when the power of the camera is turned on. [Pulse width] When "Pulse" is clicked. Default: Latch [Alarm Output] Select "Open" or "Close" to determine whether to the alarm out connector can be configured on this page. Configure the settings relating to the alarm out connector [Alarm output setup] Click the [Alarm] tab on the "Alarm setup...

WVNP244 User Guide
Page 35
... to configure the settings. acters Default: (blank) [Password] [Retype password] Enter the password. Live only: Only displaying live images is clicked, the respective user information will be displayed with the access level. (Example: admin [1]) To delete the registered user, click the [DEL] button after selecting the user to be deleted. Default: OFF [User name] Enter a user name. Administrator: Allowed all users whose access level is "1. Note: When the user name already in use is...
... to configure the settings. acters Default: (blank) [Password] [Retype password] Enter the password. Live only: Only displaying live images is clicked, the respective user information will be displayed with the access level. (Example: admin [1]) To delete the registered user, click the [DEL] button after selecting the user to be deleted. Default: OFF [User name] Enter a user name. Administrator: Allowed all users whose access level is "1. Note: When the user name already in use is...

WVNP244 User Guide
Page 41
... IP address + : (colon) + port number] in the "Address" box of the broadband router in use. When using DHCP, the DDNS function is necessary to configure the host name, user name and password registered in the DDNS server. [DDNS] Select "ON" or "OFF" to determine whether or not to use the DDNS function, it is possible to access with "Host name registered in a router. • To access the camera via the Internet...
... IP address + : (colon) + port number] in the "Address" box of the broadband router in use. When using DHCP, the DDNS function is necessary to configure the host name, user name and password registered in the DDNS server. [DDNS] Select "ON" or "OFF" to determine whether or not to use the DDNS function, it is possible to access with "Host name registered in a router. • To access the camera via the Internet...

WVNP244 User Guide
Page 42
... the community name to manage the camera with the SNMP function. acters Configure the settings relating to SNMP [SNMP] Click the [SNMP] tab on the "Network setup" page. (☞ page 16) The settings relating to SNMP can be used to be monitored. Number of characters for the camera title: 0 - 32 characters Default: (blank) 42 [User name] Enter the user name (login name) to access the DDNS server.
... the community name to manage the camera with the SNMP function. acters Configure the settings relating to SNMP [SNMP] Click the [SNMP] tab on the "Network setup" page. (☞ page 16) The settings relating to SNMP can be used to be monitored. Number of characters for the camera title: 0 - 32 characters Default: (blank) 42 [User name] Enter the user name (login name) to access the DDNS server.

WVNP244 User Guide
Page 46
... the upgrade. (Except the network settings)". " was selected, the confirmation window will be displayed. Important: • Upgrade the firmware using a PC in the process of upgrade. • The following network settings will be displayed. Step 4 Click the [Upgrade] button. → The confirmation window will not be displayed. IP address, net mask, default gateway, HTTP port, ON/OFF settings for DHCP, AUTO/MANUAL settings for DNS, DNS primary and secondary address, line speed, total bit rate, time...
... the upgrade. (Except the network settings)". " was selected, the confirmation window will be displayed. Important: • Upgrade the firmware using a PC in the process of upgrade. • The following network settings will be displayed. Step 4 Click the [Upgrade] button. → The confirmation window will not be displayed. IP address, net mask, default gateway, HTTP port, ON/OFF settings for DHCP, AUTO/MANUAL settings for DNS, DNS primary and secondary address, line speed, total bit rate, time...

WVNP244 User Guide
Page 50
.... ing normally. Are the IP addresses of the camera and the PC set for the settings of the browser checked? - Operating instructions • Is the link LED right by pressing the [INITIAL SET] button on the rear of the camera in the "Don't Use Proxy For These Addresses" box. Check if the cables have any contact failure or if the wiring is recommended to a LAN may...
.... ing normally. Are the IP addresses of the camera and the PC set for the settings of the browser checked? - Operating instructions • Is the link LED right by pressing the [INITIAL SET] button on the rear of the camera in the "Don't Use Proxy For These Addresses" box. Check if the cables have any contact failure or if the wiring is recommended to a LAN may...

WVNP244 User Guide
Page 51
... operating the camera. Check if the focus is detached. Check if the power of the network or the concen- Install the viewer software on a PC? Check if the lens cap is adjusted correctly. ties displaying the camera picture. Click the reload but- - tration of your browser, there might be refreshed. 51 Images are dust or dirt on the lens? Operating instructions • Depending on the version of access to use Internet Explorer...
... operating the camera. Check if the focus is detached. Check if the power of the network or the concen- Install the viewer software on a PC? Check if the lens cap is adjusted correctly. ties displaying the camera picture. Click the reload but- - tration of your browser, there might be refreshed. 51 Images are dust or dirt on the lens? Operating instructions • Depending on the version of access to use Internet Explorer...


