
WVCW384 User Guide
Page 1
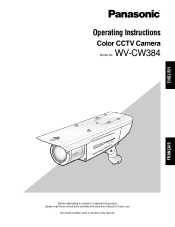
FRANÇAIS WV-CW384 Before attempting to connect or operate this product, please read these instructions carefully and save this manual. No model number suffix is shown in this manual for future use. ENGLISH Operating Instructions Color CCTV Camera WV-CW384 Model No.
FRANÇAIS WV-CW384 Before attempting to connect or operate this product, please read these instructions carefully and save this manual. No model number suffix is shown in this manual for future use. ENGLISH Operating Instructions Color CCTV Camera WV-CW384 Model No.
WVCW384 User Guide
Page 2
... identification in which case the user will be found to comply with the instruction manual, may be required to computer or peripheral devices). NO USER-SERVICEABLE PARTS INSIDE. Serial No. CAUTION: Before attempting to connect or operate this book as a permanent record of this product may cause harmful interference to cause harmful interference in the event of the FCC Rules...
... identification in which case the user will be found to comply with the instruction manual, may be required to computer or peripheral devices). NO USER-SERVICEABLE PARTS INSIDE. Serial No. CAUTION: Before attempting to connect or operate this book as a permanent record of this product may cause harmful interference to cause harmful interference in the event of the FCC Rules...
WVCW384 User Guide
Page 3
...Setting (RESOLUTION) ...29 11. Camera Identification Setting (CAMERA ID) ...23 2. Synchronization Setting (SYNC) ...26 7. Black and White Mode Setting (BW MODE) ...29 12. LED Setting (LED) ...31 16. Privacy Zone Setting (PRIVACY ZONE) ...30 13. Electronic Sensitivity Enhancement (SENS UP) ...26 6. Motion Detection Setting (MOTION DET) ...27 9. White Balance Setting (WHITE BAL) ...27 8. Special Menu (SPECIAL SETUP) ...32 Troubleshooting ...34 Specifications ...35 Standard Accessories ...36 3 Back-focus Setting (BACK-FOCUS SETUP) ...31 17. Light Control Mode Setting...
...Setting (RESOLUTION) ...29 11. Camera Identification Setting (CAMERA ID) ...23 2. Synchronization Setting (SYNC) ...26 7. Black and White Mode Setting (BW MODE) ...29 12. LED Setting (LED) ...31 16. Privacy Zone Setting (PRIVACY ZONE) ...30 13. Electronic Sensitivity Enhancement (SENS UP) ...26 6. Motion Detection Setting (MOTION DET) ...27 9. White Balance Setting (WHITE BAL) ...27 8. Special Menu (SPECIAL SETUP) ...32 Troubleshooting ...34 Specifications ...35 Standard Accessories ...36 3 Back-focus Setting (BACK-FOCUS SETUP) ...31 17. Light Control Mode Setting...
WVCW384 User Guide
Page 6
... (super dynamic function) Integration of this unit and the setup menu. The back focus can be remotely adjusted through the operation buttons on the wall or the ceilling, using the supplied camera mount bracket. This camera is required at low illuminance. Preface Panasonic's WV-CW384 camera introduces high picture quality by use of focus when changing between color and black-and-white images. Night monochrome image activation function equipped No operation is designed for installation on this...
... (super dynamic function) Integration of this unit and the setup menu. The back focus can be remotely adjusted through the operation buttons on the wall or the ceilling, using the supplied camera mount bracket. This camera is required at low illuminance. Preface Panasonic's WV-CW384 camera introduces high picture quality by use of focus when changing between color and black-and-white images. Night monochrome image activation function equipped No operation is designed for installation on this...

WVCW384 User Guide
Page 7
... changing the fixed shooting direction after turning on the CCD color filter When continuously shooting a bright light source such as a spot light causes a blooming (light bleeding) or a smear (vertical lines). The input power source is supplied from a heater. • Use this product may deteriorate and it may cause discoloration. Cleaning this product beyond the specified temperature, humidity or power source ratings. Use lens...
... changing the fixed shooting direction after turning on the CCD color filter When continuously shooting a bright light source such as a spot light causes a blooming (light bleeding) or a smear (vertical lines). The input power source is supplied from a heater. • Use this product may deteriorate and it may cause discoloration. Cleaning this product beyond the specified temperature, humidity or power source ratings. Use lens...

WVCW384 User Guide
Page 8
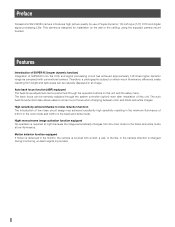
... power source. !2 Video output cable !3 Safety wire !4 Rear cover !5 Switch cover This cover is removed at operating the operation buttons. After lens adjustment, the fixing screws shall be securely tightened. ( page 17) !6 - @0 Operation buttons !6 Up button (UP) !7 Right button (RIGHT) !8 Down button (DOWN) !9 Left button (LEFT) @0 Set button (SET) @1 Camera mount bracket (accessory) @2 Adapter box (accessory) w Zoom adjustment ring Adjusts the zoom position. ( page 16) e Auto back focus button Activates the auto back focus function. The lens cover is removed at lens adjustment...
... power source. !2 Video output cable !3 Safety wire !4 Rear cover !5 Switch cover This cover is removed at operating the operation buttons. After lens adjustment, the fixing screws shall be securely tightened. ( page 17) !6 - @0 Operation buttons !6 Up button (UP) !7 Right button (RIGHT) !8 Down button (DOWN) !9 Left button (LEFT) @0 Set button (SET) @1 Camera mount bracket (accessory) @2 Adapter box (accessory) w Zoom adjustment ring Adjusts the zoom position. ( page 16) e Auto back focus button Activates the auto back focus function. The lens cover is removed at lens adjustment...
WVCW384 User Guide
Page 9
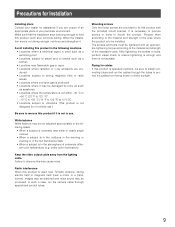
... tightening the screws or bolts, perform visual check to mount the product. under color illumination) Keep the video output cable away from being frozen or direct sunlight. 9 Avoid installing this product with an appropriate tightening torque according to protect the cables from the lighting cable. White balance White balance may be not adjusted appropriately in the following cases. • When a subject is...
... tightening the screws or bolts, perform visual check to mount the product. under color illumination) Keep the video output cable away from being frozen or direct sunlight. 9 Avoid installing this product with an appropriate tightening torque according to protect the cables from the lighting cable. White balance White balance may be not adjusted appropriately in the following cases. • When a subject is...

WVCW384 User Guide
Page 10
... the cables and wire. 10 Pass the video output cable, power cord and safety wire through the camera mount bracket from the camera side to the wall side and use the cable clamp to loosen or tighten the tilting lock screw. Note: • Use a hexagonal wrench with width across flats of objects to support the total weight, the area shall be used. Camera installation z Secure the camera to the horizontal position. 2. Tilting lock screw Camera...
... the cables and wire. 10 Pass the video output cable, power cord and safety wire through the camera mount bracket from the camera side to the wall side and use the cable clamp to loosen or tighten the tilting lock screw. Note: • Use a hexagonal wrench with width across flats of objects to support the total weight, the area shall be used. Camera installation z Secure the camera to the horizontal position. 2. Tilting lock screw Camera...
WVCW384 User Guide
Page 14
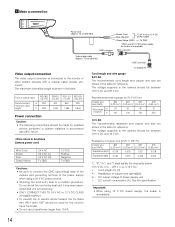
... Camera power cord Wire Color Brown Blue Green/Yellow 24 V AC 24 V AC (L) 24 V AC (N) To GND 12 V DC Positive Negative To GND Cautions: • Be sure to the monitor or other system devices with a coaxial cable (locally procured). Important: • When using 12 V DC power supply, the heater is unavailable. BNC connector Video output cable (Approx. 72 cm {28-3/8"}) BNC connector To VIDEO IN Video output connection The video output connector...
... Camera power cord Wire Color Brown Blue Green/Yellow 24 V AC 24 V AC (L) 24 V AC (N) To GND 12 V DC Positive Negative To GND Cautions: • Be sure to the monitor or other system devices with a coaxial cable (locally procured). Important: • When using 12 V DC power supply, the heater is unavailable. BNC connector Video output cable (Approx. 72 cm {28-3/8"}) BNC connector To VIDEO IN Video output connection The video output connector...

WVCW384 User Guide
Page 16
... then adjust the focus. Zoom adjustment ring 1. Press the auto back focus button after adjusting the view angle while viewing the monitor for adjustment. → The focus position indicator is not followed after focus adjustment.) • Reset the back focus position to restore the default position before the back focus adjustment. (Hold down the right and left buttons simultaneously for 2 seconds or more after automatic back focus adjustment, use the operation buttons through the setup menu. ( page 31) Notes: • No operation for...
... then adjust the focus. Zoom adjustment ring 1. Press the auto back focus button after adjusting the view angle while viewing the monitor for adjustment. → The focus position indicator is not followed after focus adjustment.) • Reset the back focus position to restore the default position before the back focus adjustment. (Hold down the right and left buttons simultaneously for 2 seconds or more after automatic back focus adjustment, use the operation buttons through the setup menu. ( page 31) Notes: • No operation for...

WVCW384 User Guide
Page 20
... secure the safety wire. For wall installation For ceiling installation Camera mount bracket WV-831 WV-7010A Safety wire WV-Q140 WV-Q141 4. Use of the safety wire on the sunshield mounting stud and screw the sunshield to use the camera mount bracket in the accessories. 20 Refer to the instructions of the camera according to take measures against a fall of the safety wire for tripod socket (accessories). Use a safety wire...
... secure the safety wire. For wall installation For ceiling installation Camera mount bracket WV-831 WV-7010A Safety wire WV-Q140 WV-Q141 4. Use of the safety wire on the sunshield mounting stud and screw the sunshield to use the camera mount bracket in the accessories. 20 Refer to the instructions of the camera according to take measures against a fall of the safety wire for tripod socket (accessories). Use a safety wire...
WVCW384 User Guide
Page 21
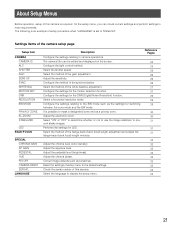
... motion detection function. Select a horizontal resolution mode. Select "ON" or "OFF" to determine whether or not to use the image stabilizer to the default settings. Adjust the aperture level. Correct image defects such as a privacy zone. Reset the settings of setup menu to prevent shaky images. Adjust the sensitivity. Configure the settings for LED. Adjust the pedestal level (brightness). The following is an example of setup procedure when "LANGUAGE" is set to display...
... motion detection function. Select a horizontal resolution mode. Select "ON" or "OFF" to determine whether or not to use the image stabilizer to the default settings. Adjust the aperture level. Correct image defects such as a privacy zone. Reset the settings of setup menu to prevent shaky images. Adjust the sensitivity. Configure the settings for LED. Adjust the pedestal level (brightness). The following is an example of setup procedure when "LANGUAGE" is set to display...
WVCW384 User Guide
Page 22
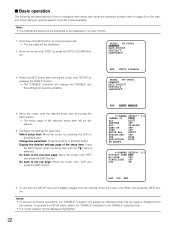
... the setup item: Press the [SET] button when the setup item with the [O] mark is also available. To operate the SETUP menu, switch the "DISABLE" indication to the "ENABLE" indication first. • The cursor position will be displayed when the top page is displayed from the camera, move the cursor onto "END" and press the [SET] button. Setup using the operation buttons (refer to page 8) on a video monitor. 1. Press the [SET] button after...
... the setup item: Press the [SET] button when the setup item with the [O] mark is also available. To operate the SETUP menu, switch the "DISABLE" indication to the "ENABLE" indication first. • The cursor position will be displayed when the top page is displayed from the camera, move the cursor onto "END" and press the [SET] button. Setup using the operation buttons (refer to page 8) on a video monitor. 1. Press the [SET] button after...
WVCW384 User Guide
Page 23
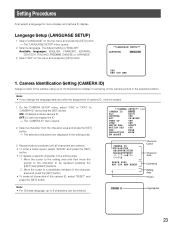
... top menu and press the [SET] button. → The "LANGUAGE SETUP" menu opens. 2. Camera Identification Setting (CAMERA ID) Assign a name to the camera using up to be entered. **CAMERA SETUP** 1/2 CAMERA ID OFF ALC ALC SHUTTER OFF AGC ON(HIGH) SENS UP OFF SYNC INT WHITE BAL ATW1 MOTION DET OFF DNR HIGH RESOLUTION HIGH BW MODE CAMERA ID 0123456789 ABCDEFGHIJKLM NOPQRSTUVWXYZ SPACE POSI RET TOP END RESET Character...
... top menu and press the [SET] button. → The "LANGUAGE SETUP" menu opens. 2. Camera Identification Setting (CAMERA ID) Assign a name to the camera using up to be entered. **CAMERA SETUP** 1/2 CAMERA ID OFF ALC ALC SHUTTER OFF AGC ON(HIGH) SENS UP OFF SYNC INT WHITE BAL ATW1 MOTION DET OFF DNR HIGH RESOLUTION HIGH BW MODE CAMERA ID 0123456789 ABCDEFGHIJKLM NOPQRSTUVWXYZ SPACE POSI RET TOP END RESET Character...
WVCW384 User Guide
Page 26
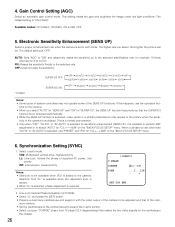
... "AUTO" for "SENS UP" and "ON" for example 10 times when set to the camera. AUTO: Sets "AGC" to "ON" and adaptively raises the sensitivity up to the selected amplification rate, for "SUPER-D3", the SENS UP function has priority so that of the SENS UP functions. tons on the "BACK-FOCUS SETUP" menu. Gain Control Setting (AGC) Select an automatic gain control mode.
... "AUTO" for "SENS UP" and "ON" for example 10 times when set to the camera. AUTO: Sets "AGC" to "ON" and adaptively raises the sensitivity up to the selected amplification rate, for "SUPER-D3", the SENS UP function has priority so that of the SENS UP functions. tons on the "BACK-FOCUS SETUP" menu. Gain Control Setting (AGC) Select an automatic gain control mode.
WVCW384 User Guide
Page 27
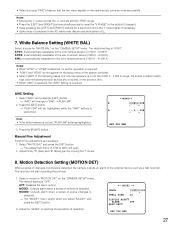
...] buttons simultaneously to reset the "V PHASE" to the default (0 degree). • Keep pressing the [LEFT] and [RIGHT] buttons for "LEVEL" to move the "I ...128 - + 2S DISPLAY MODE ALARM OFF MASK SET RET TOP END 27 MODE1: Outputs alarm when a series of LL. 7. White Balance Setting (WHITE BAL) Select a mode for "MOTION DET" on the "CAMERA SETUP" menu. ATW2: Is automatically adaptable to "AWC → PUSH SW". 2. end will change to the use...
...] buttons simultaneously to reset the "V PHASE" to the default (0 degree). • Keep pressing the [LEFT] and [RIGHT] buttons for "LEVEL" to move the "I ...128 - + 2S DISPLAY MODE ALARM OFF MASK SET RET TOP END 27 MODE1: Outputs alarm when a series of LL. 7. White Balance Setting (WHITE BAL) Select a mode for "MOTION DET" on the "CAMERA SETUP" menu. ATW2: Is automatically adaptable to "AWC → PUSH SW". 2. end will change to the use...
WVCW384 User Guide
Page 28
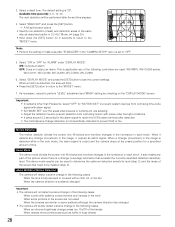
... mode divides the screen into 48 blocks and monitors changes in the luminance in the "CAMERA SETUP" menu is output and the camera stops at the preset position for "ALARM" under low light conditions. • It takes around 0.2 seconds for the alarm signal to reach the VCR's alarm terminal after detection. • The motion/scene change in the auto mode, the alarm signal is set time elapses. 4. When a cloth with alarm signal. • Set "MASK SET...
... mode divides the screen into 48 blocks and monitors changes in the luminance in the "CAMERA SETUP" menu is output and the camera stops at the preset position for "ALARM" under low light conditions. • It takes around 0.2 seconds for the alarm signal to reach the VCR's alarm terminal after detection. • The motion/scene change in the auto mode, the alarm signal is set time elapses. 4. When a cloth with alarm signal. • Set "MASK SET...
WVCW384 User Guide
Page 29
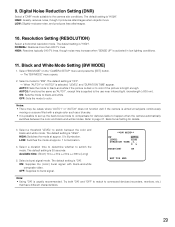
... mode to connected devices (recorders, monitors, etc.) that have different characteristics. 29 LOW: Switches the mode at approx. 5 lx illumination. Select a burst signal mode. OFF: Supplies no burst signal. **BW MODE** BW AUTO1 LEVEL HIGH DURATION TIME .I.. Select a duration time to determine whether to the camera site conditions. The default setting is "HIGH". The default setting is selected, "LEVEL" and "DURATION TIME" appear. Select "BW MODE" on the "CAMERA SETUP" menu...
... mode to connected devices (recorders, monitors, etc.) that have different characteristics. 29 LOW: Switches the mode at approx. 5 lx illumination. Select a burst signal mode. OFF: Supplies no burst signal. **BW MODE** BW AUTO1 LEVEL HIGH DURATION TIME .I.. Select a duration time to determine whether to the camera site conditions. The default setting is "HIGH". The default setting is selected, "LEVEL" and "DURATION TIME" appear. Select "BW MODE" on the "CAMERA SETUP" menu...
WVCW384 User Guide
Page 31
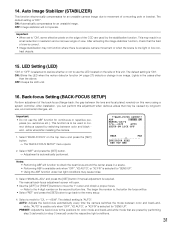
... menu using a system controller. Select "MANUAL-ADJ" and press the [SET] button if manual adjustment is "AUTO". AUTO: Adjusts the back-focus automatically every time the camera switches the mode between color and black and - This may not function where there is excessive camera movement or when the scene is to be caused by long-term use, environmental changes, etc. Lights in an image. Back-focus Setting (BACK-FOCUS SETUP) Perform adjustment of view. poses (ex. white when/after installing...
... menu using a system controller. Select "MANUAL-ADJ" and press the [SET] button if manual adjustment is "AUTO". AUTO: Adjusts the back-focus automatically every time the camera switches the mode between color and black and - This may not function where there is excessive camera movement or when the scene is to be caused by long-term use, environmental changes, etc. Lights in an image. Back-focus Setting (BACK-FOCUS SETUP) Perform adjustment of view. poses (ex. white when/after installing...
WVCW384 User Guide
Page 35
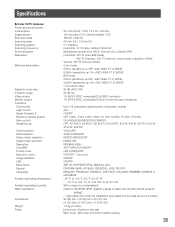
Specifications Color CCTV Cameras Power source and power consumption: Image sensor: Effective pixels: Scanning area: Scanning system: Scanning frequency: Synchronization: Resolution: Minimum illumination: Signal-to-noise ratio: Dynamic range: Video output: Monitor output: Functions Camera title: Light control: Super-Dynamic 3: Electronic shutter speed: Gain control: Sensitivity up: Synchronization: White balance: Video motion detection: Digital noise reduction: Resolution: Color/BW: Privacy zone: Electronic zoom: Image stabilizer: LED: Back-focus: Special: Language: Ambient operating ...
Specifications Color CCTV Cameras Power source and power consumption: Image sensor: Effective pixels: Scanning area: Scanning system: Scanning frequency: Synchronization: Resolution: Minimum illumination: Signal-to-noise ratio: Dynamic range: Video output: Monitor output: Functions Camera title: Light control: Super-Dynamic 3: Electronic shutter speed: Gain control: Sensitivity up: Synchronization: White balance: Video motion detection: Digital noise reduction: Resolution: Color/BW: Privacy zone: Electronic zoom: Image stabilizer: LED: Back-focus: Special: Language: Ambient operating ...


