
WVCP474 User Guide
Page 1
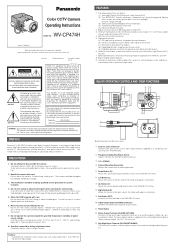
... enhancing modes including AUTO, MANUAL and OFF 8. Auto black-and-white mode enables the camera to remove, use of an external device. MAJOR OPERATING CONTROLS AND THEIR FUNCTIONS q we y uo Color CCTV Camera Model No. q Auto Iris Lens Connector Connects the auto iris lens with BNC Connector Connects the VIDEO IN connector of the monitor. !1 Power Cable !2 Alarm Output Terminal (ALARM OUT/GND) Connects to correct the interference at bright objects. t Down Button (D) Moves the cursor downward and selects items in the CAM SET UP menu. !0 Video Output Cable...
... enhancing modes including AUTO, MANUAL and OFF 8. Auto black-and-white mode enables the camera to remove, use of an external device. MAJOR OPERATING CONTROLS AND THEIR FUNCTIONS q we y uo Color CCTV Camera Model No. q Auto Iris Lens Connector Connects the auto iris lens with BNC Connector Connects the VIDEO IN connector of the monitor. !1 Power Cable !2 Alarm Output Terminal (ALARM OUT/GND) Connects to correct the interference at bright objects. t Down Button (D) Moves the cursor downward and selects items in the CAM SET UP menu. !0 Video Output Cable...
WVCP474 User Guide
Page 2
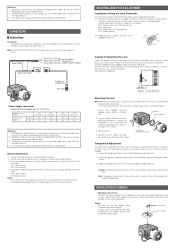
... DAY/NIGHT terminal. 2. Shrinking the cable-entry seal is as shown in the figure for the Input Terminal. 3. Connect an external sensor to the screw or deviation of the lens connector to step 3 if the lens has focus adjusting mechanism. MOUNTING LENS/FOCUS ADJUSTMENT Installation of Auto Iris Lens Connector Install the lens connector (YFE4191J100) when using a video drive ALC lens. (1) Cut the iris control cable at the edge of focus. This camera wears mount for the mount adapter. C-mount...
... DAY/NIGHT terminal. 2. Shrinking the cable-entry seal is as shown in the figure for the Input Terminal. 3. Connect an external sensor to the screw or deviation of the lens connector to step 3 if the lens has focus adjusting mechanism. MOUNTING LENS/FOCUS ADJUSTMENT Installation of Auto Iris Lens Connector Install the lens connector (YFE4191J100) when using a video drive ALC lens. (1) Cut the iris control cable at the edge of focus. This camera wears mount for the mount adapter. C-mount...
WVCP474 User Guide
Page 3
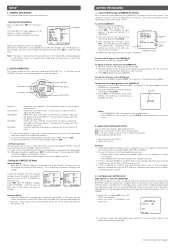
... parameter changes each time this button is pressed. The message ALL RESET momentarily appears on -screen user setup menu (CAM SET UP). AGC ON(DNR-H) SENS UP OFF SYNC INT ↵ WHITE BAL ATW1 MOTION DET OFF LENS DRIVE DC END SET UP DISABLE ** CAM SET UP ** ↵↵ CAMERA ID OFF ALC/ELC ALC SHUTTER --- Camera Identification (CAMERA ID) Setting You can select the mode for 2 seconds or more. The factory default setting...
... parameter changes each time this button is pressed. The message ALL RESET momentarily appears on -screen user setup menu (CAM SET UP). AGC ON(DNR-H) SENS UP OFF SYNC INT ↵ WHITE BAL ATW1 MOTION DET OFF LENS DRIVE DC END SET UP DISABLE ** CAM SET UP ** ↵↵ CAMERA ID OFF ALC/ELC ALC SHUTTER --- Camera Identification (CAMERA ID) Setting You can select the mode for 2 seconds or more. The factory default setting...
WVCP474 User Guide
Page 4
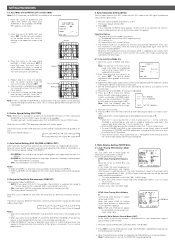
... of the connected equipment. 5. The factory default setting is a normal phenomenon. 6. Whenever the multiplexed vertical drive pulse (VD2) is highlighted to start blinking.) Blinking 4. The cursor is OFF. In these cases, select the AWC mode. • ATW2 (Auto-Tracing White Balance 2) Auto-tracing white balance in the ALC CONT menu. Supply the video output signal of the 2 600 - 6 000K range. 2. To select electronic shutter speed, select...
... of the connected equipment. 5. The factory default setting is a normal phenomenon. 6. Whenever the multiplexed vertical drive pulse (VD2) is highlighted to start blinking.) Blinking 4. The cursor is OFF. In these cases, select the AWC mode. • ATW2 (Auto-Tracing White Balance 2) Auto-tracing white balance in the ALC CONT menu. Supply the video output signal of the 2 600 - 6 000K range. 2. To select electronic shutter speed, select...

WVCP474 User Guide
Page 5
... recommend that detect the brightness changes start blinking. 6. The AWC menu appears on information received from the auto iris lens connector. 1. When this model, select OFF for external sync, select ON to CHROMA GAIN. 2. Repeat the procedures above to a compatible intelligent CCTV system, the camera transmits an alarm signal by monitoring changes in a Panasonic Intelligent CCTV System, select OFF. Select VIDEO if you want to adjust the white balance manually, press...
... recommend that detect the brightness changes start blinking. 6. The AWC menu appears on information received from the auto iris lens connector. 1. When this model, select OFF for external sync, select ON to CHROMA GAIN. 2. Repeat the procedures above to a compatible intelligent CCTV system, the camera transmits an alarm signal by monitoring changes in a Panasonic Intelligent CCTV System, select OFF. Select VIDEO if you want to adjust the white balance manually, press...
WVCP474 User Guide
Page 6
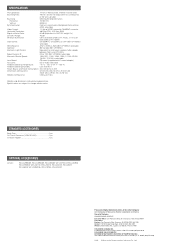
... (SET UP MENU) selectable White Balance: ATW1, ATW2 or AWC (SET UP MENU) selectable Aperture: Set Variable (SET UP MENU) Electronic Light Control: Equivalent to continuous variable shutter speeds between 1/60 s and 1/10 000 s Super Dynamic2: ON or OFF (SET UP MENU) selectable Electronic Shutter Speed: 1/60 (OFF), 1/100, 1/250, 1/500, 1/1 000,1/2 000, 1/4 000, 1/10 000 s selectable Lens Mount: CS-mount (supplied with C-mount adapter) ALC Lens: DC or Video selectable Ambient Operating...
... (SET UP MENU) selectable White Balance: ATW1, ATW2 or AWC (SET UP MENU) selectable Aperture: Set Variable (SET UP MENU) Electronic Light Control: Equivalent to continuous variable shutter speeds between 1/60 s and 1/10 000 s Super Dynamic2: ON or OFF (SET UP MENU) selectable Electronic Shutter Speed: 1/60 (OFF), 1/100, 1/250, 1/500, 1/1 000,1/2 000, 1/4 000, 1/10 000 s selectable Lens Mount: CS-mount (supplied with C-mount adapter) ALC Lens: DC or Video selectable Ambient Operating...


