
Operating Instructions
Page 2
... have specific procedures of the pictographs in order to 1 observe the instructions given in a location where it off immediately and consult your dealer or an authorized Panasonic Servicenter. ❑ Do not use the from the negative (-) battery terminal before installation. ❑ Make sure the leads do not interfere with driving or getting in a location where it replaced with power. ❑ After installation and wiring...
... have specific procedures of the pictographs in order to 1 observe the instructions given in a location where it off immediately and consult your dealer or an authorized Panasonic Servicenter. ❑ Do not use the from the negative (-) battery terminal before installation. ❑ Make sure the leads do not interfere with driving or getting in a location where it replaced with power. ❑ After installation and wiring...

Operating Instructions
Page 3
... position Operating the audio system for the remote control unit. ● Use only specified battery (CR2025). ● Match the polarity of parts other damage to damage the leads. Make sure that the unit does not get immediate medical atten- Observe the following the instructions to qualified service personnel. Not following cautions when handling the battery for a long period of time. ❑ Follow the instructions to direct...
... position Operating the audio system for the remote control unit. ● Use only specified battery (CR2025). ● Match the polarity of parts other damage to damage the leads. Make sure that the unit does not get immediate medical atten- Observe the following the instructions to qualified service personnel. Not following cautions when handling the battery for a long period of time. ❑ Follow the instructions to direct...
Operating Instructions
Page 5
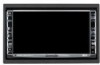
... clearly or may move slowly. Installation Hardware (screws, cords, etc.) (a Installation Instructions) Note: ¡The number in such environments. Main Unit SRC ALBUM FOLDER MENU VOL TUNE TRACK (LCD monitor/DVD player) MUTE NAVI P-MODE ASPECT ASP TILT Qty.: 1 PWR SRC MUTE VOL ENTER / BAND ENT RET RETURN TOP MENU DVD MENU CAR AV 2. System Upgrade Guidebook Qty.: 1 XXXXXXXXXXXXXXX XXXXXXXXXXXXXXXXX XXXXXXXXXXXXXX XXXXXXXXXXXXXXXX OO-OOOOO 6. CQ-VD6505U 5 Components PWR 1. Wiping Cloth Qty...
... clearly or may move slowly. Installation Hardware (screws, cords, etc.) (a Installation Instructions) Note: ¡The number in such environments. Main Unit SRC ALBUM FOLDER MENU VOL TUNE TRACK (LCD monitor/DVD player) MUTE NAVI P-MODE ASPECT ASP TILT Qty.: 1 PWR SRC MUTE VOL ENTER / BAND ENT RET RETURN TOP MENU DVD MENU CAR AV 2. System Upgrade Guidebook Qty.: 1 XXXXXXXXXXXXXXX XXXXXXXXXXXXXXXXX XXXXXXXXXXXXXX XXXXXXXXXXXXXXXX OO-OOOOO 6. CQ-VD6505U 5 Components PWR 1. Wiping Cloth Qty...
Operating Instructions
Page 7
... Parts Labor Audio Components (except items listed One (1) Year below) MXE Series Audio Components (except Two (2) Years items listed below , which result from accident, misuse, abuse, neglect, bug infestation, mishandling, misapplication, alteration, faulty installation, set-up adjustment, maladjustment of consumer control, improper maintenance, improper antenna, inadequate signal reception or pickup, power line surge, improper voltage supply, lightning, modification, commercial use...
... Parts Labor Audio Components (except items listed One (1) Year below) MXE Series Audio Components (except Two (2) Years items listed below , which result from accident, misuse, abuse, neglect, bug infestation, mishandling, misapplication, alteration, faulty installation, set-up adjustment, maladjustment of consumer control, improper maintenance, improper antenna, inadequate signal reception or pickup, power line surge, improper voltage supply, lightning, modification, commercial use...
Operating Instructions
Page 8
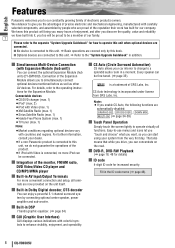
... audio room in DSP 7 bands graphic equalizer. (a page 34) ■ GUI (Graphic User Interface) GUI displays various indications with colorful symbols to enhance visibility, enjoyment, and operability. ■ CS Auto (Circle Surround Automotive) CS Auto allows your car interior to change to operate virtually all functions. Connectable devices ¡CD/DVD changer (max. 1) ¡iPod® (max. 2) ¡iPod with Video (max. 1) ¡XM Satellite Radio (max. 1) ¡Sirius Satellite Radio (max. 1) ¡Hands-Free Phone...
... audio room in DSP 7 bands graphic equalizer. (a page 34) ■ GUI (Graphic User Interface) GUI displays various indications with colorful symbols to enhance visibility, enjoyment, and operability. ■ CS Auto (Circle Surround Automotive) CS Auto allows your car interior to change to operate virtually all functions. Connectable devices ¡CD/DVD changer (max. 1) ¡iPod® (max. 2) ¡iPod with Video (max. 1) ¡XM Satellite Radio (max. 1) ¡Sirius Satellite Radio (max. 1) ¡Hands-Free Phone...
Operating Instructions
Page 9
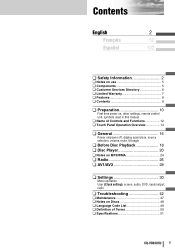
...; Preparation 10 First time power on, other settings, remote control unit, symbols used in this manual ¢ Name of Controls and Functions 12 ¢ Touch Panel Operation Overview 14 ¢ General 16 Power on/power off, display open/close, source selection, volume, mute, tilt angle ¢ Before Disc Playback 18 ¢ Disc Player 20 ¢ Notes on MP3/WMA 24 ¢ Radio 26 ¢ AV1/AV2 28 ¢ Settings 30 Menu operation User (Clock setting), screen, audio, DVD, input/output, radio ¢ Troubleshooting 42 ¢ Maintenance...
...; Preparation 10 First time power on, other settings, remote control unit, symbols used in this manual ¢ Name of Controls and Functions 12 ¢ Touch Panel Operation Overview 14 ¢ General 16 Power on/power off, display open/close, source selection, volume, mute, tilt angle ¢ Before Disc Playback 18 ¢ Disc Player 20 ¢ Notes on MP3/WMA 24 ¢ Radio 26 ¢ AV1/AV2 28 ¢ Settings 30 Menu operation User (Clock setting), screen, audio, DVD, input/output, radio ¢ Troubleshooting 42 ¢ Maintenance...
Operating Instructions
Page 10
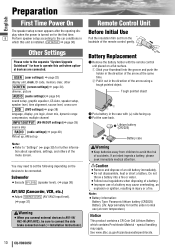
...setup screen appears after the opening display when the power is turned on for the first time. 9 Perform speaker setup according to the car conditions in which contains Perchlorate Material - USER (user settings)( a page 32) display unit, clock, ID code, memory clear, other SCREEN (screen settings)(a page 34) dimmer, picture AUDIO (audio settings)(a page 34) sound setup, graphic equalizer, CS Auto, speaker setup, speaker level, time alignment, source level, cross over DVD (DVD settings)(a page 38) language, display, pro logic, down mix, dynamic range compression, multiple channel INPUT/OUTPUT...
...setup screen appears after the opening display when the power is turned on for the first time. 9 Perform speaker setup according to the car conditions in which contains Perchlorate Material - USER (user settings)( a page 32) display unit, clock, ID code, memory clear, other SCREEN (screen settings)(a page 34) dimmer, picture AUDIO (audio settings)(a page 34) sound setup, graphic equalizer, CS Auto, speaker setup, speaker level, time alignment, source level, cross over DVD (DVD settings)(a page 38) language, display, pro logic, down mix, dynamic range compression, multiple channel INPUT/OUTPUT...

Operating Instructions
Page 13
...;Switches the power on the remote control unit. t [+] [-] (VOL) ¡Adjusts the sound volume. English Remote Control Aim the remote control at the remote control sensor of the main unit and operate it. u[ ] ¡Displays the DVD/title menu. (Operations (TOP MENU/ vary according to the previous display. ¡Inputs the number again. ¡Displays the VCD's menu. ¡Mutes the sound temporarily. q [SRC] (PWR) (SOURCE/POWER) 12 PWR SRC MUTE VOL r [MUTE] t [+] [-] (VOL) w B] [s] [d] e [RET] (RETURN) ENTER / BAND ENT RET RETURN TOP MENU DVD MENU CAR...
...;Switches the power on the remote control unit. t [+] [-] (VOL) ¡Adjusts the sound volume. English Remote Control Aim the remote control at the remote control sensor of the main unit and operate it. u[ ] ¡Displays the DVD/title menu. (Operations (TOP MENU/ vary according to the previous display. ¡Inputs the number again. ¡Displays the VCD's menu. ¡Mutes the sound temporarily. q [SRC] (PWR) (SOURCE/POWER) 12 PWR SRC MUTE VOL r [MUTE] t [+] [-] (VOL) w B] [s] [d] e [RET] (RETURN) ENTER / BAND ENT RET RETURN TOP MENU DVD MENU CAR...

Operating Instructions
Page 14
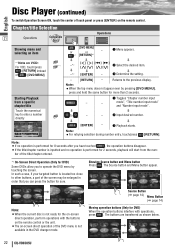
... change to quit. Volume Current Disc indicator indicator mode (Lights when a disc is loaded) Clock time (a page 32) Source Button (Content varies with each source) Displays the Source Selection Screen. Touch to desired mode. Menu Setting, (a page 30) Press [MENU] to AV1, AV2, and the Expansion Module (CY-EM100U, option). 14 CQ-VD6505U Menu Screen appears. Menu Button Displays the Menu Screen. Touch desired source button. Select desired setting. Refer to the description of the touch panel. (a page 47) Operation 13 ¡Use only...
... change to quit. Volume Current Disc indicator indicator mode (Lights when a disc is loaded) Clock time (a page 32) Source Button (Content varies with each source) Displays the Source Selection Screen. Touch to desired mode. Menu Setting, (a page 30) Press [MENU] to AV1, AV2, and the Expansion Module (CY-EM100U, option). 14 CQ-VD6505U Menu Screen appears. Menu Button Displays the Menu Screen. Touch desired source button. Select desired setting. Refer to the description of the touch panel. (a page 47) Operation 13 ¡Use only...
Operating Instructions
Page 22
... the buttons on the remote control or the unit. ¡The on-screen direct operation of the DVD menu is performed for sure. d w Input desired number. Starting Playback from the num- ber of the title/chapter entereCdo.mpatible Discs *2 On-Screen Direct Operation (Only for DVD) Some DVDs allow you can press the button for 2 seconds, playback will start from a specific chapter/title Compatible - - d d d -*2 []] [[] [s] [d w Select the desired item. The Source button and Menu button appear...
... the buttons on the remote control or the unit. ¡The on-screen direct operation of the DVD menu is performed for sure. d w Input desired number. Starting Playback from the num- ber of the title/chapter entereCdo.mpatible Discs *2 On-Screen Direct Operation (Only for DVD) Some DVDs allow you can press the button for 2 seconds, playback will start from a specific chapter/title Compatible - - d d d -*2 []] [[] [s] [d w Select the desired item. The Source button and Menu button appear...
Operating Instructions
Page 30
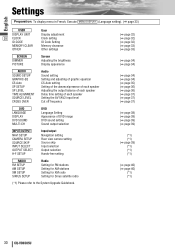
...USER DISPLAY UNIT 29 CLOCK ID-CODE MEMORY CLEAR OTHER User Display adjustment Clock setting ID Code Setting Memory clearance Other settings SCREEN DIMMER PICTURE Screen Adjusting the brightness Display appearance AUDIO SOUND SETUP GRAPHIC-EQ CS Auto SP SETUP SP LEVEL TIME ALIGNMENT SOURCE LEVEL CROSS OVER Audio Sound setting Setting and adjusting of graphic equalizer CS Auto setting Setting of the absence/presence of each speaker Adjusting the output balance of each speaker Delay time setting of each speaker Setting the AV1/AV2 input level Cut off frequency DVD LANGUAGE DISPLAY DVD SOUND...
...USER DISPLAY UNIT 29 CLOCK ID-CODE MEMORY CLEAR OTHER User Display adjustment Clock setting ID Code Setting Memory clearance Other settings SCREEN DIMMER PICTURE Screen Adjusting the brightness Display appearance AUDIO SOUND SETUP GRAPHIC-EQ CS Auto SP SETUP SP LEVEL TIME ALIGNMENT SOURCE LEVEL CROSS OVER Audio Sound setting Setting and adjusting of graphic equalizer CS Auto setting Setting of the absence/presence of each speaker Adjusting the output balance of each speaker Delay time setting of each speaker Setting the AV1/AV2 input level Cut off frequency DVD LANGUAGE DISPLAY DVD SOUND...
Operating Instructions
Page 32
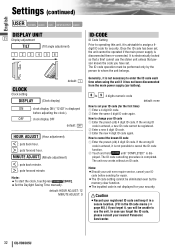
... ADJUST: 12 MINUTE ADJUST: 0 ID-CODE ID Code Setting Prior to operating this unit, it has not been disconnected from the main power supply (car battery). 0 to 9 4 digits numeric code default: none How to assign a 4digit ID code for security. If the wrong ID code is advisable to set . How to whom the unit belongs. Settings (continued) English USER SCREEN AUDIO DVD INPUT/OUTPUT RADIO DISPLAY UNIT 31 Display adjustment TILT (Tilt angle adjustment) 123456 default: 1 CLOCK Clock setting DISPLAY (Clock display) ON : clock display ON...
... ADJUST: 12 MINUTE ADJUST: 0 ID-CODE ID Code Setting Prior to operating this unit, it has not been disconnected from the main power supply (car battery). 0 to 9 4 digits numeric code default: none How to assign a 4digit ID code for security. If the wrong ID code is advisable to set . How to whom the unit belongs. Settings (continued) English USER SCREEN AUDIO DVD INPUT/OUTPUT RADIO DISPLAY UNIT 31 Display adjustment TILT (Tilt angle adjustment) 123456 default: 1 CLOCK Clock setting DISPLAY (Clock display) ON : clock display ON...

Operating Instructions
Page 34
AUDIO USER SCREEN DVD INPUT/OUTPUT RADIO SOUND SETUP Sound Set Up SOUND EFFECT (Sound effect setting) THROUGH : no GEQ or CS Auto setting GEQ : goes to GEQ setting CS Auto : goes to +12 dB (in each memory button by following the instructions below: Adjusting level of each preset The level of color on the display. e Touch/press the same preset number for more than 2 seconds. 34 CQ-VD6505U Frequency band 60 160 400 1 k 3 k 6 k 16 k (Hz) Adjustment range: -12 dB to CS Auto setting default...
AUDIO USER SCREEN DVD INPUT/OUTPUT RADIO SOUND SETUP Sound Set Up SOUND EFFECT (Sound effect setting) THROUGH : no GEQ or CS Auto setting GEQ : goes to GEQ setting CS Auto : goes to +12 dB (in each memory button by following the instructions below: Adjusting level of each preset The level of color on the display. e Touch/press the same preset number for more than 2 seconds. 34 CQ-VD6505U Frequency band 60 160 400 1 k 3 k 6 k 16 k (Hz) Adjustment range: -12 dB to CS Auto setting default...

Operating Instructions
Page 35
... the menu, and other factors. Mixing (Adjusts the SRS effect) FRONT TO REAR Mixing (Adjusts the SRS effect (front) on rear speakers) [ : more ] : less CENTER TO REAR Mixing (Adjusts the SRS effect (center) on rear speakers) [ : more than 2 seconds. ¡Expectable effects vary with the audio format to be used , settings in which an equalizer is not used at all and bass sound from the speakers to be used...
... the menu, and other factors. Mixing (Adjusts the SRS effect) FRONT TO REAR Mixing (Adjusts the SRS effect (front) on rear speakers) [ : more ] : less CENTER TO REAR Mixing (Adjusts the SRS effect (center) on rear speakers) [ : more than 2 seconds. ¡Expectable effects vary with the audio format to be used , settings in which an equalizer is not used at all and bass sound from the speakers to be used...

Operating Instructions
Page 37
.... TIME ALIGNMENT (Delay time setting of the speaker from which the audio from each speaker. SOURCE LEVEL 36 Setting the AV1/AV2 input level Make this adjustment while listening to be adjusted by pressing [+] or [-] (VOL) on the front speakers (R/L) and rear speakers (L/R). HIGH : sets the level high/sound volume decreases. TEST TONE (Test tone output) ON : enables the test tone. Adjusting the output balance: Adjust the volume of all of the other speakers to the volume level of each speaker) Adjusting...
.... TIME ALIGNMENT (Delay time setting of the speaker from which the audio from each speaker. SOURCE LEVEL 36 Setting the AV1/AV2 input level Make this adjustment while listening to be adjusted by pressing [+] or [-] (VOL) on the front speakers (R/L) and rear speakers (L/R). HIGH : sets the level high/sound volume decreases. TEST TONE (Test tone output) ON : enables the test tone. Adjusting the output balance: Adjust the volume of all of the other speakers to the volume level of each speaker) Adjusting...

Operating Instructions
Page 38
... equipment connected to AV OUT. : sets PAL in which black bands appear at the top and bottom of the screen are cut off . ON : activates angle mark. Settings (continued) English DVD USER SCREEN AUDIO INPUT/OUTPUT RADIO LANGUAGE 37 Language Setting MENU (DVD menu language) ENG : English FRA : French SPA : Spanish OTHER : other language. Input the language code. (a page 49) default: ENG DISPLAY Display aspect and DVD software mode DVD ASPECT (Display aspect setting) NARROW : plays a video...
... equipment connected to AV OUT. : sets PAL in which black bands appear at the top and bottom of the screen are cut off . ON : activates angle mark. Settings (continued) English DVD USER SCREEN AUDIO INPUT/OUTPUT RADIO LANGUAGE 37 Language Setting MENU (DVD menu language) ENG : English FRA : French SPA : Spanish OTHER : other language. Input the language code. (a page 49) default: ENG DISPLAY Display aspect and DVD software mode DVD ASPECT (Display aspect setting) NARROW : plays a video...
Operating Instructions
Page 39
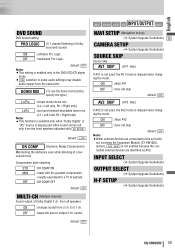
default: OFF USER SCREEN AUDIO DVD INPUT/OUTPUT RADIO NAVI SETUP (Navigation set up) (a System Upgrade Guidebook) 38 CAMERA SETUP (a System Upgrade Guidebook) SOURCE SKIP Source skip AV1 SKIP (AV1 skip) If AV1 is not used , the AV2 mode is playing and when sound comes out only from the front speakers adjusted with SP SETUP . nected external devices are connected to this unit with the greatest compression, roughly equivalent to 5.1 ch. OFF : keeps the source output 2 ch...
default: OFF USER SCREEN AUDIO DVD INPUT/OUTPUT RADIO NAVI SETUP (Navigation set up) (a System Upgrade Guidebook) 38 CAMERA SETUP (a System Upgrade Guidebook) SOURCE SKIP Source skip AV1 SKIP (AV1 skip) If AV1 is not used , the AV2 mode is playing and when sound comes out only from the front speakers adjusted with SP SETUP . nected external devices are connected to this unit with the greatest compression, roughly equivalent to 5.1 ch. OFF : keeps the source output 2 ch...

Operating Instructions
Page 42
... of checking the unit or your own repair after your dealer. Some operations are too dangerous for example, without sound, or with engine revolutions. No sound from speaker(s) Possible cause a Possible solution The power cord (battery, power and ground) is set to an unpainted part of the ground lead is a break, a short circuit, poor contact or wrong wiring regarding the speaker wiring. MUTE is connected in step...
... of checking the unit or your own repair after your dealer. Some operations are too dangerous for example, without sound, or with engine revolutions. No sound from speaker(s) Possible cause a Possible solution The power cord (battery, power and ground) is set to an unpainted part of the ground lead is a break, a short circuit, poor contact or wrong wiring regarding the speaker wiring. MUTE is connected in step...

Operating Instructions
Page 45
... the speaker. No sound on the power. ■ Sound settings No sound from the subwoofer Cables are not correctly connected. aConnect the cables correctly. Playing back a disc having a subwoofer channel ¡Subwoofer is set to ON . CQ-VD6505U 45 aInsert a correct battery in the wrong direction. The speaker leads are reversed. aAim the remote control unit at the sensor of the remote control unit is set to NO in reverse between right and left , right, front, or rear speaker...
... the speaker. No sound on the power. ■ Sound settings No sound from the subwoofer Cables are not correctly connected. aConnect the cables correctly. Playing back a disc having a subwoofer channel ¡Subwoofer is set to ON . CQ-VD6505U 45 aInsert a correct battery in the wrong direction. The speaker leads are reversed. aAim the remote control unit at the sensor of the remote control unit is set to NO in reverse between right and left , right, front, or rear speaker...
Operating Instructions
Page 47
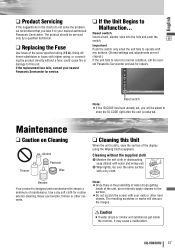
... obscure the images. SRC MENU VOL MUTE P-MODE ASPECT ASP TILT CQ-VD6505U Reset switch Note: ¡If the ID-CODE has been already set, you take it may cause a malfunction. Use a dry soft cloth for routine exterior cleaning. CQ-VD6505U 47 English ❑ Product Servicing If the suggestions in dishwashing soap diluted with any buttons. (Stored settings and adjustments are not cleared.) If...
... obscure the images. SRC MENU VOL MUTE P-MODE ASPECT ASP TILT CQ-VD6505U Reset switch Note: ¡If the ID-CODE has been already set, you take it may cause a malfunction. Use a dry soft cloth for routine exterior cleaning. CQ-VD6505U 47 English ❑ Product Servicing If the suggestions in dishwashing soap diluted with any buttons. (Stored settings and adjustments are not cleared.) If...


