
User Manual
Page 3
... box VCR DVD player Contents Be Sure to Read Safety Precautions 4 (Warning / Caution) Notes 5 Maintenance 5 Quick Start Guide Accessories / Options.........6 Identifying Controls 7 Basic Connection 9 Auto Tuning 10 Language Setting 11 Basic Features Watching TV 12 Viewing Teletext 14 Watching Videos and DVDs 16 Advanced Features How to Use Menu Functions 18 (picture, sound quality, etc.) Input Labels 22 Control Channel Audience 23 Editing Channels 24 Tuning Channels 26 Restore Settings 28 Displaying PC Screen...
... box VCR DVD player Contents Be Sure to Read Safety Precautions 4 (Warning / Caution) Notes 5 Maintenance 5 Quick Start Guide Accessories / Options.........6 Identifying Controls 7 Basic Connection 9 Auto Tuning 10 Language Setting 11 Basic Features Watching TV 12 Viewing Teletext 14 Watching Videos and DVDs 16 Advanced Features How to Use Menu Functions 18 (picture, sound quality, etc.) Input Labels 22 Control Channel Audience 23 Editing Channels 24 Tuning Channels 26 Restore Settings 28 Displaying PC Screen...

User Manual
Page 5
... substances. Equipment with a dry cloth. Finally, wipe the surface clean with an infrared sensor This TV also emits infrared rays. A liquid inside the TV could lead to standby mode. When the TV is performed for radiated heat Minimum distance 10 Auto power standby function If no signal is received and no operation is not going to a live socket outlet.
... substances. Equipment with a dry cloth. Finally, wipe the surface clean with an infrared sensor This TV also emits infrared rays. A liquid inside the TV could lead to standby mode. When the TV is performed for radiated heat Minimum distance 10 Auto power standby function If no signal is received and no operation is not going to a live socket outlet.
User Manual
Page 7
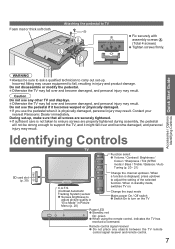
... selected function. Remote control signal receiver Do not place any other TV and displays. If sufficient care is physically damaged, personal injury may result. Do not use any objects between the TV remote control signal receiver and remote control. 7 When in injury and product damage. Change the input mode Mains power On / Off switch Switch On to fall, resulting in standby mode, switches TV on the TV Power LED Standby: red On: green When using the remote control, indicates...
... selected function. Remote control signal receiver Do not place any other TV and displays. If sufficient care is physically damaged, personal injury may result. Do not use any objects between the TV remote control signal receiver and remote control. 7 When in injury and product damage. Change the input mode Mains power On / Off switch Switch On to fall, resulting in standby mode, switches TV on the TV Power LED Standby: red On: green When using the remote control, indicates...
User Manual
Page 8
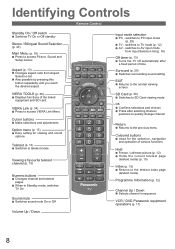
... R G Y B TEXT F.P. switches to access Picture, Sound and Setup menus Aspect (p. 13) Changes aspect ratio from Input Selection list (p. 16) Off timer (p. 13) Turns the TV off automatically after selecting channel positions to quickly change channel Return Returns to the previous menu Coloured buttons Used for viewing and sound options Teletext (p. 14) Switches to PC input mode (p. 29) TV - Identifying Controls Remote Control Standby On / Off switch Switches TV On or Off standby Stereo / Bilingual Sound Selection (p. 43) Main Menu (p. 18) Press...
... R G Y B TEXT F.P. switches to access Picture, Sound and Setup menus Aspect (p. 13) Changes aspect ratio from Input Selection list (p. 16) Off timer (p. 13) Turns the TV off automatically after selecting channel positions to quickly change channel Return Returns to the previous menu Coloured buttons Used for viewing and sound options Teletext (p. 14) Switches to PC input mode (p. 29) TV - Identifying Controls Remote Control Standby On / Off switch Switches TV On or Off standby Stereo / Bilingual Sound Selection (p. 43) Main Menu (p. 18) Press...

User Manual
Page 9
... local Television Service Centre or dealer may require the correct connection cable and plug between the wall Aerial socket and the TV. VIERA Link connection p. 33 Read the manual of the TV VIDEO VIDEO VIDEO Y L L L PB/CB PR/CR PC PC AUDIO via AV2 R R AUDIO AUDIO MONITOR OUT AV 1 IN R AUDIO COMPONENT AV 2 IN RF cable TV, DVD Recorder or VCR AC AUTO 110-240 V, 50/60 Hz (TH-L32C10R only...
... local Television Service Centre or dealer may require the correct connection cable and plug between the wall Aerial socket and the TV. VIERA Link connection p. 33 Read the manual of the TV VIDEO VIDEO VIDEO Y L L L PB/CB PR/CR PC PC AUDIO via AV2 R R AUDIO AUDIO MONITOR OUT AV 1 IN R AUDIO COMPONENT AV 2 IN RF cable TV, DVD Recorder or VCR AC AUTO 110-240 V, 50/60 Hz (TH-L32C10R only...

User Manual
Page 11
... reset all settings "Shipping Condition" (p. 28) If you turn the TV On with Mains power On / Off switch. Quick Start Guide Auto Tuning Language Setting Using the On-Screen Displays Many features available on -screen displays. 1 Display the menu 2 Select "Setup" Main Menu Picture Sound Setup 3 Select "OSD Language" Setup Menu Off Timer Child Lock Tuning Menu OSD Language Display Settings VIERA Link Settings System Menu Other Settings Access 4 Select the language OSD Language 2 access 1 select 2 access 1 select 1 select 2 set Return to the previous menu On-screen operation guide...
... reset all settings "Shipping Condition" (p. 28) If you turn the TV On with Mains power On / Off switch. Quick Start Guide Auto Tuning Language Setting Using the On-Screen Displays Many features available on -screen displays. 1 Display the menu 2 Select "Setup" Main Menu Picture Sound Setup 3 Select "OSD Language" Setup Menu Off Timer Child Lock Tuning Menu OSD Language Display Settings VIERA Link Settings System Menu Other Settings Access 4 Select the language OSD Language 2 access 1 select 2 access 1 select 1 select 2 set Return to the previous menu On-screen operation guide...

User Manual
Page 12
... Hold Freeze / unfreeze picture Display information banner Display information banner Also appears when changing channels. Watching TV 1 Turn power on Mains power On / Off switch should be On. (p. 7) 2 Select a channel up or down To select the two-digit channel number, e.g. 39 (in a short time) If one or two-digit channel number quickly changes the channel Note When the TV is switched to "Auto". 15 Audio mode (p. 43) Sound mute On Off Timer remaining time For settings p. 13 Teletext...
... Hold Freeze / unfreeze picture Display information banner Display information banner Also appears when changing channels. Watching TV 1 Turn power on Mains power On / Off switch should be On. (p. 7) 2 Select a channel up or down To select the two-digit channel number, e.g. 39 (in a short time) If one or two-digit channel number quickly changes the channel Note When the TV is switched to "Auto". 15 Audio mode (p. 43) Sound mute On Off Timer remaining time For settings p. 13 Teletext...

User Manual
Page 13
... Setup Menu (p. 21) Change the settings MPX Select Stereo / Mono Sound Menu (p. 20) Volume Correction Adjusts volume of time (Off / 15 / 30 / 45 / 60 / 75 / 90 minutes) Press repeatedly to set the time or Setup Menu Off Timer Off Child Lock Tuning Menu OSD Language Display Settings VIERA Link Settings System Menu Other Settings select Select "Off Timer" and set the time To cancel Set to "0", set to "Game". Not available in PC mode. HD signal only Zoom1 Displays a "4:3" image full-screen. Displays...
... Setup Menu (p. 21) Change the settings MPX Select Stereo / Mono Sound Menu (p. 20) Volume Correction Adjusts volume of time (Off / 15 / 30 / 45 / 60 / 75 / 90 minutes) Press repeatedly to set the time or Setup Menu Off Timer Off Child Lock Tuning Menu OSD Language Display Settings VIERA Link Settings System Menu Other Settings select Select "Off Timer" and set the time To cancel Set to "0", set to "Game". Not available in PC mode. HD signal only Zoom1 Displays a "4:3" image full-screen. Displays...

User Manual
Page 14
... the screen Available page up or or or down To select among subject blocks To select next subject within the subject block (After the last subject, it moves to use step-by the broadcasters. To change mode "Teletext" in Setup Menu (p. 21) 1 Switch to information on the page TELETEXT date broadcasters) number INFORMATION Colour bar Pressing this service is List mode? Viewing...
... the screen Available page up or or or down To select among subject blocks To select next subject within the subject block (After the last subject, it moves to use step-by the broadcasters. To change mode "Teletext" in Setup Menu (p. 21) 1 Switch to information on the page TELETEXT date broadcasters) number INFORMATION Colour bar Pressing this service is List mode? Viewing...

User Manual
Page 19
...Sound Menu Mode Bass Treble Balance Surround Volume Correction Speaker Distance to Wall MPX Sound Menu HDMI1 Input Reset to Defaults Music Off Over 30cm Stereo Digital Reset Setup Menu Off Timer Child Lock Tuning Menu OSD Language Display Settings VIERA Link Settings System Menu Other Settings Off Access Access Access Access Access Access Access 1/2 +4 +4 0 0 2/2 *3 (p. 20) Tuning Menu Channel List Edit Auto Tuning Manual Tuning OSD Language Access Access Access (p. 21) (p. 21) Display Settings Teletext Teletext Character Set Input Labels Banner Display Timeout Playing Time Display...
...Sound Menu Mode Bass Treble Balance Surround Volume Correction Speaker Distance to Wall MPX Sound Menu HDMI1 Input Reset to Defaults Music Off Over 30cm Stereo Digital Reset Setup Menu Off Timer Child Lock Tuning Menu OSD Language Display Settings VIERA Link Settings System Menu Other Settings Off Access Access Access Access Access Access Access 1/2 +4 +4 0 0 2/2 *3 (p. 20) Tuning Menu Channel List Edit Auto Tuning Manual Tuning OSD Language Access Access Access (p. 21) (p. 21) Display Settings Teletext Teletext Character Set Input Labels Banner Display Timeout Playing Time Display...
User Manual
Page 20
... on Component, PC, HDMI and SD Card Reset to Defaults Mode Press the OK button to reset the present Picture Menu to the default settings Basic sound mode (Music / Speech) Set for each input signal Bass Treble Balance Surround Increases or decreases level to enhance or minimise lower, deeper sound output Increases or decreases level to enhance or minimise sharper, higher sound output Adjusts volume level of right and left speakers Surround sound settings (Off / V-Audio) V-Audio...
... on Component, PC, HDMI and SD Card Reset to Defaults Mode Press the OK button to reset the present Picture Menu to the default settings Basic sound mode (Music / Speech) Set for each input signal Bass Treble Balance Surround Increases or decreases level to enhance or minimise lower, deeper sound output Increases or decreases level to enhance or minimise sharper, higher sound output Adjusts volume level of right and left speakers Surround sound settings (Off / V-Audio) V-Audio...
User Manual
Page 21
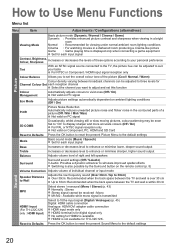
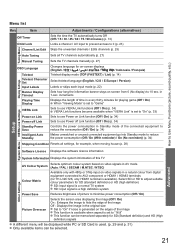
... / 90 minutes) (p. 13) Locks a channel / AV input to prevent access to it (p. 23) Skips the unwanted channels / Edits channels (p. 25) Tuning Menu Auto Tuning Sets all settings, for example, when moving house (p. 28) Setup System Menu VIERA Link Settings Software Licence Displays the software licence information System Information Displays the system information of this TV AV Colour System Selects optimum colour system based on video signals in AV mode (Auto / PAL / SECAM...
... / 90 minutes) (p. 13) Locks a channel / AV input to prevent access to it (p. 23) Skips the unwanted channels / Edits channels (p. 25) Tuning Menu Auto Tuning Sets all settings, for example, when moving house (p. 28) Setup System Menu VIERA Link Settings Software Licence Displays the software licence information System Information Displays the system information of this TV AV Colour System Selects optimum colour system based on video signals in AV mode (Auto / PAL / SECAM...
User Manual
Page 22
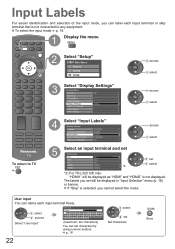
... the mode. If "Skip" is selected, you set will be displayed in "Input Selection" menu (p. 16) or banner. p. 18 22 1 select 2 set 1 select *2) For TH-L32C12K only: "HDMI1" will be displayed as "HDMI" and "HDMI2" is not connected to TV 3 Select "Display Settings" Setup Menu Off Timer Child Lock Tuning Menu OSD Language Display Settings VIERA Link Settings System Menu Other Settings Off Access 2 access 1 select 4 Select "Input Labels" Display Settings Teletext Teletext Character Set Input Labels Banner Display Timeout Playing Time Display...
... the mode. If "Skip" is selected, you set will be displayed in "Input Selection" menu (p. 16) or banner. p. 18 22 1 select 2 set 1 select *2) For TH-L32C12K only: "HDMI1" will be displayed as "HDMI" and "HDMI2" is not connected to TV 3 Select "Display Settings" Setup Menu Off Timer Child Lock Tuning Menu OSD Language Display Settings VIERA Link Settings System Menu Other Settings Off Access 2 access 1 select 4 Select "Input Labels" Display Settings Teletext Teletext Character Set Input Labels Banner Display Timeout Playing Time Display...

User Manual
Page 24
Editing Channels You can skip unwanted channels, etc. 1 Display the menu 2 Select "Setup" Main Menu Picture Sound Setup 3 Select "Tuning Menu" Setup Menu Off Timer Child Lock Tuning Menu OSD Language Display Settings VIERA Link Settings System Menu Other Settings Off Access 4 Select "Channel List Edit" Tuning Menu Channel List Edit Auto Tuning Manual Tuning Access 5 Set To return to TV 2 access 1 select 2 access 1 select 2 access 1 select 24
Editing Channels You can skip unwanted channels, etc. 1 Display the menu 2 Select "Setup" Main Menu Picture Sound Setup 3 Select "Tuning Menu" Setup Menu Off Timer Child Lock Tuning Menu OSD Language Display Settings VIERA Link Settings System Menu Other Settings Off Access 4 Select "Channel List Edit" Tuning Menu Channel List Edit Auto Tuning Manual Tuning Access 5 Set To return to TV 2 access 1 select 2 access 1 select 2 access 1 select 24

User Manual
Page 26
Tuning Channels You can retune all the TV channels when moving house. 1 Display the menu 2 Select "Setup" Main Menu Picture Sound Setup 3 Select "Tuning Menu" Setup Menu Off Timer Child Lock Tuning Menu OSD Language Display Settings VIERA Link Settings System Menu Other Settings Off Access 4 Select a function Tuning Menu Channel List Edit Auto Tuning Manual Tuning Access 5 Set To return to TV 2 access 1 select 2 access 1 select 2 access 1 select 26
Tuning Channels You can retune all the TV channels when moving house. 1 Display the menu 2 Select "Setup" Main Menu Picture Sound Setup 3 Select "Tuning Menu" Setup Menu Off Timer Child Lock Tuning Menu OSD Language Display Settings VIERA Link Settings System Menu Other Settings Off Access 4 Select a function Tuning Menu Channel List Edit Auto Tuning Manual Tuning Access 5 Set To return to TV 2 access 1 select 2 access 1 select 2 access 1 select 26

User Manual
Page 27
... operation is connected only with the RF cable, select channel position "0". Start Auto Tuning Access "Auto Tuning" Settings are erased. Manual Tuning 1 BBC1 Fine Tuning Manual Tuning 1 Sound System Colour System 5.5MHz Auto CH33 CH13230 Select the channel position Select the channel Search and store 1 search 2 store Sound System Allows you to change the sound system used for a programme channel. (4.5MHz / 5.5MHz / 6.0MHz / 6.5MHz) Select the channel you want to adjust Set...
... operation is connected only with the RF cable, select channel position "0". Start Auto Tuning Access "Auto Tuning" Settings are erased. Manual Tuning 1 BBC1 Fine Tuning Manual Tuning 1 Sound System Colour System 5.5MHz Auto CH33 CH13230 Select the channel position Select the channel Search and store 1 search 2 store Sound System Allows you to change the sound system used for a programme channel. (4.5MHz / 5.5MHz / 6.0MHz / 6.5MHz) Select the channel you want to adjust Set...

User Manual
Page 29
... signals (p. 46) 2 To change the settings, see the table below Restore Settings Displaying PC Screen on TV Advanced To return to TV PC menu setting (changed as desired) Menu Item Adjustments / Configurations (options) R-Gain Adjusts the white balance for red areas Picture Advanced G-Gain PC B-Gain Settings Gamma Adjusts the white balance for green areas Adjusts the white balance for blue areas (2.0 / 2.2 / 2.5) Reset to Defaults Press the OK button to reset to the default Picture settings Input Resolution Clock Switches to a wide view...
... signals (p. 46) 2 To change the settings, see the table below Restore Settings Displaying PC Screen on TV Advanced To return to TV PC menu setting (changed as desired) Menu Item Adjustments / Configurations (options) R-Gain Adjusts the white balance for red areas Picture Advanced G-Gain PC B-Gain Settings Gamma Adjusts the white balance for green areas Adjusts the white balance for blue areas (2.0 / 2.2 / 2.5) Reset to Defaults Press the OK button to reset to the default Picture settings Input Resolution Clock Switches to a wide view...
User Manual
Page 34
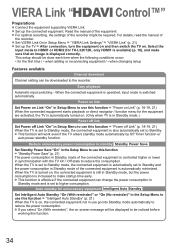
... TH-L32C12K, only HDMI1 is controlled higher or lower in Setup Menu to use this function. 34 When the TV is turned on screen message will work even if the TV enters standby mode automatically by Off Timer function or auto power standby function. If you select "On (With reminder)", the on , the connected equipment is still in Standby mode of the equipment. For optimal recording, the settings...
... TH-L32C12K, only HDMI1 is controlled higher or lower in Setup Menu to use this function. 34 When the TV is turned on screen message will work even if the TV enters standby mode automatically by Off Timer function or auto power standby function. If you select "On (With reminder)", the on , the connected equipment is still in Standby mode of the equipment. For optimal recording, the settings...
User Manual
Page 45
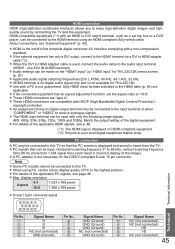
... signals that the PC screen is displayed and sound is the world's first complete digital consumer AV interface complying with HDCP (High-Bandwidth Digital Content Protection) copyright protection. A PC adapter is not guaranteed. If the connected equipment has an aspect adjustment function, set top box or a DVD player, can be connected to the audio input terminal (HDMI1 : use AV2 IN AUDIO terminal). When using an HDMI compliant (fully wired) cable. HDMI-compatible equipment...
... signals that the PC screen is displayed and sound is the world's first complete digital consumer AV interface complying with HDCP (High-Bandwidth Digital Content Protection) copyright protection. A PC adapter is not guaranteed. If the connected equipment has an aspect adjustment function, set top box or a DVD player, can be connected to the audio input terminal (HDMI1 : use AV2 IN AUDIO terminal). When using an HDMI compliant (fully wired) cable. HDMI-compatible equipment...
User Manual
Page 48
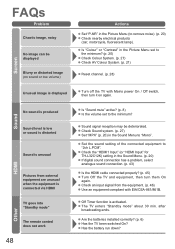
.... (p. 46) Use an equipment compliant with Mains power On / Off switch, then turn them On again. Check Sound system. (p. 27) Set "MPX" (p. 20) in the Picture Menu set to the minimum? The TV enters "Standby mode" about 30 min. Off Timer function is connected via HDMI TV goes into "Standby mode" The remote control does not work 48 Actions Set "P-NR" in the Picture Menu (to "Mono". Set the sound setting of the connected equipment to...
.... (p. 46) Use an equipment compliant with Mains power On / Off switch, then turn them On again. Check Sound system. (p. 27) Set "MPX" (p. 20) in the Picture Menu set to the minimum? The TV enters "Standby mode" about 30 min. Off Timer function is connected via HDMI TV goes into "Standby mode" The remote control does not work 48 Actions Set "P-NR" in the Picture Menu (to "Mono". Set the sound setting of the connected equipment to...


