
User Manual
Page 2
Turn your own living room into a movie theatre! Sharp pictures with HDMI terminal Create home theatre and DVD recorder link-ups with "VIERA Link" without complicated settings! 2 Experience an amazing level of multi-
Turn your own living room into a movie theatre! Sharp pictures with HDMI terminal Create home theatre and DVD recorder link-ups with "VIERA Link" without complicated settings! 2 Experience an amazing level of multi-

User Manual
Page 3
... Channel Audience 23 Editing Channels 24 Tuning Channels 26 Restore Settings 28 Displaying PC Screen on TV 29 Viewing from SD Card (VIERA IMAGE VIEWER 30 VIERA Link "HDAVI Control 32 VIERA Tools 39 External Equipment 40 Technical Features Technical Information 42 FAQs 47 Licence 49 Specifications 50 3 Technical Advanced Basic Quick Start...
... Channel Audience 23 Editing Channels 24 Tuning Channels 26 Restore Settings 28 Displaying PC Screen on TV 29 Viewing from SD Card (VIERA IMAGE VIEWER 30 VIERA Link "HDAVI Control 32 VIERA Tools 39 External Equipment 40 Technical Features Technical Information 42 FAQs 47 Licence 49 Specifications 50 3 Technical Advanced Basic Quick Start...
User Manual
Page 8
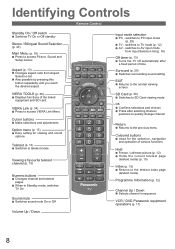
...On Sound mute Switches sound mute On or Off Volume Up / Down POWER INPUT PC TV AV MENU SURROUND OFF TIMER ASPECT EXIT k VIERA TOOLS S VIERA Lin D CARD OK OPTION RETURN R G Y B TEXT F.P. switches to access Picture, Sound and Setup menus Aspect (p. 13) Changes ...14) Switches to teletext mode Viewing a favourite teletext channel (p. 15) Numeric buttons Changes channel and teletext pages When in sequence VCR / DVD Panasonic equipment operations (p. 17) 8 Identifying Controls Remote Control Standby On / Off switch Switches TV On or Off standby Stereo / Bilingual Sound Selection ...
...On Sound mute Switches sound mute On or Off Volume Up / Down POWER INPUT PC TV AV MENU SURROUND OFF TIMER ASPECT EXIT k VIERA TOOLS S VIERA Lin D CARD OK OPTION RETURN R G Y B TEXT F.P. switches to access Picture, Sound and Setup menus Aspect (p. 13) Changes ...14) Switches to teletext mode Viewing a favourite teletext channel (p. 15) Numeric buttons Changes channel and teletext pages When in sequence VCR / DVD Panasonic equipment operations (p. 17) 8 Identifying Controls Remote Control Standby On / Off switch Switches TV On or Off standby Stereo / Bilingual Sound Selection ...

User Manual
Page 9
... may require the correct connection cable and plug between the wall Aerial socket and the TV. TV only AC AUTO 110-240 V, 50/60 Hz (TH-L32C10R only: AC Single 220-240 V, 50/60 Hz) Connecting aerial Rear of the TV Aerial VIDEO VIDEO VIDEO Y Mains lead L L L PB/CB PR/CR... 2 IN RF cable TV, DVD Recorder or VCR AC AUTO 110-240 V, 50/60 Hz (TH-L32C10R only: AC Single 220-240 V, 50/60 Hz) Mains lead Connecting DVD Recorder / VCR Rear of you, the Customer. VIERA Link connection p. 33 Read the manual of the equipment too. 9 Basic Connection External equipment and...
... may require the correct connection cable and plug between the wall Aerial socket and the TV. TV only AC AUTO 110-240 V, 50/60 Hz (TH-L32C10R only: AC Single 220-240 V, 50/60 Hz) Connecting aerial Rear of the TV Aerial VIDEO VIDEO VIDEO Y Mains lead L L L PB/CB PR/CR... 2 IN RF cable TV, DVD Recorder or VCR AC AUTO 110-240 V, 50/60 Hz (TH-L32C10R only: AC Single 220-240 V, 50/60 Hz) Mains lead Connecting DVD Recorder / VCR Rear of you, the Customer. VIERA Link connection p. 33 Read the manual of the equipment too. 9 Basic Connection External equipment and...

User Manual
Page 11
.... 1 Display the menu 2 Select "Setup" Main Menu Picture Sound Setup 3 Select "OSD Language" Setup Menu Off Timer Child Lock Tuning Menu OSD Language Display Settings VIERA Link Settings System Menu Other Settings Access 4 Select the language OSD Language 2 access 1 select 2 access 1 select 1 select 2 set Return to the previous menu On-screen...
.... 1 Display the menu 2 Select "Setup" Main Menu Picture Sound Setup 3 Select "OSD Language" Setup Menu Off Timer Child Lock Tuning Menu OSD Language Display Settings VIERA Link Settings System Menu Other Settings Access 4 Select the language OSD Language 2 access 1 select 2 access 1 select 1 select 2 set Return to the previous menu On-screen...

User Manual
Page 13
... / 45 / 60 / 75 / 90 minutes) Press repeatedly to set the time or Setup Menu Off Timer Off Child Lock Tuning Menu OSD Language Display Settings VIERA Link Settings System Menu Other Settings select Select "Off Timer" and set the time To cancel Set to "0", set to change the mode using the...
... / 45 / 60 / 75 / 90 minutes) Press repeatedly to set the time or Setup Menu Off Timer Off Child Lock Tuning Menu OSD Language Display Settings VIERA Link Settings System Menu Other Settings select Select "Off Timer" and set the time To cancel Set to "0", set to change the mode using the...

User Manual
Page 17
...search forward Pause Pause / Restart DVD: Press and hold during the following operations Enter the appropriate code See table below Press Type of Panasonic equipment has its own remote control code. Basic 17 Standby Set to Standby mode / Turn on some equipment models. Press and hold ...Please change the code for each equipment Each type of equipment DVD Recorder / DVD Player Player theatre / Blu-ray Disc theatre VCR VIERA Link compatible equipment "VIERA Link Control" (p. 37) Code 70 (default) 71 72 73 Note Confirm if the remote control works correctly after changing the code...
...search forward Pause Pause / Restart DVD: Press and hold during the following operations Enter the appropriate code See table below Press Type of Panasonic equipment has its own remote control code. Basic 17 Standby Set to Standby mode / Turn on some equipment models. Press and hold ...Please change the code for each equipment Each type of equipment DVD Recorder / DVD Player Player theatre / Blu-ray Disc theatre VCR VIERA Link compatible equipment "VIERA Link Control" (p. 37) Code 70 (default) 71 72 73 Note Confirm if the remote control works correctly after changing the code...

User Manual
Page 19
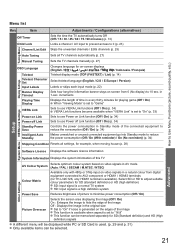
...(p. 21) (p. 21) Display Settings Teletext Teletext Character Set Input Labels Banner Display Timeout Playing Time Display TOP English Access 3 seconds On VIERA Link Settings VIERA Link On Power on Link Off Power off Link On Standby Power Save Off Intelligent Auto Standby Off System Menu Shipping Condition Software Licence... System Colour Matrix Power Save Picture Overscan Auto SD Off On Depending on the received signals, available items are varied. *3) For TH-L32C12K only : "HDMI1 Input" will be displayed as "HDMI Input". (p. 26) (p. 21) (p. 34) (p. 28) (p. 21) 19 Advanced
...(p. 21) (p. 21) Display Settings Teletext Teletext Character Set Input Labels Banner Display Timeout Playing Time Display TOP English Access 3 seconds On VIERA Link Settings VIERA Link On Power on Link Off Power off Link On Standby Power Save Off Intelligent Auto Standby Off System Menu Shipping Condition Software Licence... System Colour Matrix Power Save Picture Overscan Auto SD Off On Depending on the received signals, available items are varied. *3) For TH-L32C12K only : "HDMI1 Input" will be displayed as "HDMI Input". (p. 26) (p. 21) (p. 34) (p. 28) (p. 21) 19 Advanced
User Manual
Page 21
...function (Off / On) (p. 34) Power off Link Sets to use VIERA Link functions (Off / On) (p. 34) VIERA Link functions become available when "VIERA Link" is set to AV2 component or HDMI1 / HDMI2 terminals (for TH-L32C12K, only HDMI1 terminal is available). increments Playing Time Display Displays the ...length of time in every thirty minutes for playing game (Off / On) When "Viewing Mode" is set to "Game" VIERA Link Sets to use Power off Link function...
...function (Off / On) (p. 34) Power off Link Sets to use VIERA Link functions (Off / On) (p. 34) VIERA Link functions become available when "VIERA Link" is set to AV2 component or HDMI1 / HDMI2 terminals (for TH-L32C12K, only HDMI1 terminal is available). increments Playing Time Display Displays the ...length of time in every thirty minutes for playing game (Off / On) When "Viewing Mode" is set to "Game" VIERA Link Sets to use Power off Link function...
User Manual
Page 22
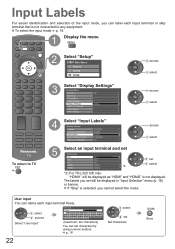
..." menu (p. 16) or banner. If "Skip" is selected, you cannot select the mode. p. 18 22 1 select 2 set 1 select *2) For TH-L32C12K only: "HDMI1" will be displayed as "HDMI" and "HDMI2" is not displayed. The labels you set characters by using numeric buttons. Input Labels ...skip terminal that is not connected to TV 3 Select "Display Settings" Setup Menu Off Timer Child Lock Tuning Menu OSD Language Display Settings VIERA Link Settings System Menu Other Settings Off Access 2 access 1 select 4 Select "Input Labels" Display Settings Teletext Teletext Character Set Input Labels...
..." menu (p. 16) or banner. If "Skip" is selected, you cannot select the mode. p. 18 22 1 select 2 set 1 select *2) For TH-L32C12K only: "HDMI1" will be displayed as "HDMI" and "HDMI2" is not displayed. The labels you set characters by using numeric buttons. Input Labels ...skip terminal that is not connected to TV 3 Select "Display Settings" Setup Menu Off Timer Child Lock Tuning Menu OSD Language Display Settings VIERA Link Settings System Menu Other Settings Off Access 2 access 1 select 4 Select "Input Labels" Display Settings Teletext Teletext Character Set Input Labels...
User Manual
Page 23
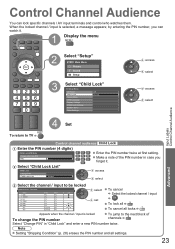
... Control Channel Audience 2 Select "Setup" Main Menu Picture Sound Setup 3 Select "Child Lock" Setup Menu Off Timer Child Lock Tuning Menu OSD Language Display Settings VIERA Link Settings System Menu Other Settings Off Access 2 access 1 select 2 access 1 select 4 Set To return to TV Control channel audience Child Lock 1 Enter the PIN...
... Control Channel Audience 2 Select "Setup" Main Menu Picture Sound Setup 3 Select "Child Lock" Setup Menu Off Timer Child Lock Tuning Menu OSD Language Display Settings VIERA Link Settings System Menu Other Settings Off Access 2 access 1 select 2 access 1 select 4 Set To return to TV Control channel audience Child Lock 1 Enter the PIN...

User Manual
Page 24
Editing Channels You can skip unwanted channels, etc. 1 Display the menu 2 Select "Setup" Main Menu Picture Sound Setup 3 Select "Tuning Menu" Setup Menu Off Timer Child Lock Tuning Menu OSD Language Display Settings VIERA Link Settings System Menu Other Settings Off Access 4 Select "Channel List Edit" Tuning Menu Channel List Edit Auto Tuning Manual Tuning Access 5 Set To return to TV 2 access 1 select 2 access 1 select 2 access 1 select 24
Editing Channels You can skip unwanted channels, etc. 1 Display the menu 2 Select "Setup" Main Menu Picture Sound Setup 3 Select "Tuning Menu" Setup Menu Off Timer Child Lock Tuning Menu OSD Language Display Settings VIERA Link Settings System Menu Other Settings Off Access 4 Select "Channel List Edit" Tuning Menu Channel List Edit Auto Tuning Manual Tuning Access 5 Set To return to TV 2 access 1 select 2 access 1 select 2 access 1 select 24

User Manual
Page 26
Tuning Channels You can retune all the TV channels when moving house. 1 Display the menu 2 Select "Setup" Main Menu Picture Sound Setup 3 Select "Tuning Menu" Setup Menu Off Timer Child Lock Tuning Menu OSD Language Display Settings VIERA Link Settings System Menu Other Settings Off Access 4 Select a function Tuning Menu Channel List Edit Auto Tuning Manual Tuning Access 5 Set To return to TV 2 access 1 select 2 access 1 select 2 access 1 select 26
Tuning Channels You can retune all the TV channels when moving house. 1 Display the menu 2 Select "Setup" Main Menu Picture Sound Setup 3 Select "Tuning Menu" Setup Menu Off Timer Child Lock Tuning Menu OSD Language Display Settings VIERA Link Settings System Menu Other Settings Off Access 4 Select a function Tuning Menu Channel List Edit Auto Tuning Manual Tuning Access 5 Set To return to TV 2 access 1 select 2 access 1 select 2 access 1 select 26
User Manual
Page 28
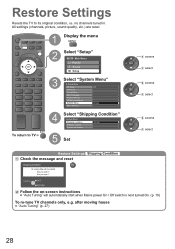
... TV to TV 2 Select "Setup" Main Menu Picture Sound Setup 3 Select "System Menu" Setup Menu Off Timer Child Lock Tuning Menu OSD Language Display Settings VIERA Link Settings System Menu Other Settings Off Access 4 Select "Shipping Condition" System Menu Shipping Condition Software Licence System Information Access 5 Set 2 access 1 select 2 access 1 select...
... TV to TV 2 Select "Setup" Main Menu Picture Sound Setup 3 Select "System Menu" Setup Menu Off Timer Child Lock Tuning Menu OSD Language Display Settings VIERA Link Settings System Menu Other Settings Off Access 4 Select "Shipping Condition" System Menu Shipping Condition Software Licence System Information Access 5 Set 2 access 1 select 2 access 1 select...

User Manual
Page 30
... displayed by date or month recorded p. 31 Selected photo information is shown with asterisks when the file has no signals are output from SD Card (VIERA IMAGE VIEWER) Photo View: Still images recorded by the digital camera. It is displayed To return to the previous screen To return to TV or...
... displayed by date or month recorded p. 31 Selected photo information is shown with asterisks when the file has no signals are output from SD Card (VIERA IMAGE VIEWER) Photo View: Still images recorded by the digital camera. It is displayed To return to the previous screen To return to TV or...

User Manual
Page 31
...) 1 select 2 thumbnail of the selected group 1 select 2 thumbnail of all the photos Display the thumbnail of the selected group Advanced 31 Viewing from SD Card (VIERA IMAGE VIEWER) Start Slideshow (operate in SD Card.
...) 1 select 2 thumbnail of the selected group 1 select 2 thumbnail of all the photos Display the thumbnail of the selected group Advanced 31 Viewing from SD Card (VIERA IMAGE VIEWER) Start Slideshow (operate in SD Card.
User Manual
Page 32
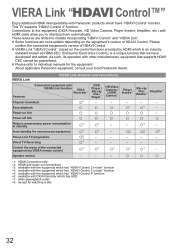
... Electronics Control), is a unique function that supports HDMI CEC cannot be guaranteed. VIERA Link "HDAVI Control", based on the control functions provided by VIERA remote control 3 3 3 3 3 - VIERA Link VIERA Link features and connections Features Connected equipment with Panasonic products which has HDD 7: while playingback a disc 8: except for watching...
... Electronics Control), is a unique function that supports HDMI CEC cannot be guaranteed. VIERA Link "HDAVI Control", based on the control functions provided by VIERA remote control 3 3 3 3 3 - VIERA Link VIERA Link features and connections Features Connected equipment with Panasonic products which has HDD 7: while playingback a disc 8: except for watching...

User Manual
Page 33
... cables cannot be utilized. For Player theatre / Blu-ray Disc theatre / Amplifier, connect to HDMI1 or HDMI2 terminal (for audio output from the TV. Recommended Panasonic's HDMI cable part number: • RP-CDHG10 (1.0 m) • RP-CDHG15 (1.5 m) • RP-CDHG20 (2.0 m) • RP-CDHG30 (3.0 m) • RP-... cable RCA cable HDMI cable Amplifier with VIERA Link function HDMI cable HD Video Camera / LUMIX Camera with VIERA Link function DIGA Recorder with VIERA function, connect to HDMI1 terminal via an HDMI cable and/or RCA cable for TH-L32C12K, only HDMI1 terminal is available) ...
... cables cannot be utilized. For Player theatre / Blu-ray Disc theatre / Amplifier, connect to HDMI1 or HDMI2 terminal (for audio output from the TV. Recommended Panasonic's HDMI cable part number: • RP-CDHG10 (1.0 m) • RP-CDHG15 (1.5 m) • RP-CDHG20 (2.0 m) • RP-CDHG30 (3.0 m) • RP-... cable RCA cable HDMI cable Amplifier with VIERA Link function HDMI cable HD Video Camera / LUMIX Camera with VIERA Link function DIGA Recorder with VIERA function, connect to HDMI1 terminal via an HDMI cable and/or RCA cable for TH-L32C12K, only HDMI1 terminal is available) ...
User Manual
Page 34
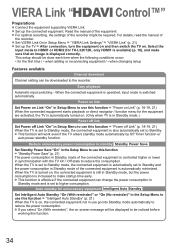
...Standby mode of the connected equipment is on . When the TV is available) (p. 16), and make startup time early. Auto standby for TH-L32C12K, only HDMI1 is turned on screen message will work even if the TV enters standby mode automatically by Off Timer function or auto power... standby function. Set VIERA Link On in Setup Menu "VIERA Link Settings" "VIERA Link" (p. 21) Set up the connected equipment. Reduce unnecessary power consumption in standby Standby Power Save Set Standby Power...
...Standby mode of the connected equipment is on . When the TV is available) (p. 16), and make startup time early. Auto standby for TH-L32C12K, only HDMI1 is turned on screen message will work even if the TV enters standby mode automatically by Off Timer function or auto power... standby function. Set VIERA Link On in Setup Menu "VIERA Link Settings" "VIERA Link" (p. 21) Set up the connected equipment. Reduce unnecessary power consumption in standby Standby Power Save Set Standby Power...

User Manual
Page 35
...What you see is What you cannot operate, check the settings and the equipment "VIERA Link features and connections" (p. 32 - 33) 1 Display "VIERA Link Menu" 2 Select "Direct TV Rec" and start recording VIERA Link Menu Pause Live TV Direct TV Rec SVpIEeRaAkeLr iSnkelCecotniotrnol Speaker Selection Start Start ...HRoemcoerdCeirnema Home Cinema 2 start 1 select To stop recording Select "Stop" in DIGA Recorder immediately. Features available (Using VIERA Link Menu) Direct TV Recording - If you record Direct TV Rec Recording the current programme in "Direct TV Rec" and access...
...What you see is What you cannot operate, check the settings and the equipment "VIERA Link features and connections" (p. 32 - 33) 1 Display "VIERA Link Menu" 2 Select "Direct TV Rec" and start recording VIERA Link Menu Pause Live TV Direct TV Rec SVpIEeRaAkeLr iSnkelCecotniotrnol Speaker Selection Start Start ...HRoemcoerdCeirnema Home Cinema 2 start 1 select To stop recording Select "Stop" in DIGA Recorder immediately. Features available (Using VIERA Link Menu) Direct TV Recording - If you record Direct TV Rec Recording the current programme in "Direct TV Rec" and access...


