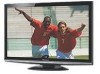

37" Lcd Tv
Page 3
... Viewing from SD Card 20 Watching Videos and DVDs 22 Displaying PC Screen on TV 24 Advanced Features How to the "Home" setting or other factory default settings could result in which energy savings will be achieved. Any modifications to Use Menu Functions (picture, sound quality, etc 26 VIERA LinkTM "HDAVI ControlTM 30 Lock 36 Editing and Setting Channels 38 Closed Caption 40 Input Labels 41 Using Timer 42 Recommended AV Connections 43 Viewing...
... Viewing from SD Card 20 Watching Videos and DVDs 22 Displaying PC Screen on TV 24 Advanced Features How to the "Home" setting or other factory default settings could result in which energy savings will be achieved. Any modifications to Use Menu Functions (picture, sound quality, etc 26 VIERA LinkTM "HDAVI ControlTM 30 Lock 36 Editing and Setting Channels 38 Closed Caption 40 Input Labels 41 Using Timer 42 Recommended AV Connections 43 Viewing...
37" Lcd Tv
Page 4
... voltage points or short out parts that important operating and servicing instructions are provided for ventilation, and to ensure reliable operation of time. 14) Refer all instructions. 5) Do not use attachments / accessories specified by the manufacturer. 12) Use only with the cart, stand, tripod, bracket or table specified by placing the LCD TV on the marking label. If the provided plug does not fit into...
... voltage points or short out parts that important operating and servicing instructions are provided for ventilation, and to ensure reliable operation of time. 14) Refer all instructions. 5) Do not use attachments / accessories specified by the manufacturer. 12) Use only with the cart, stand, tripod, bracket or table specified by placing the LCD TV on the marking label. If the provided plug does not fit into...

37" Lcd Tv
Page 6
... by the display manufacturer and/or listed by an independent laboratory (such as UL, CSA, ETL). • Follow all . Some wall mounts are mounting the display is appropriate. Flat panel displays can become excited while watching a program, especially on the proper stands or installed according to follow the following safety guidelines: TUNE INTO SAFETY: • One size does NOT fit all instructions supplied by curious...
... by the display manufacturer and/or listed by an independent laboratory (such as UL, CSA, ETL). • Follow all . Some wall mounts are mounting the display is appropriate. Flat panel displays can become excited while watching a program, especially on the proper stands or installed according to follow the following safety guidelines: TUNE INTO SAFETY: • One size does NOT fit all instructions supplied by curious...
37" Lcd Tv
Page 9
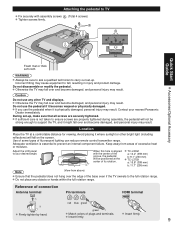
... you use the pedestal if it where sunlight or other TV and displays. If sufficient care is aligned TC-L32G1 with assembly screws A . (Total 4 screws) Tighten screws firmly. TC-L37G1 a: 15.8" (399 mm) 15° 15° a b: 11.7" (295 mm) Note (View from areas of connection Antenna terminal Pin terminals HDMI terminal red blue green green Firmly tighten by hand. Match colors of fluorescent lighting can reduce remote control transmitter range...
... you use the pedestal if it where sunlight or other TV and displays. If sufficient care is aligned TC-L32G1 with assembly screws A . (Total 4 screws) Tighten screws firmly. TC-L37G1 a: 15.8" (399 mm) 15° 15° a b: 11.7" (295 mm) Note (View from areas of connection Antenna terminal Pin terminals HDMI terminal red blue green green Firmly tighten by hand. Match colors of fluorescent lighting can reduce remote control transmitter range...
37" Lcd Tv
Page 10
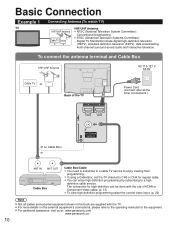
... use of HDMI or • Component Video cable. (p. 13) To view high-definition programming select the correct video input. (p. 22) Note Not all the other connections.) (If no Cable Box) or ANTENNA Cable In DIO ANT IN ANT OUT Cable Box •Cable Box/Cable You need to subscribe to a cable TV service to enjoy viewing their programming. For additional assistance, visit us at: www.panasonic.com www.panasonic.ca 10 Basic Connection Example 1 TV Connecting Antenna (To watch TV) VHF/UHF Antenna Cable TV...
... use of HDMI or • Component Video cable. (p. 13) To view high-definition programming select the correct video input. (p. 22) Note Not all the other connections.) (If no Cable Box) or ANTENNA Cable In DIO ANT IN ANT OUT Cable Box •Cable Box/Cable You need to subscribe to a cable TV service to enjoy viewing their programming. For additional assistance, visit us at: www.panasonic.com www.panasonic.ca 10 Basic Connection Example 1 TV Connecting Antenna (To watch TV) VHF/UHF Antenna Cable TV...
37" Lcd Tv
Page 16
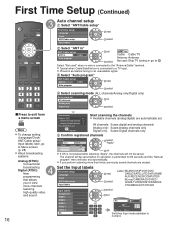
... to Auto program Progress 8% Number of analog channels 10 Number of digital channels 0 Press RETURN to quit. Yes select "Apply" ... ... Set the Input labels First time setup Language Clock ANT/Cable setup Input labels next select Label: [BLANK] SKIP/VCR/DVD/ CABLE/SATELLITE/DVR/GAME/ AUX/RECEIVER/COMPUTER/ Blu-ray/CAMERA/DVD REC/ HOME THTR/MONITOR/MEDIA CTR/MEDIA EXT/OTHER Input labels Component HDMI 1 HDMI 2 HDMI 3 Video 1 Video 2 PC GAME select set Video 2 GAME PC G A A or OK Select RETURN G ABC → abc Y Delete Switches Input mode...
... to Auto program Progress 8% Number of analog channels 10 Number of digital channels 0 Press RETURN to quit. Yes select "Apply" ... ... Set the Input labels First time setup Language Clock ANT/Cable setup Input labels next select Label: [BLANK] SKIP/VCR/DVD/ CABLE/SATELLITE/DVR/GAME/ AUX/RECEIVER/COMPUTER/ Blu-ray/CAMERA/DVD REC/ HOME THTR/MONITOR/MEDIA CTR/MEDIA EXT/OTHER Input labels Component HDMI 1 HDMI 2 HDMI 3 Video 1 Video 2 PC GAME select set Video 2 GAME PC G A A or OK Select RETURN G ABC → abc Y Delete Switches Input mode...

37" Lcd Tv
Page 23
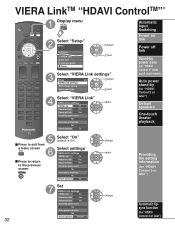
... (p. 32-35). VIERA LinkTM Setting If you connect equipment that has the "HDAVI Control" function to a TV using these functions, you need to set "VIERA Link" setting to p. 30-35. Note If no HDMI equipment is On) change Now you can set each "VIERA Link" function according to use. Display menu Viewing Watching Videos and DVDs Select "Setup" Menu Picture AVIuEdRioA Link SD card Closed caption Setup select next Select "VIERA Link settings" Setup 2/2 VIERA Link settings...
... (p. 32-35). VIERA LinkTM Setting If you connect equipment that has the "HDAVI Control" function to a TV using these functions, you need to set "VIERA Link" setting to p. 30-35. Note If no HDMI equipment is On) change Now you can set each "VIERA Link" function according to use. Display menu Viewing Watching Videos and DVDs Select "Setup" Menu Picture AVIuEdRioA Link SD card Closed caption Setup select next Select "VIERA Link settings" Setup 2/2 VIERA Link settings...
37" Lcd Tv
Page 27
... picture when images corresponding to "x.v.Color" are input via the HDMI input of an image. (Size 1/Size 2) Size 2: Adjust image size according to factory default settings. Increases or decreases the bass response. x.v.Color A.I . Scanning 95% •• Size 2: Selected item for reducing noise. (p. 48) Resets Bass, Treble and Balance adjustments to aspect mode for "HD size". Adjusts color, brightness, etc. Scanning 100% Adjust horizontal display range to access and operate. (Recorder/Home theater/Player/Camcorder/LUMIX) (p. 34-35) [Speaker output...
... picture when images corresponding to "x.v.Color" are input via the HDMI input of an image. (Size 1/Size 2) Size 2: Adjust image size according to factory default settings. Increases or decreases the bass response. x.v.Color A.I . Scanning 95% •• Size 2: Selected item for reducing noise. (p. 48) Resets Bass, Treble and Balance adjustments to aspect mode for "HD size". Adjusts color, brightness, etc. Scanning 100% Adjust horizontal display range to access and operate. (Recorder/Home theater/Player/Camcorder/LUMIX) (p. 34-35) [Speaker output...

37" Lcd Tv
Page 28
... the input signal) Select "Setup" Menu next Picture Audio Timer Lock VIERA Link SD card Closed caption Setup select Select the item Setup 1/2 Channel surf mode All Language Clock ANT/Cable setup Input labels next select Setup ECO/energy saving VIERA Link settings Language Clock ANT/Cable setup Input labels VIERA Link Power on link Power off link Stand-by power save Auto power stand-by Default speakers Power save No signal for 10 minutes No activity for you to make settings for the picture, sound...
... the input signal) Select "Setup" Menu next Picture Audio Timer Lock VIERA Link SD card Closed caption Setup select Select the item Setup 1/2 Channel surf mode All Language Clock ANT/Cable setup Input labels next select Setup ECO/energy saving VIERA Link settings Language Clock ANT/Cable setup Input labels VIERA Link Power on link Power off link Stand-by power save Auto power stand-by Default speakers Power save No signal for 10 minutes No activity for you to make settings for the picture, sound...

37" Lcd Tv
Page 29
... time after turning the power off by " of HDMI connection equipment. (p. 32) (No/Yes (with Setup, such as FAVORITE (p. 18) Selects the screen menu language (p. 15) Channel surf mode All Language Adjusts the clock (p. 15) Clock Sets channels (p. 39) ANT/Cable setup Selects the terminal and label of remote or side panel key continues for more than 3 hours. (Enable/Disable) Note Not in use when setting "Auto power on", "On/Off Timer or PC input display...
... time after turning the power off by " of HDMI connection equipment. (p. 32) (No/Yes (with Setup, such as FAVORITE (p. 18) Selects the screen menu language (p. 15) Channel surf mode All Language Adjusts the clock (p. 15) Clock Sets channels (p. 39) ANT/Cable setup Selects the terminal and label of remote or side panel key continues for more than 3 hours. (Enable/Disable) Note Not in use when setting "Auto power on", "On/Off Timer or PC input display...

37" Lcd Tv
Page 30
... first time/When adding new equipment, reconnecting equipment or changing the setup after the connection, turn the equipment on and then switch the TV on the TV remote. It is a unique function that supports HDMI CEC cannot be utilized. Enjoy additional HDMI Inter-Operability with other manufacturers' equipment supporting the VIERA Link function. ■HDMI cable This function needs an HDMI compliant (fully wired) cable. Set the input mode to the operating manuals for...
... first time/When adding new equipment, reconnecting equipment or changing the setup after the connection, turn the equipment on and then switch the TV on the TV remote. It is a unique function that supports HDMI CEC cannot be utilized. Enjoy additional HDMI Inter-Operability with other manufacturers' equipment supporting the VIERA Link function. ■HDMI cable This function needs an HDMI compliant (fully wired) cable. Set the input mode to the operating manuals for...

37" Lcd Tv
Page 31
... HDMI cable for connecting Panasonic HD camcorder, read the manual for Setup Menu settings and additional control information. • Optional HDMI and/or optical cables are not included. After connection, confirm the HDMI control functions (p. 32-35). ■Connecting this unit to HDMI 2/HDMI 3. Please refer to each model. Note HDMI 1 is changed, switch the power of this unit to connect the AV amp between this unit and the DVD recorder (DIGA). ■Setting of the TV Digital Audio out HDMI 1 HDMI 2 DIGITAL AUDIO...
... HDMI cable for connecting Panasonic HD camcorder, read the manual for Setup Menu settings and additional control information. • Optional HDMI and/or optical cables are not included. After connection, confirm the HDMI control functions (p. 32-35). ■Connecting this unit to HDMI 2/HDMI 3. Please refer to each model. Note HDMI 1 is changed, switch the power of this unit to connect the AV amp between this unit and the DVD recorder (DIGA). ■Setting of the TV Digital Audio out HDMI 1 HDMI 2 DIGITAL AUDIO...
37" Lcd Tv
Page 32
..." Display menu Select "Setup" Menu Picture AVIuEdRioA Link SD card Closed caption Setup select next Select "VIERA Link settings" Setup 2/2 VIERA Link settings ECO/energy saving Advanced setup About select next Select "VIERA Link" VIERA Link settings VIERA Link On Power on link Yes Power off link Yes Stand-by power save No Auto power stand-by No Default speakers TV select Automatic Input Switching Power on link Power off link Stand-by power save (for "HDAVI Control 4" (with quick start mode)) Auto power stand...
..." Display menu Select "Setup" Menu Picture AVIuEdRioA Link SD card Closed caption Setup select next Select "VIERA Link settings" Setup 2/2 VIERA Link settings ECO/energy saving Advanced setup About select next Select "VIERA Link" VIERA Link settings VIERA Link On Power on link Yes Power off link Yes Stand-by power save No Auto power stand-by No Default speakers TV select Automatic Input Switching Power on link Power off link Stand-by power save (for "HDAVI Control 4" (with quick start mode)) Auto power stand...

37" Lcd Tv
Page 33
...;ais) ○ Panel Aspect Ratio (16:9 fixed) ○ Closed caption information (Mode/CC type/Digital setting) ○ Channel information (Input signal/Channel list/Caption information) ○ Home theater ○ ○ --- --- Advanced Minimizes lip-sync delays between the picture and audio when you are transmitting Channel information). (Continued) VIERA LinkTM "HDAVI ControlTM" At the start mode)" connected with HDMI cable. Condition Auto power stand-by power save: Yes The equipment has "HDAVI Control 4 (with quick start of equipment...
...;ais) ○ Panel Aspect Ratio (16:9 fixed) ○ Closed caption information (Mode/CC type/Digital setting) ○ Channel information (Input signal/Channel list/Caption information) ○ Home theater ○ ○ --- --- Advanced Minimizes lip-sync delays between the picture and audio when you are transmitting Channel information). (Continued) VIERA LinkTM "HDAVI ControlTM" At the start mode)" connected with HDMI cable. Condition Auto power stand-by power save: Yes The equipment has "HDAVI Control 4 (with quick start of equipment...
37" Lcd Tv
Page 38
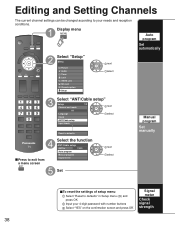
... channel settings can be changed according to defaults" in Cable Auto program Manual program Signal meter next select Set Manual program Set manually ■To reset the settings of setup menu Select "Reset to your 4-digit password with number buttons Select "YES" on the confirmation screen and press OK Signal meter Check signal strength 38 Display menu Select "Setup" Menu Picture Audio Timer Lock VIERA Link SD card Closed caption Setup next select Auto program Set automatically ■Press to exit from a menu screen Select "ANT/Cable setup" Setup 1/2 Channel surf mode...
... channel settings can be changed according to defaults" in Cable Auto program Manual program Signal meter next select Set Manual program Set manually ■To reset the settings of setup menu Select "Reset to your 4-digit password with number buttons Select "YES" on the confirmation screen and press OK Signal meter Check signal strength 38 Display menu Select "Setup" Menu Picture Audio Timer Lock VIERA Link SD card Closed caption Setup next select Auto program Set automatically ■Press to exit from a menu screen Select "ANT/Cable setup" Setup 1/2 Channel surf mode...

37" Lcd Tv
Page 41
Input Labels Display menu Input Labels Closed Caption Advanced ■Press to exit from a menu screen Select "Setup" Menu Picture Audio Timer Lock VIERA Link SD card Closed caption Setup Select "Input labels" Setup 1/2 Channel surf mode All Language Clock ANT/Cable setup Input labels next select next select Input labels Display labels of Connected devices Devices connected to numeric Terminals: Component/HDMI 1-3/Video 1-2/PC Label: [BLANK] SKIP/VCR/DVD/CABLE/SATELLITE/DVR/GAME/ AUX/RECEIVER/COMPUTER/Blu-ray/CAMERA/DVD REC/ HOME THTR/MONITOR/MEDIA CTR/MEDIA EXT/OTHER...
Input Labels Display menu Input Labels Closed Caption Advanced ■Press to exit from a menu screen Select "Setup" Menu Picture Audio Timer Lock VIERA Link SD card Closed caption Setup Select "Input labels" Setup 1/2 Channel surf mode All Language Clock ANT/Cable setup Input labels next select next select Input labels Display labels of Connected devices Devices connected to numeric Terminals: Component/HDMI 1-3/Video 1-2/PC Label: [BLANK] SKIP/VCR/DVD/CABLE/SATELLITE/DVR/GAME/ AUX/RECEIVER/COMPUTER/Blu-ray/CAMERA/DVD REC/ HOME THTR/MONITOR/MEDIA CTR/MEDIA EXT/OTHER...

37" Lcd Tv
Page 47
... output terminal, such as of either "COMPONENT", "S VIDEO", or "VIDEO" to receive analog signals. HDMI-compatible equipment (*1) with HDMI cable, the sound from an Input label other than "GAME" to "GAME" label. When the DVI to HDMI adapter cable is displayed in JPEG menu. All signals are reformatted before being displayed on even if TV is not assumed. Caution Depending on your local digital equipment retailer shop. It provides a soft, film-like picture. Photo is used...
... output terminal, such as of either "COMPONENT", "S VIDEO", or "VIDEO" to receive analog signals. HDMI-compatible equipment (*1) with HDMI cable, the sound from an Input label other than "GAME" to "GAME" label. When the DVI to HDMI adapter cable is displayed in JPEG menu. All signals are reformatted before being displayed on even if TV is not assumed. Caution Depending on your local digital equipment retailer shop. It provides a soft, film-like picture. Photo is used...
37" Lcd Tv
Page 50
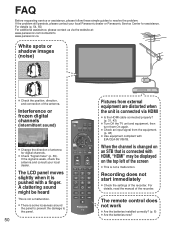
FAQ Before requesting service or assistance, please follow these simple guides to the panel. 50 Pictures from the equipment. (p. 48) Use equipment compliant with a finger. Check "Signal meter" (p. 39). The LCD panel moves slightly when it is not a malfunction. The remote control does not work Are the batteries installed correctly? (p. 8) Are the batteries new? Check an input signal from external equipment are distorted when the...
FAQ Before requesting service or assistance, please follow these simple guides to the panel. 50 Pictures from the equipment. (p. 48) Use equipment compliant with a finger. Check "Signal meter" (p. 39). The LCD panel moves slightly when it is not a malfunction. The remote control does not work Are the batteries installed correctly? (p. 8) Are the batteries new? Check an input signal from external equipment are distorted when the...
37" Lcd Tv
Page 51
.... Changes in " settings. (p. 26) Set "SAP" setting to "Linear PCM". If there is a problem with your local Panasonic dealer, quoting the model number and serial number (both found on the rear of the TV). Sometimes a few million pixels and is not a sign of faulty operation or a malfunction. 3- Check the channel settings. (p. 38) Check the antenna cables. Is the TV unit turned On? Check Picture menu (p. 26) and volume. Check the HDMI device connected to...
.... Changes in " settings. (p. 26) Set "SAP" setting to "Linear PCM". If there is a problem with your local Panasonic dealer, quoting the model number and serial number (both found on the rear of the TV). Sometimes a few million pixels and is not a sign of faulty operation or a malfunction. 3- Check the channel settings. (p. 38) Check the antenna cables. Is the TV unit turned On? Check Picture menu (p. 26) and volume. Check the HDMI device connected to...
37" Lcd Tv
Page 53
... products not supplied by the warrantor, or failures which was not sold "as "the warrantor") will be removed for parts. and Puerto Rico only) Specifications PANASONIC CONSUMER ELECTRONICS COMPANY, DIVISION OF: PANASONIC CORPORATION OF NORTH AMERICA One Panasonic Way Secaucus, New Jersey 07094 Panasonic LCD Televisions Limited Warranty Limited Warranty Coverage If your product with a new or a refurbished product. The items listed are...
... products not supplied by the warrantor, or failures which was not sold "as "the warrantor") will be removed for parts. and Puerto Rico only) Specifications PANASONIC CONSUMER ELECTRONICS COMPANY, DIVISION OF: PANASONIC CORPORATION OF NORTH AMERICA One Panasonic Way Secaucus, New Jersey 07094 Panasonic LCD Televisions Limited Warranty Limited Warranty Coverage If your product with a new or a refurbished product. The items listed are...


