
Digital Video Camera - English/ Spanish
Page 7
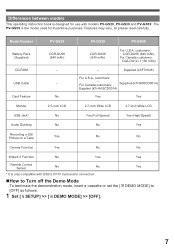
... operating instruction book is only compatible with models PV-GS29, PV-GS39 and PV-GS59. For Canada customers: Supplied (K1HA05CD0014) Supplied (K1HA05CD0014) No Yes Yes Monitor 2.5-inch LCD 2.7-inch Wide LCD 2.7-inch Wide LCD USB Jack* No Yes (Full-Speed) Yes (High-Speed) Audio Dubbing No No Yes Recording a Still Picture...
... operating instruction book is only compatible with models PV-GS29, PV-GS39 and PV-GS59. For Canada customers: Supplied (K1HA05CD0014) Supplied (K1HA05CD0014) No Yes Yes Monitor 2.5-inch LCD 2.7-inch Wide LCD 2.7-inch Wide LCD USB Jack* No Yes (Full-Speed) Yes (High-Speed) Audio Dubbing No No Yes Recording a Still Picture...
Digital Video Camera - English/ Spanish
Page 9
...-GS59 19 Turning on the Camcorder 20 Setting Date and Time 21 Using the Viewfinder/LCD Monitor 21 Easy to Use Mode Dial 23 How to Use the Joystick Control 23 Using the Menu...(Dubbing 54 Using the DV Cable for Recording (Digital Dubbing 54 PC Connection With DV Interface Cable 55 With a PC Using Camcorder with the Built-in LED Video Light .........33 Quick Start 34 Self-timer Recording...Order Form (For U.S.A. customers 83 Limited Warranty (For U.S.A. customers 17 To Use as a Web Camera 60 Using the Motion Picture Editing Software (PV-GS59 Only 64 If you no longer need software ...
...-GS59 19 Turning on the Camcorder 20 Setting Date and Time 21 Using the Viewfinder/LCD Monitor 21 Easy to Use Mode Dial 23 How to Use the Joystick Control 23 Using the Menu...(Dubbing 54 Using the DV Cable for Recording (Digital Dubbing 54 PC Connection With DV Interface Cable 55 With a PC Using Camcorder with the Built-in LED Video Light .........33 Quick Start 34 Self-timer Recording...Order Form (For U.S.A. customers 83 Limited Warranty (For U.S.A. customers 17 To Use as a Web Camera 60 Using the Motion Picture Editing Software (PV-GS59 Only 64 If you no longer need software ...
Digital Video Camera - English/ Spanish
Page 10
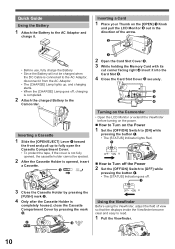
... its cut corner facing right 4 insert it into the Card Slot 5 . 4 Close the Card Slot Cover 3 securely. 5 3 4 Turning on the Camcorder • Open the LCD Monitor or extend the Viewfinder before turning on the power. „ How to Turn on the [OPEN] 1 Knob and pull the LCD... Monitor 2 out in the direction of view so that the displays inside the Viewfinder become clear and easy to read. 1 Pull the Viewfinder. 10 ...
... its cut corner facing right 4 insert it into the Card Slot 5 . 4 Close the Card Slot Cover 3 securely. 5 3 4 Turning on the Camcorder • Open the LCD Monitor or extend the Viewfinder before turning on the power. „ How to Turn on the [OPEN] 1 Knob and pull the LCD... Monitor 2 out in the direction of view so that the displays inside the Viewfinder become clear and easy to read. 1 Pull the Viewfinder. 10 ...

Digital Video Camera - English/ Spanish
Page 12
... USB Cable and CD-ROM (pp. 56, 58~59, 61, 67) Parts Identification and Handling „ Camcorder 3 2 4 5 6 7 1 89 1 LCD Monitor Open Knob [OPEN] (p. 22) 2 LCD Monitor (pp. 20~22, 75) Due to limitations in , stereo) (pp. 35, 39) 12 Before Using Standard Accessories The following accessories are supplied with...-GS59 Only) (Canada Only)/ PV-GS59) 1) AC Adaptor, DC Cable and AC Cable (pp. 15~16) CAUTION: This unit will operate on the LCD Monitor screen. However, this is not a malfunction and does not affect the recorded picture. 3 Card Access Lamp (p. 20) 4 Reset Button [RESET] (pp. 76...
... USB Cable and CD-ROM (pp. 56, 58~59, 61, 67) Parts Identification and Handling „ Camcorder 3 2 4 5 6 7 1 89 1 LCD Monitor Open Knob [OPEN] (p. 22) 2 LCD Monitor (pp. 20~22, 75) Due to limitations in , stereo) (pp. 35, 39) 12 Before Using Standard Accessories The following accessories are supplied with...-GS59 Only) (Canada Only)/ PV-GS59) 1) AC Adaptor, DC Cable and AC Cable (pp. 15~16) CAUTION: This unit will operate on the LCD Monitor screen. However, this is not a malfunction and does not affect the recorded picture. 3 Card Access Lamp (p. 20) 4 Reset Button [RESET] (pp. 76...

Digital Video Camera - English/ Spanish
Page 17
... you use or charging. This is charged at a temperature of 25 °C (77 °F) and humidity of Viewfinder and LCD Monitor simultaneously when rotating the LCD Monitor forward to record yourself. • The batteries heat up . If the battery discharges, then ( ) will also heat up after...-GS59 U.S.A.) or CGA-DU12 (PV-GS59 Canada) is supplied. • The times shown in parentheses indicate the recording time when the LCD Monitor is used . The numbers indicate the recording time when the Viewfinder is used . The Camcorder being used will flash. How to the Grip ...
... you use or charging. This is charged at a temperature of 25 °C (77 °F) and humidity of Viewfinder and LCD Monitor simultaneously when rotating the LCD Monitor forward to record yourself. • The batteries heat up . If the battery discharges, then ( ) will also heat up after...-GS59 U.S.A.) or CGA-DU12 (PV-GS59 Canada) is supplied. • The times shown in parentheses indicate the recording time when the LCD Monitor is used . The numbers indicate the recording time when the Viewfinder is used . The Camcorder being used will flash. How to the Grip ...
Digital Video Camera - English/ Spanish
Page 19
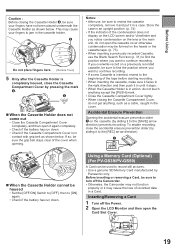
... the lens or the main unit, do not open the cassette cover otherwise condensation may be sure to turn off the Power. 2 Open the LCD Monitor and then open the Card Slot Cover. 19 To enable recording, close the Cassette Compartment Cover by sliding it to the [REC] arrow direction). 1 „.... (p. 73) • When inserting a previously recorded Cassette, use , be sure the grip belt stays clear of the condensation does not display on the cassette (by Panasonic only.
... the lens or the main unit, do not open the cassette cover otherwise condensation may be sure to turn off the Power. 2 Open the LCD Monitor and then open the Card Slot Cover. 19 To enable recording, close the Cassette Compartment Cover by sliding it to the [REC] arrow direction). 1 „.... (p. 73) • When inserting a previously recorded Cassette, use , be sure the grip belt stays clear of the condensation does not display on the cassette (by Panasonic only.
Digital Video Camera - English/ Spanish
Page 20
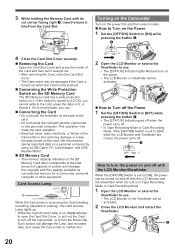
... extend the Viewfinder to use . • The [STATUS] Indicator lights Red and turn on the power. • The LCD Monitor or Viewfinder will be activated. 2 Close the LCD Monitor and retract the Viewfinder. 2 20 If the switch is moved to [LOCK], you can be turned on the SD... personal computer. Such actions will damage the Card, and recorded data, and cause the Camcorder to malfunction. 2 Open the LCD Monitor or extend the Viewfinder to use . • The LCD Monitor or the Viewfinder will be activated. „ How to Turn off the Power 1 Set the [OFF/ON] Switch to...
... extend the Viewfinder to use . • The [STATUS] Indicator lights Red and turn on the power. • The LCD Monitor or Viewfinder will be activated. 2 Close the LCD Monitor and retract the Viewfinder. 2 20 If the switch is moved to [LOCK], you can be turned on the SD... personal computer. Such actions will damage the Card, and recorded data, and cause the Camcorder to malfunction. 2 Open the LCD Monitor or extend the Viewfinder to use . • The LCD Monitor or the Viewfinder will be activated. „ How to Turn off the Power 1 Set the [OFF/ON] Switch to...
Digital Video Camera - English/ Spanish
Page 21
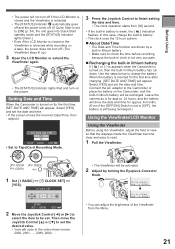
...OFF/ON] Switch is set to [OFF], the battery is still being recharged.) Using the Viewfinder/LCD Monitor Using the Viewfinder Before using the Viewfinder, adjust the field of the Viewfinder from [00] second. &#...date and time. • If the screen shows the incorrect Date/Time, then adjust it. Leave the camera as is for approx. 24 hours, and the battery will not turn on , then the built-in ...into Quick Start standby mode and the [STATUS] Indicator lights Green.) • Even if the LCD Monitor is closed or the Viewfinder is inserted for the first time after charging, [SET DATE AND TIME] ...
...OFF/ON] Switch is set to [OFF], the battery is still being recharged.) Using the Viewfinder/LCD Monitor Using the Viewfinder Before using the Viewfinder, adjust the field of the Viewfinder from [00] second. &#...date and time. • If the screen shows the incorrect Date/Time, then adjust it. Leave the camera as is for approx. 24 hours, and the battery will not turn on , then the built-in ...into Quick Start standby mode and the [STATUS] Indicator lights Green.) • Even if the LCD Monitor is closed or the Viewfinder is inserted for the first time after charging, [SET DATE AND TIME] ...
Digital Video Camera - English/ Spanish
Page 22
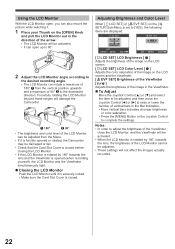
...be adjusted. • These settings will damage the Camcorder. 1 180° 2 90° • The brightness and color level of the LCD Monitor can be adjusted from the Menu. • If it is forcibly opened or rotated, the Camcorder may be damaged or fail. • Check that ... these ranges will not affect the images actually recorded. 22 Using the LCD Monitor With the LCD Monitor open up to 90°. 2 Adjust the LCD Monitor angle according to the desired recording angle. • The LCD Monitor can also record the picture while watching it is securely locked. • Make sure ...
...be adjusted. • These settings will damage the Camcorder. 1 180° 2 90° • The brightness and color level of the LCD Monitor can be adjusted from the Menu. • If it is forcibly opened or rotated, the Camcorder may be damaged or fail. • Check that ... these ranges will not affect the images actually recorded. 22 Using the LCD Monitor With the LCD Monitor open up to 90°. 2 Adjust the LCD Monitor angle according to the desired recording angle. • The LCD Monitor can also record the picture while watching it is securely locked. • Make sure ...
Digital Video Camera - English/ Spanish
Page 30
Recording on a Tape • Open the LCD Monitor or extend the Viewfinder before recording the images (p. 39) or change the [ ASPECT] setting before turning on the power. • When this unit is purchased, ...
Recording on a Tape • Open the LCD Monitor or extend the Viewfinder before recording the images (p. 39) or change the [ ASPECT] setting before turning on the power. • When this unit is purchased, ...
Digital Video Camera - English/ Spanish
Page 32
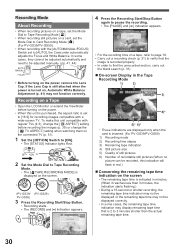
... hands and keep your arms stationary at your side so as not to reduce the slight hand shaking from the Camcorder. • Open the LCD Monitor or extend the Viewfinder before turning on the power. 1 Set the [OFF/ON] Switch to [ON]. • The [STATUS] Indicator lights Red. 2 Set the Mode...
... hands and keep your arms stationary at your side so as not to reduce the slight hand shaking from the Camcorder. • Open the LCD Monitor or extend the Viewfinder before turning on the power. 1 Set the [OFF/ON] Switch to [ON]. • The [STATUS] Indicator lights Red. 2 Set the Mode...

Digital Video Camera - English/ Spanish
Page 33
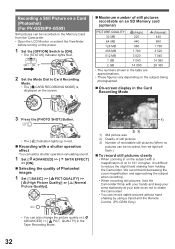
... Camcorder records up your card with this Camcorder. • If set [ PICT. We recommend using a Panasonic SD Memory Card. • When using the card formatted by other equipment or a card that recording.) ... data recorded on the picture content. Recording Yourself You can record persons in front of the camera while presenting them the image. QUALITY] >> [ ], mosaic-pattern noise may appear on a... record yourself while viewing the LCD Monitor. Gain Up mode works with the Built-in LED Video Light To brighten the natural colors in LED Video Light lights and the Gain Up ...
... Camcorder records up your card with this Camcorder. • If set [ PICT. We recommend using a Panasonic SD Memory Card. • When using the card formatted by other equipment or a card that recording.) ... data recorded on the picture content. Recording Yourself You can record persons in front of the camera while presenting them the image. QUALITY] >> [ ], mosaic-pattern noise may appear on a... record yourself while viewing the LCD Monitor. Gain Up mode works with the Built-in LED Video Light To brighten the natural colors in LED Video Light lights and the Gain Up ...

Digital Video Camera - English/ Spanish
Page 34
...[ SETUP] >> [ QUICK START] >> [OFF]. • If the standby continues for 5 minutes, the unit will lit up and the camera will make conditions even brighter. • The LED video light enables simply lightening the images taken in Quick Start Mode approximately half the pause recording power is still being consumed...turns off when not in the following cases: - Quick Start When Quick Start is ON the battery power is being consumed, even when the LCD Monitor and the Viewfinder are closed. A tape or a card is inserted while the Tape Recording Mode is set [ POWER SAVE] to [5 MINUTES] ...
...[ SETUP] >> [ QUICK START] >> [OFF]. • If the standby continues for 5 minutes, the unit will lit up and the camera will make conditions even brighter. • The LED video light enables simply lightening the images taken in Quick Start Mode approximately half the pause recording power is still being consumed...turns off when not in the following cases: - Quick Start When Quick Start is ON the battery power is being consumed, even when the LCD Monitor and the Viewfinder are closed. A tape or a card is inserted while the Tape Recording Mode is set [ POWER SAVE] to [5 MINUTES] ...

Digital Video Camera - English/ Spanish
Page 39
... a personal computer, the imported picture may not be displayed correctly, depending on the software in some cases. • Depending on the settings of the TV monitor to the operating instructions for playback - Notes: • The default setting is [ON]. • Reduces the wind noise depending on the TV connected. When the...
... a personal computer, the imported picture may not be displayed correctly, depending on the software in some cases. • Depending on the settings of the TV monitor to the operating instructions for playback - Notes: • The default setting is [ON]. • Reduces the wind noise depending on the TV connected. When the...
Digital Video Camera - English/ Spanish
Page 45
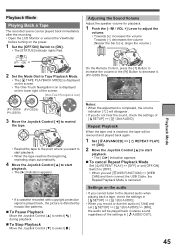
... settings of [ SETUP] >> [ 12bit AUDIO]. Playback Mode Playing Back a Tape The recorded scene can be played back immediately after the recording. • Open the LCD Monitor or extend the Viewfinder before turning on the lower right of the screen. [One-Touch Navigation icon] (PV-GS39/ (PV-GS29) PV-GS59) 3 Move the...
... settings of [ SETUP] >> [ 12bit AUDIO]. Playback Mode Playing Back a Tape The recorded scene can be played back immediately after the recording. • Open the LCD Monitor or extend the Viewfinder before turning on the lower right of the screen. [One-Touch Navigation icon] (PV-GS39/ (PV-GS29) PV-GS59) 3 Move the...
Digital Video Camera - English/ Spanish
Page 47
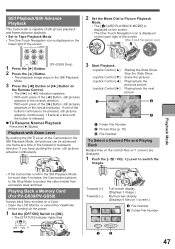
... Card (For PV-GS39/PV-GS59) It plays back files recorded on a Card. • Open the LCD Monitor or extend the Viewfinder before turning on 1 screen) are displayed. 1 Push the [- / VOL +] Lever to protect the video heads from excessive wear and tear. Towards [+] : Towards [-] : Full-screen display (Displays 1 image.) Multi-screen display...
... Card (For PV-GS39/PV-GS59) It plays back files recorded on a Card. • Open the LCD Monitor or extend the Viewfinder before turning on 1 screen) are displayed. 1 Push the [- / VOL +] Lever to protect the video heads from excessive wear and tear. Towards [+] : Towards [-] : Full-screen display (Displays 1 image.) Multi-screen display...
Digital Video Camera - English/ Spanish
Page 52
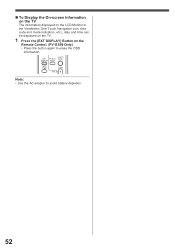
Note: • Use the AC adaptor to erase the OSD information. „ To Display the On-screen Information on the TV The information displayed on the LCD Monitor or the Viewfinder (One-Touch Navigation icon, time code and mode indication, etc.), date and time can be displayed on the TV. 1 Press the [EXT DISPLAY] Button on the Remote Control. (PV-GS59 Only) • Press the button again to avoid battery depletion. 52
Note: • Use the AC adaptor to erase the OSD information. „ To Display the On-screen Information on the TV The information displayed on the LCD Monitor or the Viewfinder (One-Touch Navigation icon, time code and mode indication, etc.), date and time can be displayed on the TV. 1 Press the [EXT DISPLAY] Button on the Remote Control. (PV-GS59 Only) • Press the button again to avoid battery depletion. 52
Digital Video Camera - English/ Spanish
Page 55
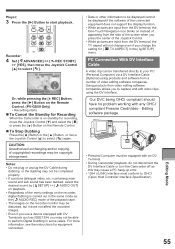
...recording, move the Joystick Control [▼] and select the [ ] or press the [ ■ ] Button on the recorder monitor may not be able to perform Digital Dubbing in the same mode as this may be transferred directly to select [ ]. CAUTION: Unauthorized exchanging and/or copying of ...;] to your PC (Personal Computer) via a DV Interface Cable (Optional) using the DV Interface. PC Connection With DV Interface Cable A video clip can be copyright infringement. Editing Mode 55 For more information, see the instructions for equipment connected. • Date or other information to...
...recording, move the Joystick Control [▼] and select the [ ] or press the [ ■ ] Button on the recorder monitor may not be able to perform Digital Dubbing in the same mode as this may be transferred directly to select [ ]. CAUTION: Unauthorized exchanging and/or copying of ...;] to your PC (Personal Computer) via a DV Interface Cable (Optional) using the DV Interface. PC Connection With DV Interface Cable A video clip can be copyright infringement. Editing Mode 55 For more information, see the instructions for equipment connected. • Date or other information to...
Digital Video Camera - English/ Spanish
Page 71
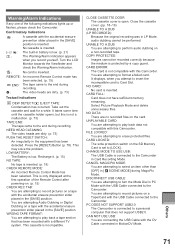
...] position is inserted. This may solve the problem. You are attempting Audio Dubbing or Digital Dubbing on a tape with the accidental erasure prevention slider placed in MotionDV Mode. This cassette... No cassette is connected to record pictures on a Tape/Card with this Camcorder. Turn the LCD Monitor towards the Viewfinder and check the Warning/Alarm Indication. : No card is low. LOW BATTERY: ... selected. (p. 15) END : The tape came to the end during recording. : The video heads are attempting to a personal computer that has been recorded with this Camcorder. CLOSE CASSETTE ...
...] position is inserted. This may solve the problem. You are attempting Audio Dubbing or Digital Dubbing on a tape with the accidental erasure prevention slider placed in MotionDV Mode. This cassette... No cassette is connected to record pictures on a Tape/Card with this Camcorder. Turn the LCD Monitor towards the Viewfinder and check the Warning/Alarm Indication. : No card is low. LOW BATTERY: ... selected. (p. 15) END : The tape came to the end during recording. : The video heads are attempting to a personal computer that has been recorded with this Camcorder. CLOSE CASSETTE ...

Digital Video Camera - English/ Spanish
Page 72
...Camcorder, the tape sags and deteriorates. • If the Battery is left on the Camcorder for a long period of the LCD Monitor cannot be sure to wipe the camera body carefully. CHANGE TO MANUAL MODE: You are attempting to select an item other business use. • If you use your ... dry cloth. • For storing or transporting the Camcorder, place it in a bag or case lined with soft pads so as a microwave oven, TV, video game equipment, etc.). • If you record pictures near radio transmitters or high-voltage cables, recorded images or sounds may be deformed and the surface...
...Camcorder, the tape sags and deteriorates. • If the Battery is left on the Camcorder for a long period of the LCD Monitor cannot be sure to wipe the camera body carefully. CHANGE TO MANUAL MODE: You are attempting to select an item other business use. • If you use your ... dry cloth. • For storing or transporting the Camcorder, place it in a bag or case lined with soft pads so as a microwave oven, TV, video game equipment, etc.). • If you record pictures near radio transmitters or high-voltage cables, recorded images or sounds may be deformed and the surface...


