User Manual
Page 4
... 49 Network status page 49 Using the PJLinkTM protocol 50 Supported commands 50 PJLinkTM security authentication 50 Setting the security 51 PASSWORD 51 PASSWORD CHANGE 51 DISPLAY SETTING 51 TEXT CHANGE 51 CONTROL DEVICE SETUP 51 Using the serial terminals 52 Examples of connection 52 Pin assignments and signal names 52 Communication conditions 52 Basic format 52 Control commands 53 Cable specifications 53 Using the Remote 2 terminal 53 Indication of lamp monitor 54 Cleaning and replacement of air filter 55...
... 49 Network status page 49 Using the PJLinkTM protocol 50 Supported commands 50 PJLinkTM security authentication 50 Setting the security 51 PASSWORD 51 PASSWORD CHANGE 51 DISPLAY SETTING 51 TEXT CHANGE 51 CONTROL DEVICE SETUP 51 Using the serial terminals 52 Examples of connection 52 Pin assignments and signal names 52 Communication conditions 52 Basic format 52 Control commands 53 Cable specifications 53 Using the Remote 2 terminal 53 Indication of lamp monitor 54 Cleaning and replacement of air filter 55...

User Manual
Page 5
... projector, contact an Authorized Service Center. Clean the power cord plug regularly to prevent it , fire or electric shocks could result. • If any inspection, adjustment and repair work (such as this projector ...model. • Use the provided safety wire cable and take the full weight of the projector or on top of a surface which is unstable. • If the projector is installed in a place which is emitted from the projector. Never attempt to observe this condition may result. Do not use the supplied power cord with equipment other than the projector. • Failure...
... projector, contact an Authorized Service Center. Clean the power cord plug regularly to prevent it , fire or electric shocks could result. • If any inspection, adjustment and repair work (such as this projector ...model. • Use the provided safety wire cable and take the full weight of the projector or on top of a surface which is unstable. • If the projector is installed in a place which is emitted from the projector. Never attempt to observe this condition may result. Do not use the supplied power cord with equipment other than the projector. • Failure...
User Manual
Page 7
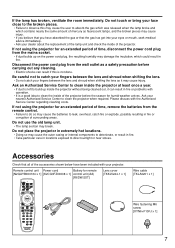
... a good idea to clean the projector when required. If not using the projector for an extended period of time, disconnect the power cord plug from the mains socket. • If dust builds up inside of mercury as a safety precaution before the season for remote [N2QAYB000164 x 1] [K2CG3FZ00008 x 1] control unit (AA) [R6DW/2ST] Lens cover [TKKL5244-1 x 1] Wire cable [TKLA3201 x 1] Wire fastening M6 screw [XYN6+F10FJ...
... a good idea to clean the projector when required. If not using the projector for an extended period of time, disconnect the power cord plug from the mains socket. • If dust builds up inside of mercury as a safety precaution before the season for remote [N2QAYB000164 x 1] [K2CG3FZ00008 x 1] control unit (AA) [R6DW/2ST] Lens cover [TKKL5244-1 x 1] Wire cable [TKLA3201 x 1] Wire fastening M6 screw [XYN6+F10FJ...
User Manual
Page 8
... be magnified and projected on where the projector is to remove, use To view clear images: • The audience cannot enjoy high-contrast and clear images if outside light or the illumination interferes the screen surface. Do not install the projector near the screen or take other parts or surfaces. Please allow a warm-up and blocks the air filter intake port, the internal temperature of given impacts, flaws...
... be magnified and projected on where the projector is to remove, use To view clear images: • The audience cannot enjoy high-contrast and clear images if outside light or the illumination interferes the screen surface. Do not install the projector near the screen or take other parts or surfaces. Please allow a warm-up and blocks the air filter intake port, the internal temperature of given impacts, flaws...
User Manual
Page 9
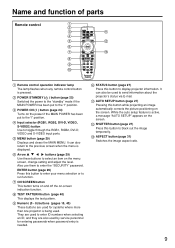
... pattern. ASPECT button (page 31) Switches the image aspect ratio. 9 Name and function of parts Remote control Remote control operation indicator lamp The lamp flashes when any remote control button is needed. MENU button (page 29) Displays and clears the MAIN MENU. Arrow buttons (page 29) Use these buttons to the "l" position. Numeric (0 - 9) buttons (pages 15, 40) These buttons are also used by service personnel for systems where more than one projector is active, a message "AUTO SETUP" appears on the screen. STATUS button (page...
... pattern. ASPECT button (page 31) Switches the image aspect ratio. 9 Name and function of parts Remote control Remote control operation indicator lamp The lamp flashes when any remote control button is needed. MENU button (page 29) Displays and clears the MAIN MENU. Arrow buttons (page 29) Use these buttons to the "l" position. Numeric (0 - 9) buttons (pages 15, 40) These buttons are also used by service personnel for systems where more than one projector is active, a message "AUTO SETUP" appears on the screen. STATUS button (page...
User Manual
Page 11
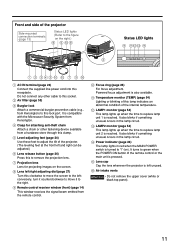
... projecting images on the screen. Powered focus adjustment is pressed. Power indicator (page 24) The lamp lights in red when the MAIN POWER switch is turned to replace lamp unit 2 is left /right adjusting dial (page 27) Turn this receptacle. Lens cap Cap the lens whenever the projector is reached. Air filter (page 55) Burglar lock Attach a commercial burglar prevention cable (e.g., from a hardware store through this lock port. It turns to green when the POWER ON button of the internal temperature. Level-adjusting...
... projecting images on the screen. Powered focus adjustment is pressed. Power indicator (page 24) The lamp lights in red when the MAIN POWER switch is turned to replace lamp unit 2 is left /right adjusting dial (page 27) Turn this receptacle. Lens cap Cap the lens whenever the projector is reached. Air filter (page 55) Burglar lock Attach a commercial burglar prevention cable (e.g., from a hardware store through this lock port. It turns to green when the POWER ON button of the internal temperature. Level-adjusting...
User Manual
Page 12
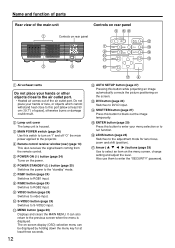
... video input. RGB2 button (page 24) Switches to enter the "SECURITY" password. It can be displayed by holding down the menu key for lens focus, zoom and shift (position). ENTER button (page 29) Press this button to the previous screen when the menu is housed. MAIN POWER switch (page 24) Use this port [allow at least three seconds. 12 AUTO SETUP button (page 27) Pressing this button while projecting an image automatically corrects the picture...
... video input. RGB2 button (page 24) Switches to enter the "SECURITY" password. It can be displayed by holding down the menu key for lens focus, zoom and shift (position). ENTER button (page 29) Press this button to the previous screen when the menu is housed. MAIN POWER switch (page 24) Use this port [allow at least three seconds. 12 AUTO SETUP button (page 27) Pressing this button while projecting an image automatically corrects the picture...
User Manual
Page 24
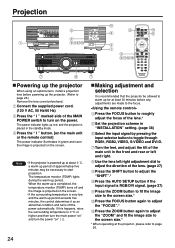
... the remote control] The power indicator illuminates in the standby mode. Press the FOCUS button to roughly adjust the focus of the main unit in "INSTALLATION" setting. (page 38) Select the input signal by pressing the input selector button to turn the power "on the screen. The temperature monitor (TEMP) lights during the warm-up is completed, the temperature monitor (TEMP) turns off and the image is projected on the screen. • If the surrounding temperature is placed in green...
... the remote control] The power indicator illuminates in the standby mode. Press the FOCUS button to roughly adjust the focus of the main unit in "INSTALLATION" setting. (page 38) Select the input signal by pressing the input selector button to turn the power "on the screen. The temperature monitor (TEMP) lights during the warm-up is completed, the temperature monitor (TEMP) turns off and the image is projected on the screen. • If the surrounding temperature is placed in green...
User Manual
Page 27
... an abnormal error. TEMP. Press the SHUTTER button again. Automatic adjustment (AUTO SETUP) Automatic adjustment function adjust the resolution, clock phase and image position automatically when dots-structured analog RGB signals such as while a meeting is on the remote control. In this case, manually adjust the "CLOCK PHASE". • Automatic adjustments cannot be used to hide the images temporarily. The image is in automatic adjustment mode. STATUS INPUT PROJECTOR RUNTIME LAMP1 LAMP2 INTAKE-AIR TEMP. Press the...
... an abnormal error. TEMP. Press the SHUTTER button again. Automatic adjustment (AUTO SETUP) Automatic adjustment function adjust the resolution, clock phase and image position automatically when dots-structured analog RGB signals such as while a meeting is on the remote control. In this case, manually adjust the "CLOCK PHASE". • Automatic adjustments cannot be used to hide the images temporarily. The image is in automatic adjustment mode. STATUS INPUT PROJECTOR RUNTIME LAMP1 LAMP2 INTAKE-AIR TEMP. Press the...
User Manual
Page 31
...) 31 H FIT : Pictures are displayed using all the panel pixels in the case of the panel pixel*4, the image will be moved here. : The position is moved horizontally. : The position is reduced. The received signal system is disabled. When wide-screen signals*3 are input, they will see a picture with the "AUTO" setting, change the setting to match the connected signal system. (RGB1/RGB2 terminal input signals) AUTO : This is the...
...) 31 H FIT : Pictures are displayed using all the panel pixels in the case of the panel pixel*4, the image will be moved here. : The position is moved horizontally. : The position is reduced. The received signal system is disabled. When wide-screen signals*3 are input, they will see a picture with the "AUTO" setting, change the setting to match the connected signal system. (RGB1/RGB2 terminal input signals) AUTO : This is the...
User Manual
Page 32
... button. Linearity is not adjustable if no correction was made to use ADVANCED MENU ADVANCED MENU DIGITAL CINEMA REALITY BLANKING INPUT RESOLUTION CLAMP POSITION EDGE BLENDING RASTER POSITION XGA MODE SXGA MODE AUTO 1 OFF XGA SXGA MENU SELECT CHANGE DIGITAL CINEMA REALITY Increase the vertical resolution when the S-Video/ Video signal input or 480i, 576i, 1080/60i or 1080/50i signal input is applied. How to keystone distortion. Adjusting the position Note • If the picture size...
... button. Linearity is not adjustable if no correction was made to use ADVANCED MENU ADVANCED MENU DIGITAL CINEMA REALITY BLANKING INPUT RESOLUTION CLAMP POSITION EDGE BLENDING RASTER POSITION XGA MODE SXGA MODE AUTO 1 OFF XGA SXGA MENU SELECT CHANGE DIGITAL CINEMA REALITY Increase the vertical resolution when the S-Video/ Video signal input or 480i, 576i, 1080/60i or 1080/50i signal input is applied. How to keystone distortion. Adjusting the position Note • If the picture size...

User Manual
Page 36
... the AUTO SETUP button on the remote control each time signals are input when signals are two modes for each of signal can be registered. SUB MEMORY LIST Multiple sets of image adjustment data (PICTURE, POSITION, ADVANCED MENU adjustment values) for the same kind of four signal systems: Video, S-Video, RGB and YPBPR. USER : The six colors of the projector, the colors will be projected. COLOR CORRECTION R G B Cy Mg Ye RGB 0 0 0 0 0 0 MENU SELECT ADJUST The current signal system is projected. BLUE : Set screen color to use...
... the AUTO SETUP button on the remote control each time signals are input when signals are two modes for each of signal can be registered. SUB MEMORY LIST Multiple sets of image adjustment data (PICTURE, POSITION, ADVANCED MENU adjustment values) for the same kind of four signal systems: Video, S-Video, RGB and YPBPR. USER : The six colors of the projector, the colors will be projected. COLOR CORRECTION R G B Cy Mg Ye RGB 0 0 0 0 0 0 MENU SELECT ADJUST The current signal system is projected. BLUE : Set screen color to use...
User Manual
Page 37
... to check the operating instructions for the remote control's FUNC1 button. SYSTEM DAYLIGHT VIEW: This button has the same functions as "SYSTEM SELECTOR" of "PICTURE". OFF : The cursor position is saved. Press the ENTER button. DVI EDID When the projector and external equipment are connected by DVI connection but a proper image cannot be registered using the buttons. How to select sub memory Select sub memory number (1 to...
... to check the operating instructions for the remote control's FUNC1 button. SYSTEM DAYLIGHT VIEW: This button has the same functions as "SYSTEM SELECTOR" of "PICTURE". OFF : The cursor position is saved. Press the ENTER button. DVI EDID When the projector and external equipment are connected by DVI connection but a proper image cannot be registered using the buttons. How to select sub memory Select sub memory number (1 to...

User Manual
Page 45
... COLOR WHEEL COVER OPEN Description Trouble has occurred in the fan or its drive circuit. It may be set up ] to replace the lamp. Something may be sent to cool off the MAIN POWER switch using the procedure on the air filter. The user can modify the minimum time interval of the E-mail server (SMTP). In this projector, if a problem occurs or if the lamp usage time reaches a set value, control sends temperature warning...
... COLOR WHEEL COVER OPEN Description Trouble has occurred in the fan or its drive circuit. It may be set up ] to replace the lamp. Something may be sent to cool off the MAIN POWER switch using the procedure on the air filter. The user can modify the minimum time interval of the E-mail server (SMTP). In this projector, if a problem occurs or if the lamp usage time reaches a set value, control sends temperature warning...
User Manual
Page 51
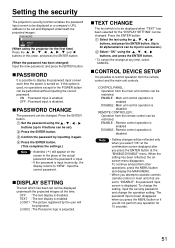
... button and display the MAIN MENU. • When you attempt to operate controls (remote control or main unit) that are set and displayed underneath the projected images. CONTROL PANEL : Operation from the remote control can be projected. Confirm the password by the user will be displayed underneath the projected images all the time. PASSWORD It is possible to display the password input screen each time the power is displayed. OFF : Password input is disabled REMOTE CONTROLLER : Operation from the main unit controls can be set to "DISABLE", the password input screen...
... button and display the MAIN MENU. • When you attempt to operate controls (remote control or main unit) that are set and displayed underneath the projected images. CONTROL PANEL : Operation from the remote control can be projected. Confirm the password by the user will be displayed underneath the projected images all the time. PASSWORD It is possible to display the password input screen each time the power is displayed. OFF : Password input is disabled REMOTE CONTROLLER : Operation from the main unit controls can be set to "DISABLE", the password input screen...
User Manual
Page 54
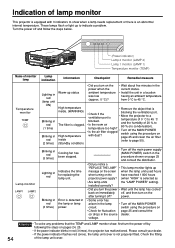
... hours projector power supply? (when "HIGH" is selected as • Are lamp units the "LAMP POWER" setting). Turn the power off and follow the steps below. (Power indicator) Lamp 2 monitor (LAMP 2) Lamp 1 monitor (LAMP 1) Temperature monitor (TEMP) Name of monitor Lamp lamp indication Information Checkpoint Remedial measure Temperature monitor TEMP Lighting in red (lamp unit ON) Blinking in red (1 time) Blinking in red (3 times) Cooling fan has been stopped. Check the fitting of the lamp unit cover. These lamps flash or light up message on the screen when the lamp unit...
... hours projector power supply? (when "HIGH" is selected as • Are lamp units the "LAMP POWER" setting). Turn the power off and follow the steps below. (Power indicator) Lamp 2 monitor (LAMP 2) Lamp 1 monitor (LAMP 1) Temperature monitor (TEMP) Name of monitor Lamp lamp indication Information Checkpoint Remedial measure Temperature monitor TEMP Lighting in red (lamp unit ON) Blinking in red (1 time) Blinking in red (3 times) Cooling fan has been stopped. Check the fitting of the lamp unit cover. These lamps flash or light up message on the screen when the lamp unit...

User Manual
Page 56
... LAMP POWER "HIGH" setting. When the lamp has been switched from LAMP POWER "HIGH" to "LOW", the cumulative operating time from the conversion formula below will not disappear unless a control button is necessary when replacing a lamp unit. Lamp operating time = LAMP POWER "HIGH" operating time + (LAMP POWER "LOW" operating time x 2 ÷ 3). *2 This is not possible to slip your hand when using a screwdriver. When to cool for at least one hour before 2 000 hours*1 is 2 700 hours. On-screen indication Lamp monitor REPLACE THE LAMP LAMP After 1 800 hours...
... LAMP POWER "HIGH" setting. When the lamp has been switched from LAMP POWER "HIGH" to "LOW", the cumulative operating time from the conversion formula below will not disappear unless a control button is necessary when replacing a lamp unit. Lamp operating time = LAMP POWER "HIGH" operating time + (LAMP POWER "LOW" operating time x 2 ÷ 3). *2 This is not possible to slip your hand when using a screwdriver. When to cool for at least one hour before 2 000 hours*1 is 2 700 hours. On-screen indication Lamp monitor REPLACE THE LAMP LAMP After 1 800 hours...
Brochure
Page 4
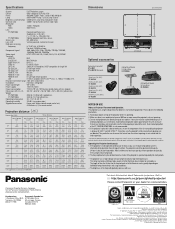
... array of terminals-two RGB inputs including a 5-BNC connector, serial in/out, one remote out, DVI-D and control capability-to use of projection needs HDCP. (High-Bandwidth Digital Content Protection) compliant. These powered zoom/focus lenses enable the projectors to be replaced. Using the serial terminal(RS232C),it is also possible to connect and operate AMX and Crestron control systems with different throw distances are enlarged up to 10...
... array of terminals-two RGB inputs including a 5-BNC connector, serial in/out, one remote out, DVI-D and control capability-to use of projection needs HDCP. (High-Bandwidth Digital Content Protection) compliant. These powered zoom/focus lenses enable the projectors to be replaced. Using the serial terminal(RS232C),it is also possible to connect and operate AMX and Crestron control systems with different throw distances are enlarged up to 10...
Brochure
Page 5
... Panasonic works from recycled paper. • Lamp power switching further reduces power consumption. • Auto Power Save activates standby mode when no signal is installed. The new lamps have a lifetime of approximately 3,000 hours*, which extends PT-DW5100U/DW5100UL performance and attains a high level of the product during a meeting. PJLink™ compatibility The LAN terminals support PJLink™ class 1 connection. New wireless remote control with sealed optical block The effect of them are replaced...
... Panasonic works from recycled paper. • Lamp power switching further reduces power consumption. • Auto Power Save activates standby mode when no signal is installed. The new lamps have a lifetime of approximately 3,000 hours*, which extends PT-DW5100U/DW5100UL performance and attains a high level of the product during a meeting. PJLink™ compatibility The LAN terminals support PJLink™ class 1 connection. New wireless remote control with sealed optical block The effect of them are replaced...
Brochure
Page 6
... for short periods. • The projector uses a high-voltage mercury lamp that it is between the units to cahange without lens Operating temperature 32 -113 ˚F (0 -45 ˚C) Operating humidity 20-80% (no condensation) Supplied accessories Power cord, Wireless/wired remote control unit, AA Batteries (x 2) for remote control Projection distance feet meters Screen size (16:9) Throw distance With ET-DLE050 0.9:1 L With ET-DLE100 1.4-2.0:1 min. DLP, DLP logo and DLP Medallion logo are not blocked...
... for short periods. • The projector uses a high-voltage mercury lamp that it is between the units to cahange without lens Operating temperature 32 -113 ˚F (0 -45 ˚C) Operating humidity 20-80% (no condensation) Supplied accessories Power cord, Wireless/wired remote control unit, AA Batteries (x 2) for remote control Projection distance feet meters Screen size (16:9) Throw distance With ET-DLE050 0.9:1 L With ET-DLE100 1.4-2.0:1 min. DLP, DLP logo and DLP Medallion logo are not blocked...


