

NNS504 User Guide
Page 1
... Instructions Microwave Oven Models: NN-S604/S614/S504/S505 Safety Information Precautions Inside cover Important Safety Instructions .........1-3 Installation and Grounding Instructions 3-4 Safety Precautions 5-6 Operation Control Panel 8-9 Starting to Use Your Oven 10 Setting the Clock 10 Child Safety Lock 10 Selecting Power & Cook Time 11 Quick Min Feature 11 Keep Warm Feature 11 Popcorn Feature 12 More/Less Feature 12 Inverter Turbo Defrost Feature 13 Defrosting Tips & Techniques.........13-14 Auto Reheat Feature 15 Auto Cook Feature 15 Auto Cook Chart 16 Operation Timer...
... Instructions Microwave Oven Models: NN-S604/S614/S504/S505 Safety Information Precautions Inside cover Important Safety Instructions .........1-3 Installation and Grounding Instructions 3-4 Safety Precautions 5-6 Operation Control Panel 8-9 Starting to Use Your Oven 10 Setting the Clock 10 Child Safety Lock 10 Selecting Power & Cook Time 11 Quick Min Feature 11 Keep Warm Feature 11 Popcorn Feature 12 More/Less Feature 12 Inverter Turbo Defrost Feature 13 Defrosting Tips & Techniques.........13-14 Auto Reheat Feature 15 Auto Cook Feature 15 Auto Cook Chart 16 Operation Timer...

NNS504 User Guide
Page 3
...: IMPORTANT SAFETY INSTRUCTIONS WARNING -To reduce the risk of a table or counter. 15. This appliance must be heated in the oven cavity: (a) Do not overcook food. Connect only to excessive microwave energy: 1. DO NOT assume that come together on the inside the oven ignites, keep oven door closed, turn oven off, and disconnect the power cord, or shut off power at the fuse or circuit breaker panel. (d) DO NOT use . 1
...: IMPORTANT SAFETY INSTRUCTIONS WARNING -To reduce the risk of a table or counter. 15. This appliance must be heated in the oven cavity: (a) Do not overcook food. Connect only to excessive microwave energy: 1. DO NOT assume that come together on the inside the oven ignites, keep oven door closed, turn oven off, and disconnect the power cord, or shut off power at the fuse or circuit breaker panel. (d) DO NOT use . 1
NNS504 User Guide
Page 4
... microwave oven use recycled paper products unless the paper product is transferred from the HOT food to the Glass Tray. IMPORTANT SAFETY INSTRUCTIONS (continued) 18. It can also be used when removing items from oven. Damage to the oven. DO NOT cook directly on top of your oven read remaining safety cautions and operating instructions. 2 WARNING TO AVOID THE RISK OF SHOCK: DO NOT remove outer panel from the oven...
... microwave oven use recycled paper products unless the paper product is transferred from the HOT food to the Glass Tray. IMPORTANT SAFETY INSTRUCTIONS (continued) 18. It can also be used when removing items from oven. Damage to the oven. DO NOT cook directly on top of your oven read remaining safety cautions and operating instructions. 2 WARNING TO AVOID THE RISK OF SHOCK: DO NOT remove outer panel from the oven...
NNS504 User Guide
Page 5
... that the Glass Tray is not approved or tested for built-in the door. Use only the Glass Tray specifically designed for counter top household use . Always place food in a microwave safe dish, or on the Glass Tray touches oven walls, causing the tray to stop moving, the tray will turn in the opposite direction. INSTALLATION AND GROUNDING INSTRUCTIONS Examine Your Oven Unpack oven, remove all packing material and examine the oven for cooking along with the Glass Tray. Installation DO NOT block...
... that the Glass Tray is not approved or tested for built-in the door. Use only the Glass Tray specifically designed for counter top household use . Always place food in a microwave safe dish, or on the Glass Tray touches oven walls, causing the tray to stop moving, the tray will turn in the opposite direction. INSTALLATION AND GROUNDING INSTRUCTIONS Examine Your Oven Unpack oven, remove all packing material and examine the oven for cooking along with the Glass Tray. Installation DO NOT block...
NNS504 User Guide
Page 6
... cause slow cooking. The marked rating of the oven with a grounding plug. If a long cord or extension cord is used if care is the personal responsibility and obligation of the consumer to obtain stronger signal reception. (c) Clean door and sealing surfaces of the oven. (See Care and Cleaning of a table or counter. 3. Power Supply 1. Consult a qualified electrician or service person if the grounding instructions are available...
... cause slow cooking. The marked rating of the oven with a grounding plug. If a long cord or extension cord is used if care is the personal responsibility and obligation of the consumer to obtain stronger signal reception. (c) Clean door and sealing surfaces of the oven. (See Care and Cleaning of a table or counter. 3. Power Supply 1. Consult a qualified electrician or service person if the grounding instructions are available...
NNS504 User Guide
Page 8
... cut from the HOT food to the touch (ex. Heat is used , as to burn the infant's mouth and esophagus. 10) REHEATING PASTRY PRODUCTS • When reheating pastry products, check temperatures of any purpose other than 6 minutes. • If an oven cooking bag is transferred from the open end of space between foil and interior oven walls or door. • Dishes with metallic trim...
... cut from the HOT food to the touch (ex. Heat is used , as to burn the infant's mouth and esophagus. 10) REHEATING PASTRY PRODUCTS • When reheating pastry products, check temperatures of any purpose other than 6 minutes. • If an oven cooking bag is transferred from the open end of space between foil and interior oven walls or door. • Dishes with metallic trim...
NNS504 User Guide
Page 9
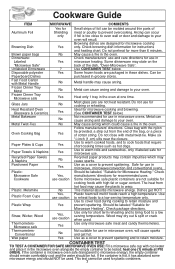
... HOT! Heat only 1 tray in microwave ovens. Ideal for microwave cooking and browning. (See CONTAINER TEST below . Use to microwave energy), the empty container should remain comfortably cool and the water should NOT be purchased in the oven. Use to reheat foods to your oven. Wood may cause arcing. heat one (1) minute at one time. Cookware Guide ITEM MICROWAVE COMMENTS Aluminum Foil Yes for Microwave Heating." Check manufacturers' use and care directions...
... HOT! Heat only 1 tray in microwave ovens. Ideal for microwave cooking and browning. (See CONTAINER TEST below . Use to microwave energy), the empty container should remain comfortably cool and the water should NOT be purchased in the oven. Use to reheat foods to your oven. Wood may cause arcing. heat one (1) minute at one time. Cookware Guide ITEM MICROWAVE COMMENTS Aluminum Foil Yes for Microwave Heating." Check manufacturers' use and care directions...
NNS504 User Guide
Page 10
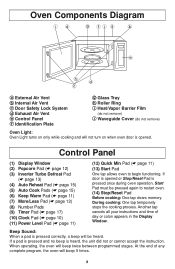
... in the Display Window. Another tap cancels all your instructions and time of any complete program, the oven will not turn on only while cooking and will beep 5 times. 8 Oven Components Diagram id g fj a b e h d c a External Air Vent b Internal Air Vent c Door Safety Lock System d Exhaust Air Vent e Control Panel f Identification Plate g Glass Tray h Roller Ring i Heat/Vapor Barrier Film (do not remove) j Waveguide Cover (do not remove) Oven Light: Oven Light turns on when oven door is opened or Stop/Reset Pad is pressed once during oven operation, Start Pad...
... in the Display Window. Another tap cancels all your instructions and time of any complete program, the oven will not turn on only while cooking and will beep 5 times. 8 Oven Components Diagram id g fj a b e h d c a External Air Vent b Internal Air Vent c Door Safety Lock System d Exhaust Air Vent e Control Panel f Identification Plate g Glass Tray h Roller Ring i Heat/Vapor Barrier Film (do not remove) j Waveguide Cover (do not remove) Oven Light: Oven Light turns on when oven door is opened or Stop/Reset Pad is pressed once during oven operation, Start Pad...
NNS504 User Guide
Page 13
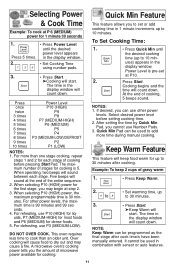
... display window will cause food to 30 minutes after cook time/s have been manually entered. To Set Cooking Time: 1. • Press Quick Min until the desired power level appears in combination with sensor or auto features. 11 At the end of the entire sequence. 2. NOTES: 1. Select desired power level before pressing Start Pad. After setting the time by Quick Min Pad, you to set at the end of cooking, 5 beeps sound. Quick Min Pad can use...
... display window will cause food to 30 minutes after cook time/s have been manually entered. To Set Cooking Time: 1. • Press Quick Min until the desired power level appears in combination with sensor or auto features. 11 At the end of the entire sequence. 2. NOTES: 1. Select desired power level before pressing Start Pad. After setting the time by Quick Min Pad, you to set at the end of cooking, 5 beeps sound. Quick Min Pad can use...
NNS504 User Guide
Page 14
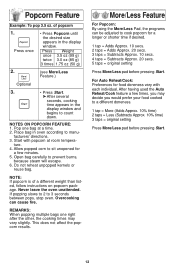
... Approx. 10 secs. 4 taps = Subtracts Approx. 20 secs. 5 taps = original setting Press More/Less pad before pressing Start. 12 NOTES ON POPCORN FEATURE: 1. of a different weight than listed, follow instructions on popcorn package. Do not reheat unpopped kernels or reuse bag. Open bag carefully to 3 seconds between pops, stop oven. REMARKS: When popping multiple bags one bag at room tempera- Press...
... Approx. 10 secs. 4 taps = Subtracts Approx. 20 secs. 5 taps = original setting Press More/Less pad before pressing Start. 12 NOTES ON POPCORN FEATURE: 1. of a different weight than listed, follow instructions on popcorn package. Do not reheat unpopped kernels or reuse bag. Open bag carefully to 3 seconds between pops, stop oven. REMARKS: When popping multiple bags one bag at room tempera- Press...
NNS504 User Guide
Page 15
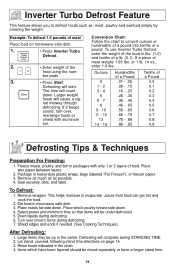
... liquids during defrosting. 7. After Defrosting: 1. Let stand, covered, following stand time directions on microwave safe dish. 1. • Press Inverter Turbo Defrost. 2. • Enter weight of a pound. ber pads. 3. • Press Start. nal midway through defrosting. If a piece of food. Remove as much air as : meat, poultry and seafood simply by entering the weight. Juices from food can get hot and cook the food. 2. Select power and minimum time so that...
... liquids during defrosting. 7. After Defrosting: 1. Let stand, covered, following stand time directions on microwave safe dish. 1. • Press Inverter Turbo Defrost. 2. • Enter weight of a pound. ber pads. 3. • Press Start. nal midway through defrosting. If a piece of food. Remove as much air as : meat, poultry and seafood simply by entering the weight. Juices from food can get hot and cook the food. 2. Select power and minimum time so that...

NNS504 User Guide
Page 16
.... Break apart/Turn over/ Remove defrosted Pieces Break apart/Turn over/Shield Turn over/Shield Turn over - - - - in refrig. 14 Turn over/Rearrange/Shield ends and defrosted surface Turn over /Shield 20 min. Turn over /Rearrange/Shield ends and defrosted surface Break apart/Rearrange/ 5 min. Turn over 5 min. Defrosting Tips & Techniques (continued) FOOD DEFROST TIME at P3 mins (per lb) DURING DEFROSTING AFTER DEFROSTING Stand Time Rinse Fish and...
.... Break apart/Turn over/ Remove defrosted Pieces Break apart/Turn over/Shield Turn over/Shield Turn over - - - - in refrig. 14 Turn over/Rearrange/Shield ends and defrosted surface Turn over /Shield 20 min. Turn over /Rearrange/Shield ends and defrosted surface Break apart/Rearrange/ 5 min. Turn over 5 min. Defrosting Tips & Techniques (continued) FOOD DEFROST TIME at P3 mins (per lb) DURING DEFROSTING AFTER DEFROSTING Stand Time Rinse Fish and...

NNS504 User Guide
Page 18
... with hot tap water in butter or sauce.) After 2 beeps, stir or rearrange. 5. Place potato or potatoes around surface. Remove facing away from you to cook manually. 6. Pasta 2, 4, 6, 8 oz. All pieces should be the same size. of water per 1/2 cup of vegetables, and cover with lid or vented plastic wrap. of water per 1/2 cup of paper-towel-lined glass tray (Turntable...
... with hot tap water in butter or sauce.) After 2 beeps, stir or rearrange. 5. Place potato or potatoes around surface. Remove facing away from you to cook manually. 6. Pasta 2, 4, 6, 8 oz. All pieces should be the same size. of water per 1/2 cup of vegetables, and cover with lid or vented plastic wrap. of water per 1/2 cup of paper-towel-lined glass tray (Turntable...
NNS504 User Guide
Page 19
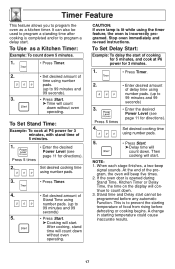
To Set Stand Time: Example: To cook at P6 power for 3 minutes, with stand time of Stand Time using the timer feature, the oven is incorrectly programed. CAUTION: If oven lamp is opened during Stand Time, Kitchen Timer or Delay Time, the time on the display will continue to 99 minutes and 99 seconds) 3. Set desired cooking time using number pads. 5. • Press Start. ➤Delay time will beep five times. 2. If the oven door is lit while using number pads. (up to...
To Set Stand Time: Example: To cook at P6 power for 3 minutes, with stand time of Stand Time using the timer feature, the oven is incorrectly programed. CAUTION: If oven lamp is opened during Stand Time, Kitchen Timer or Delay Time, the time on the display will continue to 99 minutes and 99 seconds) 3. Set desired cooking time using number pads. 5. • Press Start. ➤Delay time will beep five times. 2. If the oven door is lit while using number pads. (up to...

NNS504 User Guide
Page 20
... a microwave safe colander set into microwave safe serving bowl. Do not salt/butter until after cooking. (Not suitable for vegetables in a 8 oz. (225 g) microwave safe bowl. After heating, stir until after cooking. Cover with lid or plastic wrap. Wash thoroughly, add 1 tbsp of water per 1/2 cup of vegetables, and cover with lid or vented plastic wrap. 18 Drain grease. Microwave Shortcuts FOOD POWER TIME (in a microwave...
... a microwave safe colander set into microwave safe serving bowl. Do not salt/butter until after cooking. (Not suitable for vegetables in a 8 oz. (225 g) microwave safe bowl. After heating, stir until after cooking. Cover with lid or plastic wrap. Wash thoroughly, add 1 tbsp of water per 1/2 cup of vegetables, and cover with lid or vented plastic wrap. 18 Drain grease. Microwave Shortcuts FOOD POWER TIME (in a microwave...
NNS504 User Guide
Page 23
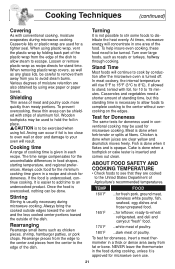
... 15 minutes. Loosen or remove plastic wrap as any glass lids, be used for doneness, insert a meat thermometer in the food during microwave cooking. When removing plastic wrap covers, as well as recipe directs for microwave oven use. 21 Various degrees of poultry. Wooden toothpicks may be careful to remove them away from the center to an undercooked product. The time range compensates for 10 to...
... 15 minutes. Loosen or remove plastic wrap as any glass lids, be used for doneness, insert a meat thermometer in the food during microwave cooking. When removing plastic wrap covers, as well as recipe directs for microwave oven use. 21 Various degrees of poultry. Wooden toothpicks may be careful to remove them away from the center to an undercooked product. The time range compensates for 10 to...

NNS504 User Guide
Page 24
.... Glass Tray: Remove and wash in warm soapy water or in the proper position and press Stop/Reset Pad to the operating parts inside the oven, water should be kept clean in mild soapy water or dish- PARTS DESCRIPTION Instructions / Operating Manual (this film. (Hint - AFTER CLEANING: Be sure to seep into ventilation openings. with a damp cloth. inside or around the outside of the oven door. Care and Cleaning of Your Microwave Oven BEFORE CLEANING...
.... Glass Tray: Remove and wash in warm soapy water or in the proper position and press Stop/Reset Pad to the operating parts inside the oven, water should be kept clean in mild soapy water or dish- PARTS DESCRIPTION Instructions / Operating Manual (this film. (Hint - AFTER CLEANING: Be sure to seep into ventilation openings. with a damp cloth. inside or around the outside of the oven door. Care and Cleaning of Your Microwave Oven BEFORE CLEANING...
NNS504 User Guide
Page 25
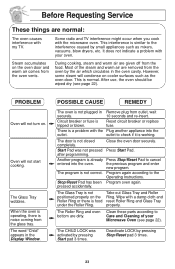
... program and enter new program. Wipe with the microwave oven. The CHILD LOCK was not pressed after programming. PROBLEM Oven will not start cooking. The Glass Tray wobbles. Circuit breaker or fuse is normal. Press Start Pad. The Roller Ring and oven bottom are normal: The oven causes interference with the Plug another appliance into the oven. This interference is working. Steam accumulates on the Ring. This is Reset circuit breaker or replace...
... program and enter new program. Wipe with the microwave oven. The CHILD LOCK was not pressed after programming. PROBLEM Oven will not start cooking. The Glass Tray wobbles. Circuit breaker or fuse is normal. Press Start Pad. The Roller Ring and oven bottom are normal: The oven causes interference with the Plug another appliance into the oven. This interference is working. Steam accumulates on the Ring. This is Reset circuit breaker or replace...

NNS504 User Guide
Page 26
... no charge for parts. You must carry-in or mail-in your nearest Dealer or servicenter; Limited Warranty Limits And Exclusions This warranty ONLY COVERS failures due to products purchased and serviced in a hotel, office, restaurant, or other business), rental use (such as "the warrantor") will be no charge for warranty service. handling, misapplication, alteration, faulty installation, set-up adjustments, misadjustment...
... no charge for parts. You must carry-in or mail-in your nearest Dealer or servicenter; Limited Warranty Limits And Exclusions This warranty ONLY COVERS failures due to products purchased and serviced in a hotel, office, restaurant, or other business), rental use (such as "the warrantor") will be no charge for warranty service. handling, misapplication, alteration, faulty installation, set-up adjustments, misadjustment...

NNS504 User Guide
Page 28
... Serial No Date of Purchase ___________ Panasonic Consumer Electronics Company, Division of Panasonic Corporation of North America One Panasonic Way Secaucus, New Jersey 07094 Panasonic Sales Company, Division of the oven. Panasonic Home Appliances Microwave Oven (Shanghai) Co., Ltd. 898 Long Dong Road, Pu Dong, Shanghai, China 201203 Web Site: http://www.panasonic.co.jp/global 26 Specifications Power Source: Power Consumption: Cooking Power:* Outside Dimensions (H x W x D): Oven Cavity Dimensions (H x W x D): Operating...
... Serial No Date of Purchase ___________ Panasonic Consumer Electronics Company, Division of Panasonic Corporation of North America One Panasonic Way Secaucus, New Jersey 07094 Panasonic Sales Company, Division of the oven. Panasonic Home Appliances Microwave Oven (Shanghai) Co., Ltd. 898 Long Dong Road, Pu Dong, Shanghai, China 201203 Web Site: http://www.panasonic.co.jp/global 26 Specifications Power Source: Power Consumption: Cooking Power:* Outside Dimensions (H x W x D): Oven Cavity Dimensions (H x W x D): Operating...


