Telephone Equipment
Page 2
... phone 6 Important safety instructions 7 For best performance 9 System capabilities 10 Preparation Installation 11 Installing the backup battery in the base unit 11 Connecting the base unit handset and AC adaptor 12 Connecting the line cords 13 Connecting the AC adaptor to the charger 15 If you subscribe to a DSL service . . 15 Installing the battery in the cordless handset...
... phone 6 Important safety instructions 7 For best performance 9 System capabilities 10 Preparation Installation 11 Installing the backup battery in the base unit 11 Connecting the base unit handset and AC adaptor 12 Connecting the line cords 13 Connecting the AC adaptor to the charger 15 If you subscribe to a DSL service . . 15 Installing the battery in the cordless handset...
Telephone Equipment
Page 3
... battery (cordless handset 107 Voice mail system/ automated attendant system/ answering system 108 Frequently asked questions 109 The base unit 109 The cordless handset 109 Messages and voice mail 110 Calls 111 Lines 111 FCC and other information 112 Warranty 115 Specifications 117 Customer services 118 Index Index 119 For assistance, please visit http://www.panasonic.com...
... battery (cordless handset 107 Voice mail system/ automated attendant system/ answering system 108 Frequently asked questions 109 The base unit 109 The cordless handset 109 Messages and voice mail 110 Calls 111 Lines 111 FCC and other information 112 Warranty 115 Specifications 117 Customer services 118 Index Index 119 For assistance, please visit http://www.panasonic.com...

Telephone Equipment
Page 5
.... Accessory items 1 AC adaptor (for base unit and charger) 2 Base unit handset 3 Cordless handset 4 Cordless handset battery 5 Cordless handset battery cover 6 4-wire telephone line cord 7 Backup battery 8 Audio cable 9 Charger 10 Handset cord 11 Belt clip Order number Quantity PQLV256Z 2 PQJXF0201Z 1 KX-TG4500BR 1 HHR-P104 1 PQYNTG4500BR 1 PQJA10088Z 2 HHR-P516 1 PQJA10165Z 1 PQLV30046ZA 1 PQJA212V 1 PQKE10377Z5 1 1 2 3 4 5 6 7 8 9 10 11 For assistance, please visit http://www.panasonic.com/phonehelp 5
.... Accessory items 1 AC adaptor (for base unit and charger) 2 Base unit handset 3 Cordless handset 4 Cordless handset battery 5 Cordless handset battery cover 6 4-wire telephone line cord 7 Backup battery 8 Audio cable 9 Charger 10 Handset cord 11 Belt clip Order number Quantity PQLV256Z 2 PQJXF0201Z 1 KX-TG4500BR 1 HHR-P104 1 PQYNTG4500BR 1 PQJA10088Z 2 HHR-P516 1 PQJA10165Z 1 PQLV30046ZA 1 PQJA212V 1 PQKE10377Z5 1 1 2 3 4 5 6 7 8 9 10 11 For assistance, please visit http://www.panasonic.com/phonehelp 5
Telephone Equipment
Page 6
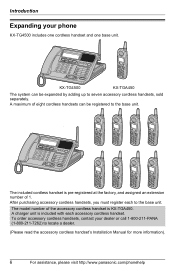
After purchasing accessory cordless handsets, you must register each accessory cordless handset. To order accessory cordless handsets, contact your phone KX-TG4500 includes one cordless handset and one base unit. 1 4 7 2 5 8 3 6 9 0 ANSWER O N SSPP--PPHONEE KX-TG4500 KX-TGA450 The system can be expanded by adding up to locate a dealer. (Please read the accessory cordless handset's Installation Manual for more information). 6 For assistance, please visit http://www.panasonic.com/phonehelp Introduction Expanding...
After purchasing accessory cordless handsets, you must register each accessory cordless handset. To order accessory cordless handsets, contact your phone KX-TG4500 includes one cordless handset and one base unit. 1 4 7 2 5 8 3 6 9 0 ANSWER O N SSPP--PPHONEE KX-TG4500 KX-TGA450 The system can be expanded by adding up to locate a dealer. (Please read the accessory cordless handset's Installation Manual for more information). 6 For assistance, please visit http://www.panasonic.com/phonehelp Introduction Expanding...
Telephone Equipment
Page 8
...(ies) in wet locations unless the jack is corrosive and may cause burns or injury to the eyes or skin. The unit operates in the frequency range of fire or injury to ensure that the AC outlet is installed near the...(ies) and/or the conductive material may explode. L When installing the base unit and cordless handset(s), ensure that smoke has stopped and contact the Panasonic Call Center at eye level. The electrolyte may retain small ferrous objects. L The base unit handset and cordless handset earpieces are not mounted in this product only in accordance with this manual....
...(ies) in wet locations unless the jack is corrosive and may cause burns or injury to the eyes or skin. The unit operates in the frequency range of fire or injury to ensure that the AC outlet is installed near the...(ies) and/or the conductive material may explode. L When installing the base unit and cordless handset(s), ensure that smoke has stopped and contact the Panasonic Call Center at eye level. The electrolyte may retain small ferrous objects. L The base unit handset and cordless handset earpieces are not mounted in this product only in accordance with this manual....
Telephone Equipment
Page 9
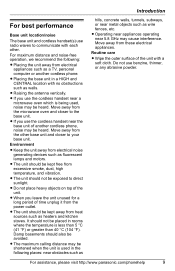
...distance may be shortened when the unit is used , noise may be placed in a HIGH and CENTRAL location with no obstructions such as walls. For assistance, please visit http://www.panasonic.com/phonehelp 9 L If you use the cordless handset near a microwave oven which is...another cordless phone, noise may cause interference. Do not use benzine, thinner, or any abrasive powder. Introduction For best performance Base unit location/noise The base unit and cordless handset(s) use radio waves to communicate with each other base unit and closer to your base unit. L Placing the base unit in...
...distance may be shortened when the unit is used , noise may be placed in a HIGH and CENTRAL location with no obstructions such as walls. For assistance, please visit http://www.panasonic.com/phonehelp 9 L If you use the cordless handset near a microwave oven which is...another cordless phone, noise may cause interference. Do not use benzine, thinner, or any abrasive powder. Introduction For best performance Base unit location/noise The base unit and cordless handset(s) use radio waves to communicate with each other base unit and closer to your base unit. L Placing the base unit in...

Telephone Equipment
Page 10
... registering up to three external calls can be conducted on cordless handsets or the base unit while a fourth cordless handset simultaneously conducts an intercom call on line1. line3. The unit allows four simultaneous external calls with the base unit and three cordless handsets, or with the base unit or another cordless handset. The capabilities of cordless handsets that can be used simultaneously will vary depending on call...
... registering up to three external calls can be conducted on cordless handsets or the base unit while a fourth cordless handset simultaneously conducts an intercom call on line1. line3. The unit allows four simultaneous external calls with the base unit and three cordless handsets, or with the base unit or another cordless handset. The capabilities of cordless handsets that can be used simultaneously will vary depending on call...

Telephone Equipment
Page 11
... be overcharged. Blinking fast: The battery is not connected, defective or non-chargeable. For assistance, please visit http://www.panasonic.com/phonehelp 11 The fully charged backup battery provides the base unit with a standard telephone to charge fully. 1 Open the battery cover. 2 Install the backup battery in the battery compartment. Preparation Installation Installing...
... be overcharged. Blinking fast: The battery is not connected, defective or non-chargeable. For assistance, please visit http://www.panasonic.com/phonehelp 11 The fully charged backup battery provides the base unit with a standard telephone to charge fully. 1 Open the battery cover. 2 Install the backup battery in the battery compartment. Preparation Installation Installing...
Telephone Equipment
Page 12
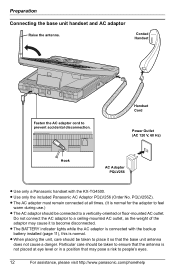
...that may cause it to prevent accidental disconnection. L Use only the included Panasonic AC Adaptor PQLV256 (Order No. L The BATTERY indicator lights while the AC adaptor is connected with the KX-TG4500. PQLV256Z). Do not connect the AC adaptor to a ceiling-mounted AC ...It is normal. Preparation Connecting the base unit handset and AC adaptor Raise the antenna. Corded Handset Fasten the AC adaptor cord to become disconnected. Particular care should be connected to people's eyes. 12 For assistance, please visit http://www.panasonic.com/phonehelp L The AC adaptor ...
...that may cause it to prevent accidental disconnection. L Use only the included Panasonic AC Adaptor PQLV256 (Order No. L The BATTERY indicator lights while the AC adaptor is connected with the KX-TG4500. PQLV256Z). Do not connect the AC adaptor to a ceiling-mounted AC ...It is normal. Preparation Connecting the base unit handset and AC adaptor Raise the antenna. Corded Handset Fasten the AC adaptor cord to become disconnected. Particular care should be connected to people's eyes. 12 For assistance, please visit http://www.panasonic.com/phonehelp L The AC adaptor ...

Telephone Equipment
Page 13
Connecting the line cords Connect the telephone line cords to the base unit. To connect two two-line telephone jacks Preparation Two-Line Telephone Jacks (RJ14C) LINE3 LINE4 4-Wire Telephone Line Cord LINE 3/4 LINE 1/2 LINE1 LINE2 For assistance, please visit http://www.panasonic.com/phonehelp 13
Connecting the line cords Connect the telephone line cords to the base unit. To connect two two-line telephone jacks Preparation Two-Line Telephone Jacks (RJ14C) LINE3 LINE4 4-Wire Telephone Line Cord LINE 3/4 LINE 1/2 LINE1 LINE2 For assistance, please visit http://www.panasonic.com/phonehelp 13
Telephone Equipment
Page 15
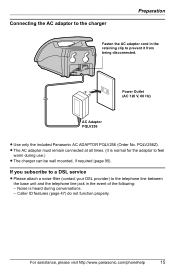
If you subscribe to a DSL service L Please attach a noise filter (contact your DSL provider) to the telephone line between the base unit and the telephone line jack in the retaining clip to prevent it from being disconnected. L The AC adaptor must remain connected at all times. (It ... Preparation Fasten the AC adaptor cord in the event of the following: - Power Outlet (AC 120 V, 60 Hz) AC Adaptor PQLV256 L Use only the included Panasonic AC ADAPTOR PQLV256 (Order No. Noise is normal for the adaptor to feel warm during conversations. - For assistance, please visit http://www...
If you subscribe to a DSL service L Please attach a noise filter (contact your DSL provider) to the telephone line between the base unit and the telephone line jack in the retaining clip to prevent it from being disconnected. L The AC adaptor must remain connected at all times. (It ... Preparation Fasten the AC adaptor cord in the event of the following: - Power Outlet (AC 120 V, 60 Hz) AC Adaptor PQLV256 L Use only the included Panasonic AC ADAPTOR PQLV256 (Order No. Noise is normal for the adaptor to feel warm during conversations. - For assistance, please visit http://www...

Telephone Equipment
Page 18
Preparation Controls and display Controls Base unit 1 23 45 6 AUTOMATED ATTENDANT LINE 1 LINE 2 LINE 3 LINE 4 CONF HOLD 1 2 GHI 74 85 963 PQRS ABC JKL TUV OPER DEF BATTERY MNO REDIAL WXYZ PAUSE/... NU SSPP--PPHONEE ENTER HEADSET MUTE VOICE MAIL ALL 5 6 7 8 15 14 13 12 11 10 98 7 1 Corded handset 2 LINE 1, 2, 3 and 4, and indicators 3 Display 4 {CONF} 5 {HOLD} 6 Antenna 7 {RESET} button 8 {INTERCOM}/{TRANSFER}, ({ALL}, {1} to {8}) 9 {SP-PHONE}/{HEADSET} and indicator 10 {BATTERY} indicator 11 {REDIAL} 12 {PAUSE}/{EDIT} 13 {CALL WAIT}/{FLASH} 14 {TONE} 15...
Preparation Controls and display Controls Base unit 1 23 45 6 AUTOMATED ATTENDANT LINE 1 LINE 2 LINE 3 LINE 4 CONF HOLD 1 2 GHI 74 85 963 PQRS ABC JKL TUV OPER DEF BATTERY MNO REDIAL WXYZ PAUSE/... NU SSPP--PPHONEE ENTER HEADSET MUTE VOICE MAIL ALL 5 6 7 8 15 14 13 12 11 10 98 7 1 Corded handset 2 LINE 1, 2, 3 and 4, and indicators 3 Display 4 {CONF} 5 {HOLD} 6 Antenna 7 {RESET} button 8 {INTERCOM}/{TRANSFER}, ({ALL}, {1} to {8}) 9 {SP-PHONE}/{HEADSET} and indicator 10 {BATTERY} indicator 11 {REDIAL} 12 {PAUSE}/{EDIT} 13 {CALL WAIT}/{FLASH} 14 {TONE} 15...
Telephone Equipment
Page 22
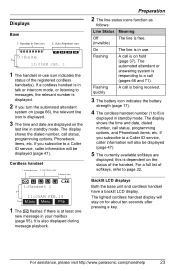
... item. Using the base unit's navigator key LOUD/ BACK SEARCH FWD The {>} and {} and { Use the {^}, {V}, {f}, {g} keys to move the cursor backwards and forwards when inserting a Phonebook item. The {g} key is used to the previous screen. Preparation The cordless handset's softkeys: Display function... Searches the records Select Selects the current option Start Starts recording Ye s Confirms the current action Using the cordless handset's joystick The cordless handset's joystick can be used to navigate through the function menu (page 75), the Caller List (page 48), and...
... item. Using the base unit's navigator key LOUD/ BACK SEARCH FWD The {>} and {} and { Use the {^}, {V}, {f}, {g} keys to move the cursor backwards and forwards when inserting a Phonebook item. The {g} key is used to the previous screen. Preparation The cordless handset's softkeys: Display function... Searches the records Select Selects the current option Start Starts recording Ye s Confirms the current action Using the cordless handset's joystick The cordless handset's joystick can be used to navigate through the function menu (page 75), the Caller List (page 48), and...
Telephone Equipment
Page 23
...to a Caller ID service, caller information will also be displayed (page 47). Backlit LCD displays Both the base unit and cordless handset have a backlit LCD display. Displays Base 1. If a cordless handset is in talk or intercom mode, or listening to 8) is at least one new message in standby ... For assistance, please visit http://www.panasonic.com/phonehelp 23 Preparation 2 The line status icons function as follows: Line Status Meaning Off (invisible) The line is on for about ten seconds after pressing a key. The lighted cordless handset display will be displayed (page 47)....
...to a Caller ID service, caller information will also be displayed (page 47). Backlit LCD displays Both the base unit and cordless handset have a backlit LCD display. Displays Base 1. If a cordless handset is in talk or intercom mode, or listening to 8) is at least one new message in standby ... For assistance, please visit http://www.panasonic.com/phonehelp 23 Preparation 2 The line status icons function as follows: Line Status Meaning Off (invisible) The line is on for about ten seconds after pressing a key. The lighted cordless handset display will be displayed (page 47)....
Telephone Equipment
Page 24
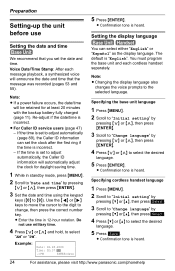
...AM" or "PM". Do not use Setting the date and time Base Unit We recommend that the message was recorded (pages 53 and 55). The default is heard. Voice Date/Time Stamp: After each cordless handset separately. Re-adjust if the date/time is incorrect. - Example:... the voice prompts to change, then press the correct number key. L Confirmation tone is heard. 24 For assistance, please visit http://www.panasonic.com/phonehelp Specifying cordless handset language 1 Press {MENU}. 2 Scroll to "Initial setting" by pressing {V} or {^}, then press Select . 3 Scroll to "Change language...
...AM" or "PM". Do not use Setting the date and time Base Unit We recommend that the message was recorded (pages 53 and 55). The default is heard. Voice Date/Time Stamp: After each cordless handset separately. Re-adjust if the date/time is incorrect. - Example:... the voice prompts to change, then press the correct number key. L Confirmation tone is heard. 24 For assistance, please visit http://www.panasonic.com/phonehelp Specifying cordless handset language 1 Press {MENU}. 2 Scroll to "Initial setting" by pressing {V} or {^}, then press Select . 3 Scroll to "Change language...
Telephone Equipment
Page 25
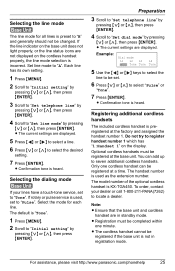
... optional cordless handset is preset to "B" and generally should not be registered if the base unit is used , set to locate a dealer. Note: L Ensure that the base unit and cordless handset are not displayed on the cordless handset properly,...panasonic.com/phonehelp 25 Select the mode for all lines is KX-TGA450. Do not try to "Initial setting" by pressing {}, then press {ENTER}. Only one minute. Set line mode to select "Pulse" or "Tone". 7 Press {ENTER}. L Confirmation tone is "Tone". 1 Press {MENU}. 2 Scroll to register handset number 1 which has "1:Handset 1" on the base unit...
... optional cordless handset is preset to "B" and generally should not be registered if the base unit is used , set to locate a dealer. Note: L Ensure that the base unit and cordless handset are not displayed on the cordless handset properly,...panasonic.com/phonehelp 25 Select the mode for all lines is KX-TGA450. Do not try to "Initial setting" by pressing {}, then press {ENTER}. Only one minute. Set line mode to select "Pulse" or "Tone". 7 Press {ENTER}. L Confirmation tone is "Tone". 1 Press {MENU}. 2 Scroll to register handset number 1 which has "1:Handset 1" on the base unit...

Telephone Equipment
Page 26
... http://www.panasonic.com/phonehelp Repeat to register additional cordless handsets. L To rename the cordless handset to something memorable, refer to the base unit, the completion screen is displayed and confirmation tone is heard on both are described below. L Once successfully linked, "Handset registered" is heard on both the base unit and the cordless handset. Repeat to register additional cordless handsets. L The cordless handset attempts to...
... http://www.panasonic.com/phonehelp Repeat to register additional cordless handsets. L To rename the cordless handset to something memorable, refer to the base unit, the completion screen is displayed and confirmation tone is heard on both are described below. L Once successfully linked, "Handset registered" is heard on both the base unit and the cordless handset. Repeat to register additional cordless handsets. L The cordless handset attempts to...

Telephone Equipment
Page 27
...: Deregistering HS No.: 1234---- Preparation For assistance, please visit http://www.panasonic.com/phonehelp 27 De-registering a cordless handset Base Unit Note: L De-registering a cordless handset clears all data on the base unit for the selected cordless handset (for example, Alert phone number, Alert on/off, greeting messages, etc.). 1 While the base unit is in standby mode, press {MENU}. 2 Scroll to "Initial setting" by...
...: Deregistering HS No.: 1234---- Preparation For assistance, please visit http://www.panasonic.com/phonehelp 27 De-registering a cordless handset Base Unit Note: L De-registering a cordless handset clears all data on the base unit for the selected cordless handset (for example, Alert phone number, Alert on/off, greeting messages, etc.). 1 While the base unit is in standby mode, press {MENU}. 2 Scroll to "Initial setting" by...
Telephone Equipment
Page 28
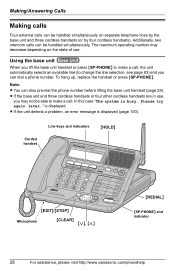
..., please visit http://www.panasonic.com/phonehelp Making/Answering Calls Making calls Four external calls can be handled simultaneously on the state of use , you may decrease depending on separate telephone lines by the base unit and three cordless handsets (or by four cordless handsets). Using the base unit Base Unit When you lift the base unit handset or press {SP-PHONE} to make a call...
..., please visit http://www.panasonic.com/phonehelp Making/Answering Calls Making calls Four external calls can be handled simultaneously on the state of use , you may decrease depending on separate telephone lines by the base unit and three cordless handsets (or by four cordless handsets). Using the base unit Base Unit When you lift the base unit handset or press {SP-PHONE} to make a call...
Telephone Equipment
Page 29
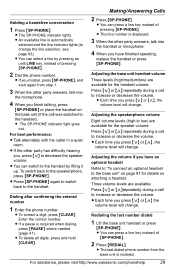
... start again from step 1. 3 When the other party has difficulty hearing you finish talking, press {SP-PHONE} or place the handset on the base unit (if the call was switched to change the line selection, see page 83). L If the other party answers, talk into the microphone. 4 When you , press { L ...
... start again from step 1. 3 When the other party has difficulty hearing you finish talking, press {SP-PHONE} or place the handset on the base unit (if the call was switched to change the line selection, see page 83). L If the other party answers, talk into the microphone. 4 When you , press { L ...


